GE 2-900SST User manual

IMPORTANT SAFETY INSTRUCTIONS
When using your cordless telephone equipment, basic safety precautions
should always be followed to reduce the risk of fire, electrical shock and
injury to persons, including the following:
• Read and understand all instructions.
• Never install telephone wiring to this cordless telephone during a
lightning storm.
• Never install telephone jacks in wet locations unless the jacks are
specifically designed for wet locations.
• Never touch uninsulated telephone wires or terminals unless discon-
nected at the network interface.
• Use caution when installing or modifying telephone lines.
• Follow all warnings and instructions marked on the phone.
• Unplug phone base from the wall outlet before cleaning. Do not use
liquid cleaners or aerosol cleaners. Use damp cloth for cleaning.
• Do not use the base half of this product near water, for example, near a
bath tub, wash bowl, kitchen sink, laundry tub, swimming pool or in a
wet basement.
• Do not place the phone on an unstable cart, stand, or table. The phone
may fall, causing serious damage to the product.
• This phone should be operated only from the type of power source
indicated on the marking label. If you are not sure of the type of power
supply to your home, consultThomson or local power company.
• Do not allow anything to rest on the power cord. Do not locate this
phone where the cord will be abused by persons walking on it.
• Do not overload wall outlets and extension cords as this can result in
the risk of fire or electrical shock.
• Never push objects of any kind into this phone through case slots as
they may touch dangerous voltage points or short out parts that could
result in a risk of fire or electrical shock. Never spill liquid of any kind on
the phone.
SAVE THESE INSTRUCTIONS
2
• To reduce the risk of electrical shock, do not disassemble this product.
Send it to Thomson when some service or repair work is required.
Opening or removing covers may expose you to dangerous voltages or
other risks. Incorrect reassembly can cause electrical shock when the
phone is subsequently used.
• Unplug this phone from the wall outlets and refer servicing to Thomson
under the following conditions:
A. When the power supply cord or plug is damaged or frayed.
B. If liquid has been spilled into the base.
C. If the phone has been exposed to rain or water.
D. If the phone has been dropped or the case has been damaged.
E. If the phone exhibits a distinct change in performance.
• Do not use the telephone to report a gas leak when the handset or the
base is in the vicinity of the leak.
• Use only the following battery pack type: Thomson Part No. 5-2388.
• Do not dispose of the battery pack in a fire. The cells may explode.
Check with local codes for possible special disposal instructions.
• Do not open or mutilate the battery pack. Released electrolyte is corro-
sive and may cause damage to the eyes or skin. It may be toxic if
swallowed.
• Exercise care in handling batteries in order not to short the battery with
conducting materials such as rings, bracelets, and keys. The battery or
conductor may overheat and cause burns.
• Charge the batteries provided with or identified for use with this
product only in accordance with the instructions and limitations speci-
fied in this manual.
SAVE THESE INSTRUCTIONS
WARNING:
TO PREVENT FIRE
OR ELECTRICAL SHOCK HAZARD,
DO NOT EXPOSE THIS PRODUCT
TO RAIN OR MOISTURE.
SEE MARKING ON BOTTOM / BACK OF PRODUCT
CAUTION
RISK OF ELECTRIC SHOCK
DO NOT OPEN
THE EXCLAMATION
POINT WITHIN THE
TRIANGLE IS A
WARNING SIGN
ALERTING YOU OF
IMPORTANT
INSTRUCTIONS
ACCOMPANYING
THE PRODUCT.
THE LIGHTNING
FLASH AND ARROW-
HEAD WITHIN THE
TRIANGLE IS A
WARNING SIGN
ALERTING YOU OF
"DANGEROUS
VOLTAGE" INSIDE
THE PRODUCT.
CAUTION: TO REDUCE THE
RISK OF ELECTRIC SHOCK,
DO NOT REMOVE COVER
(OR BACK). NO USER-
SERVICEABLE PARTS IN-
SIDE. REFER SERVICING
TO QUALIFIED SERVICE
PERSONNEL.

3
INTRODUCTION
Thank you for choosing the GE 900 MHz Digital Spread Spectrum Cordless
Telephone.This phone is the result of our commitment to design and
manufacture the best consumer electronics product incorporating the
following advancements:
High performance “Direct Sequence” Digital Spread Spectrum Technol-
ogy adapted from advanced U.S. military communications systems. This
provides secure, clear, reliable communications with outstanding range.
Range by incorporating its unique Digital Spread SpectrumTechnology
to transmit digitally on the frequencies within the 900 MHz band, this
phone will give you far greater range than traditional cordless phones.
Enjoy conversing in and around your home, yard and even your
neighborhood!
Security and Privacy In addition to digitalization, there are four levels of
security built into the phone:
• 100 channels
• 100,000 digital security codes
• Digital transmission
• Spread Spectrum (a form of voice scrambling)
All of these ensure private wireless conversations and virtually eliminate
any chance of eavesdropping by other telephone users in your area.
Designed and Manufactured in USA

4
TABLE OF CONTENTS
GETTING STARTED ......................................................................................... 5
MODULAR JACK REQUIREMENTS ............................................................................. 5
HANDSET SETUP ........................................................................................... 6
DESKTOP INSTALLATION .................................................................................. 7
WALL MOUNT INSTALLATION ........................................................................... 8
CORDLESS PHONE BASICS ............................................................................... 9
MAKING ACALL ............................................................................................ 9
TALK LIGHT ................................................................................................ 9
REDIAL ........................................................................................................ 9
RECEIVING ACALL ......................................................................................... 9
FLASH BUTTON ........................................................................................... 10
VOLUME BUTTON ........................................................................................ 10
MUTE BUTTON ........................................................................................... 10
TEMPORARY TONE ....................................................................................... 11
PAGING THE HANDSET .................................................................................. 11
ADVANCED FEATURES ................................................................................... 12
CHANNEL BUTTON ....................................................................................... 12
THE MEMORY FEATURE ................................................................................ 12
STORING ANUMBER IN MEMORY ................................................................... 12
CHANGING ASTORED NUMBER ...................................................................... 12
DIALING ASTORED NUMBER ......................................................................... 13
CHAIN DIALING FROM MEMORY ..................................................................... 14
CHANGING THE BATTERY ............................................................................... 14
BATTERY SAFETY PRECAUTIONS ..................................................................... 15
TROUBLESHOOTING GUIDE ............................................................................ 16
GENERAL PRODUCT CARE ............................................................................. 18
HANDSET SOUND SIGNALS ........................................................................... 18
CAUSES OF POOR RECEPTION ........................................................................ 19
INTERFERENCE INFORMATION .................................................................................
19
TELEPHONE NETWORK INFORMATION ......................................................................
20
LOAD NUMBER ..................................................................................................
20
INDEX ........................................................................................................ 21
SERVICE ..................................................................................................... 22
5
GETTING STARTED
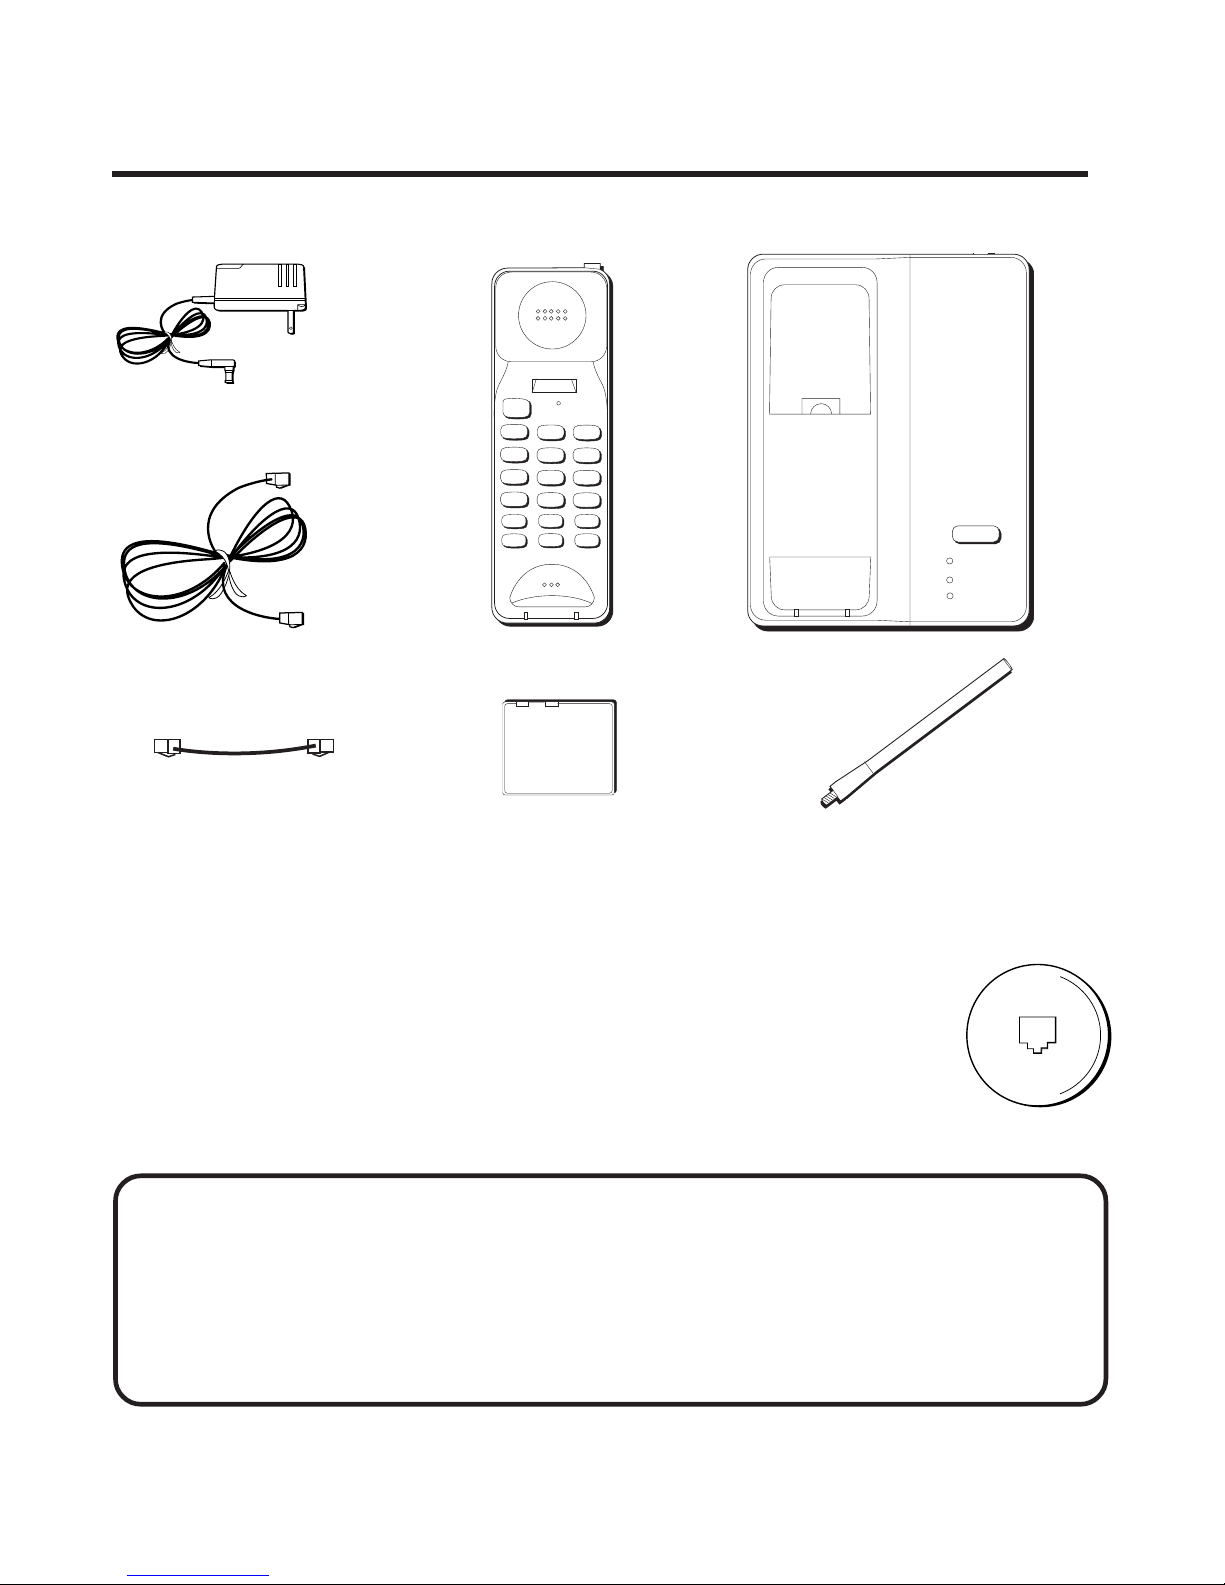
Make sure your package includes the items shown here.
AC power supply
Telephone line cord
BEFORE YOU BEGIN
Short Telephone line cord
PAGE/FIND
AUXILIARY
CHARGER
CHARGE
IN USE
BATT LOW
TALK
12
ABC
3
DEF
456
GHI JKL MNO
7
PQRS
8
TUV
9
WXYZ
OPER
0#
*
VOL MEM REDIAL
FLASH CHAN MUTE
Handset Base
Handset Antenna
Nickel-Cadmium Battery
MODULAR JACK REQUIREMENTS
You need an RJ11 (CA11A) type modular jack, which is
the most common type of phone jack and might look like
the one pictured here. If you don’t have a modular jack,
call your local phone company to find out how to get one
installed.
INSTALLATION NOTE: Some cordless telephones operate at frequencies
that may cause interference to nearby TVs and VCRs. To minimize or prevent
such interference, the base of the cordless telephone should not be placed
near or on top of a TV or VCR. If interference continues, moving the cordless
telephone farther away from the TV or VCR will often reduce or eliminate the
interference.
6
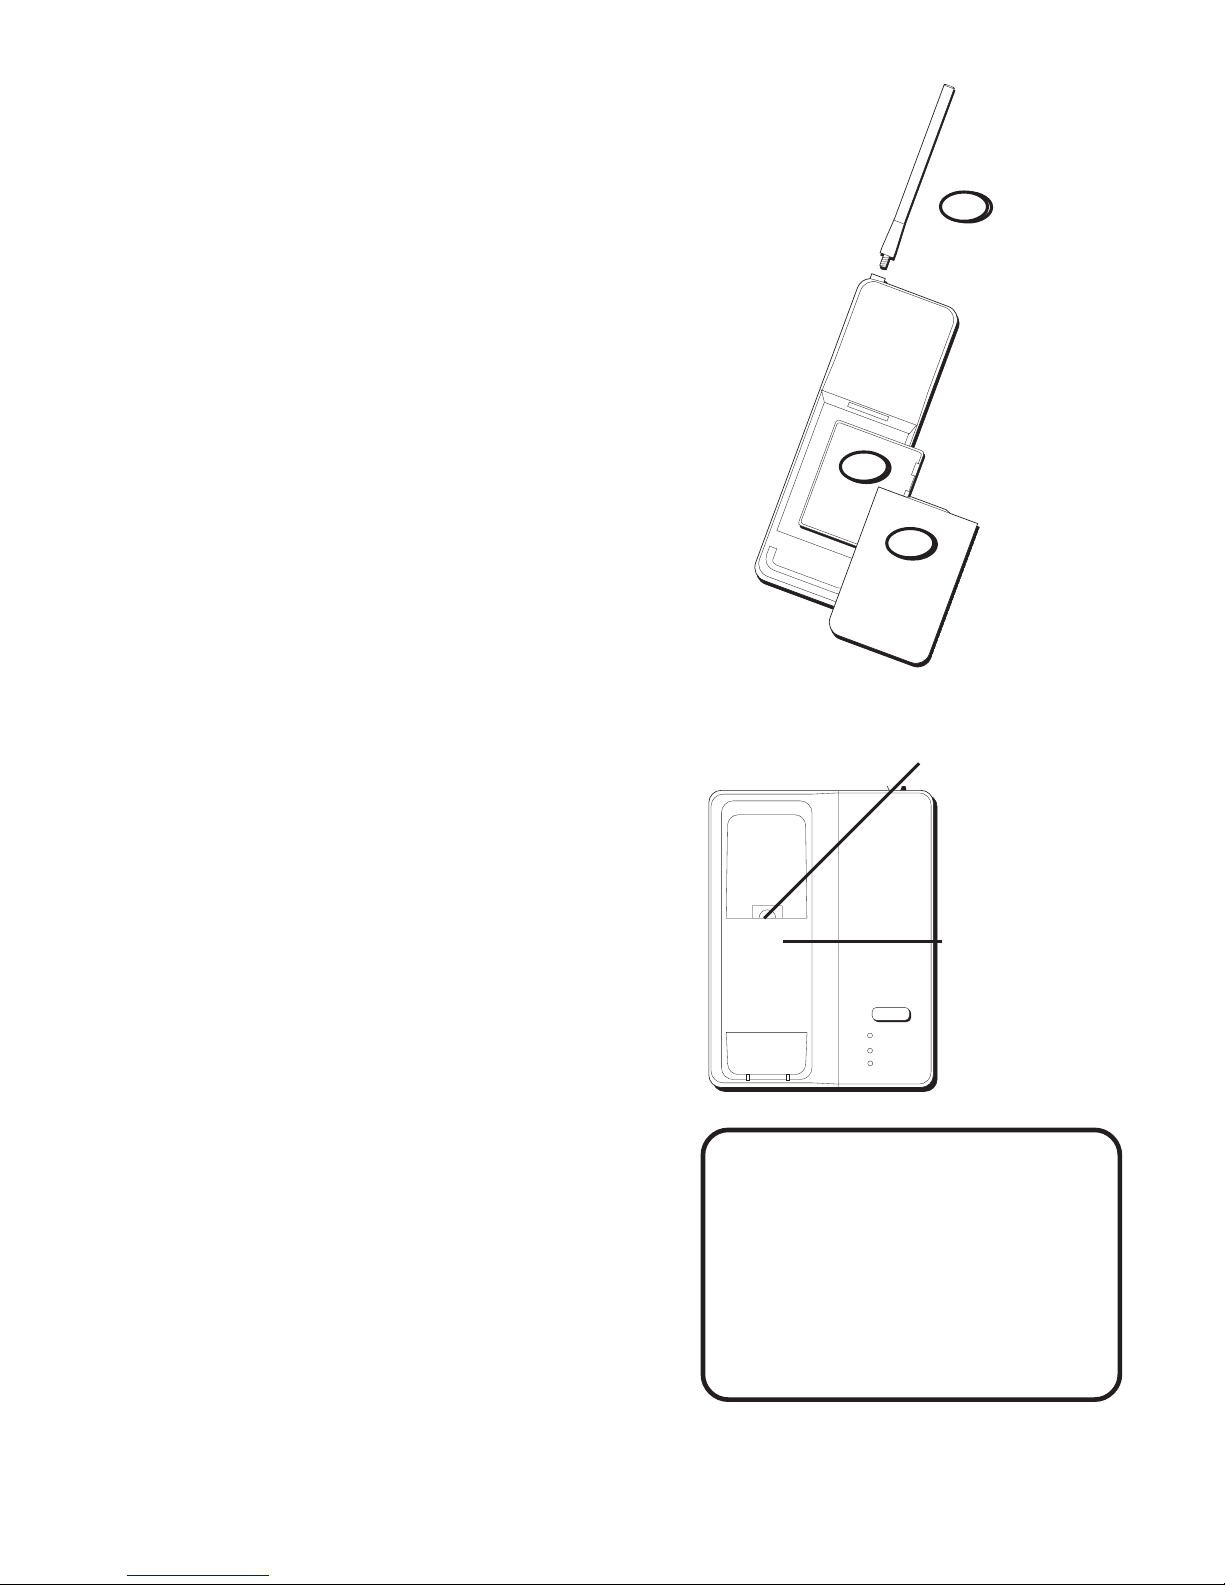
HANDSET SETUP
1. Insert the battery into the compartment.
2. Install the battery compartment door.
3. Attach the handset antenna by screwing
the antenna clockwise into the top of the
handset.
AUXILIARY POWER RESERVE
The spare battery also functions as a
power back up. In the event of a power
service interruption, the base will draw
power from this battery and provide you
with 4 hours of standby time and 2 hours
of talk time.
TIP: In order to maximize
your battery’s use, we recom-
mend that you periodically
use the handset without
returning it to the base to
drain the battery completely,
then recharge for 8 hours.
BATTERY CHARGER COMPARTMENT
You can purchase a second nickel-
cadmium battery to use as a back up.
Just put the extra battery in the auxil-
iary charger compartment, located in
phone’s base, and you will always have
a fully charged battery ready for use.
To remove the battery charger compart-
ment door, press the release right
below the hook switch and lift off the
door.
Always return the handset to the base
for at least 10 seconds after installing a
charged battery.
2
3
PAGE/FIND
AUXILIARY
CHARGER
CHARGE
IN USE
Auxiliary
charger
compartment
door
Press the release
and pull off door.
1

7
1. Plug the telephone line cord into the base and into a modular jack.
2. Plug the power supply cord into the base and into an AC outlet.
3. Set the PULSE/TONE switch to TONE for touch-tone service, or PULSE
for rotary service. If you don’t know which type of service you have,
check with the phone company.
4. Select either OFF, LO, or HI (on the base) for the preferred ringer
volume. If you select OFF, the handset will not ring with incoming calls
or paging, but theTALK button will light.
5. Raise the base antenna.
6. Place handset in the base to charge for 8 hours. The CHARGE light
comes on indicating that the battery is charging. A low battery warning
(BATT LOW light and warning tone) will remind you to charge the
handset batteries for at least 8 hours.
NOTE: Use only the Thomson 5-2387 power supply that came with this unit.
Using other adapters may damage the unit.
DESKTOP
INSTALLATION
1
PULSE/TONE switch
3
4
Ringer volume switch
5
6
2
8
PAGE/FIND
AUXILLIARY
CHARGER
CHARGE
IN USE
WALL MOUNT INSTALLATION
1. Plug one end of the short telephone
line cord into the jack marked PHONE
LINE on the back of the unit, and plug
the other end into a modular wall jack.
2. Connect the power supply adapter to
the POWER 12V DC jack on the back of
the unit, and plug it into an AC outlet.
3. Slip the mounting holes over the wall
plate posts and slide the unit down
firmly into place. (Wall plate not
included.)
4. Set the TONE/PULSE switch to TONE
you if have touch-tone service or to
PULSE if you have rotary dial service.
5. Select either OFF, LO, or HI (on the
base) for the preferred ringer volume.
If you select OFF, the handset will not
ring with incoming calls or paging, but
the TALK button will light.
6. Place handset in the base to charge for
8 hours. The CHARGE light comes on
indicating that the battery is charging.
A low battery warning (BATT LOW
light and warning tone) will remind
you to charge the handset batteries for
at least 8 hours.
21
3
54
6

9
CORDLESS PHONE BASICS
MAKING ACALL
After initial set up, batteries should be charged for at least 8 hours.
The only two things you need to know to make a call are:
• Press theTALK button before you dial. If you attempt to make a call out
of operation range, the handset will emit a set of three beeps.
• PressTALK or place the handset in the base to hang up.
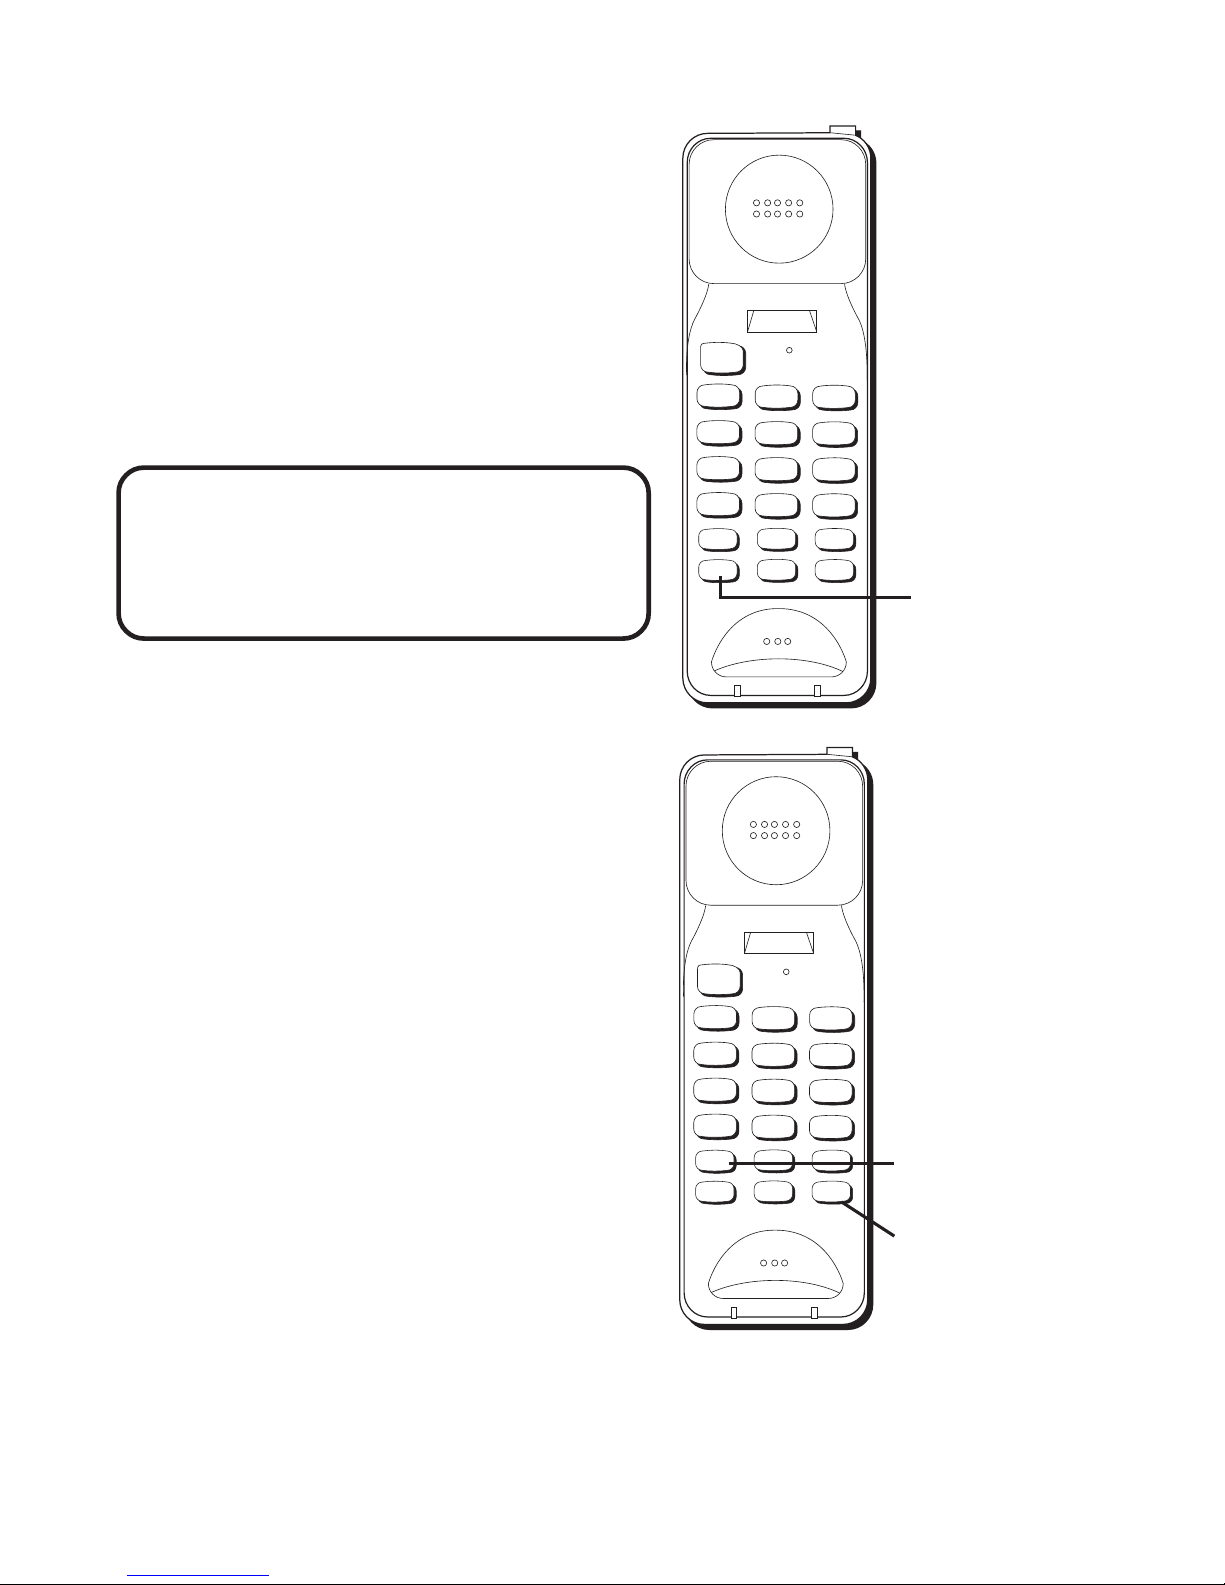
TALK LIGHT
You know the phone is on when you see
the TALK button on the handset light. The
TALK button blinks when you are nearing
an out-of-range condition.
REDIAL
Press theTALK button, then press the
REDIAL button to redial the last number
you called.
RECEIVING ACALL
To answer a call when the handset is out
of the base, you must press the
TALK button before you can talk.
BATT LOW
TALK
12
ABC
3
DEF
456
GHI JKL MNO
7
PQRS
8
TUV
9
WXYZ
OPER
0#
*
VOL MEM REDIAL
FLASH CHAN MUTE
TALK button
REDIAL button
10
BATT LOW
TALK
12
ABC
3
DEF
456
GHI JKL MNO
7
PQRS
8
TUV
9
WXYZ
OPER
0#
*
VOL MEM REDIAL
FLASH CHAN MUTE
BATT LOW
TALK
12
ABC
3
DEF
456
GHI JKL MNO
7
PQRS
8
TUV
9
WXYZ
OPER
0#
*
VOL MEM REDIAL
FLASH CHAN MUTE
FLASH BUTTON
Use the FLASH button to activate
customer calling services such as call
waiting or call transfer, which are
available through your local phone
company.
TIP: Don't use the TALK button to
activate customer calling services such
as call waiting, or you’ll hang up the
phone.
MUTE BUTTON
Press and hold the MUTE button to
engage in a side conversation without
the other party hearing you (you will
still be able to hear the other party).To
return to the telephone conversation,
release the MUTE button.
VOLUME BUTTON (VOL)
Controls the volume of the handset's
earpiece.
VOL (volume)
button
MUTE button
FLASH button
Table of contents
Other GE Cordless Telephone manuals


