
G-STORY GS116HR User manual

USER’S MANUAL FOR LED MONITOR
VILSUN (H.K.) LIMITED


1
2
3
Installation 6
OSD Menu 9
Remote Control 11
Specification 12
12
Environmental Precautions
TABLE OF CONTENTS
Safety Precautions
Content of the Package
2
Do not modify or tamper with this product.
Do not pull roughly or bend the cable.
Keep away from dusty or humid areas.
Only use included AC adapter.
Do not get wet.
Avoid tou ching the External Input Terminal. Proloned exposure can cause burns.
Caution
Make sure the console is turned off and disconnected before mounting.
Only use designated AC adapter and cables.
Do not twist the cable.
Do not place on ustable surface.
Disconnect the AC adapter when maintaining the monitor.
Disconnect AC adapter when transporting.
Do not lift holding only the monitor.
Disconnect AC adapter when not in use for an extended period of time.
Avoid places of direct sunlight during storage.
Do not place anything on top of the monitor.
Do not abuse or misuse this product by applying unnecessary force.
Keep this product away from childten.
Do not abuse or misuse this product by applying unnecessary force.
Avoid prolonged use of the monitor.
Use of product at high volume for an extended period of time may result in hearing loss.
Before using this product please read the instructions carefully.
About the LCD screen.
Do not abuse or misuse this product by applying unnecessary force.
Avoid damaging the LCD screen.
Disconnect the AC adapter when maintaining the monitor, Clean only with a dry or
slightly damp cloth. Using cleaning solutions or attempting to clean connectors may
damage this product.
Disposal
Dispose in accordance with local and national disposal regulations (if any).
SAFETY PRECAUTIONS
3
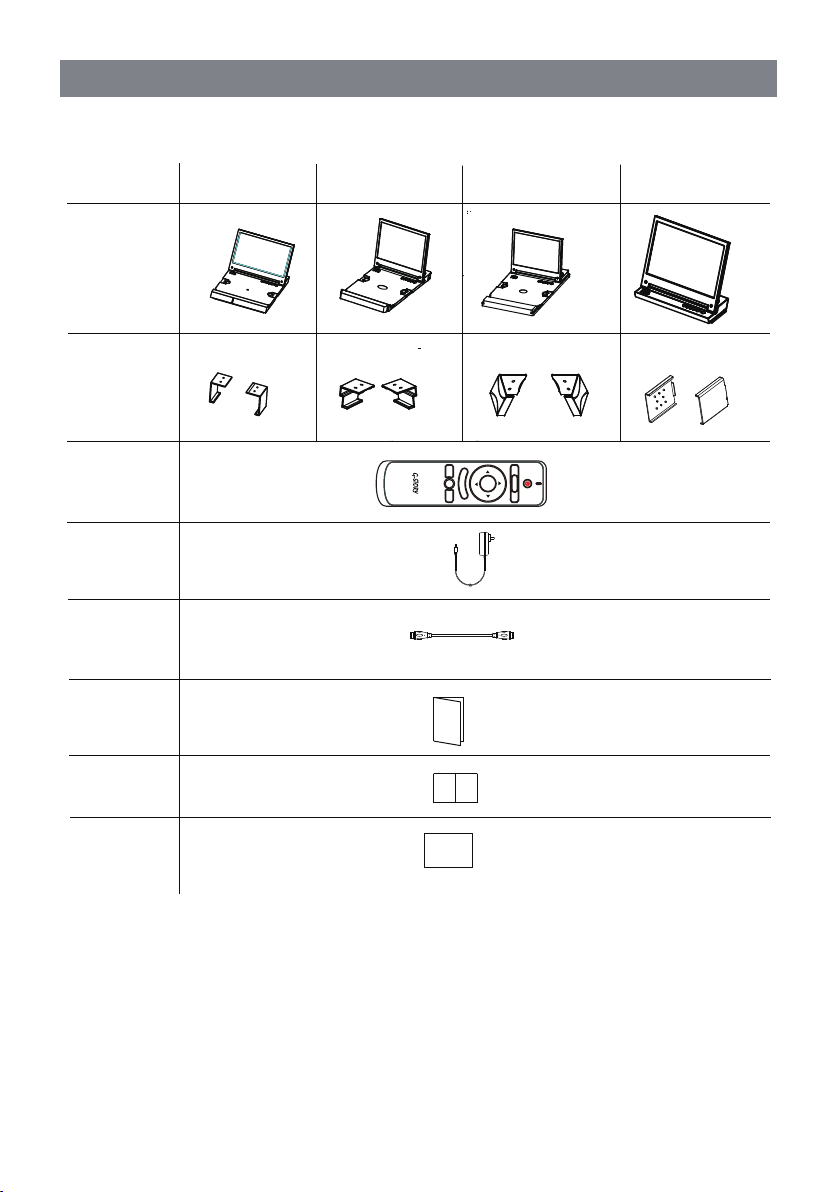
Before you open the packing of the LCD Monitor,pls prepare a stable and clean desk
that is near to the power plug on the wall for your monitor and computor.
GS116HR GS116SR GS116PR
OK
F1 F 2
ME N U
EXIT
SOURCE
SC A L E
MU T E
P
-
UP
MU T E
+
DO W N
Buckle 2 pcs
Adapter 1pc
HDMI cable
1pc
Manual 1pc
Warranty card
1pc
Thank you card
1pc
The remote
control
1pc
GS116XR
Monitor 1 set
*ALL the picture and component in this manual is for reference only,please see the final product for detail
information. We preserve the right to update the product without notice.
CONTENT OF THE PACKAGE

4
INCLUDED
Fuction Instruction of components
1
2
3
4
5
6
7
8
1
2 3 4 5 6 7 8
OK
SOURCE
2 3 4 5 6 7 8
OK
SOURCE
2 3 4 5 6 7 8
OK
SOURCE
GS116HR
GS116SR
GS116PR
GS116XR
2 3 4 5 6 7 8
OK
SOURCE
Front
LED light
Key
Light for PS4 monitor,display on the monitor via IR lens
HDMI port: Turn down after choose arrow key
MENU Key
Call out the menu options of the monitor or exit the menu
options.
/SOURCE Key
HDMI port: SOURCE fuction key(Siginal source) when no
display on the screen;Arrow keys when display
MENU or other options
Key
Arrow key to left and voice down
/OK Key
Arrow key to right and turn volume up.
Confirm the menu option.
LED light
Working status of Monitor:
Red: Standby
Green: Working
Key
Power switch
*ALL the picture and component in this manual is for reference only,please see the final product for detail
information. We preserve the right to update the product without notice.
9
9
9
9
9IR
Remote control receive

5
INCLUDED
Install & Connecting Instruction
9
10
11
12
10 11 12
9
GS116HR
GS116SR
GS116PR
9
9
10 11 12
10
11
12
GS116XR
9
10 11 12
Back
Stereo sperker HDMI input port
3.5mm Stereo earphone output port:Stereo earphone
sockets,able to use 2 earphones
Power input port
Input 5~12V direct power supply
*ALL the picture and component in this manual is for reference only,please see the final product for detail
information. We preserve the right to update the product without notice.

6
INSTALLATION
Install & Connecting Instruction
①
②
1.2 (Installation for GS116XR)
①Place the monitor(with protective foam) on Xbox one S console steadily as showed in picture 1
1. Put the monitor above the Play Station4
The monitor shall be put on the PS4 steadly and aligned
2. Fix the monitor
Uplift the screen of the monitor,refer to Picture 1
Take out the buckles from the accessory and fasten the monitor
Plicture 1
Plicture 1
Picture 2
Take out the buckles from the accessory and fasten the monitor
Fashen the buckle on the monitor first,refer to the first picture of Picture 2
Put the buckles into the card slot along the direction of Picture 2 arrow,refer to the second picture of

7
INSTALLATION
①
②
③
①
②
③
2.2 (Installation for GS116XR)
Fix the monitor on the top of Xbox one S console with buckles provided as below picture 1.
Note: Please make sure the monitor is well
placed on the top of the console as showed
in picture 1 and picture 2.
①
②
①
②
The procedures in picture 2 are as below
①Put the buckle on the card slot of the monitor downward
as per arrow 1 then tighten the monitor and console with
the buckle.
②Push the buckle inward to the front side of the
Xbox One S console as per arrow 2
3.Connecting
HDMI out
Plug the AC terminal of
the adaptor in the power
socket of the electric
supply
Plug the AC terminal of
the adaptor in the power
socket of the electric
supply
HDMI OUT port
①Connect the HDMI port of the monitor to the HDMI therminal of Game consoles with HDMI cable of accessory
②Plug the DC terminal of the adaptor from the accessory in the DC IN port (12V) of the monitor
③Plug the AC terminal of the adaptor in the power socket of the electric supply
Plicture 1
Picture 2

8
INSTALLATION
①① ②
①
Install & Connecting Instruction
4.Power on
Power switch
LED light
②
Power switch
LED light
①Lift the screen of the Monitor
②Press the power key
LED light will turn green after flashing for 3 times,Automatic display screen or blue screen standby signal
channel.
Remark: In the last step of connecting,please choose HDMI port 1 if HDMI cable is connented to port 1,
otherwise, please choose port 2
③Turn on the power of the PlayStation4
This manual suits for next models
3
Table of contents
Other G-STORY Monitor manuals






