
Fogazzo 525 Service manual

®
MODEL 525
INSTALLATION INSTRUCTIONS
&
OWNER’S MANUAL

Fogazzo Wood Fired Ovens and Barbec es, LLC
Manufacturing, import, export, sales, and the distribution of wood fired ovens, barbecues, fireplaces, and, related accessories.
114 E Saint Joseph Street
rcadia C 91106
Toll Free: 1-866-364-2996
www.fogazzo.com
Model 525 Installation Instr ctions © 2001-2014 Fogazzo Wood Fired Ovens and Barbecues LLC, all rights reserved
Images, illustrations, and, text by: Sergio de Paula
Note:
ll text, illustrations, specifications, etc, are based on information available at the time of publication. Fogazzo Wood Fired Ovens
and Barbecues LLC reserves the right to make changes at any time without notice.
Important:
Check with the local building authority and or fire department having jurisdiction over your project for all construction and permit
requirements and or use approvals prior to the start of your installation.
Warranty:
copy of the Fogazzo Limited Warranty is found on the last page of this manual and is also posted on the world wide web at
http://www.fogazzo.com/waranty.html
UL and NFPA Compliance
This product has been tested to comply with the “Underwriters Laboratory”
UL 737 Standard
for “Fireplace Stoves” and, meets the
“National Fire Protection ssociation”
NFP Classification
of a “Prefabricated Fire Chamber ssembly”. It shall be professionally
installed in accordance to these instructions in order to maintain its
UL and NFP Compliance.
This product must be installed in accordance to the
NFP Standards
for Chimneys, Fireplaces, Vents and Solid Fuel Burning ppli-
ances
“NFP 211”
in addition to all applicable local code requirements.
This kit comes complete with its own chimney. If an extension is used, all chimney systems used in conjunction with this kit must
meet both the NFP and UL Standards and be must be installed in strict accordance to the specific manufacturers instructions.
®
Declaration of Conformity
s the manufacturer of this barbecue kit, Fogazzo Wood Fired Ovens & Barbecues
LLC hereby declares that this product is in conformity with the following standards and directives of the EEC.
The construction files for this product are held by Fogazzo (the manufacturer)
and would be available for inspection by a national authority, upon request.
Signed by: Sergio de Paula 21st May 2001
For Fogazzo Wood Fired Ovens and Barbecues LLC
Fogazzo Model 525
Charcoal Fired BBQ Kit
89/106 EEC
Constr ction Prod cts Directive
93/68/EEC
EC Marking Directive
Model 525 Installation Instructions ©2014 Fogazzo Wood Fired Ovens and Barbecues LLC. ll Rights Reserved

Thank you for choosing a Fogazzo Barbecue kit that is Made in the US .
Because of the assembly requirements and unique features of this product, we have
developed this Installation Instructions and Owner’s Manual to assist you. It contains
valuable information on how to properly install, operate and maintain your new BBQ.
Please read all instructions carefully and plan your installation well ahead of time to
ensure the timely completion of your project. This installation system is designed for
professionals with full knowledge of construction practices and is not recommended
for amateurs or do-it-yourselfers. If you are unsure of any aspect of this installation,
please consult Fogazzo or a qualified local contractor.
Every BBQ installation is unique because generally, the architectural elements of the
home will dictate the style and types of finishes to be used.
The aim of these plans is to convey known practices that are considered essential for
a good installation. ll Fogazzo plans emphasize the efficiency and safety for the
completed installation. Minimal cracking inside and outside is expected and is a char-
acteristic of any cast refractory product.
Following the guidelines contained herein will minimize cracking and insure that your
Fogazzo BBQ will last a lifetime. Upon completion of the bbq installation, it is critical
to follow the initial firing guidelines to aid in the proper curing of your installation.
Please follow the directions carefully and be patient. Your patience will be rewarded.
Cheers,
The Fogazzo Team
®


TABLE OF CONTENTS
· Kit Contents 1
· Exploded view 1
· Kit Dimensions, Foundation & Floor Slab 2
· BBQ ssembly, Distance to Combustibles 3, 4
· Interior Finishes 5
· Exterior Finishes 5
· Curing and Initial Firing 6
· Resources 6
· BBQ Basics 7
· Fogazzo Limited Warranty 8
Model 525 Installation Instructions ©2014 Fogazzo Wood Fired Ovens and Barbecues, LLC. ll Rights Reserved


Model 525
Mesquite Fired BBQ Kit
Installation Instructions
Kit Contents
Cap
Chimney
2 Piece Hood
Upper cooking area
Lower cooking area
Firebox surround
Firebox (four pieces)
Firebox floor
Stand (base)
Rotisserie Rack
Rotisseries are optional and
can be found at
www.fogazzo.com
Printed Materials
Installation Instructions &
Owners Manual
Warranty
Installation Instr ctions Toll Free Help Line 1-866-FOGAZZO
Model 525 Installation Instructions ©2014 Fogazzo Wood Fired Ovens and Barbecues, LLC. ll Rights Reserved Page 01
Order Model 525
accessories at
WWW.FOGAZZO.COM
®

Model 525 Installation Instructions ©2014 Fogazzo Wood Fired Ovens and Barbecues, LLC. ll Rights Reserved Page 02
Kit Dimensions
Fo ndation and floor slab
Installation Instr ctions Toll Free Help Line 1-866-FOGAZZO
Fo ndation and floor slab
Dig a 42” wide by 24“ front to back hole to a depth
of at least 12 inches. Set forms around the perime-
ter using 2x4 or 2x6 material held by stakes. Place
rebar grid using #4 rebar at 12 inches on center in
both directions.
Pour your foundation (minimal 12 inches) and floor
slab (minimal 4 inches) as a monolith, using 1500
lbs. or higher concrete mix with 3/4” rock. Varieties
of pre-mixed concrete are readily available at local
home centers with cured strength ratings as high as
5000 lbs. Follow mixing instructions on bag.
®
4”
Min.
Slab on grade
12” min.
12” min.
#4 rebar
Footing
Fig 1
Kit Dimensions
Model 525 Installation Instructions ©2014 Fogazzo Wood Fired Ovens and Barbecues LLC. ll Rights Reserved Page 03
BBQ Assembly
Distance to Comb stibles
Installation Instr ctions Toll Free Help Line 1-866-FOGAZZO
BBQ Parts
ll our BBQs are hand made pre-cast products. s
such, small imperfections are a known characteristic
including small (hairline) shrinkage cracks that often
appear as the parts dry after casting. These small
cracks are visible on the various pieces specially
near corners, ll pieces are reinforced with pencil
rod inside the casting which will ensure its struc-
tural strength. The assemble parts will be much
stronger than the individual pieces.
Note: small differences can be made up with the
finish materials.
BBQ Assembly
Use Type S masonry mortar to assemble all BBQ
parts except the firebox.
Firebox Assembly
Set firebox pieces using fireproof mortar. Mix mor-
tar as follows:
• 5 Parts fire-clay sand (provided w/ kit)
• 1 Part Portland Cement
Mix using clean water to a peanut butter like consis-
tency.
Do not se add mixes with this mortar.
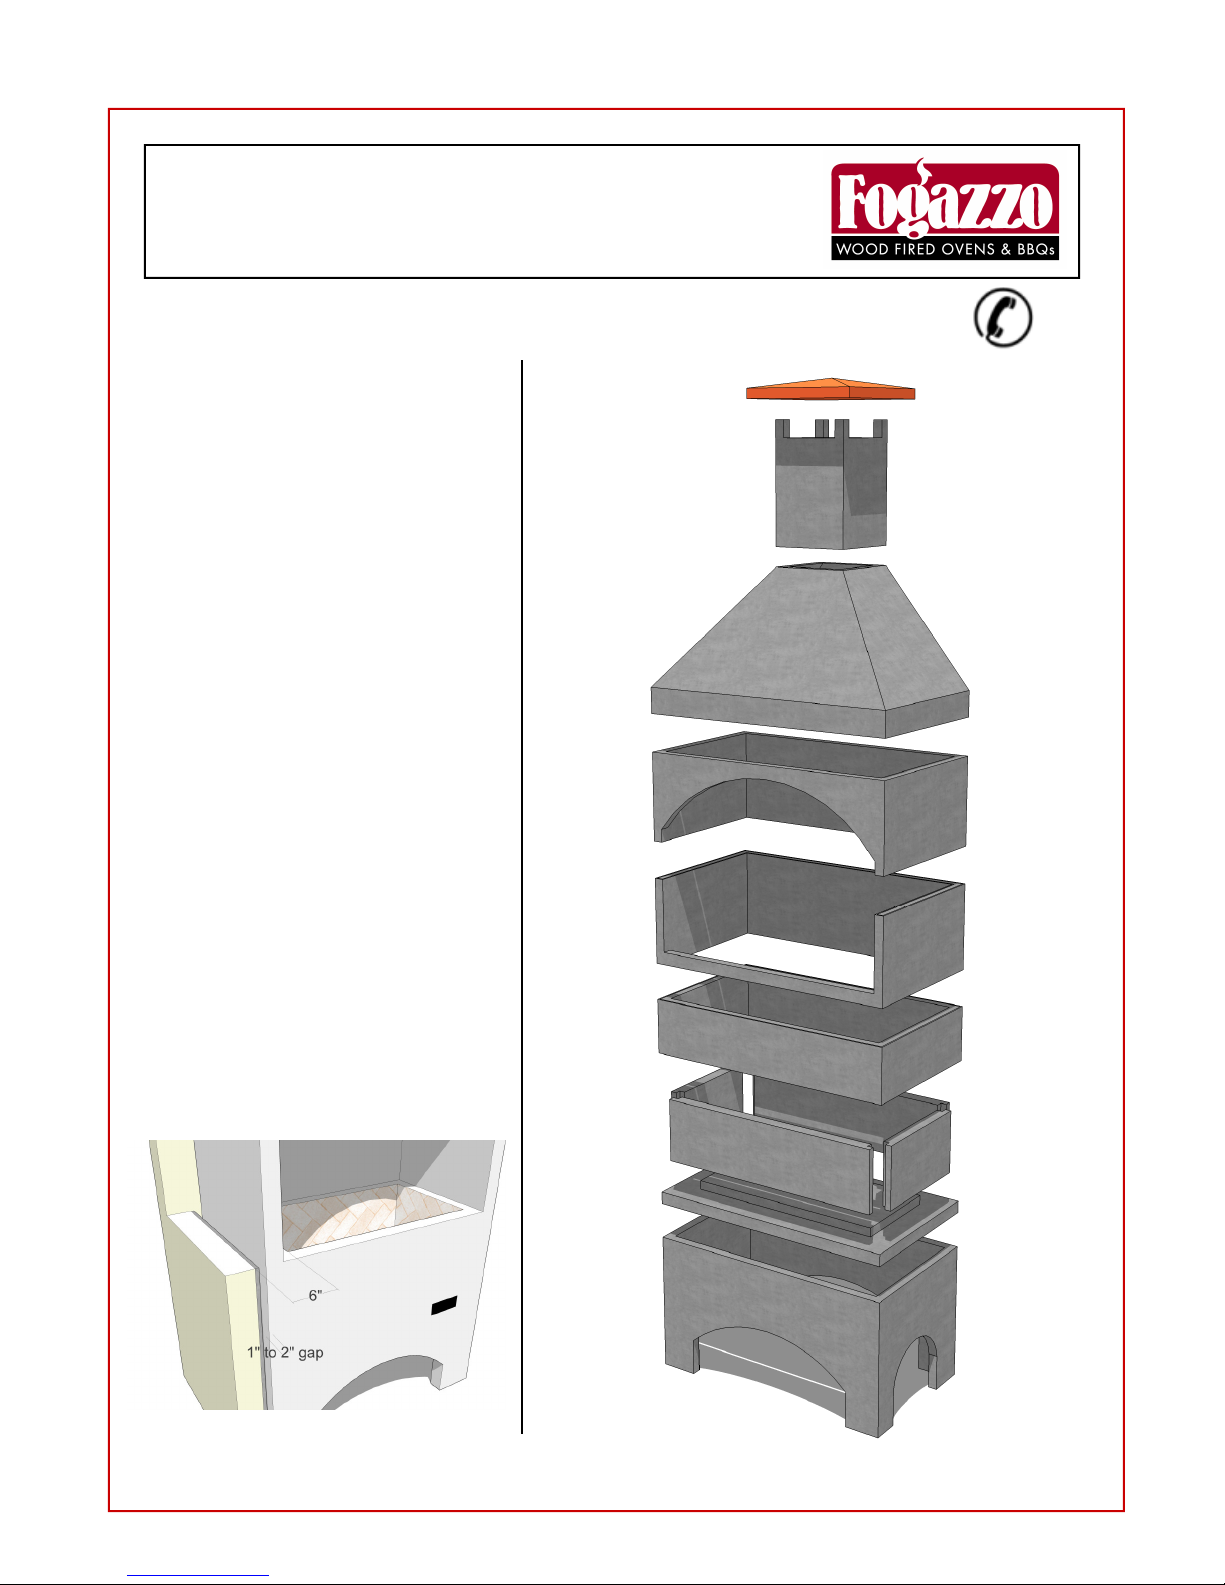
Distance to comb stibles
If the barbecue is installed in proximity to wood
framed walls, a minimal distance to combustibles
must be maintained. The inner firebox must have a
total distance of no less than 6” to combustibles.
This means that the outer face of all walls of the
barbecue must be 2” to a wood framed wall that is
covered with drywall or 1” to wood framed wall
covered with a cement backer board.
Fig 3
®

Model 525 Installation Instructions ©2014 Fogazzo Wood Fired Ovens and Barbecues LLC. ll Rights Reserved Page 04
BBQ Assembly
Installation Instr ctions Toll Free Help Line 1-866-FOGAZZO
®
1) Anchor the base to
footing using angles and
concrete anchors.
2) Set firebox floor using
type S mortar.
3) Set firebox surround
using type S mortar
4) Set the firebox using
fireproof mortar. A small
gap of up to 1” to the sur-
round is normal.
5) Set the lower cooking
area section using type
S mortar.
6) Set the upper cooking
area section using type
S mortar.
7) Set the 2 piece hood
using type S mortar.
9) Now set the chimney
section using Type S
mortar.
10) Set the chimney cap
using type S mortar.
11) Install metal corners
on each corner using
screws or nails (pre-drill)
and lath over the entire
barbecue. Place stucco,
tile, or stone as you like
over the entire structure.
Other manuals for 525
1
Table of contents
Other Fogazzo Grill manuals

Popular Grill manuals by other brands


Kenmore
Kenmore 415.16123800 Use and care guide

Camp Chef
Camp Chef PG24CLAU Warning & instruction booklet

Tucker Barbecues
Tucker Barbecues GTR Series Assembly, installation and operating instructions

Monogram
Monogram ZGG540NCP1SS owner's manual

Equipex
Equipex Sodir Savoy Operation manual

Gaggenau
Gaggenau VR 414 610 use and care manual


