
Fluke PTI120-9 User manual

PTi120
Pocket Thermal Imager
Users Manual
April 2019 (English)
© 2019 Fluke Corporation. All rights reserved. Specifications are subject to change without notice.
All product names are trademarks of their respective companies.
www.GlobalTestSupply.com
Find Quality Products Online at: sales@GlobalTestSupply.com

LIMITED WARRANTY AND LIMITATION OF LIABILITY
Each Fluke product is warranted to be free from defects in material and workmanship under normal use and
service. The warranty period is two years and begins on the date of shipment. Parts, product repairs, and services
are warranted for 90 days. This warranty extends only to the original buyer or end-user customer of a Fluke
authorized reseller, and does not apply to fuses, disposable batteries, or to any product which, in Fluke's opinion,
has been misused, altered, neglected, contaminated, or damaged by accident or abnormal conditions of operation
or handling. Fluke warrants that software will operate substantially in accordance with its functional specifications
for 90 days and that it has been properly recorded on non-defective media. Fluke does not warrant that software
will be error free or operate without interruption.
Fluke authorized resellers shall extend this warranty on new and unused products to end-user customers only but
have no authority to extend a greater or different warranty on behalf of Fluke. Warranty support is available only if
product is purchased through a Fluke authorized sales outlet or Buyer has paid the applicable international price.
Fluke reserves the right to invoice Buyer for importation costs of repair/replacement parts when product purchased
in one country is submitted for repair in another country.
Fluke's warranty obligation is limited, at Fluke's option, to refund of the purchase price, free of charge repair, or
replacement of a defective product which is returned to a Fluke authorized service center within the warranty
period.
To obtain warranty service, contact your nearest Fluke authorized service center to obtain return authorization
information, then send the product to that service center, with a description of the difficulty, postage and insurance
prepaid (FOB Destination). Fluke assumes no risk for damage in transit. Following warranty repair, the product will
be returned to Buyer, transportation prepaid (FOB Destination). If Fluke determines that failure was caused by
neglect, misuse, contamination, alteration, accident, or abnormal condition of operation or handling, including
overvoltage failures caused by use outside the product’s specified rating, or normal wear and tear of mechanical
components, Fluke will provide an estimate of repair costs and obtain authorization before commencing the work.
Following repair, the product will be returned to the Buyer transportation prepaid and the Buyer will be billed for the
repair and return transportation charges (FOB Shipping Point).
THIS WARRANTY IS BUYER'S SOLE AND EXCLUSIVE REMEDY AND IS IN LIEU OF ALL OTHER
WARRANTIES, EXPRESS OR IMPLIED, INCLUDING BUT NOT LIMITED TO ANY IMPLIED WARRANTY OF
MERCHANTABILITY OR FITNESS FOR A PARTICULAR PURPOSE. FLUKE SHALL NOT BE LIABLE FOR ANY
SPECIAL, INDIRECT, INCIDENTAL OR CONSEQUENTIAL DAMAGES OR LOSSES, INCLUDING LOSS OF
DATA, ARISING FROM ANY CAUSE OR THEORY.
Since some countries or states do not allow limitation of the term of an implied warranty, or exclusion or limitation
of incidental or consequential damages, the limitations and exclusions of this warranty may not apply to every
buyer. If any provision of this Warranty is held invalid or unenforceable by a court or other decision-maker of
competent jurisdiction, such holding will not affect the validity or enforceability of any other provision.
LIMITED WARRANTY AND LIMITATION OF LIABILITY
www.GlobalTestSupply.com
Find Quality Products Online at: sales@GlobalTestSupply.com

i
Table of Contents
Title Page
Introduction ........................................................................................................... 1
How to Contact Fluke............................................................................................ 1
Safety Information................................................................................................. 1
Product Familiarization ......................................................................................... 2
Features........................................................................................................... 2
Controls and Connections ............................................................................... 2
Touch Screen (Display) ................................................................................... 3
Basic Operation .................................................................................................... 4
Turn On and Off the Product ........................................................................... 4
Capture Image ................................................................................................. 4
Save Images to PC.......................................................................................... 4
Menu Controls....................................................................................................... 5
Main Menu ............................................................................................................ 6
Image Menu .......................................................................................................... 7
Palette Menu......................................................................................................... 8
Display Menu ........................................................................................................ 8
Settings Menu ....................................................................................................... 9
Device Settings Menu...................................................................................... 9
IR Settings Menu ............................................................................................. 10
Emissivity Adjustment................................................................................. 11
Transmissivity............................................................................................. 11
Memory Menu (Memory Gallery) .......................................................................... 11
View Image ...................................................................................................... 12
Notes ............................................................................................................... 12
Notes with Single Image............................................................................. 12
Add a Note to Multiple Images ................................................................... 12
Delete Images.................................................................................................. 13
Delete an Image ......................................................................................... 13
Delete Multiple Images ............................................................................... 13
Delete All Images ....................................................................................... 13
Asset ID ........................................................................................................... 13
Asset Identification (Asset ID)............................................................................... 14
Assign Asset ID Tag with a QR Code or Barcode ........................................... 14
Assign Asset ID Tag Manually......................................................................... 14
Exit an Asset ID Tag ........................................................................................ 14
Assign a Different Asset ID Tag....................................................................... 15
Fluke Connect Desktop Software ......................................................................... 15
Download Fluke Connect Software ................................................................. 15
Update Firmware ............................................................................................. 15
www.GlobalTestSupply.com
Find Quality Products Online at: sales@GlobalTestSupply.com

PTi120
Users Manual
ii
Maintenance.......................................................................................................... 16
Clean the Case ................................................................................................ 16
Lens Care......................................................................................................... 16
Battery Care ..................................................................................................... 16
Charge Batteries .............................................................................................. 16
Radio Frequency Data .......................................................................................... 17
Specifications ........................................................................................................ 17
www.GlobalTestSupply.com
Find Quality Products Online at: sales@GlobalTestSupply.com

1
Introduction
The Fluke PTi120 Pocket Thermal Imager (the Product or Imager) is a handheld, infrared imaging camera for use
in many applications. These applications include equipment troubleshooting, preventive and predictive
maintenance, building diagnostics, and research and development.
The Product shows thermal images on a high-visibility, industrial-quality LCD touch screen. The Product saves
images to internal memory which can be transferred to a PC through a direct USB connection to the PC or by
wireless transfer to a PC or mobile device.
The Product includes Fluke Connect desktop software. Fluke Connect is a high-performance, professional
software suite for quality analysis and reporting.
www.GlobalTestSupply.com
Find Quality Products Online at: sales@GlobalTestSupply.com

PTi120
Users Manual
2
Product Familiarization
Use Table 1 to identify the features of your Product.
Features
Table 1 lists the features of the Product.
Controls and Connections
Table 2 shows the controls and connections of the Product.
Table 1. Features
IR-Fusion Technology Image annotations
Visible Asset Identification
Fullscreen IR AutoblendFluke Connect desktop software
Table 2. Controls and Connections
Item Description Item Description
LCD touch screen (display) GHand strap
Image capture button HLED torch/flashlight
Fluke Connect indicator IInfrared camera lens
DPower button JVisual light camera lens
EUSB port KUSB cable
FConnector cover
1 2
3
4
5
7
11
8
10
9
6
PTi120
POCKET THERMAL
IMAGER
www.GlobalTestSupply.com
Find Quality Products Online at: sales@GlobalTestSupply.com

Pocket Thermal Imager
Product Familiarization
3
Touch Screen (Display)
The touch screen is the user interface of the Product. The touch screen has a backlight for work in dimly lit
spaces.
Table 3 shows the default information on the screen of the Product.
Table 3. Display
Item Description Item Description
Center point marker HStatus bar
Center point temperature IBackground temperature
Scale JEmissivity value
DTemperature range upper value KTime
E
Range bar
The range of colors in the palette mapped to
a certain range of temperatures
LDate
FCenter point color in relation to the palette MBattery status
GTemperature range lower value
12
4
5
6
7
910111213
3
8
www.GlobalTestSupply.com
Find Quality Products Online at: sales@GlobalTestSupply.com

PTi120
Users Manual
4
Basic Operation
Turn On and Off the Product
Before you use the Product for the first time, charge the battery for a minimum of 1.5 hours. See Charge
Batteries.
To turn on or turn off the Product, push and hold for 2 seconds. To keep the Product on and turn the display
off, push for <2 seconds.
Note
There is no visible way to tell if only the display is off or if the Product is off. To maximize the life of the
battery, use the LCD Time Out and Power Off features. See Table 8 for more information about how to
set these features.
Note
All thermal imagers need sufficient warm-up time for accurate temperature measurements and best
image quality. Warm-up time can vary by model and environmental conditions. Although most imagers
are fully warmed up in 3 minutes to 5 minutes, wait a minimum of 10 minutes if the most accurate
temperature measurement is important to your application. When you move an imager between
environments with large differences in ambient temperature, allow for additional adjustment time.
Capture Image
To capture an image:
1. Focus on a target.
2. Push and release the Image Capture button or double tap on the display to capture and freeze the image.
The image is in the memory buffer for you to save or to add an asset ID tag or note to the image. To add an
asset ID tag to the image, see Asset Identification (Asset ID). To add a note to an image, see Notes.
Note
Asset ID tags and notes can be saved with images captured in .is2 file format only. To select .is2 file
format, see Device Settings Menu.
Save Images to PC
To save images to a PC with the USB cord:
1. Turn on the Product.
2. Connect one end of the USB cord into the USB port on the Product and the other end into a USB port on a
PC.
The PC recognizes the Product as an external memory storage device.
3. On the PC:
a. Save the images to a directory.
b. Eject the Product from the PC.
4. Remove the USB cable from the PC and the Product.
www.GlobalTestSupply.com
Find Quality Products Online at: sales@GlobalTestSupply.com

Pocket Thermal Imager
Menu Controls
5
Menu Controls
To use the menus to change and view settings:
1. Tap the display to open the main menu.
2. Tap an icon on the main menu to open a submenu. See Table 5.
The background of the selected icon changes to yellow.
3. Tap a menu control to set and change options. See Table 4.
4. To close a submenu and return to live camera mode, tap the submenu icon again.
Table 4 lists the menu controls.
Table 4. Menu Controls
Item Control Function
Slider bar Adjusts a value. Touch and slide the bar to the left to decrease
the value or to the right to increase the value.
Toggle switch Turns on or off a feature.
Feature on.
Radio button
Selects one item from a list.
Option selected.
More menu options button Opens a menu to show other menu options.
Option menu button Opens an option menu to adjust a setting.
Numerical value adjuster
buttons
/Decreases a numerical value.
/Increases a numerical value.
Back arrow Returns to the previous menu.
Exit button
Closes menu and returns to camera mode.
Or,
Exits out of an Asset ID. See Asset ID.
Delete button Delete an image. See Delete Images.
Note button View, add, or edit a note. See Notes.
Add a note button With at least one note attached to an image, add another note
to the image. See Notes.
Asset ID button Add or remove an asset ID tag. See Asset ID.
www.GlobalTestSupply.com
Find Quality Products Online at: sales@GlobalTestSupply.com
PTi120
Users Manual
6
Main Menu
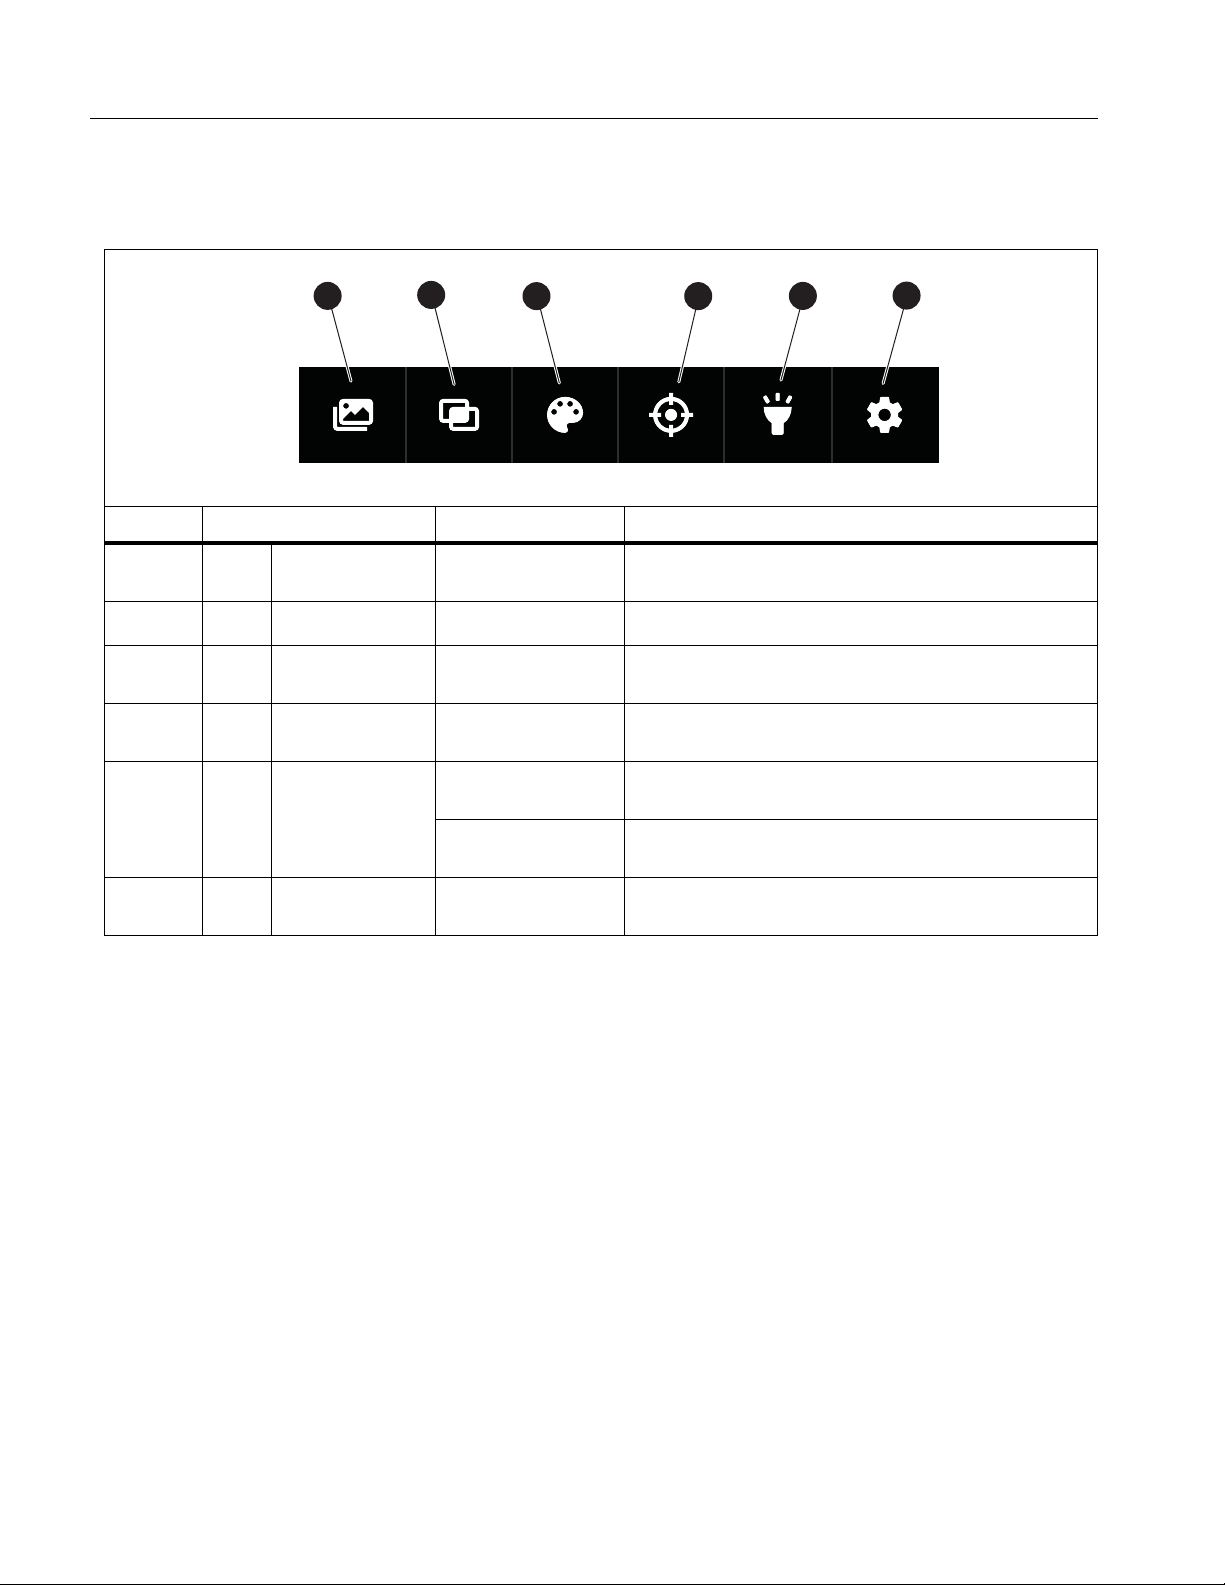
Table 5 lists the secondary menus available in the Main Menu.
Table 5. Main Menu
Item Secondary Menu Option Function
Memory <options> Select to review, edit, and delete captured images.
See Memory Menu (Memory Gallery).
Image IR-Fusion Set the IR-Fusion level. See Image Menu.
Palette <options> Set the palette to use on the image. See Palette
Menu.
DDisplay <options> Set the features to show on the display. See
Display Menu.
ELight
Torch Use the toggle switch to turn on or off the torch
(flashlight).
Backlight Use the slider bar to set the brightness level of the
display.
FSettings <options> Set user preferences and view information about
the Product. See Settings Menu.
123456
www.GlobalTestSupply.com
Find Quality Products Online at: sales@GlobalTestSupply.com
This manual suits for next models
1
Table of contents
Other Fluke Thermal Camera manuals


Fluke
Fluke Ti105 User manual

Fluke
Fluke TiR32 Instruction manual

Fluke
Fluke Ti20 User manual

Fluke
Fluke ThermoView TV30 Series User manual

Fluke
Fluke Ti50FT-20 User manual

Fluke
Fluke Ti27 Instruction manual

Fluke
Fluke Ti9 Instruction manual

Fluke
Fluke RSE30 User manual

Fluke
Fluke Ti300 User manual

Fluke
Fluke TiS55+ User manual


