Eurotops 47133 User manual


Content
1. Preface.................................................................................. 1
2. Attention................................................................................1
3. Package Content...................................................................2
4. Product Specification ............................................................. 3
5. Function Introduction ............................................................. 4
6. Getting Start...........................................................................6
7. Manual Setting.......................................................................6
8. Alarm Function Setting........................................................... 8
8.1 Activate/Deactivate the Alarm Function.................................. 8
8.2 Manual Setting of the Alarm ...................................................9
8.3 Turn off theAlarm Tone.................................................................9
8.4 Snooze Function.................................................................... 9
9. Projection Setting................................................................. 10
9.1 Temporary Time & Temp Projection..................................... 10
9.2 Permanent Time & Temp Projection ..................................... 11
10. Backlit Adjustment................................................................ 11
10.1 Backlit Dimmer..................................................................... 11
10.2 Muhiple Cobr Backlit............................................................ 12
11. Wireless Outdoor Temperature Sensor................................ 13
12. Temperature........................................................................ 13
12.1 Temp Display & Temp Trend ................................................ 13
12.2 Maximum/Minimum Temperature Records........................... 14
12.3 Outdoor Temperature Frost Alarm........................................ 15
13. Weather Forecast................................................................ 15
13.1 Weather Forecast Statement ............................................... 15
13.2 The Symbols of Weather Forecast....................................... 15

13.3 Barometric Pressure Trend..................................................16
14. Low Battery.........................................................
15. USB Charger.......................................................
16. Waste Disposal......................................................................19

1
.Preface
Thanks for choosing this device .
Before You Start Using It
•Make sure to read the instruction manual carefully. This
information will help you to familiarize yourself with your new
device, to learn all of its functions, and to get advice in the
event of problems.
•Following thei nstructions will prevent damage to your device.
•We shall not be liable for any damage occurring as a result of
not-followingoftheseinstructions.
•Please keep this instruction manual for future reference.
2. Attention
•Please follow the instructions for operation.
•Please use the original or manufacturer specified attachments or
accessories.
•Do not disassemble the product, so as not to cause trouble or
safety hazards.
•Do not place any items on top of the product or damage the
product.
•Do not place the product near water source or in a damp place.
•Please terminate use immediately upon damage which is caused

2
as a result of improper use or repair by a nonfactory approved
technician.
•Do not place the product in direct sunlight and high temperature
places (radiator, electric heater, stove, etc.).
•Keep the product away from strong electromagnetic waves,
strong static electricity, or moisture and condensation.
•Use by children below 10 years old should be supervised by an
adult.
•Clean your device with a soft damp cloth. Do not use solvents or
scouring agents.
3. Package Content
•Projection alarm clock
•Instruction manual
•DC power adapter
•Outdoor sensor
4. Product Specification
•Radio controlled time (DCF)
•Projection time and temperature onto a wall (digital)
•Two alarms with Snooze function
•Calendar (up to the year of 2099)
•12/24 hour format is alternative

3
•Multiple color backlit
•Temperature:
•Indoor temperature: 0°C ~50°C
•Outdoor temperature: -20°C~60°C
•Temperature alternatively in °C or °F
•Wireless sonsor Wall mounting or table stand
•50m transmission range in an openarea
•Weather forecast
•Battery: LR03 AAA battery x2 (notincluded)
•DC power adapter: 5V 1A
•USB charger function

4
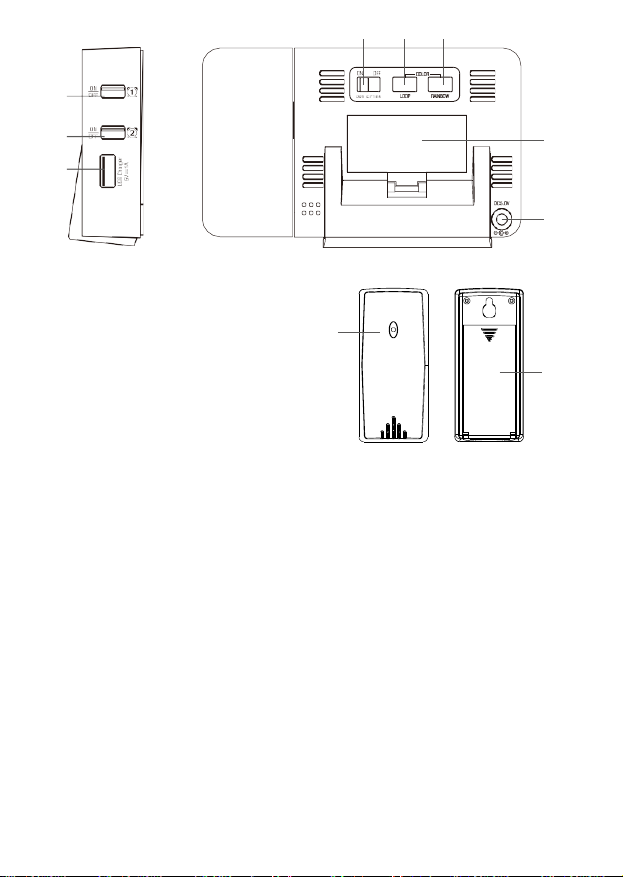
5. Function Introduction
1
2
3
4
5
6
7
8
9 10 11 12
1.
Snoozetouchbutton
2.
Projectiondisplay
3.
Weatherforecasting
4.
Time ( DCF)
5.
Week
6.
Indoortemperature
7.
Outdoortemperature
8.
Monthanddate
9.
"MODE"button
10.
"MEM"button
11.
"+"button
12.
"-"button
5
16 17 18
13
14 19
15
20
21
22
13. Alarm 1 on/off switch
14. Alarm 2 on/off switch
15. USB Charging port
16. Projection on/off port
17. "LOOP" button
18. "RAINBOW" button
19.
Battery compartment
20.
DC power interface
21.
Wireless remote sensor
22.
Wireless remote sensor battery compartment

6. Getting Start
Open the battery compartment and insert two new 1.5V AAA
batteries into the clock. Ensure that the battery polarities "+"
and "-" are correct. Close the battery compartment.
When insert the batteries, all the symbols on the LCD display
will light up for 3 seconds. You will hear a "dididi" sound. The
projection clock starts to detect indoor temperature. Connect
the clock with DC power adapter at the same time.
Insert 2 new 1.5V AAA batteries to wireless remote sensor.
Ensure that the battery polarities "+"and "-"are correct. Close
the battery compartment.
The projection clock starts to make a connection with the
outdoor remote sensor, displayed by a flashing symbol in the
"OUT" display area on the LCD screen. This procedure will take
about 3 minutes.
7. Radio-controlled time reception
The clock will now scan the DCF frequency signal and DCF
symbol will be flashing. when the time code is received
successfully after 3-7 minutes, the radio-controlled time
and the DCF-symbol are displayed steadily in the display.
Caution: During the DCF time reception period, backlight turns
off and no outdoor temperature will be transmitted.
If there is no reception possible, manual initialization can be
helpful
Press “+” and “-” button at same time.
The DCF symbol will be flashing.

Interrupt the reception by pressing the WAVE button again, The
DCF symbol disappears. The DCF reception always take place
at 1:00 o’ clock in the morning until 5:00 o’ clock. If the reception
is not successfully received at 5:00 o’ clock, further attempts will
be made again at 1:00 clock in the morning.
If the clock cannot detect the DCF- signal ( for example due to
disturbances, transmitting distance, etc.), the time can be set
manually. The DCF symbol disappears and the clock
will then work as a normal quartz clock. (see: Manual setting of
the clock and calendar )
7. Note for radio controlled timeDCF
The time base for the radio-controlled time is a caesium atomic
clock operated by the Physikalisch Technische Bundesanstalt
Braunschweig. It has a time deviation of less than one second in
one million years. The time is coded and transmitted from
Mainflingen near Frankfurt via frequency signal DCF-77 ( 77.5
kHz) and has a transmitting range of approximately 1500km.
Changeover from summer time or winter time is automatic. In
Daylight Saving Time “DST” is shown on the LCD. The quality of
the reception depends mainly on the geographic location. Normally
there should be no reception problems within a 1,500 km radius
around Frankfurt.
Table of contents
Other Eurotops Alarm Clock manuals


