Eleglide D1 User manual
User Manual

CATALOGUE
01~12
13~24
25~36
37~48
49~60
ENGLISH
FRANÇAIS
DEUTSCHE
ITALIANO
ESPAÑOL

*Before the first operation,
please read the user manual carefully!
1. Note
2. Packing List
3. Diagram
4. Assembling Your E-scooter
5. First Ride
6. Folding and Carrying
7. Trouble Shooting
8. Maintenance
9. Specification
10. Warranty
Contents
This manual was written to help you get the most performance, comfort, enjoyment and safety when
riding your new Eleglide electric scooter(hereinafter referred to as e-scooter). It is important for you to
understand your new e-scooter. By reading this manual before you go out on your first ride, you’ll
know how to get the most from your new e-scooter. It is also important that your first ride on your new
e-scooter is taken in a controlled environment, away from cars, obstacles, and other riders.
The e-scooter a recreational product. Before mastering riding skills, you need to practice. Neither
Eleglide Team nor its Resellers are responsible for any injuries or damage caused by a rider's inex
perience or failure to follow the instructions in this document.
E-scooter are vehicles with certain risks, please make sure to follow the traffic rules. Also, when
emergency braking, apply brakes to the rear wheel first, and only then the front wheel, especially if
the cycling speed is too high. If the front brake is used suddenly, you may fall over. Please ride care
fully.
The e-scooter is supplied without basic mandatory equipment, which may vary from place to place.
Therefore, if you intend using the e-scooter on public roads, it's necessary to equip the bike with the
basic mandatory equipment, in accordance with the relevant laws and regulations.
This product is designed for home use. Do not use it for commercial or other purposes.
Keep this manual in a safe place to be able to find information in the future or for other users.
1. Note
EN
01
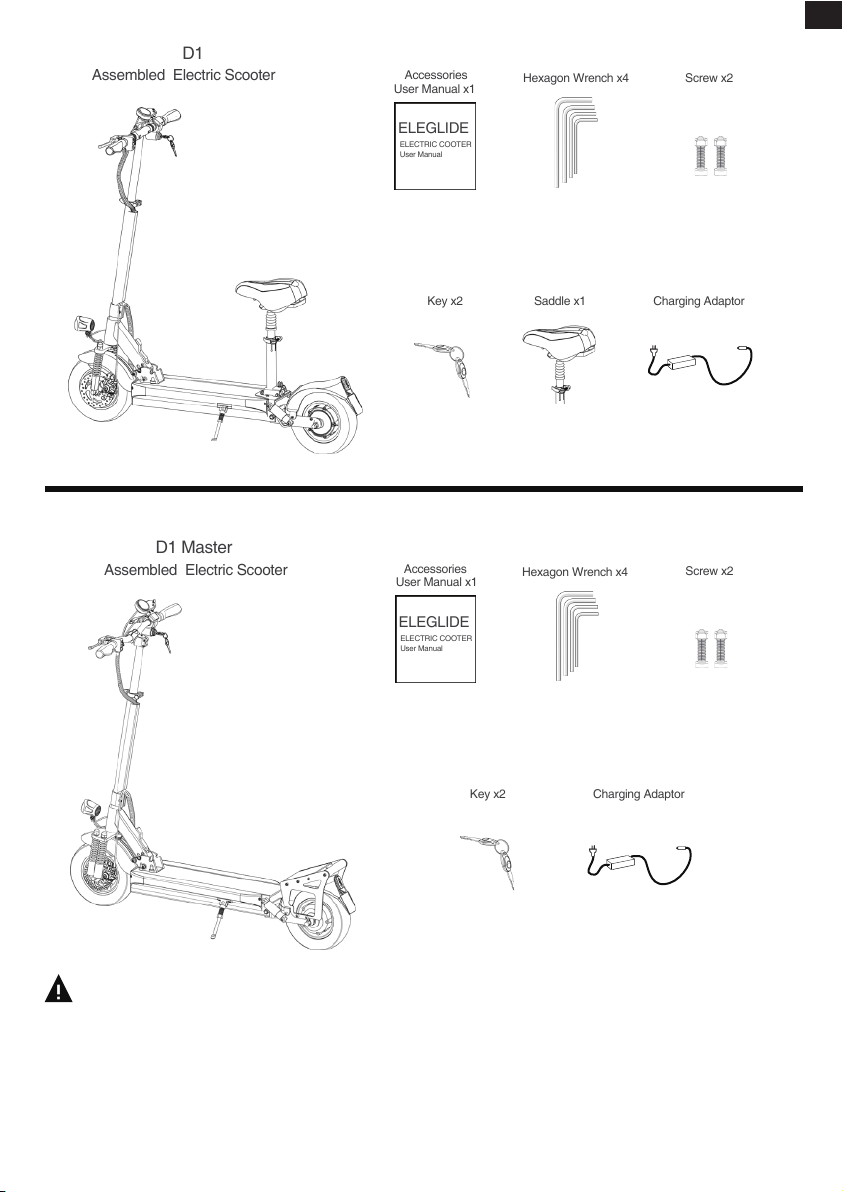
Assembled Electric Scooter
D1
Hexagon Wrench x4 Screw x2
Key x2 Saddle x1
Accessories
ELEGLIDE
ELECTRIC COOTER
User Manual
User Manual x1
Charging Adaptor
Assembled Electric Scooter
D1 Master
Hexagon Wrench x4 Screw x2
Key x2
Accessories
ELEGLIDE
ELECTRIC COOTER
User Manual
User Manual x1
Charging Adaptor
EN
02
Please retain the box and packaging materials in case you need to ship your e-scooter in the future.
Remember to power off your e-scooter and unplug the power cord before assembling, mounting
accessories, or cleaning the mainframe.
Display
Accelerator
ON/OFF Key
Lock sleeve
Quick- release grip
Head light
Folding lever
Saddle
Rear mud block
Motor
Tail light
Rear wheel
Rear shock
absorber
Side light
Side light
Frame
D1
Kickstand
Folding base
Front shock absorber
Front wheel
Front disc brake
Front mud block
Light switch
Horn switch
Brake Lever
Rear mud block
Display
Brake Lever Light switch
Horn switch
Quick- release grip
Head light
Front mud block
Front shock absorber
Front disc brake
Front wheel
Folding lever
Folding base
Tail light
Rear handle
Rear shock
absorber
Motor
Side light
Side light
Kickstand
Frame
ON/OFF Key
D1 Master
Accelerator
3. Diagram
EN
03
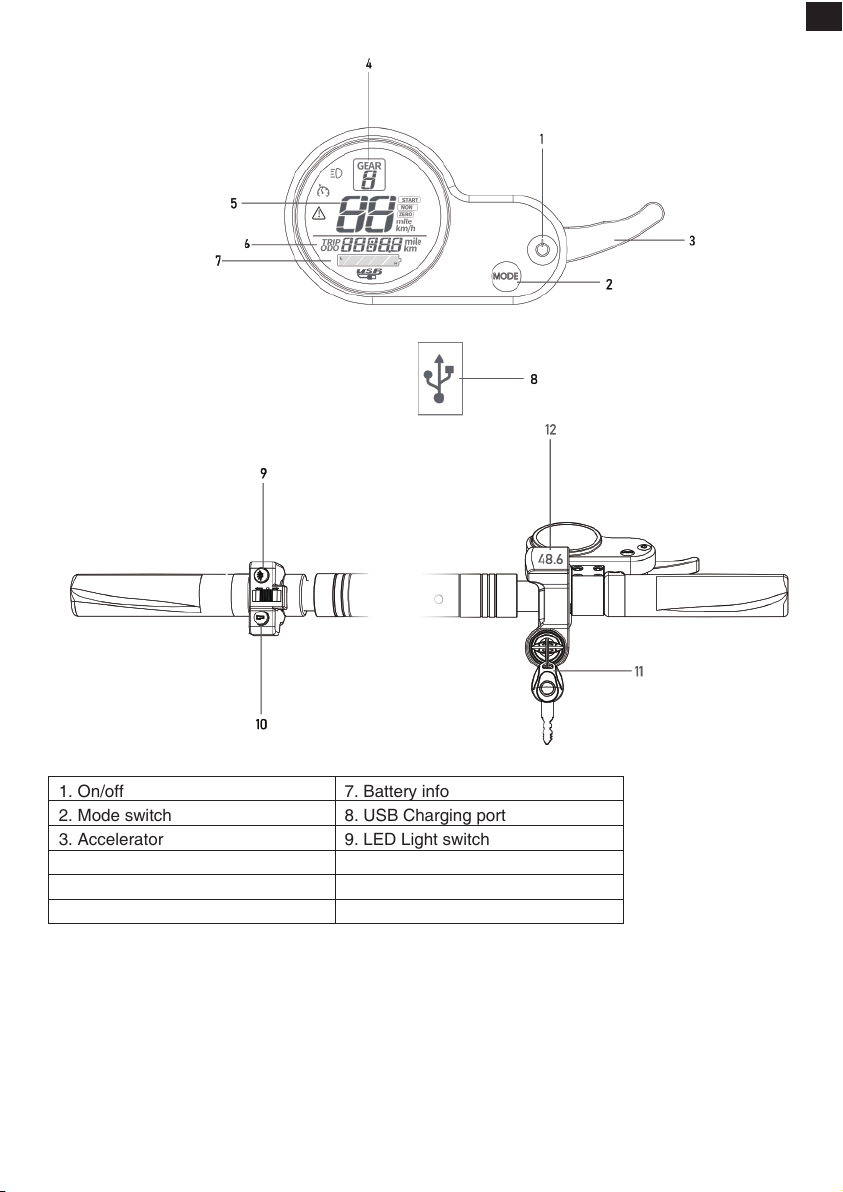
Function Instruction:
On/off : Press on/off button for 3 second, the e-scooter will be of / on.
Mode button: press it could help you to change the speed mode(supportsupto3-levelspeed)
Accelerator: Use it to speed up.
Cruise function: Twist and hold the accelerator for up to 5 second toactivatethecruisecontrol
function.
LED Light On/Off:Press the button.
1. On/off
2. Mode switch
3. Accelerator
4. Display
5. Speed info display
6. Mileage display
7. Battery info
8. USB Charging port
9. LED Light switch
10. Horn switch
11. Key
12. Power Indicator
EN
04

2) Check the handlebar: Lift up the handlebar
and check if it’s fasten. If handlebar is loose, Fold
the handlebar and fasted the screw with the
included hexwrenches.
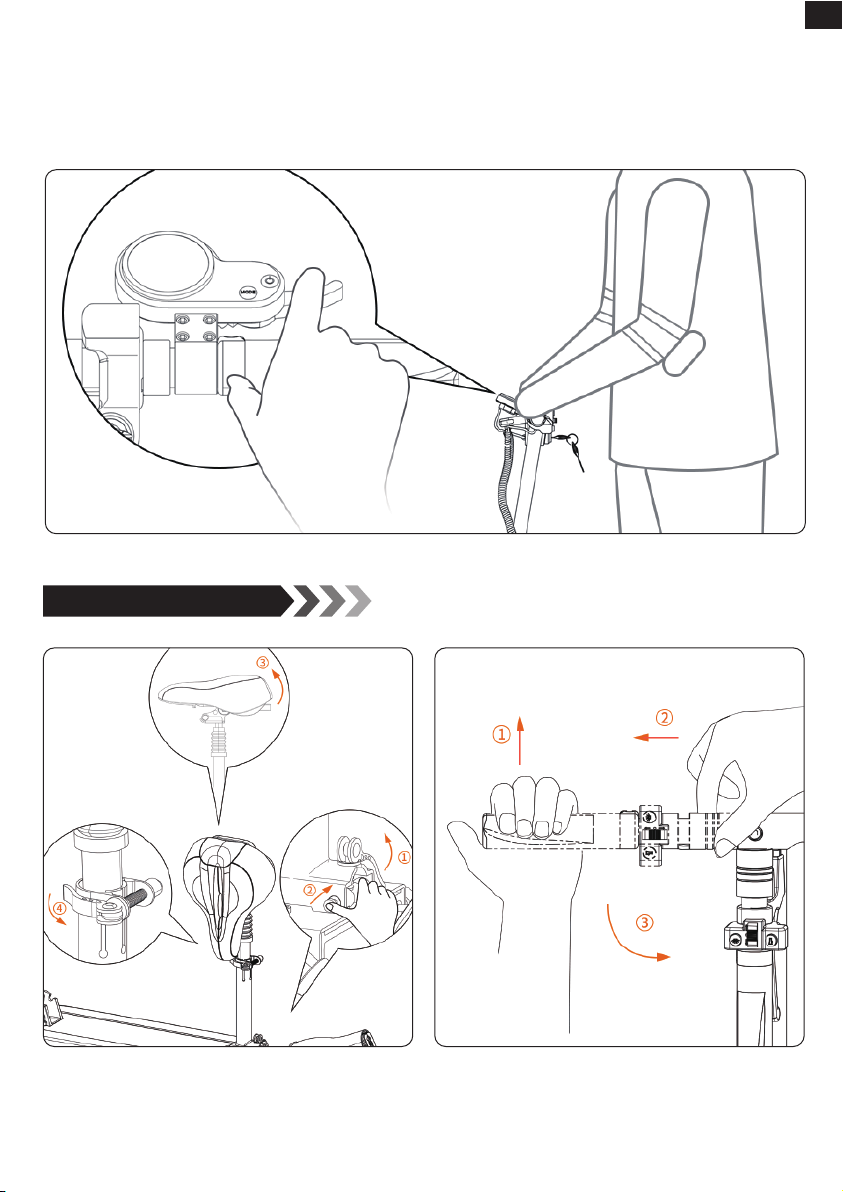
4) Saddle Assembling (For D1 which with the
saddle only)
a.Lift up the seatpost and fasten it with the nut.(twist
the nut, make sure the seat post is steady).
b.Loose the quick release clip. Put the saddle in the
seat post and fasten the clip with a suitable height for
you.
1) Get it out and unfold it: Unfold the handlebar
stem and fasten. Then unfold the kickstand to
support the e-scooter.
4. Assembling Your E-scooter
3) Display Assembling: Put it on the right
handlebar and fasten it in the right position with
the tool in the package.
EN
05
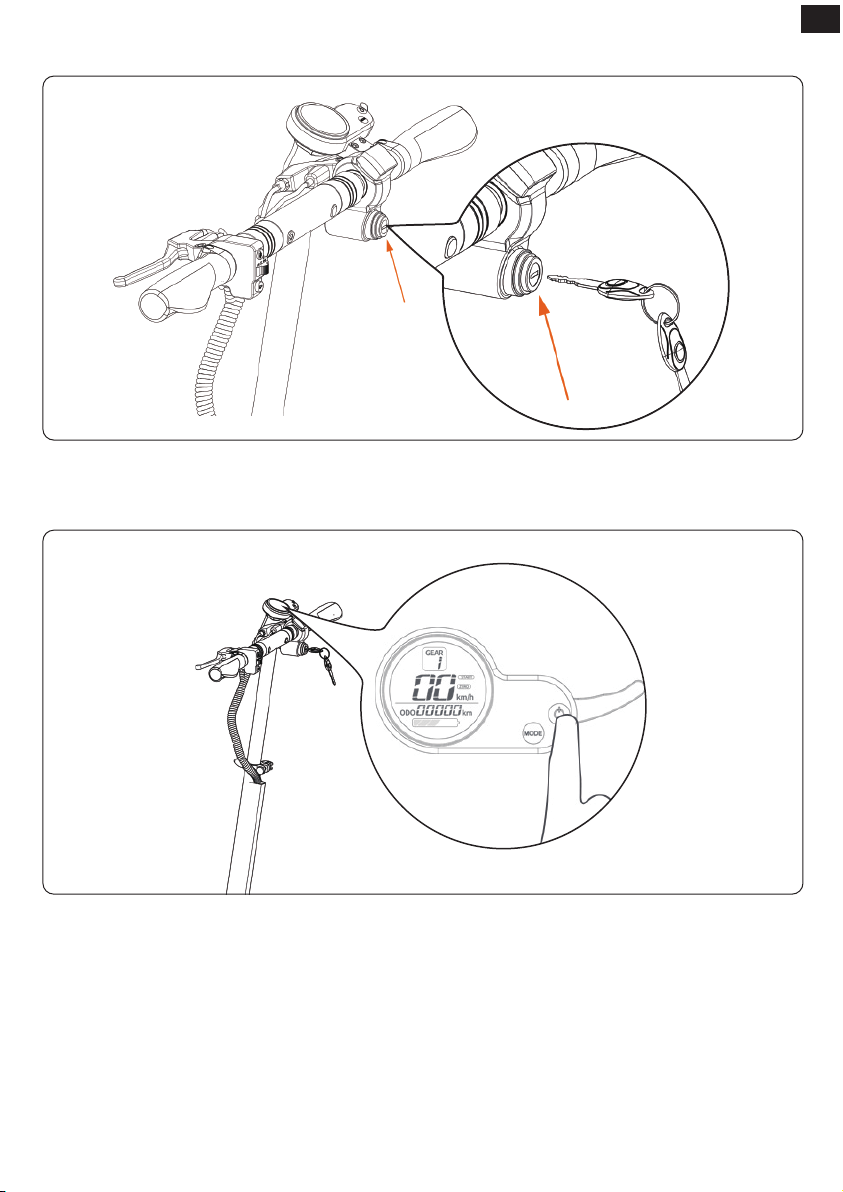
5) Battery supply: Use the key to get the battery supply. (Please take care of the key)
6) Finished: The bike is ready for your first ride. Turn on the battery and the bike, go out with it.
06
EN
Warning: Wear an approved helmet and other protective gear to minimize any possible injury. And if
you intend using the e-scooter on public roads, it's necessary to equip the bike with the basic
mandatory equipment, in accordance with the relevant laws and regulations.
A. Power on (Press On/off button for 3 seconds) the E-scooter and check the power level indicator.
Charge the E-scooter if the battery level is low.
B. Stand on the footrest with one foot and push off with another foot to start gliding.
6. Folding and Carrying
2) Handlebar Folding: Horizontal slide outward
the lock sleeve and put down the handlebar.
1) Handlebar Folding:
Loose the seatpost clip
and put the saddle on the pedal. (Only for the
model D1 which with the saddle)
EN
07
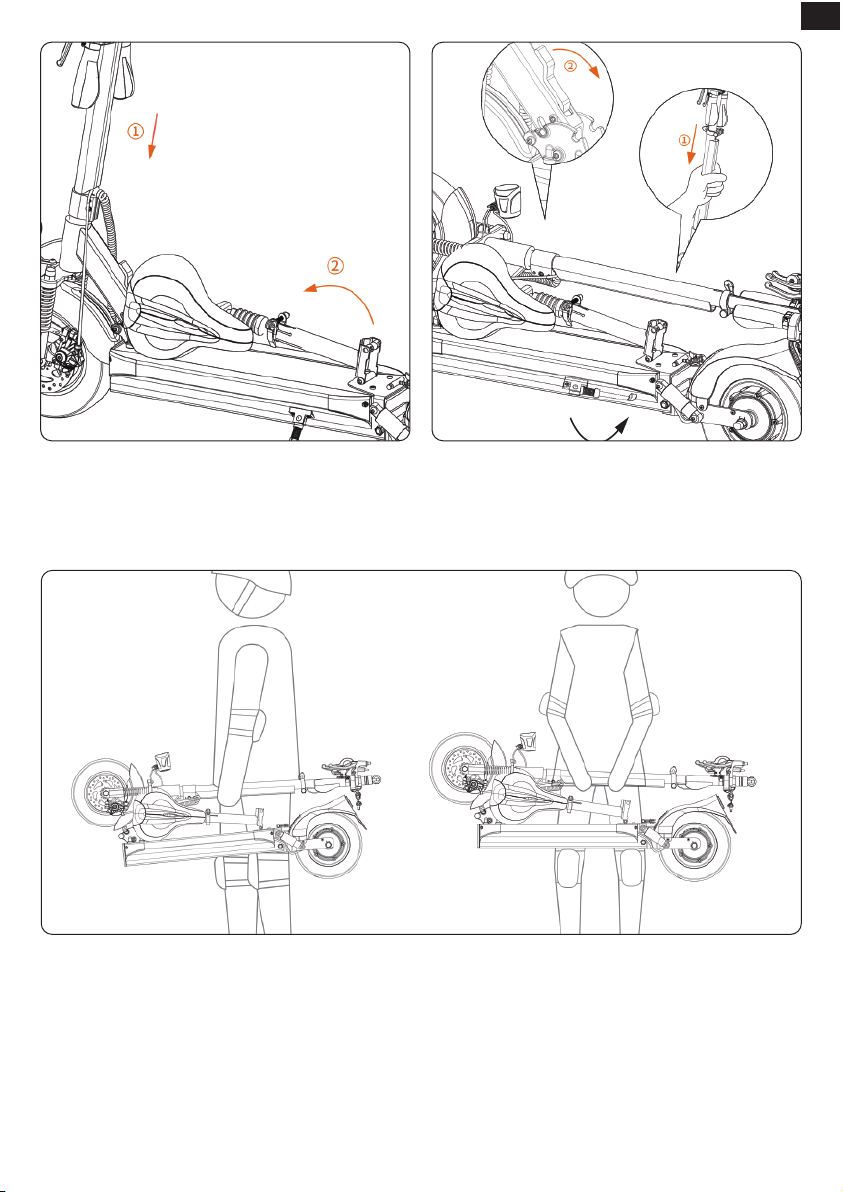
3) Put down the telescopicrod: Loose the
quick release clip and put the telescopic rod
down to a right position.
5) Carrying: Hold the rod and take it to where you want.
4) Scooter Folding: Hold the scooter upright rod
and pull down the folding handle. Make the
kickstand be folded as well.
EN
08
EN
This manual suits for next models
1
Table of contents
Languages:
Other Eleglide Scooter manuals


