Elba ECO-A1213 User manual
CONVECTION OVEN
Model: ECO-A1213(MR)
Owner’s Manual
Please read this manual carefully before operating
your set
Retain it for future reference
Record model number and serial number of the set
See the label attached on the set and quote this
information to your dealer when you require
service
For The Warranty Terms & Conditions, Please Refer To Warranty Certificate
1
Thank you for purchasing convection oven model ECO-A1213˄MR˅.
Before operating the appliance, please read this instruction manual and take note
of all safety precautions and follow the operating procedures. After reading, kindly
keep this instruction manual in a safe place for your future reference. Should you
pass on this Convection Oven to a third party, please kindly hand over this
instruction manual as well.
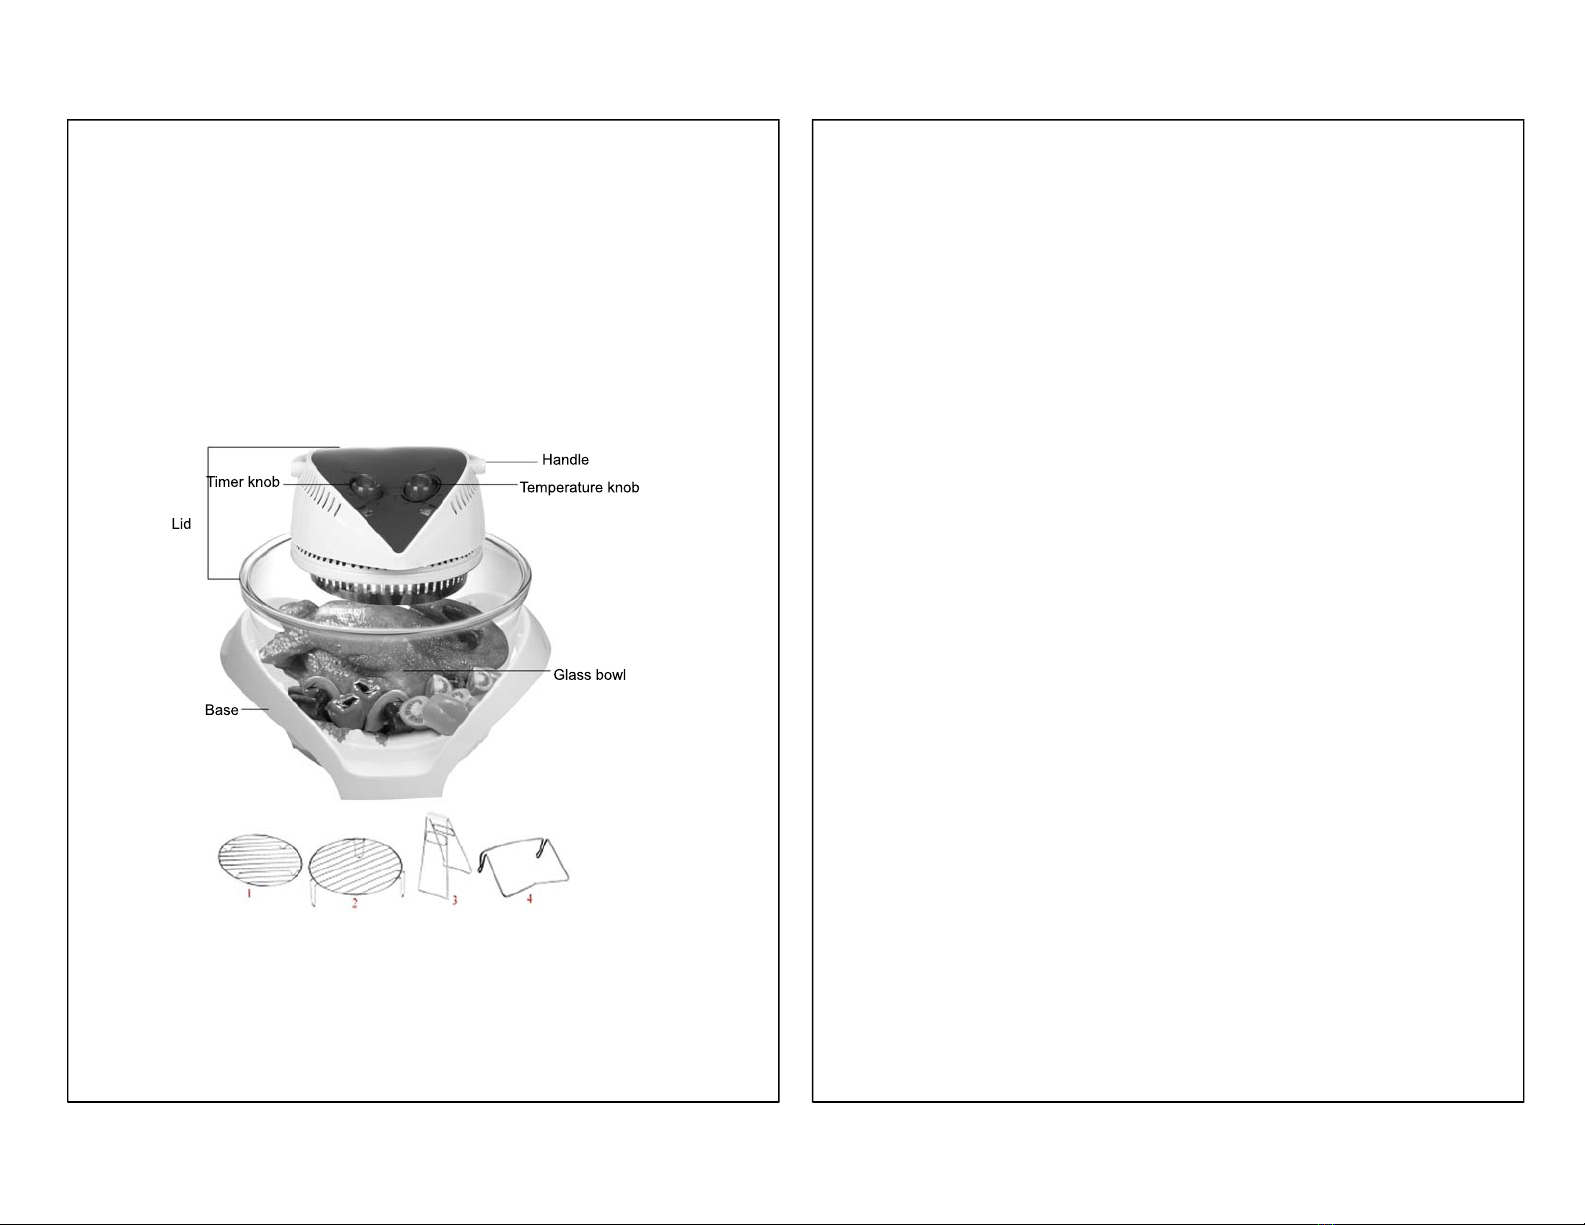
PARTS DESCRIPTION
1. Low rack – To hold large food such as chicken.
2. High rack – To hold small quantity of food.
3. Tong – To take out the food from the glass bowl.
4. Lid holder – To put hold the lid after cooking.
2
IMPORTANT SAFEGUARDS
When using your ELBA Convection Oven, basic safety precautions should always be followed:
xAlways operate your ELBA Convection Oven from a power source of the same
voltage and frequency rating as indicated on the rating label.
xPlace the Convection Oven on a flat surface and far from the edge of the top
counter.
xKeep at least 2 inches of space on all sides of the Convection Oven to allow proper
ventilation.
xDo not operate the Convection Oven if any part of it is damaged. Return the
appliance to the authorized dealer or service facility for repair.
xDo not operate or place any part of your Convection Oven on or near any hot
surface such as a gas or electric burner, hot plate or heated oven.
xDo not use or replace the accessories of the Convection Oven, other than the one
originally provided.
xOversized foods must not be put inside the Convection Oven glass bowl to avoid
the risk of fire or electric shock.
xThis Convection Oven is not intended to be used with an external timer. Use only
the timer control of the oven.
xAvoid touching hot surfaces of the Convection Oven during use. Use only the
handle.
xNever leave the Convection Oven unattended when in use.
xTurn timer to OFF and remove plug from the power outlet before lifting off the lid.
xAlways turn setting controls to OFF before disconnecting the cord from the power
supply. Hold the plug when unplugging from socket. Do not unplug by pulling the
power cord.
xSwitch OFF and unplug the Convection Oven from the power outlet when not in
use or before cleaning.
xTo reduce the risk of electric shock, do not immerse or expose the Convection
Oven to rain, moisture or any liquids.
xKeep the appliance out of reach from children or from persons with mental or
physical disabilities.
xThis ELBA Convection Oven is intended for normal domestic/household use only.
This model is not suitable for commercial use.
3
HOW TO USE
xFor initial use, wipe the bowl with a soft, damp cloth. Place lid on top then heat
up the Convection Oven for 10 minutes without any food inside.
xSome parts of the Convection Oven have been slightly greased and as a result,
the oven might slightly emit smoke when connected for the first time. However,
it will cease after you have used the oven for some time.
xPlace the low rack or the high rack inside the glass bowl of the Convection
Oven.
xPut the food on top of low Rack, allow at least 1 inch of space between the food
and the glass bowl.
xClose the glass bowl with the convection oven lid. Allow at least 1 inch of space
between the food and the lid.
xInsert plug into the power outlet.
xSet temperature from 125°C to 250°C by turning the temperature knob in
clockwise.
xSet cooking time from 6 minutes to 60 minutes or as per required cooking time
of the food you are cooking by turning the Timer knob clockwise.
xMake sure to pull down the handle of oven to start the cooking process. For
safe cooking, the oven is specially designed not to operate or stop operating
when the handle is lifted up.
Use low and high rack
x
when cooking 2 different foods at the same time. Put the
food that takes longer
time to cook on the low rack.
x
Convection Oven will automatically turn OFF after the setting time has elapsed.
COOKING SETTINGS
x
Roasting/Broiling:
Place food directly on the wire rack. Cooking time may vary according
to the size of the food that you are roasting.
4
xBaking:
Place food to be baked in a metal or tempered glass pan not more than 12
inches in diameter to leave enough space for proper hot air circulation.
xSteaming:
When steaming vegetables, place food in aluminium foil pouch, add few drops
of water then seal pouch.
xFrying:
Dip food to be fried in oil then place on the wire rack.
xToasting:
When toasting bread or chips, place foods directly on the wire rack.
xDefrosting:
Place food to be defrosted on the wire rack then set heat control of the
Convection Oven to 50°C. To cook frozen foods, please set the
temperature to 100°C until the food is cooked.
Food Time Temperature
CHICKEN 30-40min 180-200°C
FISH 10-15min 130-150°C
PORK 15-20min 180-200°C
CAKE 10-12min 140-160°C
LOBSTER 12-15min 140-160°C
SHRIMP 10-12min 150-180°C
SAUSAGE 10-13min 125-150°C
PEANUT 10-15min 140-160°C
ROASTED BREAD 8-10min 125-140°C
POTATO 12-15min 180-200°C
RICE 15-20min 150-180°C
CRAB 10-13min 140-160°C

5
CLEAN AND CARE
xAllow the Convection Oven to cool down before cleaning.
xFor self cleaning, pour water and a few drops of liquid soap into the glass bowl.
Set temperature from 125°C to 150°C and the timer from 5 to 10 minutes. Pull
down handle of the oven. After that, discard water and rinse glass bowl
thoroughly.
xFor manual cleaning, wash the bowl and the base with warm soapy water or by
using a dishwasher.
xWipe external parts of the oven using a soft, damp cloth and a mild detergent.
xWipe dry the Convection Oven using a soft, dry cloth.
xDo not use harsh cleaning agents or abrasive objects (e.g. scrubbing pads or
metal brushes) for cleaning.
xStore Convection Oven in a cool dry place after cleaning.
xPut back parts and accessories of the Convection Oven to their proper places
before operating again.
This manual suits for next models
1
Table of contents
Other Elba Convection Oven manuals

 User manual")


