Eight HDR1 User manual


1
Table of Contents
Safety Instruction ……………………………………………………………………
…
2
Introduction …………………………………………………………………………
…
3-4
Front Panel …………………………………………………………………………
…
5
Rear Panel …………………………………………………………………………… 6
Remote Control Guide ……………………………………………………………… 7-8
Using the Remote Control …………………………………………………………
…
9
Cable Connections …………………………………………………………………
…
10-11
Main Menu …………………………………………………………………………… 12-15
Basic Operation ……………………………………………………………………
…
16-20
Channel Search …………………………………………………………………… 16-17
Changing Channel/Info Box/Changing Volume/………………………………
…
18
Subtitle/Audio/Mute/Time Shift Function ………………………………………
…
19
Real Standby Function …………………………………………………………
…
20
Recording Function …………………………………………………………………
…
21-23
Network ………………………………………………………………………………
…
23-26
Electronic Program Guide (EPG) …………………………………………………
…
27
Troubleshooting ……………………………………………………………………
…
28
Technical Specification ……………………………………………………………
…
29

2
Safety Instructions
•Always read the safety instructions carefully.
•Keep this User's Manual for future reference.
•Keep this equipment away from humidity.
•Place this equipment on a reliable flat surface before setting it up.
•Do not stand it on soft furnishings.
•If any of the following situation arises, get the equipment checked by a service
technician:
- The equipment has been exposed to moisture.
- The equipment has been dropped and damaged.
- The equipment has obvious signs of breakage.
- The equipment has not been working well or you cannot get it to work according to
the User's Manual.
Warning
•To prevent the risk of electric shock, do not open the cover or the back of unit.
•Do not block the ventilation holes of the device. Leave appropriate gap above and
around it to allow for adequate ventilation.
•Do not place the device in an unventilated cabinet or on top of a unit which emits
heat.
•Danger of explosion if battery in incorrectly replace. Replaced only with the same
or equivalent type.
•The apparatus shall not be exposed to dripping or splashing and no objects filled
with liquids, such as vases, shall be placed on the apparatus.
•The main plug is used as the disconnected device, the main plug shall remain
readily operable.
•To reduce the risk of fire or electric risk, do not expose this apparatus to rain or
colds.
Copyright Statement
No part of this publication may be reproduced in any form by any means without the
prior written permission. Other trademarks or brand names mentioned herein are
trademarks or registered trademarks belong to EIGHT Limited.
Disclaimer
Information in this document is subject to change without notice. The manufacturer
does not make any representations or warranties (implied or otherwise) regarding the
accuracy and completeness of this document and shall in no event be liable for any
loss of profit or any commercial damage, including but not limited to special, incidental,
consequential, or other damage.
This symbol indicates that this product incorporates double insulation
between hazardous mains voltage and user accessible parts. When
servicing use only identical replacement parts.

3
Introduction
Applications/Features
zSupport DMB-TH digital broadcast standard
zSupport DAB+ digital Radio broadcast standard
zTime Shift supports with record function up to 2 hours
z7 days Electronic Program Guide (EPG)
zPersonal Video Recorder (PVR) with schedule/EPG recording
zAspect Ratio Conversion (16:9, 4:3)
zChannel List
zLogical Channels (0-999) Number Display
zOSD Language support Traditional Chinese/English
zSupport Ethernet
zSupport Channel Search in Automatic and Manual methods
zUSB 2.0 supported
zSoftware upgradeable via USB 2.0
zSupport HD or SD output (HDMI, YPbPr, CVBS)
zOutput display support 1080p/1080i/720p/576p/576i/480i
zHDMI output: 1080p/1080i/720p/576p/576i/480i
zYPbPr output: 1080p/1080i/720p/576p/576i/480i
zSupport PCM digital audio output
zDigital Audio Output SPDIF (Optical/Coaxial)
zTick Play in Time Shift mode and in PVR playback mode: Fast Forward &
Rewind (2X/4X/8X/16X/32X/64X), Instant Replay, Pause, Quick Skip Play

4
Introduction
Package Contents
Before installation, please check the items of the package. The package should
contain the following items:
1. MainUnit x1
2. RemoteControl x1
3. “AAA” Batteries (for remote) x2
4. Instruction Manual x1
5. Composite Cable x1
6. DAB Antenna x1
7. RF Cable x1

5
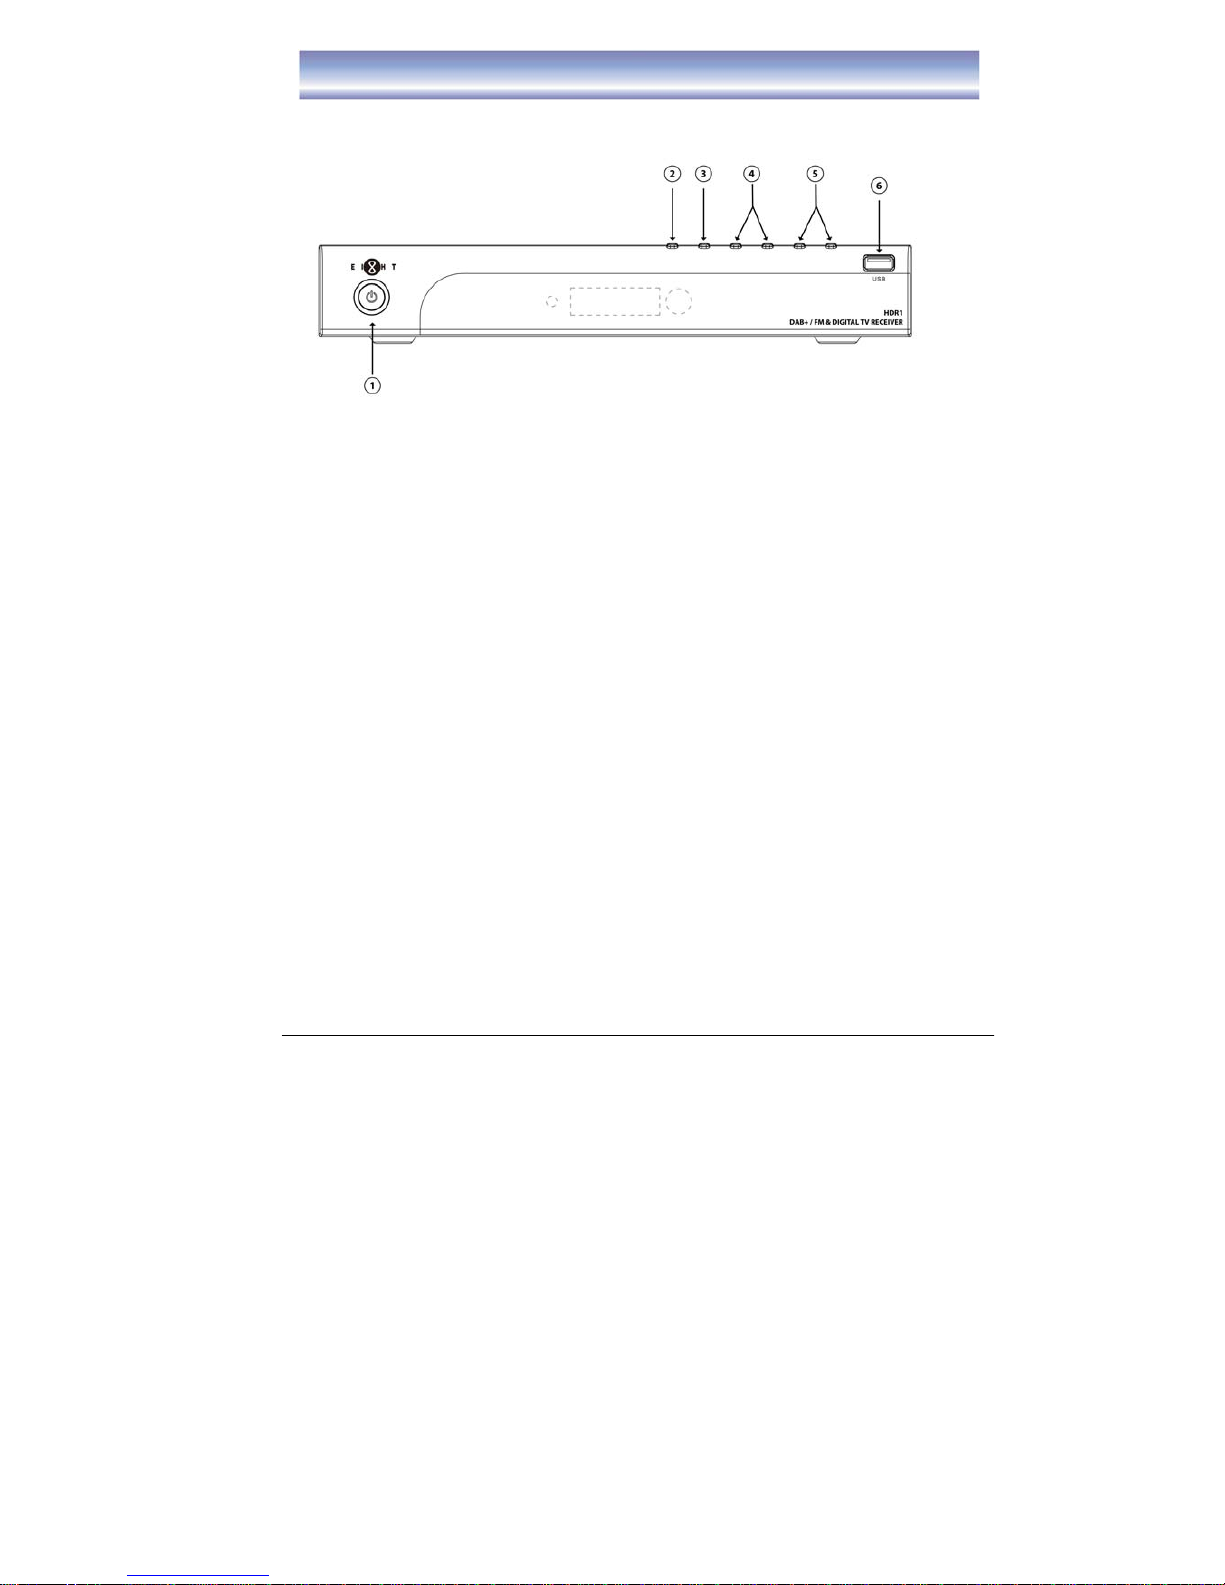
Front Panel
Front Panel
1. STAND BY: To turn the Standby mode ON/OFF.
2. MENU: To enter the Main Menu.
3. OK: To confirm the selected menu item.
4. CH-/CH+:To change Channel up/down or move cursor up/down in the menu.
5. VOL-/VOL+:To control volume level up/down or move cursor up/down in the
menu.
6. USB Slot: Connect for software upgrade or proceed the recording function..
(USB2)

6
Rear Panel
Rear Panel
1. LOOP OUT: Loop output RF signal to another receiver or DAB+ IN.
2. ANT IN: Connect to terrestrial antenna.
3. ETHERNET: Connect to Ethernet.
4. SPDIF: Output digital audio signal to amplifier.
5. USB: Connect to specific USB device.
(USB1)
6. HDMI: Output video and audio signal to TV (support high definition
Output).
7. YPbPr: Output Y/Pb/Pr video signal to TV (support high definition output).
8. DAB+ IN: To connect the DAB+ antenna or RF Cable
9. COAXIAL: Output digital audio signal to amplilfier.
10. CVBS: Ouput CVBS video signal to TV.
11. AUDIO L/R: Output right/left audio signal to TV or Amplifier.

7
Remote Control Guide
Key functions for remote control:
1. POWER: To turn unit ON/OFF.
2. TV: Shortcut key to TV function.
3. PVR: Shortcut key to PVR function.
4. DAB+: Shortcut key to DAB+
function.
5. INTERNET: Shortcut key to Internet
function.
6. REW: Rewind playing record or time
shift (support 2X, 4X, 8X, 16X, 32X,
64X).
7. PREV: Go to the start point of a
program (in time shift or PVR mode).
8. PAUSE: Pause to play or start time
shift function.
9. PLAY: Start to playing or resume
time shift.
10. AUDIO: To switch audio mode.
11. CH+/- : Change the channel.
12. SUBT: To switch ON/OFF Subtitle
function.
13. 4 COLOR KEYS: For referring usage
shown on the screen.
14. MENU: To open Main Menu.
15. ▲▼: To move up/down or switch
channel.
16. OK: To confirm the selected item.
17. EPG: Shortcut key to EPG list.
18. NUMERIC BUTTON(0-9) : For channel change by LCN or setting input.
19. RECALL: Back to previous watching channel.
20. MUTE:To mute or recover the sound of the unit.
21. MEDIA: Shortcut key to Media function.
22. A. RATIO: To change Aspect Ratio.
23. FM: Shortcut key to FM function.
24. T-SHIFT: To switch ON/OFF Time shift function (must connect external
Harddisk/USB device).
25. FF: Forward playing record or time shift (support 2X, 4X, 8X, 16X, 32X, 64X).
26. NEXT: Go to the end of the program.

8
Remote Control Guide
27. STOP: Stop to run existing recording or time shift.
28. REC: To start instant record on current program.
29. PAGE UP: Go to previous page.
30. VOL+/-: To control the level of volume.
31. PAGE DOWN: Go to next page.
32. EXIT:Exit current screen.
33. ◀▶:Move between left and right.
34. TIMER: Shortcut key to Timer function.
35. INFO: To display the current and next program information.
Table of contents