Eastman Outdoors 38245 User manual

Revision date: 2/2018
Distributed By
Eastman Outdoors, Inc.
1230 Poplar Ave.
Superior, WI 54880
PH: 800-282-4868
Made in China
www.eastmanoutdoors.com
2.4 HP Mossy Oak Electric
Meat Grinder
Before operating, be sure
to read and understand
instructions completely.
Failure to follow the
safety rules and other
basic safety precautions
may result in serious
personal injury.
Instructions and Care
Model: 38245
Eastman Outdoors, Inc.
HOUSEHOLD USE ONLY
Input: 120VAC, 60 Hz
Output: 700 Watts Running
1800 Watts Peak

Important Safeguards
THIS APPLIANCE IS FOR HOUSEHOLD USE ONLY
To avoid serious injury or death, malfunction or
damage to property use the appliance only for its
intended use and always follow the Instructions.
When using this electrical appliance, safety precautions should always
be observed, including the following:
1. Read all of the instructions carefully even if you are familiar with the
appliance.
2. To protect against risk of electrical shock, do not put the meat grinder in
water or other liquid or in an area where there may be ooding.
3. Close supervision is necessary when this appliance is used by or near
children. This appliance is not recommended for children.
4. Never leave this appliance unattended when in use.
5. Switch off and unplug from outlet when not in use, before putting on or
taking off parts and before cleaning.
6. Do not abuse the cord. Never carry the appliance by the cord or yank it to
disconnect from the outlet. Instead, grasp the plug and pull to disconnect.
7. The appliance should always be in the OFF position before inserting or
removing the plug from a wall outlet.
8. Do not operate any appliance with a damaged cord, plug or after the
appliance malfunctions or if it is dropped or damaged in any manner.
Return the appliance to the nearest authorized service facility for
examination or repair or electrical or mechanical adjustment.
9. Using attachments not recommended or sold by the manufacturer may
cause re, electric shock or injury.
10. Do not let cord hang over the edge of the table or counter. Do not let cord
come in contact with hot surfaces including the stove.
11. Do not use an extension cord with this appliance, however if one is used, it
must have a rating equal to or exceeding the rating of this appliance.
12. Do not operate or place any part of this appliance on or near hot surfaces
such as a hot gas or electric burner, in an oven or in a dishwasher.
13. Do not use outdoors.
14. Do not grind hard foods such as bones and nuts. Do not grind ginger or
other materials with hard ber.
15. Avoid contact with moving parts. Never feed food by hand. Always use
the food pusher. Keep hair, hands, clothing and utensils away from moving
parts while operating to reduce the risk of personal injury and/or damage to
the meat grinder.
16. Do not use ngers to scrape food away from discharge disc while
appliance is operating. Injury may result. CAUTION: DO NOT PUT YOUR
FINGERS NEAR THE HOPPER TRAY OR GRINDER HOUSING WHILE IN
OPERATION.
2
WARNING

Contents
Important Safeguards (Cont.)
Important Safeguards 2-3
Parts List 4
Service 4
Grinder Care 4-5
Precautions While Grinding 5-6
Assembling Your Grinder 6-11
Brats, Sausages, and Freezer Bags 12-13
Clearing Jams, Cleaning and Disassembly 13
One Year Limited Warranty 14
17. WARNING: The cutting blade is sharp. Handle with care when using and
cleaning.
18. When carrying the meat grinder, be sure to hold the Main Housing with both
hands. Do not hold only the Hopper Tray.
19. If the motor stalls, turn off immediately and unplug the unit. To avoid injury,
rst detach Grinder Housing then disassemble and remove clogged pieces.
20. To avoid jamming or motor stalling, do not apply excessive pressure while
operating. Do not operate continuously for more than 20 minutes.
21. Never try to repair the appliance by yourself; instead, take it to an authorized
service facility for repair.
22. This appliance is not intended for use by persons (including children) with
reduced physical, sensory or mental capabilities, or lack of experience and
knowledge, unless they are supervised by or given instruction concerning
the use of the appliance by a person responsible for their safety.
SAVE THESE INSTRUCTIONS
NOTE: This appliance has a polarized plug (one blade wider than
the other). To reduce the risk of electrical shock, this plug will t on a
polarized outlet only one way. If the plug does not t fully into the outlet,
reverse the plug. If it still does not t, contact a qualied electrician. Do
not attempt to defeat this safety feature.
Short Cord Instructions – a short power supply cord is provided to
reduce the risk resulting from becoming entangled in or tripping over a
longer cord. Extensions cords may be used if care is exercised in their
use. If an extension cord is used, the marked electrical rating of the cord
should be at least as great as the electrical rating of the appliance. The
longer cord should be arranged so that it will not drape over the tabletop
where it can be pulled on by children or tripped over unintentionally.
3
4
Grinder Care
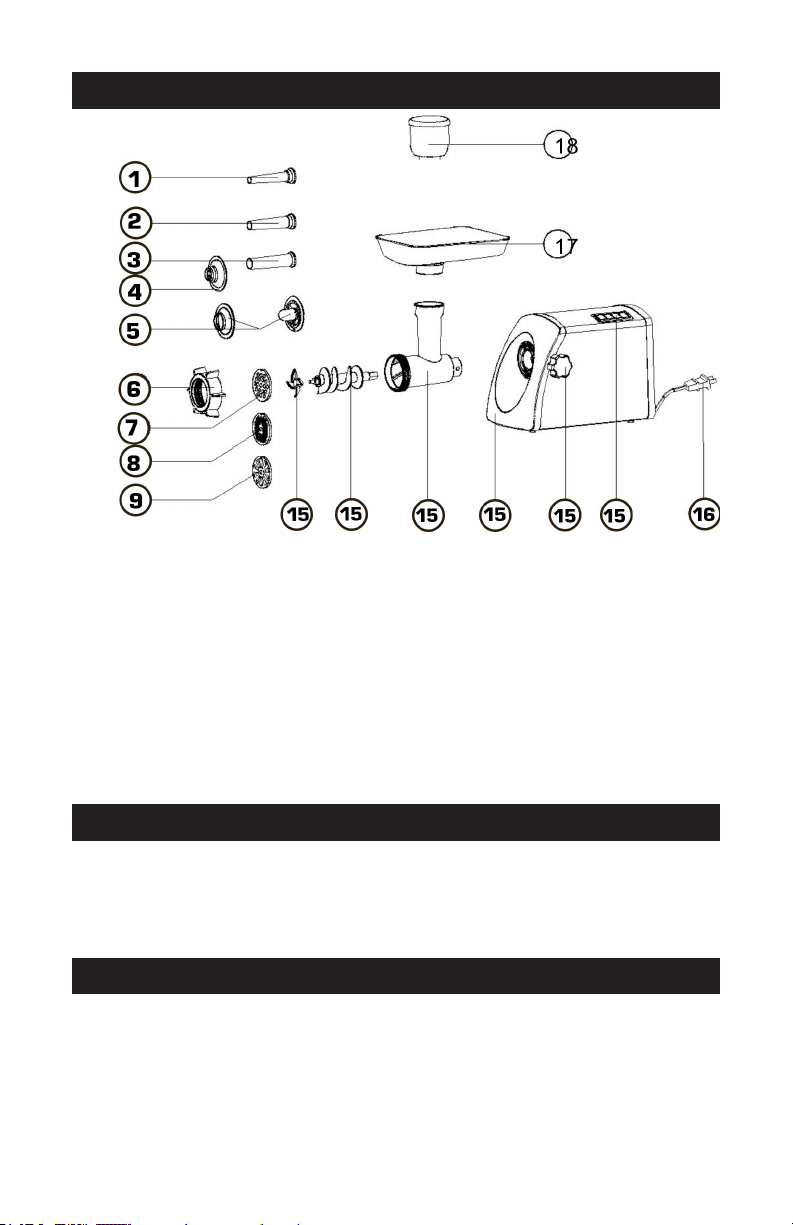
Parts List
1. Food dish 10. Sausage Attachment (Large)
2. Hopper Plate 11. Food Pusher & Attachment Storage
3. Body 12. Grinder Housing
4. Release Button 13. Feed Screw
5. ON/OFF Switch 14. Cutting Plate (Fine)
6. Head Inlet 15. Cutting Plate (Medium)
7. Sausage Attachment (Fitting) 16. Fixing Ring
8. Sausage Attachment (Fine) 17. Cutting Plate (Large)
9. Sausage Attachment (Medium) 18. Cutting Blade
Service
There are no user serviceable parts. Should you experience any
problems with your grinder, please call Eastman Outdoors Customer
Service at 1-800-241-4833.
Unpacking and Before First Use
Carefully unpack the grinder and accessory parts. Wash all parts
except the main housing in warm soapy water, rinse clean, and dry
thoroughly. Do not use any other cleaning chemicals.

5
Precautions While Grinding
Clean the main housing with a wet towel soaked in warm water and do
not use any type of a cleaning chemical on the base.
Main Housing
Your grinder’s Main Housing contains all of the moving mechanical parts
and electrical components so use proper care when cleaning. Make
sure that the Main Housing is unplugged from the outlet before cleaning.
Clean the Main Housing with a damp cloth. Do not use any type of a
cleaning chemical on the Main Housing.
Do not immerse the Main Housing in water or any
other liquid. Failure to follow this warning may
result in electric shock, injury, or even death.
Metal and Plastic Parts of the Grinder
Wash the metal Grinder Housing, Locking Nut, Hopper Plate, Feed
Screw, and Cutting Plate in warm soapy water. Plastic accessories can
be washed in dishwasher - top shelf. All plastic accessories are also to
be washed warm soapy water. Rinse, clean and dry thoroughly. Failure
to dry the metal parts thoroughly may result in rust. To protect against
rust apply a light coat of vegetable oil the cutting blade and to the
cutting plates prior to any length of storage.
The Cutting Plates and Blade are stainless steel and may be washed
in the dishwasher. No other parts should be washed in the dishwasher.
For storage you can apply a light coat of vegetable oil to any or all of the
metal parts.
Follow these safety precautions while using your grinder or while
handling food:
Do not use ngers to scrape food away from
the Cutting Plate(Locking Nut area) while the
appliance is operating. Failure to follow may
result in cut type injuries. Avoid contacting
moving parts. Never feed food into the grinder’s
head by hand. Always use the food pusher.
• Wash hands thoroughly prior to handling any food.
• Make sure all utensils, containers, and countertops are thoroughly
cleaned and disinfected before using.
• Thoroughly clean and disinfect all cutting boards, wooden or plastic
• Before plugging in the grinder, make sure the switch is in the OFF
position
• After grinding, store ground items in refrigerator or freezer.
WARNING
WARNING

6
Precautions While Grinding (cont.)
• Do not grind hard foods such as bones and nuts.
• Do not grind ginger and other materials with hard ber.
• To avoid jamming, do not force to operate the unit with excessive
pressure.
• If the unit jams due to hard materials getting lodged in the Feed Screw
or Cutting Blade, switch off immediately unplug and clean the unit.
CAUTION: When handling raw meat of any kind, clean and disinfect all
tools, and cutting boards before and after use. When using wild game,
freeze the meat for at least 60 days at 0˚F (-18˚C) before preparation
as a precaution against parasites. See FDA safety measures at www.
foodsafety.gov.
Assembling Your Grinder
Make sure that the Main Housing is unplugged
while assembling or disassembling any part of
this appliance. Failure to follow this warning may
result in electric shock, injury, or even death.
To avoid serious injury or death, malfunction or
damage to property use the appliance only for its
intended use and always follow the Instructions.
Quick Start Guide
Grinding Meat
WARNING

7
Stufng Sausages and Hot Dogs
Protecting Metal Parts
Use vegetable or salad oil to lightly coat metal parts. Thoroughly
wash all parts after storage and before use.
1
2
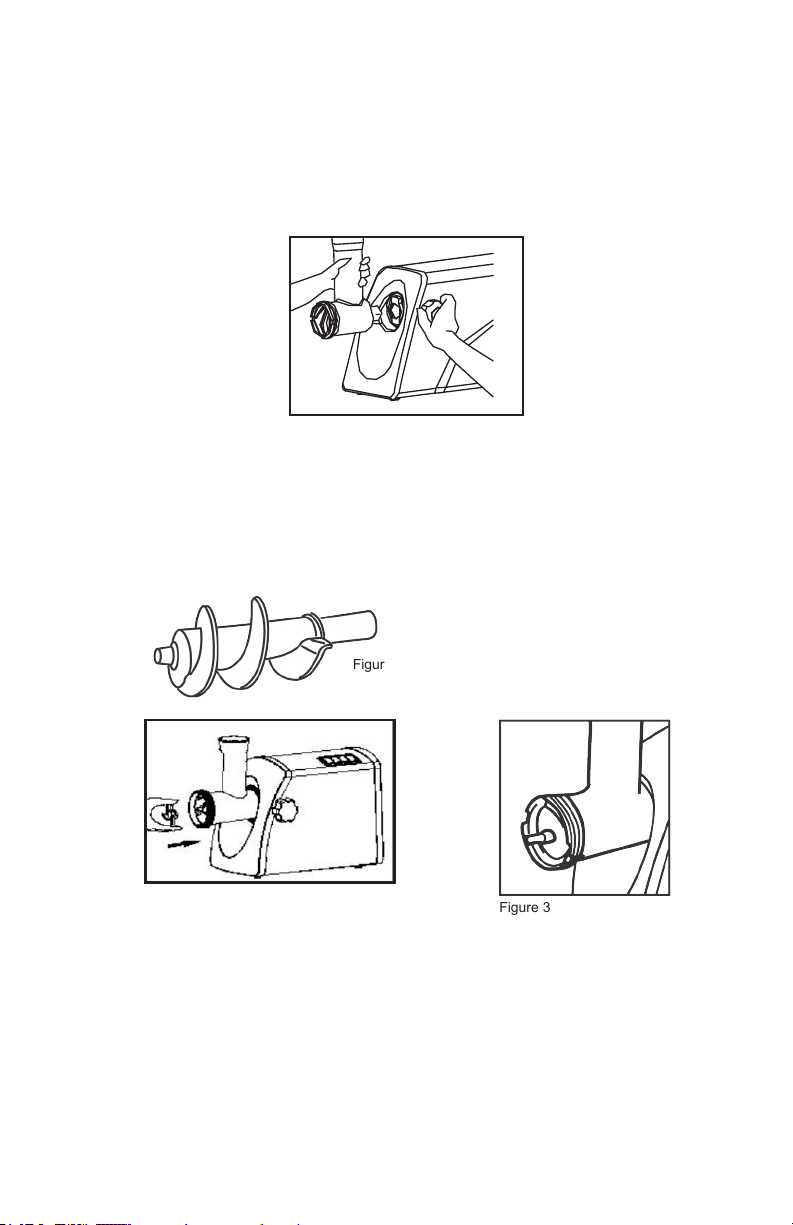
Assemble Grinder Housing to Main Housing
Step 1 - Make sure unit is unplugged and in the off position.
Fully insert the Grinder Housing into the front opening of the Main
Housing. Secure the Grinder Housing to the Main Housing with the
Locking Knob. Rotate the Locking Knob in the clockwise direction to
tighten. Hand tighten only. Do not use a wrench (Figure 1).
Assemble Feed Screw into the Grinder Housing
Insert Feed Screw into the front opening of the Head (Figure 2a and
2b). Insure that the end of the Feed Screw lines up correctly with the
drive shaft inside the Grinder Housing. Once properly lined up the
Feed Screw can be fully pushed into the Grinder Housing (Figure 3).
8
Insert this end of the Feed Screw into
the Grinder Housing
Figure 1
Figure 2a
Figure 2b Figure 3
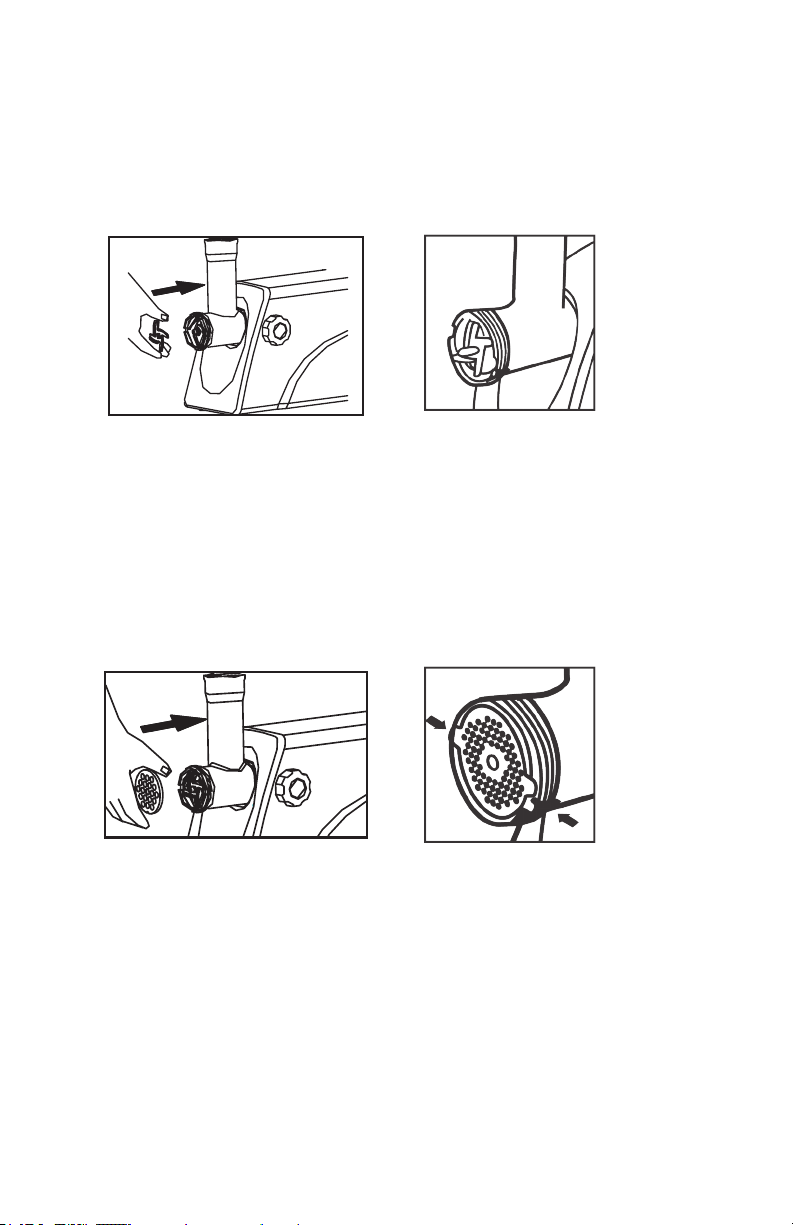
Assemble Cutting Blade to Feed Screw
First orient the Cutting Blade so that the cutting edge (at side of the
Cutting Blade) is facing away from the Feed Screw and then slide the
Cutting Blade onto the Feed Screw. Insure that the square opening
of the Cutting Blade ts over the square shaft of the Feed Screw.
Once properly lined up, the Cutting Blade can be fully pushed onto
the Feed Screw (Figure 4a and 4b).
Assemble Cutting Plate to Grinder Housing
Push the Cutting Plate onto the front opening of the Grinder Housing.
Rotate the plate until the outer tabs line up with the slots in the
Grinder Housing. Once the Cutting Plate is properly lined up, the
Cutting Plate can then be fully pushed onto the Grinder Housing
(Figure 5a and 5b).
Note: Insure that the tabs on the Cutting Plate are properly lined up
with the slots in the Grinder Housing (Figure 5b).
9
Figure 4a
Figure 5a
Figure 4b
Figure 5b
Table of contents
Other Eastman Outdoors Meat Grinder manuals


