eastern WL-1000 User manual


Frqwhqwv
Important safety instruction
Feature
Structure
Connecting Receiver [WL-R1000]
㞏#Connecting surround speaker
㞏#Connecting another amplifier
Basic operation
㞏#POWER ON
㞏#STAND BY ON
㞏#Selecting INPUT
㞏#Adjusting VOLUME
㞏#Selecting AUTO channel
㞏#Selecting MANU channel
㞏#Light on and off for POWER LAMP
....................................................................................................................
..............................................................................
俦
Connecting
俦
俦
Connecting Transmitter [WL-T1000]
㞏#Connecting DVD Player built decoder in
㞏#Conecting 2.1ch
㞏#Connecting 5.1ch sound card
㞏#Conecting 5.1ch amplifier
俦
俦10~12
Specifications ....................................................................................................................
俦13
9
..........................................................................
....................................................................................
..........................................................................................................................
.....................................................................................................
...........................................................................................................
....................................................................................................
.....................................................................................................
..............................................................................................................................
...........................................................................................................................
.........................................................................................................................
....................................................................................................................
............................................................................................................
...........................................................................................................
............................................................................................
10
10
11
11
12
12
12
7
7
8
8
5
5
5
4
4
3
3
9
9
7~8
Function of Remote control
㞏#Function of remote
㞏#Using the Remote Control
㞏#Inserting the Batteries
俦...........................................................................................
......................................................................................................................
...........................................................................................................
.................................................................................................................
5
Index to part & control [WL-R1000 Receiver]
㞏#Front Panel
㞏#Back Panel
俦..................................................................
.................................................................................................................................
.................................................................................................................................
4
Index to part & control [WL-T1000 Receiver]
㞏#Front Panel
㞏#Back Panel
俦..................................................................
.................................................................................................................................
.................................................................................................................................
...........................................................................................
......................................................................................................................................
..................................................................................................................................
3
1
2
2
.............................................................................................................................. 6

Read these instructions.
Keep these instructions.
Heed all warnings.
Follow all instructions.
Do not use this apparatus near water.
Clean only with dry cloth.
Do not block any ventilation openings. Install in accordance with the manufacturer's instructions.
Use only with the cart, stand, tripod, bracket, or table specified by the manufacturer, or
sold with the apparatus. When a cart is used, use caution when moving the
cart/apparatus combination to avoid injury from tip-over.
Unplug this apparatus during lightning storms or when unused for long periods of time.
1
2
3
4
5
6
7
Do not install near any heat sources such as radiators, heat registers, stoves, or other apparatus
(including amplifiers) that produce heat.
8
Do not defeat the safety purpose of the polarized or grounding-type plug. A polarized plug has two
blades with one wider than the other. A grounding type plug has two blades and a third grounding
prong. The wide blade or the third prong are provided for your safety. If the provided plug does not
fit into your outlet. Consult an electrician for replacement of the obsolete outlet.
9
Protect the power cord from being walked on or pinched particularly at plugs, convenience
receptacles, and the point where they exit from the apparatus.
10
Only use attachments/accessories specified by the manufacturer.11
13
Refer all servicing to qualified service personnel. Servicing is required when the apparatus has been
damaged in any way, such as power-supply cord or plug is damaged, liquid has been moisture,
does not operate normally, or has been dropped.
14
The apparatus shall not be exposed to dripping or splashing and that no objects filled with liquids,
such as vases, shall be placed on the apparatus.
15
12
WARNING: TO REDUCE THE RISK OF FIRE OR ELECTRIC SHOCK.
DO NOT EXPOSE THIS APPATATUS TO RAIN OR MOISTURE.
For Pluggable Equipment, the socket outlet shall be installed near the equipment and shall be
easily accessible
THIS SYMBOL IS INTENDED TO ALERT THE USER TO THE PRESENCE OF UNINSULATED
"DANGEROUS VOLTAGE" WITHIN THE PRODUCTS ENCLOSURE THAT MAY BE OF
SUFFICIENT MAGNITUDE TO CONSTITUTE A RISK OF ELECTRIC SHOCK TO PERSONS.
THIS SYMBOL IS INTENDED TO ALERT THE USER TO THE PERSENCE OF INPORTANT
OPERATING AND MAINTENANCE (SERVICING) INSTRUCTIONS IN THE LITERATURE
ACCOMPANYING THE APPLIANCE.
X
Lpsruwdqw#vdihw|#lqvwuxfwlrq

FCC Compliance Statement:
This device complies with part 15 of the FCC Rules. Operation is subject to the following two
conditions: (1) This device may not cause harmful interference, and (2) this device must accept
any interference received, including interference that may cause undesired operation.
CAUTION: Changes or modifications not expressly approved by the manufacturer
responsible for compliance could void the user’s authority to operate the equipment.
Important Note: To comply with FCC RF exposure compliance requirements, the antenna
used for this transmitter must be installed to provide a separation distance of at least 20cm
from alpersons and must not be co-located or operating in conjunction with any other antenna
or transmitter.
European Union Notice
This system has been tested for conformance with CE radio spectral, EMC and safety
requirements.

俦
俦
俦
俦
俦
俦
俦
俦
AFHSS (Adaptive Frequency Hopping Spread Spectrum)
When there is an error or interference during sending data on a channel, which is changed to another
channel immediately then this is very strong method to microwave or wireless LAN.
FEC (Forward Error Correction)
When there is an error or interference during sending data, this system change data immediately so
that people do not notice any mistake during correction.
Functional control
Every function operates at transmitter by remote control.
Short Delay Time (11.2m / sec)
Short delay time can be useful for Home Theater System.
Auto Sleep
Power off automatically if there is no signal during a certain period (AUTO OFF)
AUTO ID Pairing
As soon as powering up both of transmitter and receiver, IDs of transmitter and receiver are made up
automatically not to have any interference from adjacent same equipment.
Auto/Manual selector
During manual function, when there is an interference operating given one of three of fixed channels,
one channel of two channels is fixed manually.
Low input/High input
Low input: connecting for analog output of DVD player or audio output
High input: connecting for speaker output of DVD receiver
WL-T1000
(Transmitter)
1EA
Remote control
(WL-T1000)
1EA
DC 9V adapter
(WL-T1000)
1EA
Batteries
(1.5V "AAA")
2EA
Manual
1EA
WL-R1000
(Receiver)
1EA
Y
Ihdwxuh
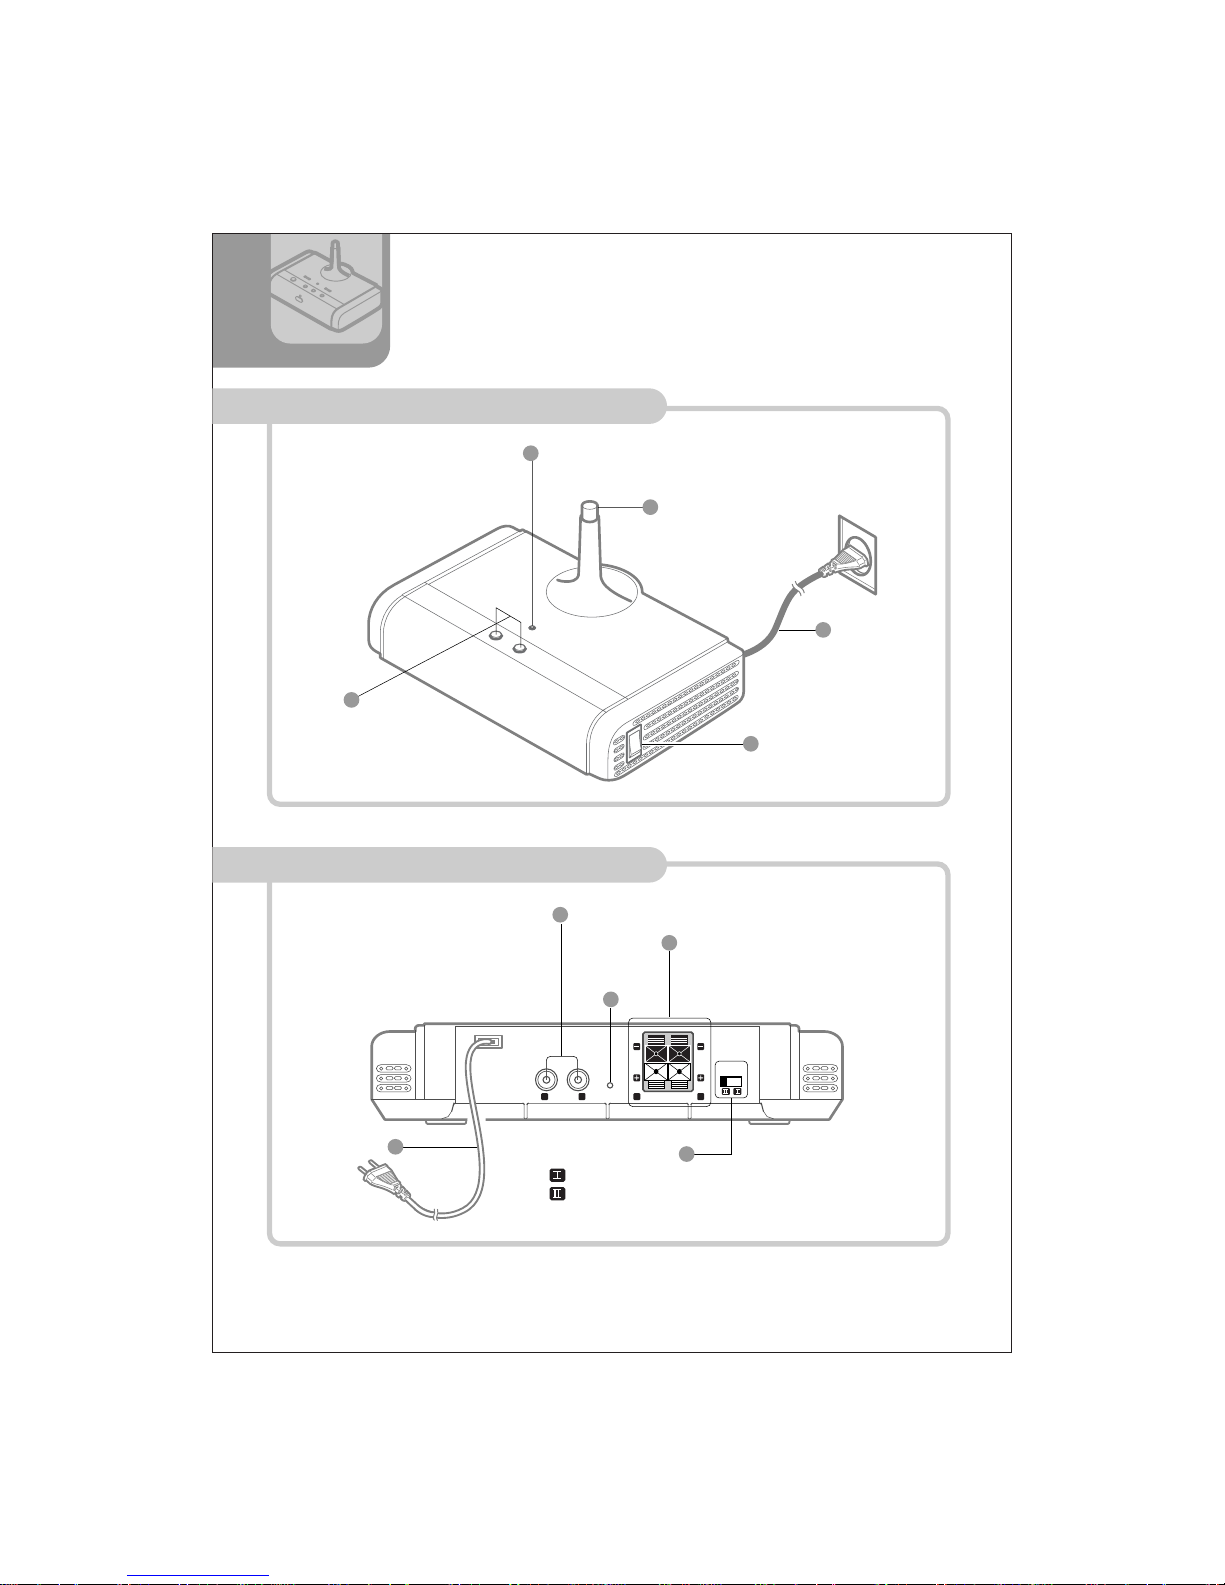
Vwuxfwxuh

OLQN#OHG
AUTO LED
SLEEP LED
STAND BY /
VOLUME 俪/俨
INPUT SELECT
REMOTE CENSOR
KLJK#OHG
SRZHU#ODPS
ORZ#OHG
If there is no signal input over 3 minute or no
power on player connecting to Transmitter, sleep
mode is operating then SLEEP LED turns up.
This set is to Auto channel set-up.
ORZ#LQSXW#
KLJK#LQSXW
UHVHW#
GF#LQSXW
SRZHU#VZLWFK
RQ###RII
SRZHU
Z
㞔Front Panel
㞔Back Panel
Lqgh{#wr#sduwv#dqg#frqwuro#
^#ZO0W4333#Wudqvplwwhu#`
OLQN#OHG
VOLUME 俪/俨
SRZHU#ODPS
SRZHU#VZLWFK
DF#FRUG
I
O
LINE OUT RESET SPEAKER OUTPUTR L L R
DXGLR#RXWSXW
VSHDNHU#RXWSXW
VSHDNHU#ILOWHU
SRZHU#FRUG
[
㞔Front Panel
㞔Back Panel
Lqgh{#wr#sduwv#dqg#frqwuro#
^#ZO0U4333#Uhfhlyhu#`
SPEAKER
FILTER
Set speaker filter ' I ' for connecting 4 ohm speaker
Set speaker filter ' Il ' for connecting 8 ohm speaker

㞔Using the Remote Control
\
㞔Inserting the Batteries
Ixqfwlrq#ri#Uhprwh#Frqwuro
5m
30 30
Open the battery
cover
Insert the batteries
(AAA size)
Close the cover.
Remote control works up to 7m
(23ft) within 30 degree angle.
Point at remote censor to
press
your desired functions.
㞔Function of remote
STAND BY: Stand by on / off
INPUT: input select
L/OFF: Antenna lamp off
L/ON: Antenna lamp on
MANUAL / CH.: Fixed channel set up
AUTO: Auto channel set up
VOLUME: Adjusting volume
STAND BY
L/ ON INPUT L/OFF
MANUAL CH. AUTO
VOLUME
㞖㞘 STAND BY
L /ON INPUT L /OFF
MANUAL CH. AUTO
VOLUME
㞖㞘

ZO0U4333#
Uhfhlyhu
]
Frqqhfwlqj
Vxuurxqg
Ohiw#Vshdnhu
Iurqw#Ohiw
Vshdnhu
Iurqw#Uljkw
Vshdnhu
Fhqwhu
Vshdnhu Vxezrrihu
Vxuurxqg
Uljkw#Vshdnhu
ZO0W4333
Wudqvplwwhu
GYG#Uhfhlyhu
㞏#The distance of Tx and Rx for best performance is 4m to 6m.
㞏#The position of Tx and Rx for best performance is the same height and the same line.
㞏#No hindrance between Tx and Rx makes you the best performance.
㞏#The socket-outlet shall be installed near the equipment and shall be easily accessible.
㞏#Keep away from microwave and LAN to avoid audio drop out.
NOTE

S/R
S/L
F/R
F/L
CEN.
WOO.
GYG#Sod|hu
OUT-PUT
Wudqvplwwhu#
^ZO0W4333`
Dgdswhu
Dgdswhu
俦#Connecting DVD Player built decoder in.
俦#Frqqhfwlqj#514FK
Frqqhfwlqj#Wudqvplwwhu#^ZO0W4333`
1. Connect DC 9V adapter to DC input jack on the back of WL-T1000.
2. Plug in DC 9V adapter connecting WL-T1000.
3. Connect LOW-INPUT to surround out jack of DVD player.
L
R
AUDIO OUT
1. Connect DC 9V adapter to DC input jack on the back of WL-T1000.
2. Plug in DC 9V adapter connecting WL-T1000.
3. Connect LOW-INPUT to audio out jack of DVD player.
^
㞏#Refer to the instruction manual of each component to be connected.
NOTE
Wudqvplwwhu#
^ZO0W4333`
GYG#Sod|hu
This manual suits for next models
2
Table of contents
Popular Microphone System manuals by other brands


Sennheiser
Sennheiser Evolution Wireless Digital EW-DX EM 2 quick guide

Alpha Technologies
Alpha Technologies RBMS Installation & operation manual

SWIT Electronics Co.,LTD.
SWIT Electronics Co.,LTD. CW-S150 user manual

Shure
Shure UA844 user guide

Panasonic
Panasonic SHFX70 - DVD HOME THEATER WIRELESS SYSTEM operating instructions

Pyle
Pyle PDWM5000 user manual