DZOFILM 20-70 T2.9 User manual

LingLung系列电影镜头使用说明书
Linglung Cinema Lens
Users’ Manual
10-24 T2.9
20-70 T2.9
www.dzofilm.com

Introduction
Linglung series lenses are the products of DZOFILM for M4/3
cameras.
Thank you for your purchase of this product. Be sure that you have
read this manual and understood its content before using the camera.
Keep the manual where it will be read by all who use the product.
For repair, inspection and internal test, please contact your
DZOFILM dealer.
Make sure that you use the lens correctly. Read the Manual
carefully before use.
● When using a lens hood, do not pick up or hold the camera using
only the hood.
● Use a blower to remove dust and lint from the glass surfaces of the
lens or filter. To remove smudges and fingerprints, apply a small
amount of lens cleaner to a soft, clean cotton cloth or lens-cleaning
tissue and clean from the center outwards using a circular motion. Do
not leave smears or touch the glass with your finger.
● Never use organic solvents such as paint thinner or benzene to
clean the lens.
● Attach the front and rear caps when the lens is not in use.
● Store the lens and filter in cool, dry locations to prevent mold and
rust. Do not store in direct sunlight or with naphtha or camphor moth
balls.
● Please keep the lens dry and wipe the water droplets off if there are
droplets on the glass surface.
● Leaving the lens near heater or in other extremely hot locations
could cause damage or warping.
● There may be a case that the glasses of the lens mist when the lens
is carried from a cool place to a high temperature and high humidity.
To avoid a mist on the glasses, before using the lens, let the lens
adjust to the ambient temperature of the place where the lens will be
used.
Product Care
Supplied Accessories
Front lens cap *1 Rear lens cap *1 Supporting rod *1
Supporting base *1 set ( including 2 bridge rods and 2 extension rods)
Zoom lever socket *1 (removable) Users' Manual *1
Quality Card *1 Desiccant *1
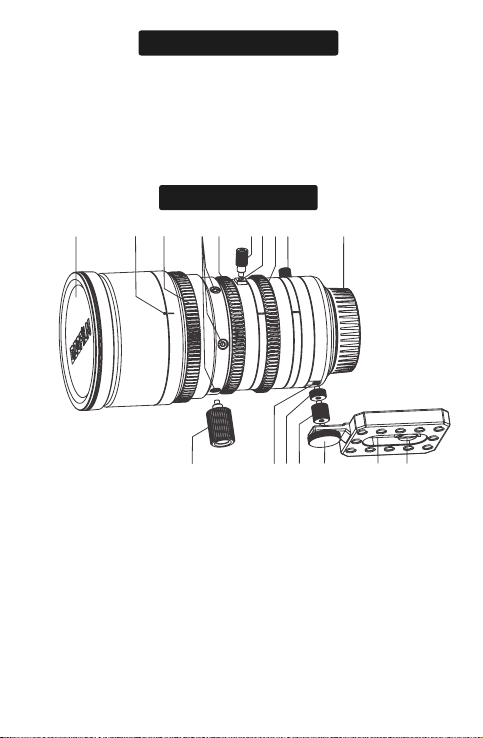
Parts of the Lens
❿❾❽❻❼❶ ❷ ❸ ❹ ❺
⓫⓬⓭⓮⓯⓰⓱
❶ Front lens cap
❷ Lens index
❸ Focus ring
❹ Service tap sockets *6
(M3, depth 4.5mm)
❺ Zoom ring
❻ Zoom lever
❼ Zoom lever socket
(M3, depth 3.5mm)
❽ Aperture ring
❾ F.f(flange focus) ring with lock knob
❿ Rear lens cap
⓫ Screws of supporting base
⓬ Supporting base
⓭ Back supporting rod
⓮ Bridge rod (long)
⓯ Bridge rod (short)
⓰ Rear supporting rod socket
(M3, depth 4mm)
⓱ Front supporting rod

Attach the Lens to the Camera
Remove the body cap from the camera and the rear cap from the
lens. Place the lens on the mount, keeping the marks on the lens and
the camera aligned, and then rotate the lens until it clicks into place.
Note that in some cases there may not be a mounting mark on the
camera body.
When attaching the lens, ensure that dust or other foreign matter
does not enter the camera and be careful not to touch the camera’s
internal parts. Do not press the lens release button while attaching
the lens and be sure the latch has securely clicked into place.
As M4/3 mount is not an active locking structure and thus it could
be loose on the connection between camera and lens. To guarantee
the shooting effect, this lens is equipped with two kinds of
supporting methods. They are supporting rod on the front of the lens
body, and the supporting base near the lens mount. When using
camera cages, front supporting rod is recommended to fix lens and
camera.
Rear supporting base is recommended to use when there is no
camera cage. Attach supporting rod of the base to the camera and
screw it into the socket in the rear lens body. This can strengthen the
stability between lens and camera.
Every lens is equipped with two extension rods to satisfy different
cameras. Use extension rods if the bridge rod is not long enough.
Before using the lens for the first time or after attaching it to a
different camera, measure the flange-back distance.
Attaching the Zoom Lever and Bridge/ Extension Rods
Demonstration of Supporting Rod/ Base

Linglung series lenses will all go through flange back adjustment
based on M4/3 standard before shipping, but flange back distance
can vary depending on the camera and even such factors as the
ambient temperature. If the flange back distance is incorrect, the
camera will not focus at the correct distance. Linglung series has fast
adjustment structure which is placed aperture ring and lens mount.
Lens Control
Use the lens controls to zoom in to zoom out, adjust aperture or focus.
Focus
Rotate the focus ring to increase or
decrease the focus distance.
Adjusting the Flange Back Distance
Focus ring
Zoom ring
Zoom
Rotate the zoom ring to zoom out,
increasing the area visible in the
frame or zoom in on the subject so
that it fills a larger area in the frame.
Fange back adjusting ring
Flange Back Adjustment
Rotate flange back adjusting ring,
increasing or decreasing the flange
back distance
Aperture ring
Aperture
Rotate the aperture ring to stop
aperture down, raising the f-number
and narrowing the aperture, or lower
the f-number to widen the aperture.

To correct the flange back distance, please follow the steps below.
1、Ready your subject. You can use a “Siemens Star”, a pattern
of black-and-white radiating spokes available on the internet.
Download and print it.
2、Attach the lens to the camera
3、Select the maximum aperture
4、Zoom all the way out.
5、Rotate the focus ring to focus on the Siemens star. Find the
position at which the black-and-white spokes are sharpest.
6、Zoom all the way in.
7、Rotate flange back adjusting ring to reserve compensatory
adjustment on focus until the intersection point is at the sharpest.
8、Repeat steps 3-7 two or three times. The adjustment is
complete when the optimal focus position is the same at all focal
lengths; if it’s not, further adjustment is required.
9、Tighten the F.f lock knob securely when the adjustment is
complete. Theoretically flange back distance requires to adjust after
changing to a different camera.

*Improvements may result in unannounced changed on specification and appearance.
Owing to how this lens is constructed the distance shown by the camera focus distance
indicator (distance indicator)may in some cases differ from the actual focus distance. (Use
the “distance indicator”as a guide only).
Specification
Specifications 20-70 10-24
Focal length
20-70 mm 10-24 mm
M4/3 mount M4/3 mount
Zoom ratio
Minimum T-stop
3.5X 2.4X
T2.9 T2.9
Aperture range
Frame size
Flange back(in air)
Minimum object distance
(from focal plane)
T2.9-T22 T2.9-T22
17.31 mm*12.98 mm(φ21.6 mm) 17.31 mm*12.98 mm(φ21.6 mm)
aspect ratio 1.33:1 aspect ratio 1.33:1
19.2mm(adjustable by±0.3mm) 19.2mm(adjustable by±0.3mm)
0.79m/2ft7in. 0.5m/1ft8in
20mm:568 mm*429 mm
70mm:162 mm*122 mm
10mm:608 mm*456 mm
24mm:268 mm*201 mm
Effective lens diameter
Front element
Rear element
53.0 mm
25.8 mm
57.0 mm
25.8 mm
Aperture control
Manual(ring rotates up to 72°)
Manual(ring rotates up to 100°)
Manual(ring rotates up to 270°)
Manual(ring rotates up to 60°)
Manual(ring rotates up to 100°)
Manual(ring rotates up to 270°)
Zoom control
Focus contorl
φ82.0*153.3mm φ82.0*150.9mm
1100g 1100g
External diameter
at front of lens
80 mm 80 mm
Filter diameter
Gear pitch
(aperture,zoom,and focus)
Number of blades
External dimensions:
diameter*length(approx.)
Weight
(approx.,excluding
lens cap and bridge rods)
77 mm
0.8 M 0.8 M
12 12
Vertical
Horizonal
Diagonal
Area photographed at
close focus distance
Lens mount
47.5°-14.3°
36.5°-10.8°
57.6°-17.9°
79.7°-40.33°
64.1°-30.8°
92.5°-49.3°
Angle of view

Repairs
Return the product to the point of purchase for repairs. Please
note that we reserve the right to refuse service in the event of
damage so severe that there is little hope of function being restored,
whether said damage is caused by physical shocks, immersion in
sand, mud, or water or the like.
Warranty service
Should the product malfunction in the course of normal use as set
forth in the users’ manual and accompanying documentation, it may
Repair and Maintenance
Appearence
20-70
10-24

be returned to
the point of purchase for repairs within warranty
period. The owner is responsible for all shipping costs. The warranty
period varies with the country or region of purchase. Stored dated
receipts or other proof of purchase in a safe place, as it will be
required for repairs made under warranty.
Service Outside the Warranty Period
Request for service will normally be accepted within a period of
roughly 5 years following the end of production, during which time
spares will be kept on hand, although owners may be offered an
equivalent product during this period in the event that spares are not
available. Compatibility with consumables and accessories for the
original product is not guaranteed. To prevent waste, repairs or
replacement may be made using refurbished parts or products, and
DZOFILM may collect returned parts or products for later use. When
returning a product for repair, please let us know if you need the
original parts.
Privacy
DZOFILM obeys all applicable laws and regulations concerning the
handling of names, addresses, phone numbers, and other personal
information provided by users.

简介
LingLung系列是DZOFILM旗下M4/3画幅产品。
感谢您购买本产品。在使用之前,请详细阅读并理解本手册内容,阅读完
后,请妥善保管手册,以随时查阅。
有关维修、检查和内部测试的信息,请与DZOFILM当地经销商联系。
请确保正确使用镜头,请在使用前仔细阅读手册,特别是安全注意事项。
● 若使用镜头遮光罩,拿起摄影机时,切勿通过遮光罩受力;
● 请使用吹气球去除镜头或滤镜玻璃表面的灰尘,若要去除污点和指纹,可
使用一块滴有少许镜头清洁剂的干净软绵布或镜头清洁纸,以圆周运动方式
从里向外进行清洁,注意不要留下污渍,也不要用手指触摸玻璃;
● 切勿使用涂料稀释剂或苯等有机溶剂清洁镜头;
● 不使用镜头时,请盖上镜头前后盖;
● 为防止发霉,请将镜头和滤镜存放在阴凉、干燥的地方,切不可存放在直
射阳光下,也不要与石脑油或樟脑丸放一起;
● 保持镜头干燥,如受潮或有水滴请擦拭干净;
● 勿将镜头放置在加热器旁或其他极其炎热的地方,否则可能导致损坏或变
形;
● 将镜头从寒冷的地方拿到温度和湿度较高的地方时,镜头的玻璃镜片上可
能会产生雾气,为避免雾气,使用镜头前,请先让镜头适应使用环境。
镜头前盖1个 镜头后盖1个 镜头前支撑螺杆1个 镜头后支撑底座1
套(含2个固定螺丝,长短桥接杆各1个) 变焦杆螺钉1个(可拆卸)
说明书1份 保修卡1份 干燥剂1包
产品保养
附带配件
This manual suits for next models
1
Table of contents
Other DZOFILM Lens manuals


Popular Lens manuals by other brands


Tamron
Tamron SP 70-300mm F/4-56 Di VC USD Brochure & specs

FujiFilm
FujiFilm FUJINON ZA17x7.6BERD-S6 Operation manual

Panasonic
Panasonic VW-W4907 operating instructions

Navitar
Navitar 1-51332 Dimensional drawing

Leica
Leica APO-SUMMICRON-SL 1:2/50 ASPH. instructions

Sony
Sony LKRL-Z200 Series Product information

 4.5/55 Operation manual")


