Dvico FusionHDTV User manual

FusionHDTV
1Before Getting Started ...............................................................................2
1.1 FusionHDTV Specification.......................................................................................................... 2
1.2 FusionHDTV System Requirements........................................................................................... 4
1.3 Package contents....................................................................................................................... 5
2Software Installation...................................................................................6
2.1 Installing FusionHDTV Applications............................................................................................ 6
2.2 Driver installation.......................................................................................................................11
3Hardware Installation ...............................................................................14
3.1 About the Board........................................................................................................................ 14
3.2 Before Installation PCI card...................................................................................................... 16
3.3 Connecting Power UP cable..................................................................................................... 17
3.4 PCI Board Installation............................................................................................................... 18
3.5 Remote Installation................................................................................................................... 19
4Using FusionHDTV...................................................................................20
4.1 Starting and Quitting................................................................................................................. 20
4.2 Display setup............................................................................................................................ 20
4.3 Using FusionRemote................................................................................................................ 24
4.4 FusionHDTV Shortcut Key ....................................................................................................... 25
5Technical Support ....................................................................................26

All specifications and information are subject to changes without further notices 2
1 Before Getting Started
1.1 FusionHDTV Specification
A Highly cost effective reception card
You can enjoy HDTV at quite a low price due to Dvico’s innovative HDTV software decoding engine.
Unrivaled crystal-clear picture quality
FusionHDTV provides up to 5 times higher resolution when compared to analog TV, and provides
crisp and crystal-clear picture quality to a PC screen.
Good picture quality on LCD or low-resolution monitor
FusionHDTV shows excellent and super-clear on HDTV screens and even on LCD TV’s and low
resolution CRT due to Dvico’s proprietary decoding engine.
Great system compatibility
FusionHDTV is compatible with most video cards and motherboards. FusionHDTV works on any
recent VGA cards including Nvidia MX series or later chipsets, as well as ATI Radeon chipsets. It
works quite well on Intel, VIA, SIS, and other motherboard chipsets. Minimum system requirements
are Pentium 4 1.6G and DDR266 memory (or RDRAM memory), or AMD’s Athlon™ XP 1600+ or
faster processor, if you don’t have the ATI Radeon VGA card. Pentium 3 1Ghz or faster will be enough
if you have an ATI Radeon card.
Recording and playback of the HDTV stream
You can record live HDTV broadcasting streams to a PC and play them back anytime you want. You
can select the single sub-channel or whole stream recording when you hit recording button.
Using the most recent tuner
FusionHDTV uses the most recent tuner to get the best reception rate, so you can get the un-interrupted
and stable HDTV screen
Supports all the formats of Australian AS4933 spec of Australian AS4933 spec
FusionHDTV supports All digital terrestrial channels, so you will have the ability to receive all the
channels available to you at your location.
ATSC 8VSB/64QAM/256QAM reception support
FusionHDTV works either with free to air digital TV(8VSB) and unencrypted digital cable TV(QAM)
broadcasting channels. So you will have the ability to receive all the channels available to you at your
location.
Support analog Video Signal Capture
You can Captures analog video signal (Composite and SVHS) and convert it to VCD/ SVCD/ DVD
format. This feature cannot be supported depending on product.
AC3 audio output
FusionHDTV provides AC3 audio decoding, which is the standard format of ATSC or DVB-T. It can also
bypass the AC3 audio to digital output to connect AV amplifier.
Supports S/PDIF audio output thru sound card
It can bypass the audio to digital output and connect directly to anAV amplifier.
High resolution still capture
FusionHDTV provides high resolution still screen capturing capability in live playback as well as file

All specifications and information are subject to changes without further notices 3
playback mode.
Cut-on-the-fly feature – Cut the transport stream files
You can cut out the wanted scenes from the captured file and reconstruct the Digital clip.
Supports sub-channel
Sub channel is listed up in sub channel play list and can be selected with channel up/down button or
mouse selection in sub channel play list.
Second language
Supports the second language function in digital broadcasting.
Supports screen saver off.
Screen saver is off while FusionHDTV runs.
Supports AAC audio decoding
TS file clips and DVHS with AAC audio can be played directly in FusionHDTV.
Supports the Favorite List
You can add your favorite programs into favorite list before watching them.
HD-to-DVD or Xvid format conversion
HD clips can be converted to MPEG2, DVD files or DivX format using FusionConverter tool.
Supports DVB-T Teletext and subtitle
You can show the real time teletext browser and subtitle.
Supports True HD Time Shifting
FusionHDTV provides the various file playback functions just like live TV mode. That is, pause/ instant
replay/ time-shifting by scroll bar/ fast-forward/ fast-rewind.
Being interrupted while watching live TV programs (such as pick up phone calls & answer the door), all
you need to do is simply press the Pause button and freeze the picture for a period of time, and then
pick up right where you left off.
The FF/REW Function is available Windows XP Service Pack 2 or above
Supports PIP (Picture in Picture)
The FusionHDTV is like having two TVs in one! With the Picture in Picture (PIP) function you can now
watch two of your favorite programs all on a single screen.
Supports Multi-View
You can see all sub channel video on the single video screen.
- This function is available under Windows XP or higher to be installed.
- The multi-View function is available without Time-shifting or analog channel.
- When the Fullscreen mode, this function doesn't work at this moment.
Supports Power up function
FusionHDTV is available the Power Up function.
Turn ON or OFF your PC like you do your TV. With multifunctional remote control you will be able to
boot your PC from a distance. Not only does it provide perfect control of all HDTV functions you will also
be able to control Windows MCE 2005 and many other application programs with this multifunctional
remote control.

All specifications and information are subject to changes without further notices 4
1.2 FusionHDTV System Requirements
System requirements for FusionHDTV are as follows
* The Specification or Input/Output may differ with the product.
<Input/Output>
One TV antenna reception port
One inside stereo connection jack to sound card for VIDEO
S-Video IN, Composite IN
<DxVA VGAs>
Pentium3 800MHz or faster with 128M memory
Celeron 900Mhz or faster with 128M memory
GeForce4 MX420,440,Fx5200,5600 Series or late all models.
Pentium M 1.4GHz or faster for notebook PC
All ATI Radeon series VGAs
Windows 2000/XP/MCE 2005/Vista 32bit/Vista 64bit
: FusionHDTV DVB-T Dual Digital4 is not supported under windows 2000
Ultra-DMA66 enabled main board and HDD for recording
<nonDxVA VGAs>
Pentium4 1.6GHz or faster with 128M memory
All Nvidia MX series VGAs and ATI Radeon series VGAs
All Matrox series VGAs
DDR266 or faster memory
Windows 2000/XP/MCE 2005/Vista 32bit/Vista 64bit
: FusionHDTV DVB-T Dual Digital4 is not supported under windows 2000.
Ultra-DMA66 enabled main board and HDD for recording
<Remote control booting>
FusionHDTV is available the Remote control booting function.
Turn ON or OFF your PC like you do your TV.

All specifications and information are subject to changes without further notices 5
1.3 Package contents
The FusionHDTV package contains the following items. Some packages may change depending on other
conditions.
①FusionHDTV card
②Setup CD
③Manual
④Internal cable to sound card for External output Audio (7 RT GOLD/DVB-T pro only)
[ Fusion Remote ]
* FusionHDTV remote transceiver is basic option.
①FusionHDTV transceiver
②IR Remote Receiver
③Converting cable for IR receiver and external input.( Not support the Dual Digital4)
1 2 3
1 2 3 4

All specifications and information are subject to changes without further notices 6
2 Software Installation
Most likely there will be an updated version of the files on our web site.
Please check the site (http://www.FusionHDTV.co.kr/Eng) before you install the software included in the CD.
2.1 Installing FusionHDTV Applications
Insert FusionHDTV Installation CD into the CD-ROM drive. The setup window will automatically pop up. if
you downloaded the recent version on DVICO’s website, please run install.exe or setup.exe.
2.1.1 Uninstall Drivers
1) When you select Uninstall Driver in the menu on the FusionHDTV INSTALLER program, Select
your FusionHDTV board type.
2) It will remove all the old drivers previously installed.
3) When all the drives are removed, you will see following message.

All specifications and information are subject to changes without further notices 7
2.1.2 Installing FusionHDTV Software
Important: Installation on Windows 2000 Professional or Windows XP
Before you install FusionHDTV software, be sure that you logged on as an account with
Administrator privileges.
1) Select “Install FusionHDTV”.
2) At the FusionHDTV Installation dialog
opens, click on the “Next>” button.
3) The “Choose Destination Location”
window will appear. Click on “Next” if
you want to install the FusionHDTV in
the default directory. Otherwise, you
can choose a different directory by
clicking on “Browse”.
4) Press “Next” on the Destination
Folder selection window.

All specifications and information are subject to changes without further notices 8
5) The “Setup status” window will appear.
6) Choose your country, then click “OK”. If your System is
Korean, This step is skipped. You have to run the ‘Select
Country’ on the Start-program-DVICO-FusionHDTV and then
scan the channel.
7) PC specification selection windows will
appear. Please select the appropriate
system. You can change the mode after
installation with configuration menu of
the application program. You do not
need to reinstall the program with
different options. Vista OS skips this step.
8) Select your FusionHDTV card, and Press
‘Install Driver’ to install latest drivers. This
selector may differ to country selection.

All specifications and information are subject to changes without further notices 9
9) The Driver Installer appears. Press
‘Next’.
10) If you connect 2 card or above, Press “YES”
and then re-install another driver, but if you
have 2 same card, you may press “NO”.
11) Press “Continue Anyway” for the digital signature message.
12) Following message indicates the completion of the setup.
13) By clicking the Finish button, the
software installation is done.
14) When you reboot, the system will
ask for the 3(2) drivers. Please click
“Yes” when the digital signature
window appears.
<Notes>
In certain cases, Windows will ask for the .sys files. You can locate the sys files in the C:\Program
Files\DVICO\FusionHDTV\driver or C:\Windows\System32\Drivers folder.
All specifications and information are subject to changes without further notices 10
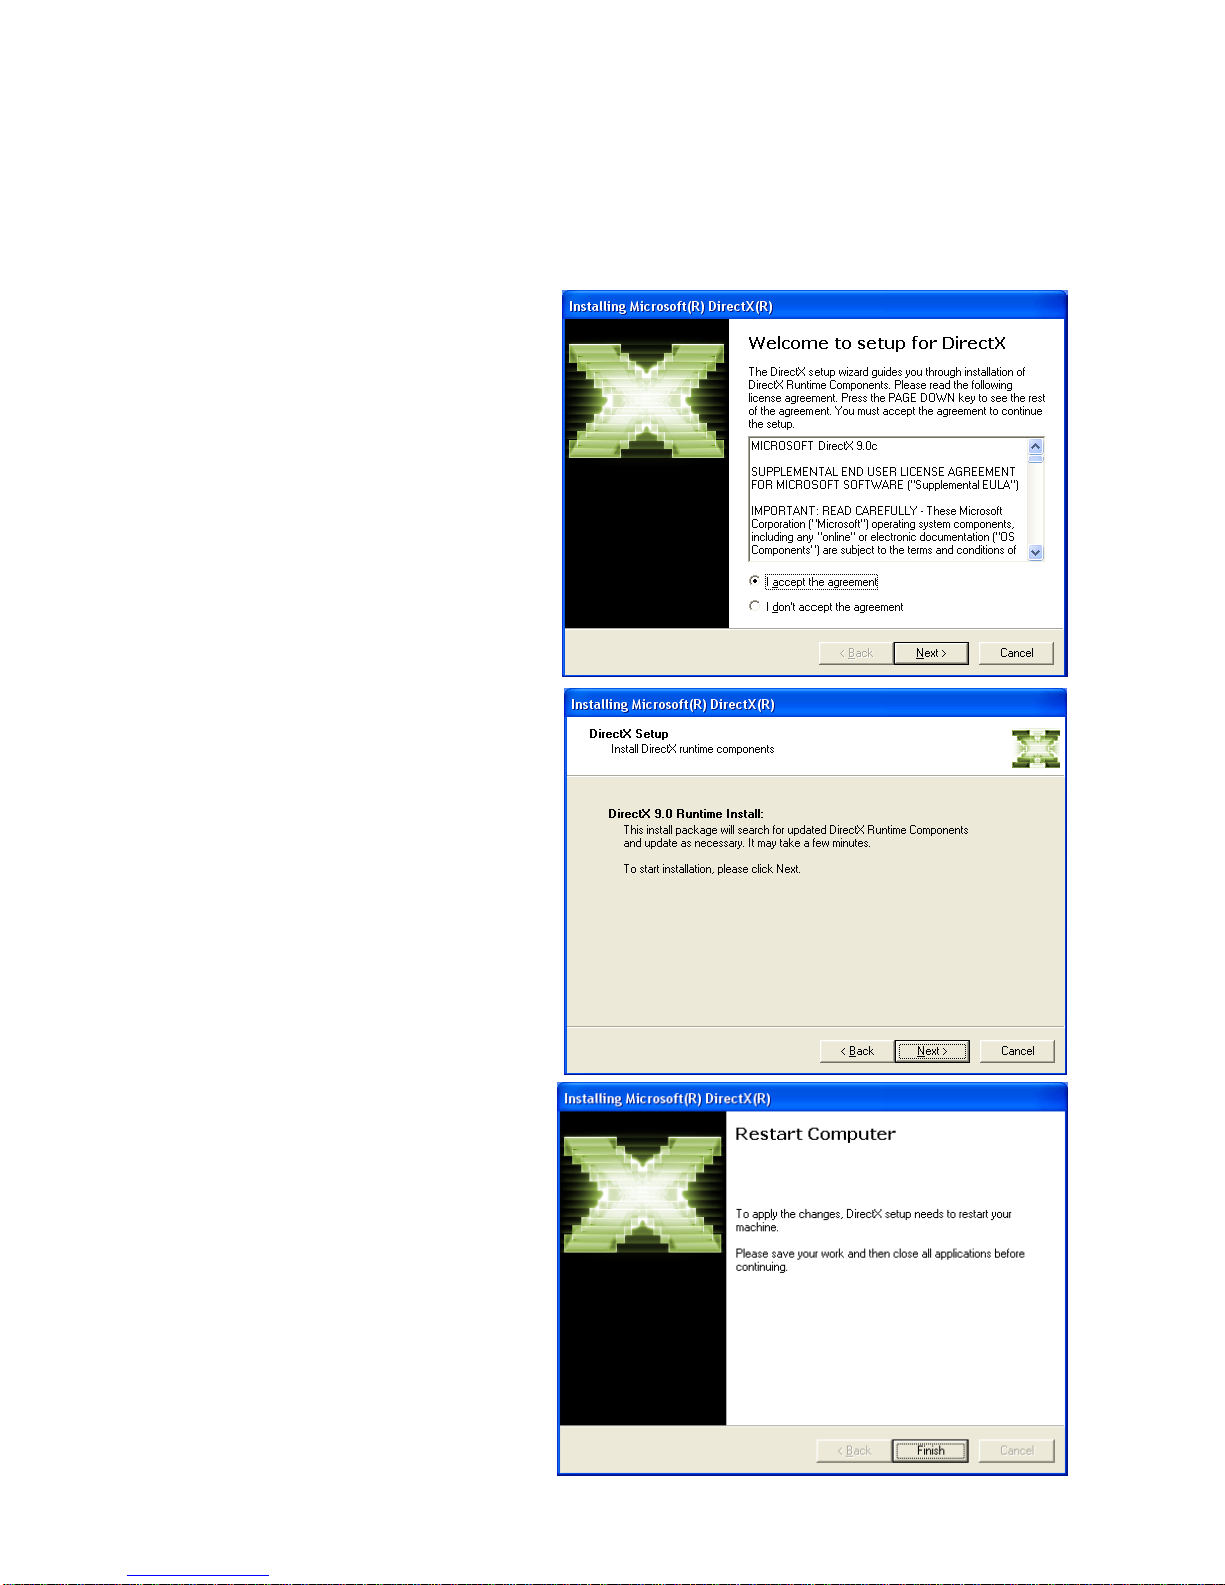
2.1.3 Installing Microsoft DirectX 9
Important! Installing on Windows 2000 Professional or Windows XP
You can check the version of DirectX by typing “dxdiag” on the command line which appears with
menu selection “start->run”
If you have DirectX 9 or later already, you
do not need to install DirectX 9 again.
1) Run ‘Install.exe’ and then select
“Install Direct 9”.
2) Read the License Agreement
carefully and check “I accept the
agreement” and then click on “Next” if
you agree.
3) To start installing of DirectX 9.0
Runtime, click on “Next”.
Tip If there is a DirectX already installed
in the system, a different window will show up
instead of the one above.
4) Click on “Finish” to restart system
and complete installation of the
DirectX.
Other manuals for FusionHDTV
1
Table of contents
Other Dvico PCI Card manuals

Popular PCI Card manuals by other brands


Conrad Electronic
Conrad Electronic 97 46 71 operating instructions

Micro Innovations
Micro Innovations USB650A Quick installation guide

KTI Networks
KTI Networks KF-310 user guide

Asus
Asus SpaceLink WL230 user manual

SIIG
SIIG SC2475 Quick installation guide

TRENDnet
TRENDnet TEW-703PI Quick installation guide


