
Donner PODSOLER PC-02 User manual

Donner Podcast Workstation PC-02
User Manual
Thank you for choosing Donner Podsoler All-in-One Podcast Workstation PC-02!
Please read this instruction manual carefully before using this product.
Be sure to save these instructions for future reference.
Introduction
Donner PODSOLER is an all-in-one podcast workstation designed for live streaming &
content creators. With the innovative exclusive algorithm and 4 XLR Mic inputs, it supports
up to four podcasters to record the program at the same time. Combined with the available
motor faders and independently controlled monitors for a better podcast experience. It also
comes with 9 customized programmable pads for instant playback of 10 sound effects and
samples, which get more fun. Furthermore, a quick connection to the phone, USB, and
Bluetooth sources is provided. Podcasts can be recorded directly to a micro SD card, or to
PC/MAC via USB. A more professional podcast workstation is assured and suited to create
multiple application scenarios: Live streaming, band performances, talk shows, gaming, and
music shows.
Important Safety Instructions
●Please use the AC adapter which supplies 12V DC by this product.
●To prevent fire or shock hazard, do not expose this appliance to rain or moisture.
●Please turn off the power supply and pull out the power cord when the product is not in
use for an extended period of time.
●Make sure that the power is off when connecting or cutting off the power cord.
●Do not place the product near the strong magnetic field.
●Please do not disassemble or modify this product so as to avoid the danger of fire and
electric shock.
●Do not store it in the following environments: Direct sunlight, high temperature, excessive
humidity, excessive dust, and strong vibration.
●Do not clean the product with thinners, alcohol, or similar chemicals to avoid
discoloration.
●Donner is not responsible for damage caused by improper use or modifications to the
device.

Features
●Integrated all-in-one podcast solution
● …
●Microphone/Instrument inputs come with four XLR connectors and built-in Preamp with
50dB gain.
●Stereo high-quality headphone outputs with four 6.35mm jacks and support high
impedance headphones.
●Industry-leading Audio Interface solution: sampling rate XXX, signal to noise ratio XXX,
providing first-class sound quality.
●Adopted Donner’s exclusive algorithm
●Equipped with four individual microphone inputs to meet the needs of professional
singing, performance, and speech.
● …
●Comes with 27 (9 x 3 Banks) customized programmable pads, illuminated pads that can
be triggered during a podcast production, and flexibly assigned new samples when you
want to add content.
●Support multi-track recording direct to unit’s MicroSD card that allows meeting the needs
of the interview, dubbing, band recording, and so on.
Included Items
Donner Podsoler x 1
Power Adapter x 1
USB-C Cable x 1
32GB MicroSD Card x 1
User Manual x 1

Name of Parts
Front Panel
① Phones Knob 1-4
Adjust the output levels of headphones.
Press the knob to select the headphone channel and balance the volume of each channel.
② Motor Fader 1-4
Adjust the volume of each channel.
The fader will display the volume of the main output in the mixer mode
The fader will display the volume of the headphone sending volume of each channel in the
monitor mode.
The E channel will display the volume of the sampler by default.
③ Solo/Mute
Press to solo/mute the signal input on that channel.
④
⑤ Sample Pad (Sound Pad)
Press to trigger the preset sound effects.
Users can flexibly record new samples according to the requirements.
⑥ Sample Group Select
Press to switch the sample group.
⑦
⑧ Display Screen

Display input level, main output level, and status parameter of each channel
⑨ Mixer Button
Press to display the mixer setting on the screen.
⑩ Select Button
Press to select the channel in the mixer display.
Press to switch the main channel (4-channel analog mono input) and sub-channel (4-
channel stereo external input)
11. Effect Button
Press to enter select effects. Use the Value knob to select or turn on/off the effect units. The
effect name will be lighted if the effect is turned on.
12. Sampler Button
Press to enter the sampler setting.
13. BT
Press to turn on/off the Bluetooth. Press and hold for pairing devices.
14. Record Button
Press to start/pause the recording. Press and hold to stop recording and exporting audio to
(SD 卡?)
15. Play Button
Press to play/pause the recorded audio. Press and hold to stop playing audio.
16. System Button
Press to enter the system setting.
17. Main Knob
Adjust the output levels of the main out
18. Value Knob
Rotating for selecting the menu and adjusting the parameters.
Pressing for confirming the selection.

Rear Panel
① Power Supply and Power Button
Press the power button to turn the unit off.
② MicroSD Slot
MicroSD slot for direct recording.
③ Game Optical Port
Optical port for connecting the PS4/Xbox devices.
④ USB-C Port
Use this to connect the PC/MAC/IOS/Android devices.
⑤ Main Out for Headphones (耳机?)
Main volume output for connecting the headphones. (接口是 TRS 6.3mm?)
⑥ Main Out for TRS Balanced L/R
Main volume output for connecting the monitor speakers.
⑦ Line Out/Line In
Mini-jack output and mini-jack input for inputting music from other devices or outputting
the main signal to the streaming device without main volume knob control.
Connect a media player or other audio device here.
⑧ Input Jacks 1-4
Combo input jacks are compatible including XLR/TS/TRS microphone and musical
instrument.

Connection Operation
Connecting audio equipment
Caution
Please adjust knobs and faders on this unit to a minimum before connecting audio equipment.
Failure to do may cause sudden loud noises from monitoring equipment, and this could damage the
equipment or harm hearing.
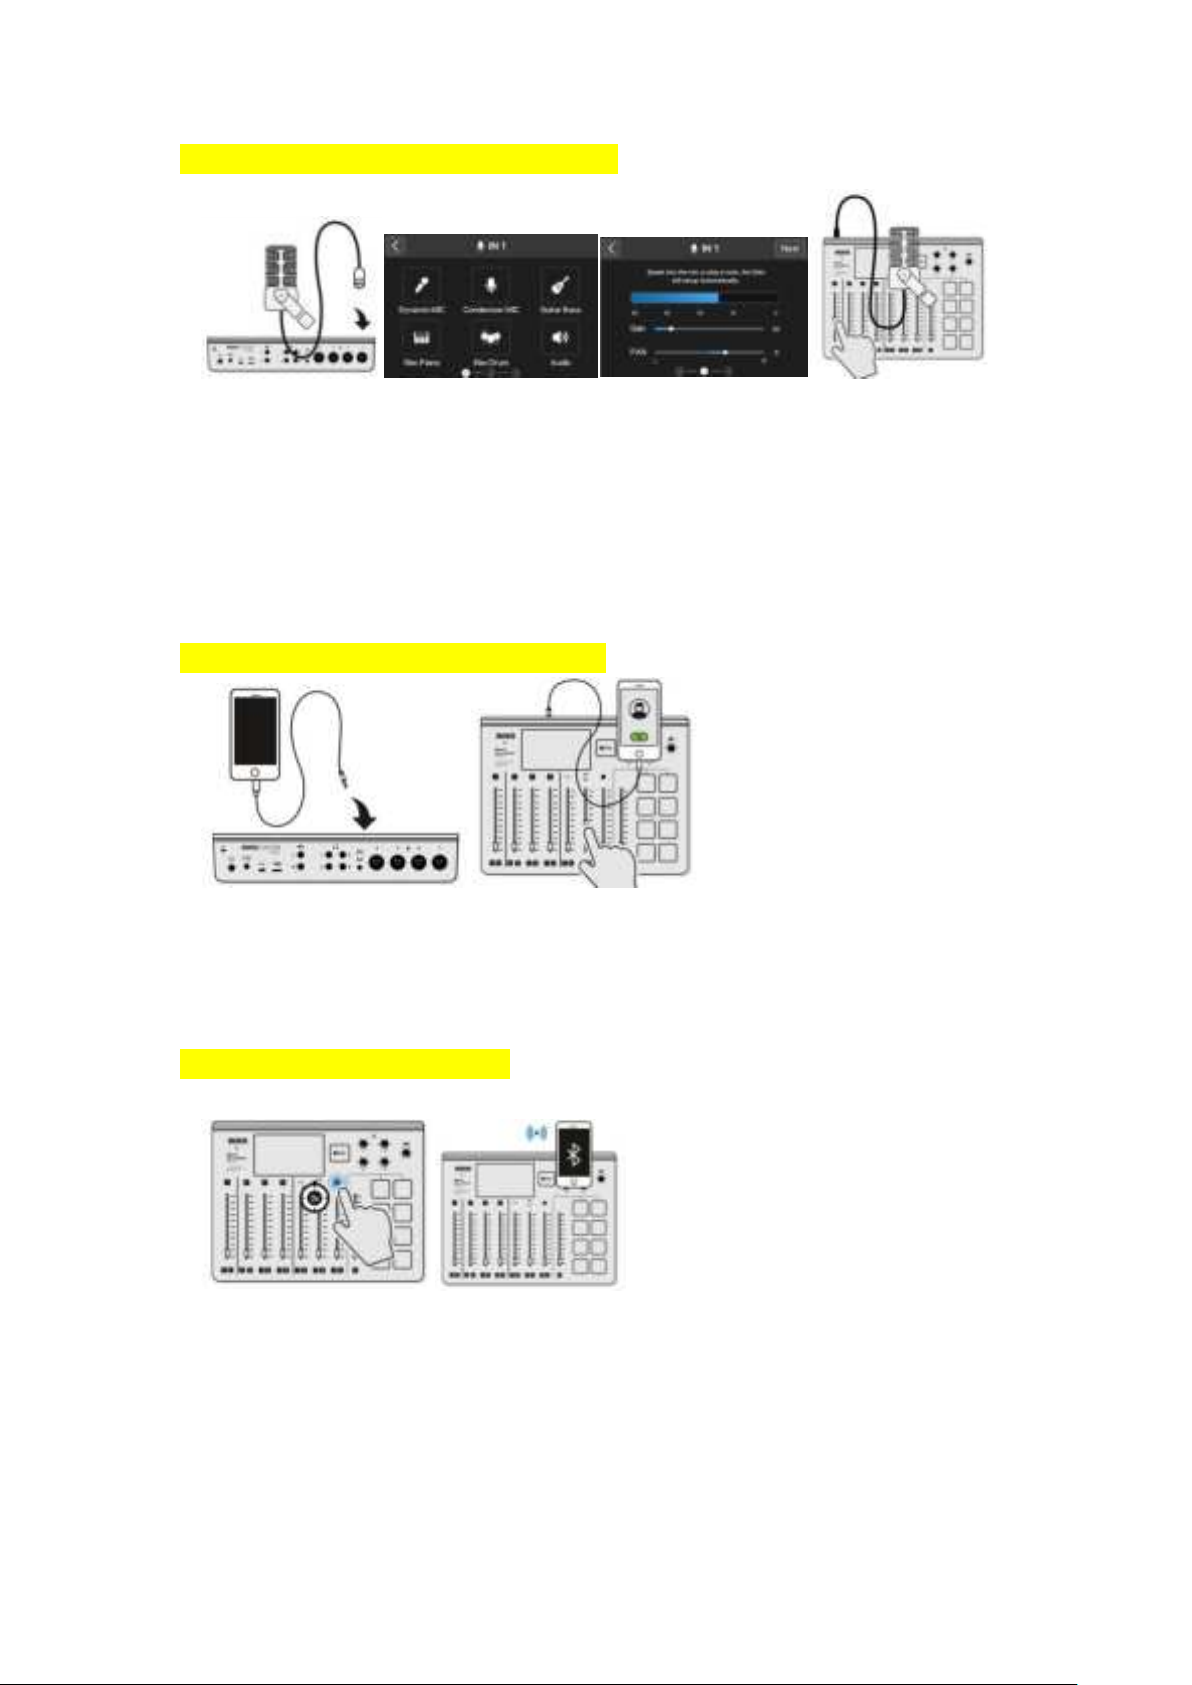
Connecting microphones/musical instruments
① ② ③
Step 1: Connect your microphone to the XLR Input 1-4 jacks on the back using a standard XLR cable (not
supplied). Or connect your musical instrument to the XLR Input 1-4 jacks on the back using a standard TRS
cable (not supplied).
Step 2: After connecting them, the screen will pop up the corresponding channel input settings. Please
select your device and complete the level settings as prompted.
Step 3: Push up the channel fader slowly to adjust the volume.
Connecting the Android/iOS Devices (Wired)
Step 1: Connect your smartphone/tablet to Line In/Out jack (USB port) on the back using a 3.5mm cable
(not supplied) or supplied USB cable.
Step 2: Push up the channel fader slowly to adjust the volume.
Connecting the Bluetooth Devices
Step 1: To get started, short press the BT button on the front panel to turn on the Bluetooth function,
then hold the BT button for pairing nearby devices.
Step 2: Turn on the Bluetooth of your device and select “Donner PC-02” to connect.
Step 3: Turn up the volume of your device and push up the channel fader slowly to adjust the volume.

Connecting the Windows and Mac Devices
Step 1: Connect your PC/MAC to the USB jack on the back using a supplied USB cable. (知道是什么接口
的吗)
Step 2: Push up the channel fader slowly to adjust the volume.
Connecting the Game Consoles and Blu-ray Players
Step 1: Connect your gaming consoles to the OPTICAL port on the back using an optical cable (not
supplied).
Step 2: Push up the channel fader slowly to adjust the volume.
Recording to MicroSD Card
Step 1: To get started, insert a microSD card into the SD slot on the back.
Step 2: After inserting it, press the REC button on the front to start recording, the indicator will light up
red. Once press the REC button to pause, the indicator will blink red.
Step 3: Long press the REC button to stop recording when you’re finished, the indicator will go off.
Step 4: The indicator of the PLAY button will light up, press it can playback the audio just recorded.

Connecting to Monitor Headphones and Monitor Speakers
Step 1: Make sure to adjust the knob on this unit to a minimum before connecting audio equipment.
Step 2: Connect your monitor headphones/ monitor speakers to the Main out jacks on the back using a
6.35mm audio cable (not supplied).
Step 3: Rotate the knob slowly to adjust the volume.
MIXER Operation
The Podsoler let you efficiently and accurately manage 9 input levels (4 Solo +4 Mute +
Sampler) of Main output and 4-channel monitor outputs through our innovative multi-
channel smart motor MIXER during the live broadcast. In other words, you can record a
total of 5 groups of MIXER data, 45 faders positions. And according to your requirements to
quickly switch, so that you achieve a full range of control.
1. Press the MIXER button to return home page. Press
the to
switch 主副 channel in the mixer.
2. Press one of the monitor knobs to set the Mixer of the monitoring channel, and the 9
input levels will be automatically saved. Press the monitor knob again to return to
MainOut’s Mixer.
3. Each time you switch the Mixer, the 5 motor faders will automatically return to the
position you set before on the Mixer.
4. Press the SOLO button and MUTE button to solo/mute the signal input on that channel.

Sampler Operation
With 27 sample pads (9x3Banks) on the Donner's Podsoler, you can play the preset sound
and flexibly record new samples you like during a podcast. It is convenient for players to
use and especially adds super fun to the podcast.
1. This machine has 9 preset sound effects that have been saved by default in Bank 1.
Press the corresponding PAD to use it directly.
2. Select the sound bank you need by pressing the bank 1/2/3 selection button, and slowly
push up/down the fader of the E channel to adjust the level.
3. The sample pads can be played at the same time, or paused, and play in a loop.
4. The pads can also be used as shortcuts to access parameters in the sound effect, such
as ,mute,vocal remover , etc.
Table of contents
Other Donner Recording Equipment manuals



