Dog Runner Tracks User manual

THE SPECIFICATIONS OF THIS PRODUCT MAY VARY FROM THIS PHOTO
AND ARE SUBJECT TO CHANGE WITHOUT NOTICE.
FOR MAXIMUM EFFECTIVENESS AND SAFETY, PLEASE READ THIS
USER’S MANUAL BEFORE USING YOUR TREADMILL.
User's Manual

IINDEX
1. OVERVIEW DRAWING ....................................... 2
2. IMPORTANT SAFETY INSTRUCTIONS ............ 3
3. GROUNDING WIRES INSTRUCTIONS............... 4
4. PRE-ASSEMBLY CHECK LIST ........................... 5
5. ASSEMBLY STEPS ............................................. 6
6. EMERGENCY STOP SYSTEM ........................... 8
7. MAINTENANCE ................................................... 9
8. COMPUTER OPERATION INSTRUCTIONS ...... 10
9. EXPLODED VIEW ................................................14
10. PARTS LIST .........................................................15
1

OVERVIEW DRAWING
2
Side rail cover (L)
Main frame welding
Computer
Safety key
Side rail cover (R)
Hooker rack

IMPORTANT SAFETY INSTRUCTIONS
3
Before using this treadmill, basic precautions should always be followed,
including the following:
● To ensure user safety and protect the unit, read all the instructions before assembling and using
the treadmill.
● Do not use this product outdoors, near swimming pools or in damp, wet locations.
● Assemble and operate the treadmill on a solid, level surface. Provide the following clearances: 1 m
(3 feet) at each side, 2 m (6 feet) at the back. Be sure the treadmill is clear of any obstructions,
including walls, furniture and other hard surface. Place a protective sheet below the treadmill to
protect the floor or carpet from possible damage. Check the treadmill before each use and verify
that all fasteners are secure.
● To reduce the risk of electrical shock, always unplug this treadmill from the electrical outlet
immediately after using it and before cleaning, attempting any maintenance tasks or before
removing the treadmill.
● Do not adjust the running belt when dog is standing on the treadmill.
● Keep the power cord away from heated surface and sharp edges.
● Never operate this treadmill if it has a damaged power cord or plug, if it is not working properly, if it
has been damaged or dropped or if it has been submerged in water. In these cases, this treadmill
should be examined by a qualified service technician.
● Do not modify or attempt any service on the treadmill yourself, seek trained repair personnel when
servicing. Contact the nearest authorized dealer or other competent repair service.
● Connect this treadmill to a properly grounded outlet only. Improper connection of the power cord
can result in a risk of electric shock. Check with a qualified electrician or serviceman if you are in
doubt as to whether the treadmill is properly grounded. Do not modify the plug provided with the
treadmill. If it will not fit in the outlet, have a proper outlet installed by a qualified electrician.
● Do not use the treadmill in areas where aerosol spray products are being used or where oxygen is
being administered. Such substances create the danger of combustion and explosion.
● Do not use the treadmill if user exceed 70kgs. (155lbs).This is the rated maximum user weight.
● Keep the running belt clean and dry all times.
● Be sure the power cord has plenty of slack and does not get pinched underneath the treadmill
when it elevates and declines.
● Do not leave the treadmill unattended when plugged in and running. After turning off the treadmill,
don’t leave it until it comes to a complete stop and is level. To disconnect, turn all controls to the
STOP or OFF position, and then remove the plug from the outlet.
Note: Read all instructions and save for future use.
WARNING:
!

GROUNDING WIRES INSTRUCTIONS
4
The treadmill needs special power supply:
Power supply voltage (V) Frequency (HZ) Rated current (A)
100 50/60 18
120 50/60 18
200 50/60 9
220 50/60 9
230 50/60 9
240+ 50/60 9
DANGER!
Wirings follow the local country electrical regulations, high voltage, low voltage wires, and grounding
wires must be separately transported and can’t connect with or twist other wires. The product must be
grounded to prevent electric shock, but improperly connect grounding device of treadmill can also
lead to electric shock. If you are not sure whether the grounding device has been properly connected,
you can consult the electrician or service personnel. If the plug is not suitable for the power supply
socket, please do not replace the plug provided with the product, please ask professional electrician
for installation.
Figure
Grounding methods
Grounding end
Socket with grounding end
PRE-ASSEMBLY CHECK LIST
5
A
B
C
D
E
F
G
H
d
b
e
c
f
a
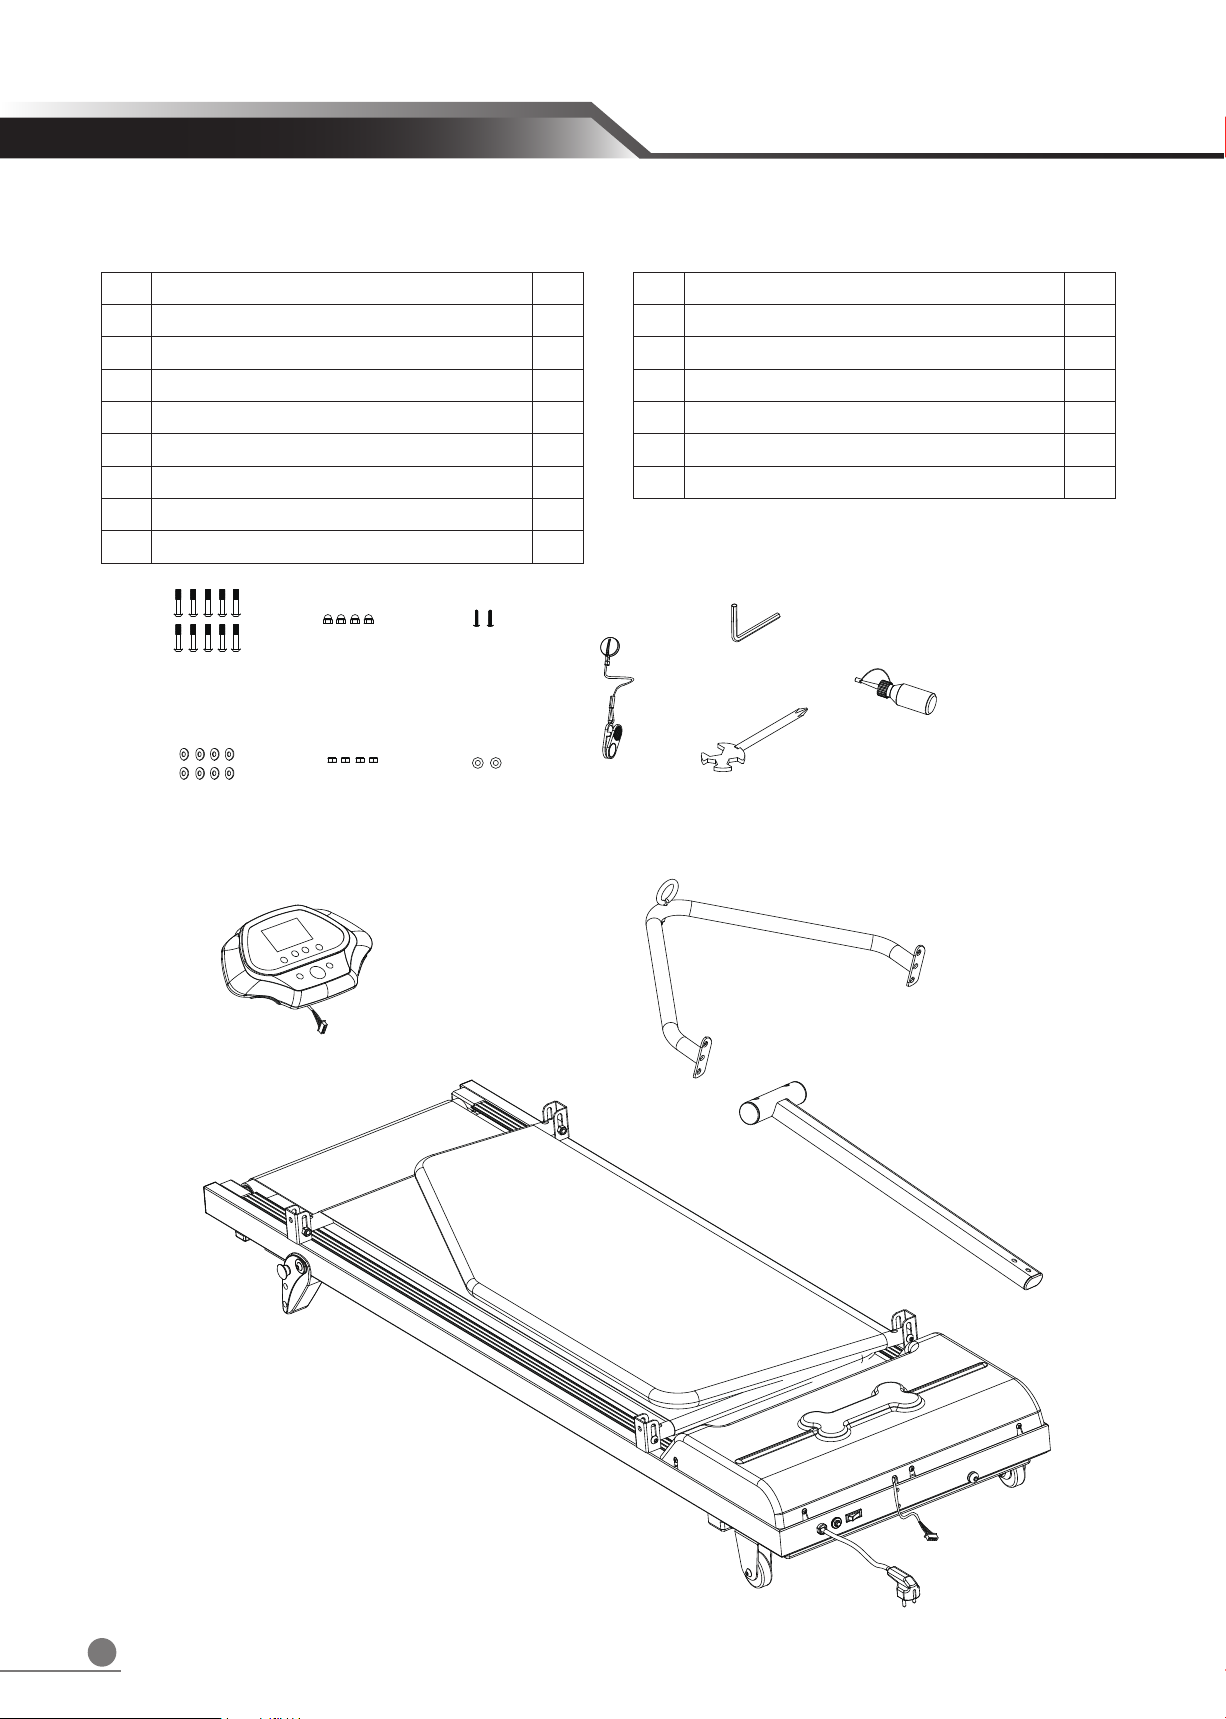
No. Description Q’ty
A Main frame welding 1
B Hooker rack 1
C Computer tube welding 1
D Computer 1
E Safety key 1
F L shaped Hex Wrench 1
G Cross wrench tool 1
H Silicon oil 1
No. Description Q’ty
a Hex screw 10
b Cap nut 4
c Truss phillips self tapping screw 2
d Curved washer 8
e Nylock 4
f Washer 2

6
Step 1.
ASSEMBLY STEPS
A
Rotate the left and right side doors (A)
upward.
Note: Firstly, rotate one side door and fixed by
screw, secondarily rotate the other side door
and fixed by screw.
Step 2.
Assemble right & left side doors by hex screw
(a), curved washer (d), and cap nut (b) . Use
L shaped hex wrench (F), Cross wrench tool
(G) as left figure shown.
Note: Not tighten the screw at this moment.
a
a
a
a
d
d
b
b
G
F
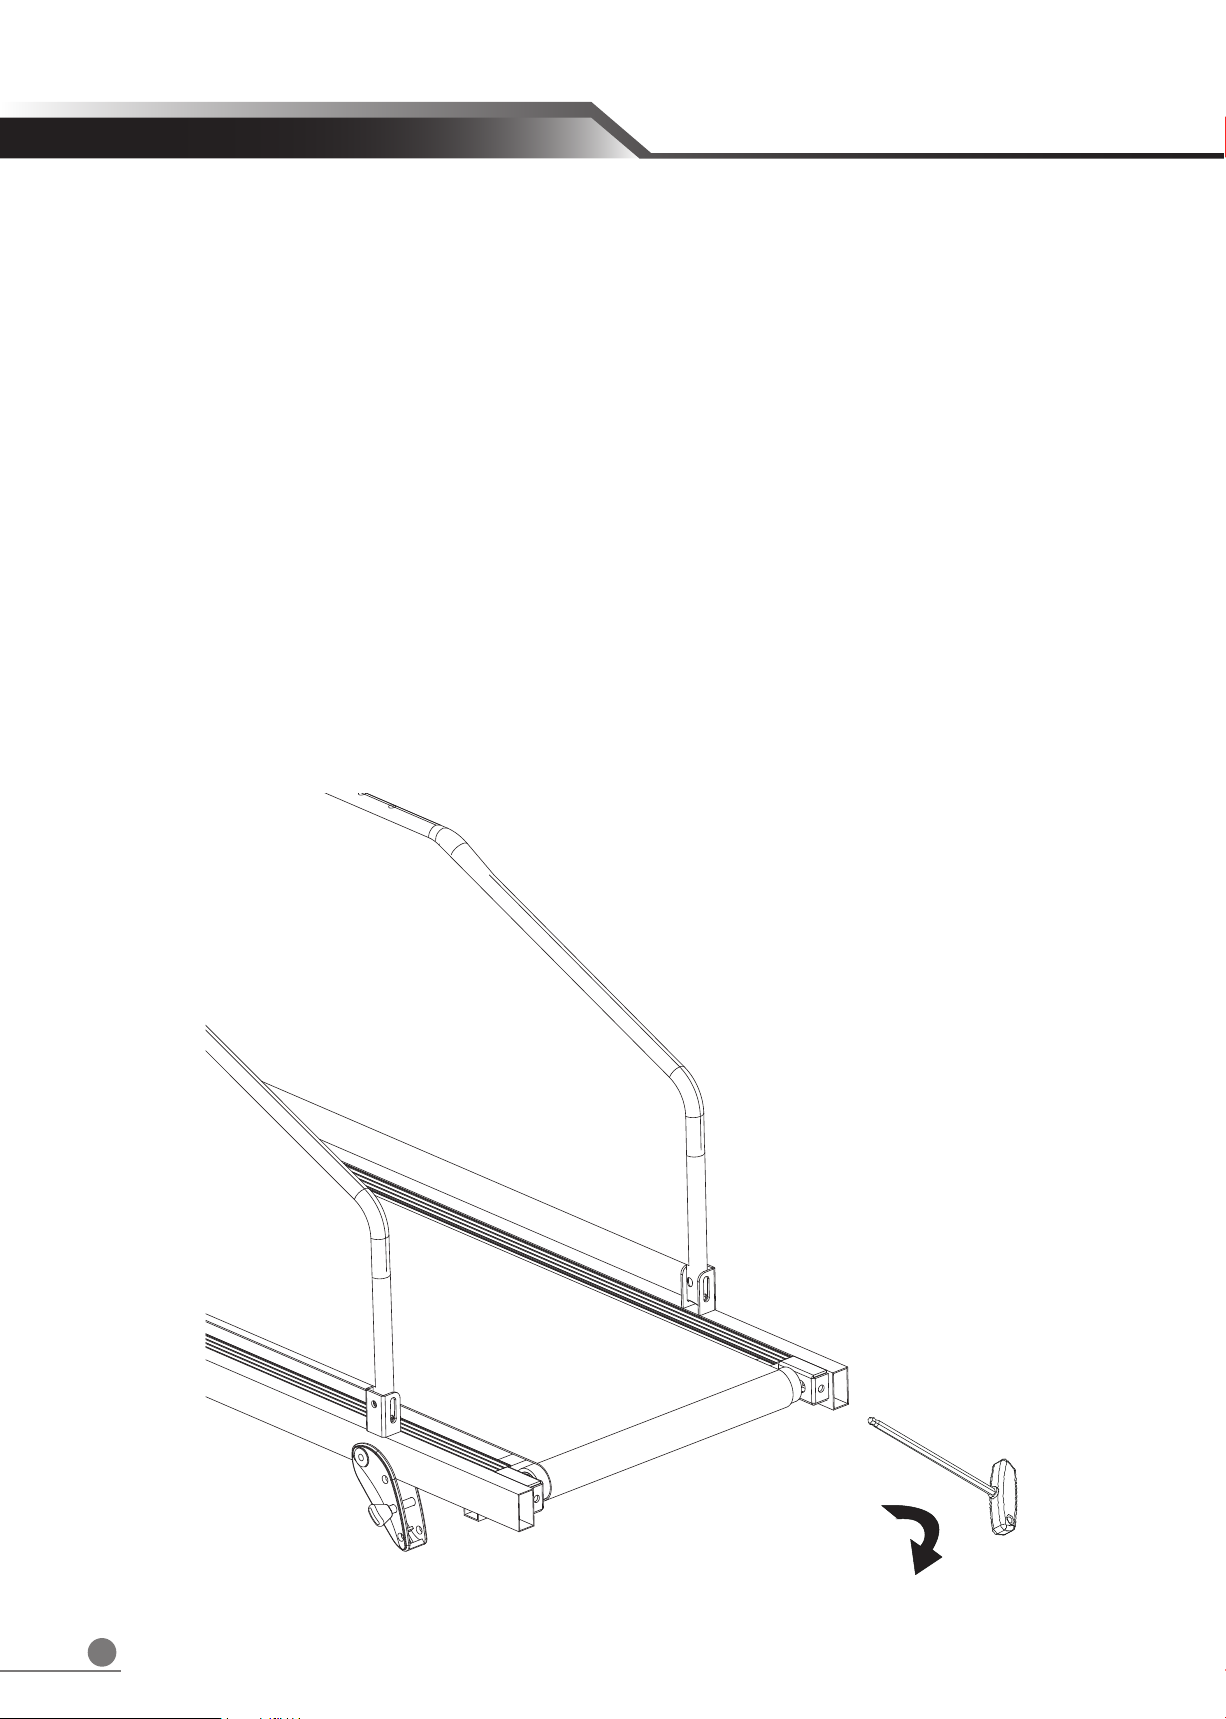
Step 3.
1. Unzip the zippers on left and right side door
covers.
2. There are three position holes on side rails
(L+R). Please put the Hooker rack (B) on
desired position holes on left and right side
rails respectively.
3. Assemble Hooker rack by hex screw (a),
curved washer (d), and cap nut (b) . Use L
shaped hex wrench (F), Cross wrench tool
(G) as left figure shown.
Note: The nut direction on hooker rack is
backwards, then tighten the screws on side
rails (L+R) and positioning screws as left
figure showing.
F
a
d
e
G
B

7
Step 4.
1. Pull out the wire and release wire through
console welding tube assembly (C).
2. Tighten computer welding tube assembly
(C) with Hex screw (a), washer (f) by hex
Wrench (F) as left figure showing.
Step 5.
1. Connect computer cable (D) with cable port
from computer welding tube assembly (C).
2. Align the computer screw column with the
computer tube hole ( C ).
3. Use cross wrench tool (G) to tighten the
Truss phillips self tapping screw (c) .
4. Attach the safety key ( E ) into computer
(D).
Step 6.
1. Finish assembly.
2. Turn on the power to check the machine if
can start functionally, if not, to check again if
the cable connection between computer ( C )
and computer welding assembly (D) if
connect properly.
F
a
f
C
Gc
E
D
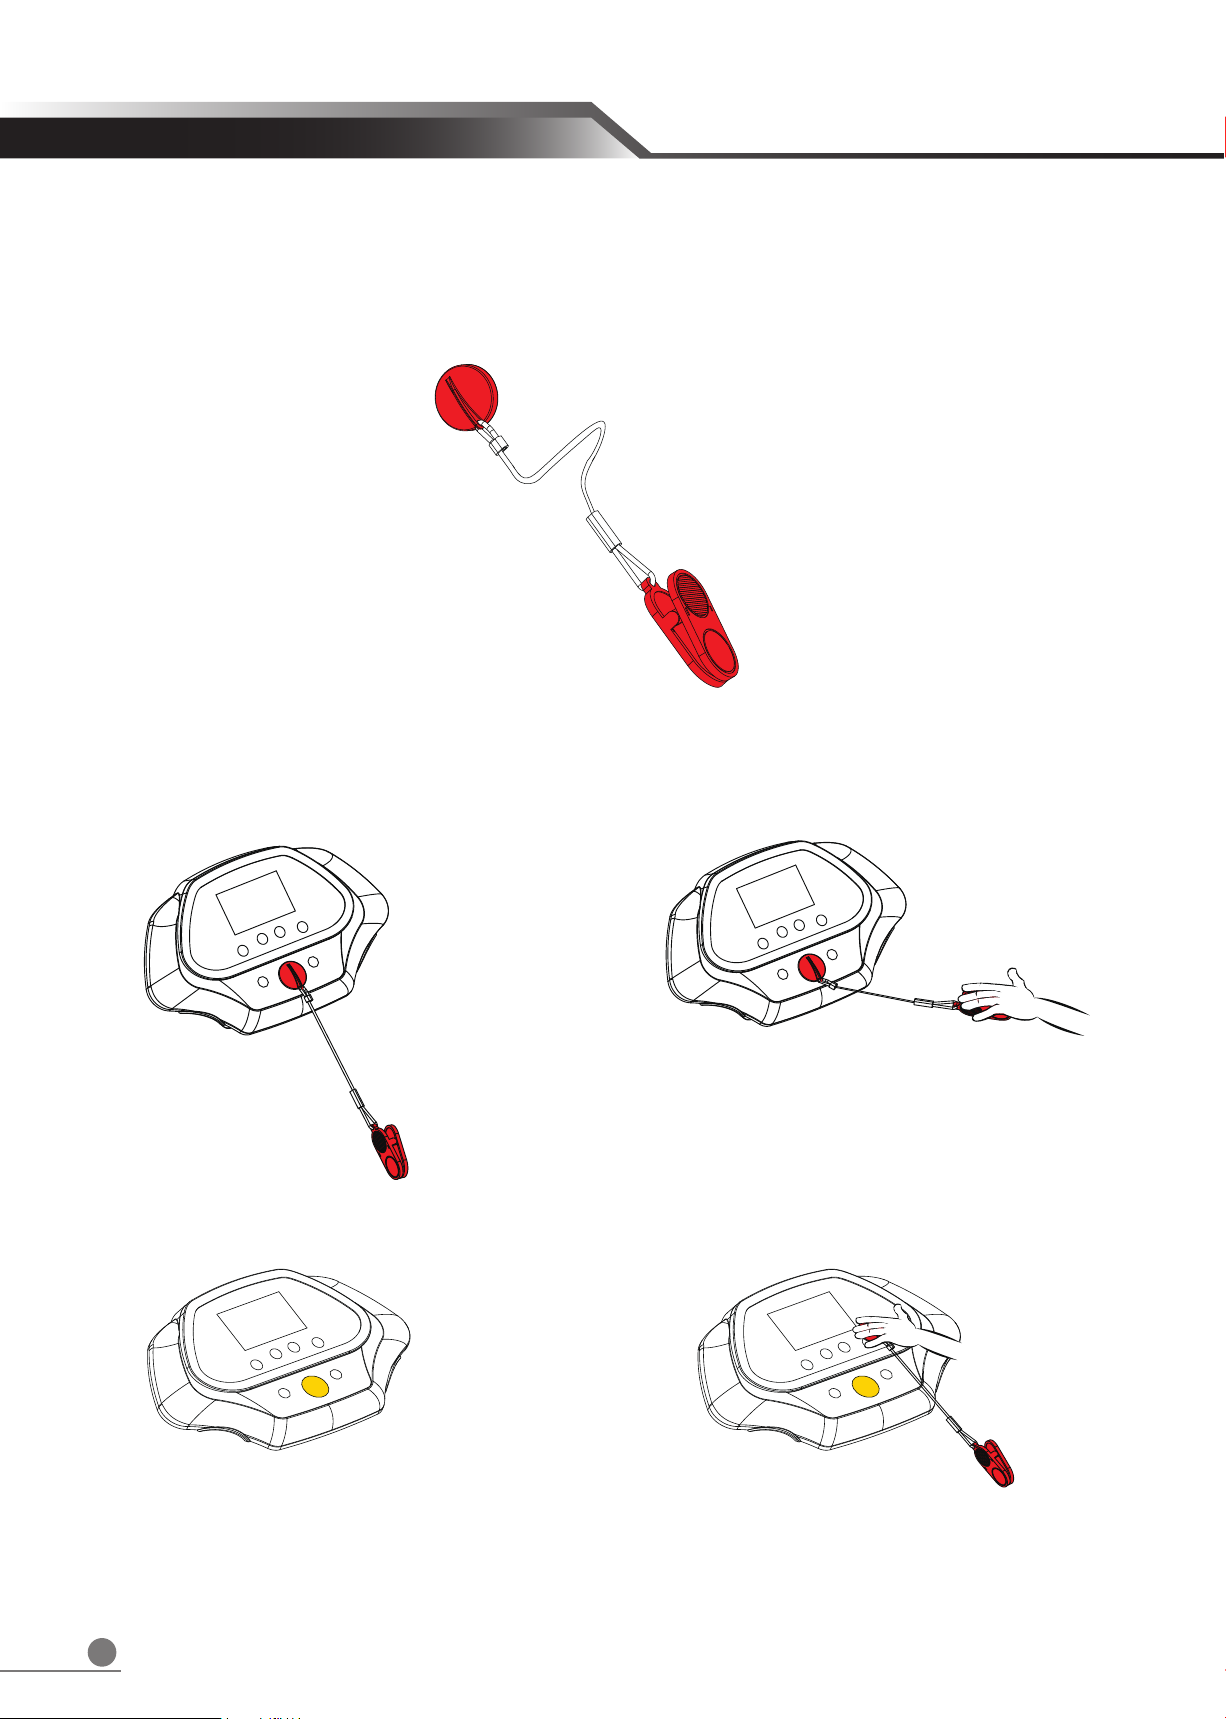
ONDERHOUD
8
This treadmill is equipped with safety system. The safety key shown as below drawing, a cord
connects the security clip to the red STOP key on computer. User must attach the security clip to your
dog’s harness before to begin any workout.
Emergently stop treadmill by pulling the cord to suspend the operation.
To continue operation, please reinsert the safety key into the computer.
EMERGENCY STOP SYSTEM
9
Running Belt Adjustment
If the running belt is not in the center, stop the treadmill then adjust the Hex Screw in the Rear End
Cap by the Hex Wrench. For example, if the running belt is moving towards the left side, turn the left
Hex Screw about 1/4 circle (clockwise). If the running belt is moving towards the right side, turn the
right Hex Screw about 1/4 circle (clockwise). Turn on the treadmill after it has been adjusted. If you
find that the belt does not move to the proper position, please repeat above steps. Do not use the
treadmill until the running belt returns to the center position.
(Ps.1. This action is very important, if the belt is not in the center, be sure to follow above steps.)
(Ps.2. The position of the running belt might not stay precisely in the center with slightly towards the
left or right side, and the situation varies with how end-users use and the weight of end-users. No
need to adjust the belt if it does not rub against the parts aside.)
MAINTENANCE
Table of contents
Other Dog Runner Pet Care Product manuals


