Digital ID View IV-IA502R User manual


Content
System setting 3
Keypad instruction 1
1.1 Set password 3
1.2 Set CMS 4
1.3 Set voice phone 5
1.4 Set system options 6
1.4.1 Set system clock 6
1.4.2 Set enter delaytime 7
1.4.3 Set exit delaytime 7
1.4.4 Set siren time 7
1.4.5 Set ring times 7
1.4.6 Set sensor loss inspection 8
1.4.7 Set phone line inspection 8
1.4.9.2 Door contact inspection 9
1.4.9.3Chenk wireless detectortamper 9
1.4.9.4Arm/disarm tone 9
1.4.9.5Force arm 10
1.5Manage wireless device 10
1.5.1Set remote controller 10
1.5.1.1Enroll remote controller 10
1.5.1.2Enter remote controller code 11
1.5.1.3Delete remote controller 11
1.5.2Set detector 11
1.5.2.1Enroll detector 11
1.5.2.2Enter detector code 11
1.5.2.3Delete detector 12
1.5.3Set appliance switch 12
1.4.8 Set AC off delay report 8
1.4.9 Set emergency alarm remindt 8
1.4.0Set more 9
1.4.9.1Arm/disarm report 9

1.5.3.2Enter appliance switch code 12
1.5.3.1Enroll appliance switch 12
1.5.3.3Delete appliance switch 12
1.6Set zone 13
1.6.1Set zone type 13
1.6.2Set zone siren 14
1.5.4Set wireless siren 13
1.5.4.1Enroll wireless siren 13
1.5.4.2Delete wireless siren 13
1.7.2Set keypad 15
1.7.2Enable/disable GPRS 16
1.7.3Set remote controller 15
6.7.3 Set GPRS 16
1.7.4Set voice phone 15
6.7.4 GPRS alarm receivingservice 16
6.7.5GPRS register info 17
1.8Set GSM 16
1.9Set advanced options 17
1.6.3Set related zone 14
1.6.4Set alarm limit 15
1.7Set system partition 15
1.7.1Set zone 15
1.7.1Enable/disable GSM 16

Power:AC off slowflash, light onwhen no trouble
Trouble:Light on when zone trouble,light off whenno trouble
Arm:Light off underdisarmed,light flash slowlyunder stay,light on under armed status
Disarm: Light onunder disarmed status, light off understay and armedstatus
Set key
UP
Down, Inquiry eventlogs under
standby mode
1
Keypad instruction
Disarm
Arm
Partition
Home
Power LED
Trouble LED
Arm LED
Disarm LED
The number key Key direction
Confirm key
Delete
Exit
LED
Key function:
Arm
Stay
Disarm
Exit
Delete
The system canbe armed differentpartitions
via keypad atthe same time
The system canbe stayed differentpartitions
via keypad atthe same time
The system can bedisarmed different partitions
via keypad at thesame time
Set key
Left, can setbypass zone under
standby mode
Right, control applianceswitch
Set key
Set key
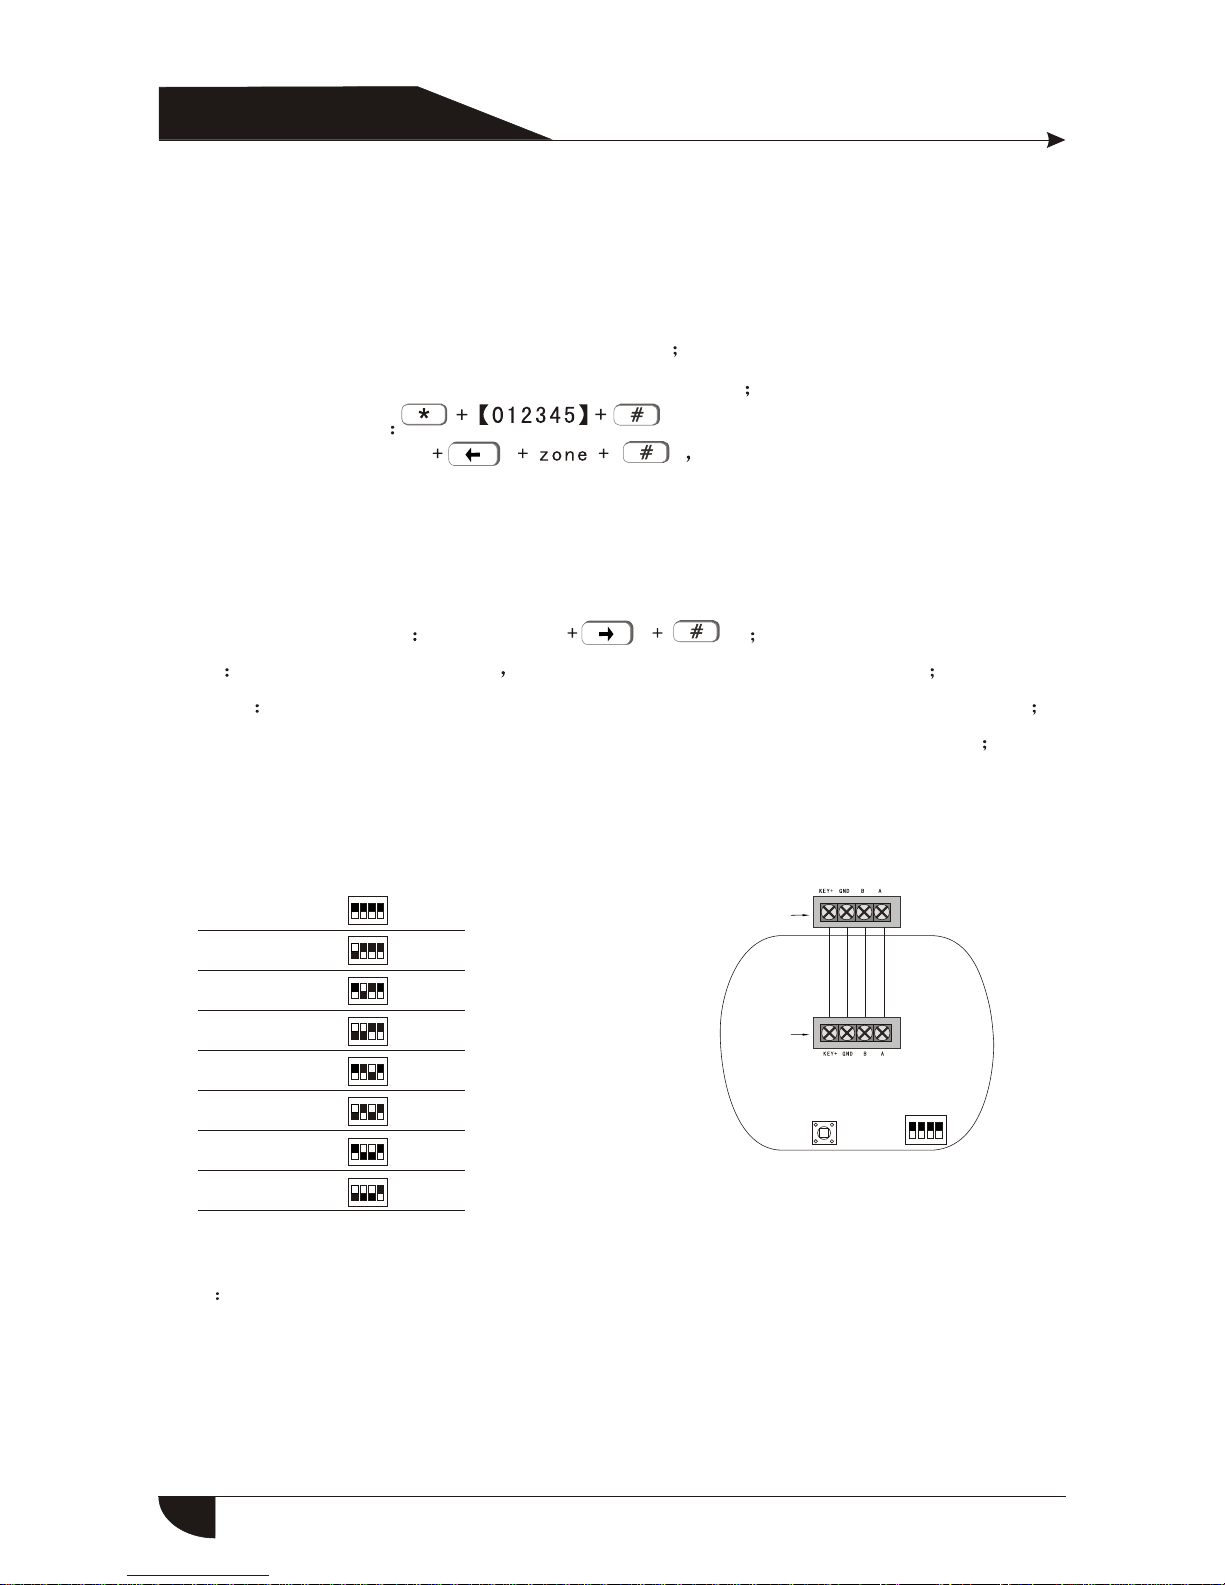
DIP switch:
1 2 3 4
ON
1
2
3
4
5
6
7
8
Keypad No. DIP switch
Note Keypad default No.1,when connect several keypads, each keypadparallel connect with
control panel, eachkeypad with differentDIP address, must connect thekeypad with control
panel before poweron .
1 2 3 4
1 2 3 4
1 2 3 4
1 2 3 4
1 2 3 4
1 2 3 4
1 2 3 4
ON
ON
ON
ON
ON
ON
ON
1 2 3 4
ON
Tamper DIP switch
Wiring port
Wiring port
Admin password:012345
Main user password:1234,manage1-4 partition
16 groups userpassword: can setand manage partition
Enter system setting
Zone bypass:user password The keypad willdisplay bypass zone.
Just one keypadcan enter bypasssetting at the same time, whenone keypad under
bypass setting status,and other keypadstry to enter bypass setting, thesystem will
remind trouble, butif for highlevel request, for example enter systemsetting, it will
exit bypass setting
Appliance switch control user password
Arm User password+arm key all zones areeffective under arm status
Disarm User password+disarm key, all zonesare ineffective under disarm status
Stay:User password+Stay key, burglar zones are ineffective under staystatus
2
Standard operation:

*
8
3
21
0
1
2
4
3
5
6
7
Set system password
Set CMS
Set voice phone
Set system options
Set wireless device
Set system zone
Set system partition
Set GSM
1.1ϵͳÃÜÂëÉèÖÃ
Set system password
3
Enter password No. 01
01-16
[3]Set user passwrod
01
*
12
[1]Set admin passwrod [2]Set main userpassword
XX
X
X
XXX
X
XX
X
XX
X
###
Enter passwrod
******
Enter password
******
Auto return to menu Auto return to menu
Auto return to menu
##
#
#
#
#
#
Partiton 1234 *Select
Manage YNNN
5
4
9Set advanced options
*3
21
0#
5
41#
3
System setting
Enter password
Enter system setting:admin password Default admin passwrd
Exit system setting:press exit key

For example: changeadmin password to888888
#
1
#1#
8888
Enter password
******
#
1.Admin password is6 digits, mainuser password is 4 digits, canset 16 user
password, the passwordNo.:01-16, but thepassword Number from 02-16 can not
enter user setting
2.If forgot the password, the admin password is000000 in 1minute when the
control panel poweron
3
21
05
4
88
Set CMS
[1]Set CMS
No.1
1.2½Ó¾¯ÖÐÐÄÉèÖÃ
[2]Set CMS
No.2
[3]Set User
No.
[5]Set CMS communication
inspection interval time
[6]Set priority
in transmission
[4]Set dialing
times
#
1#
234
Enter phone number
56
####
Enter user
No. Enter dialing
times
Enter communcation
inspection interval
time 000
0-999 h
0 disabled
Priority in
transmission:1
1Phone line
2GSM
2#
*3
21
0#
5
4
4
X
X
X
X
X
X
X
X
X
X
X#
#X
X
X
X
X#XXXX##X
Auto return to menu
Auto return to menu
Auto return to menu Auto return to menu Auto return to menu

Note: 1.The usercode is theidentification code inCMS setting,CMS1 andCMS2 use the
same user code
Dialing times canbe set as1-15, communication inspectioninterval time canbe set
as 0-999hours, thecommon setting is24 hours.
When set phonenumber,long press1, display theletter P, means pause1 second
when dialing, whenthe phone linewhich connect tocontrol panel issub-line, need a
pause dialing
For GSM, justrecognize the numberbehind P, can make sure telephone andGSM
dial the samenumber
For example: thesub-line connect tocontrol panel, CMSnumber is 80808080,in this
way, set CMS numberlike this9P80808080, 9 is out code.
#
Enter phone number P
00000000000 9808080#
2#
3210541#
*
80
1.3ÓïÒôµç»°ÉèÖÃ
3#
*3
21
0#
5
4
Set voice phone
[1]Set voice
phone 1
[2]Set voice
phone 2
[3]Set voice
phone 3
[4]Set voice
phone 4
[5]Set dialing
times
[6]Set calling
priority
Enter phone number Enter dialing times Select calling priority
Phone line
GSM
#
1#
23#4#5#6#
5
XX#XX#X
X#
Auto return to menu
Auto return to menu
Auto return to menu

Note 1.The dialing timescan be setas 1-15 times
For example: Setvoice phone number3 as 12345678
*#3#
Enter phone number
3210543#
4
32
16
578#
*
8
1
2
4
3
5
6
7
Set system clock
Set entry delay
Set exit delay
Set siren time
Set ring times
Set sensor lossinspection
Set phone lineinspection
Set ACoff delay report
1.4ϵͳѡÏîÉèÖÃ
4#
9
0
Set emergency alarmremind
Set more
3
21
0#
5
4
1.4.1 Set system clock
For example: Set system clock to 22:59:36 22/12/2013
*#4#1#
Enter system clock
According to flashof Y.M.D.H.Min.Sec on screen , enter 13.12.22.22.59.36by turn
also can press[UP] [DOWN] keyto move cursor.
1312222259
3
21
05
4
36#
YMDHMin
Secretary
6

1.4.2 Set entry delay:when trigger alarm,the panel willgive delay time(
default setting is 10s)
For example: setentry delay timeas 20s
*#4#2#
Enter delay time 010
0
3
21
05
4
20#
*#4#3#
Enter delay time 001
0
3
21
05
4
20#
1.4.3 Set exit delaytime: after userarmed the system,itis convenient foruser
to exit the area after arm successfully,(the default setting is 10s)
For example: Setexit delay timeas 20s
Note:Entry delay isjust effective for delay zone,other zone typecan not enter delay
1.4.4 Set siren time:Thesiren ring timeafter alarm istriggered(the default
setting is 5minutes)
For example: Setsiren time as10 minutes
#4#4#
Set siren time 10
3
21
05
4
10#
*
1.4.5 Set ring times:User remote control alarm panel, dial the preset phone
number , the panel will off-hook after phone ring times(the default setting
is 7 times)
For example: Setring times as5
7
s
01-30 M
#4#5#
Enter ring times 05
00-15 0 is disabled
3
21
05
4
05#
*
Table of contents


