DeFelsko PosiTest DT User manual

Dust Tape Test
Instruction Manual |Manual de instrucciones
Bedienungsanleitung |Notice d'instruction

The PosiTest DT Dust Tape Test assesses the quantity and size of
dust particles on blast cleaned surfaces prior to the application of
protective coatings. Designed in accordance with ISO 8502-3, the
PosiTest DT Dust Tape Test Kit can either be used as a pass/fail test
or as a means to provide a permanent record of the dust present on a
surface.
These instructions provide brief summaries of procedures
used to perform the Dust Tape Test. Consult and follow the applicable
standard prior to testing.
OTE:
This method is suitable for testing on steel substrates after
cleaning, which corresponded to grade A, B, or C rust before cleaning
as defined in ISO 8501-1.
Appli ation:
1. Before beginning each series of tests, remove the first three turns of
tape from the roll and discard.
2. Remove a piece of tape approximately 20 cm (8”) long from the roll.
Cut the tape from the roll with the included scissors.
OTE:
To avoid contamination, only touch the adhesive side of the
tape at the ends.
OTE:
3. Press approximately 15 cm (6”) of the freshly exposed tape onto the
surface under test using one of the following methods:
a. Thumb – Using firm pressure and a constant speed, move the
thumb across the tape 3 times in each direction. Each stroke should
take between 5 and 6 seconds.
b. DeFelsko Tape Roller – Keeping the tape between the yellow
stripes on the roller, apply the spring loaded roller onto the tape.
Maintain a downward pressure and a constant speed to press the
Dust Tape Test
Instru tion Manual

Visual Assessment:
Place the Transparent Display Board over the black, white, or two-
toned strip on the Dust Test Comparator Display Board, whichever
strip provides the most contrast.
Visually assess the size of the dust particles and classify using the
Des riptions of Dust Parti les shown on the Dust Test Comparator.
If necessary use the 10x magnifier to assess small dust particles.
0. Particles not visible under 10x magnification
1. Particles visible under 10x magnification but
not with normal or corrected vision—usually
particles less than 50 µm (2 mils) in diameter
2. Particles just visible with normal or corrected
vision—usually particles between 50 µm and
100 µm (2 and 4 mils) in diameter
3. Particles clearly visible with normal or
corrected vision—particles up to 0.5 mm (20
mils) in diameter
4. Particles between 0.5 mm and 2.5 mm (20
and 100 mils) in diameter
5. Particles larger than 2.5 mm (100 mils) in diameter
Class Des ription of Dust Parti les
Dust Size
Class
Ø 0.5 mm
20 mils
Ø 2.5 mm
100 mils
tape to the surface 3 times in each direction. Each stroke
should take between 5 and 6 seconds.
4. Remove the tape from the surface and press it onto the
Transparent Display Board using a thumb.
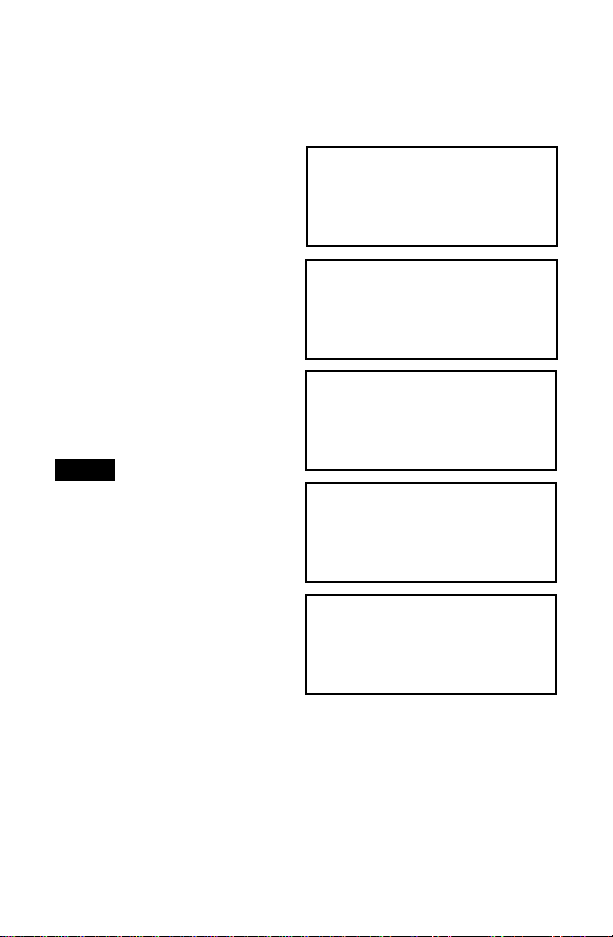
1
2
3
4
5
Assess the quantity of dust on the
tape by visually comparing an
area of the tape with equivalent-
sized areas of the pictorial
references shown on the right.
Record the corresponding rating
to the reference that is the closest
match.
The use of intermediate half-
steps is permissible if required to
give a more detailed report.
Report any overall discoloration
as quantity rating 5, dust size
class 1.
It is not unusual, after
carrying out the test, to find that
the tape displays an overall dis-
coloration, usually reddish brown
or black, sometimes with the
presence of discrete visible parti-
cles, depending on the type of
abrasive used when blast clean-
ing. This discoloration is caused
by microscopic dust from the test
surface that can cause serious
interference with paint adhesion.
OTE:
Dust Quantity Rating:
Visually assess the quantity of dust particles on each tape by
comparing it to the 5 Dust Quantity Rating pi torial referen es on
the Dust Tape Comparator.

Tape and adhesive residue should be removed before the ap-
plication of coatings.
OTE:
Consumable A essories Item Code
Dust Test Comparator Display Board, Report
Forms, Transparent Display Board
DTREPORT
DeFelsko Adhesive Tape CHDTISOTAPE
Re ording the Results:
Remove the tape from the Transparent Display Board and place it on
the provided Dust Test Kit Report Form. Under “Dust Quantity
Rating” record the number of the pictorial reference which most closely
corresponds to each Test Sample A D under “Dust Size Class” record
the dust particle size using the Description of Dust Particles shown on
the Dust Test Comparator.
Perform a sufficient number of tests to adequately characterize the
surface under test. For every surface type, perform at least 3 separate
tests. If the Dust Quantity Rating results differ by more than one,
perform at least 2 additional tests and average the results of all tests.

La PosiTest DT Dust Tape Test analiza la cantidad y el tamaño de las
partículas de polvo en superficies granalladas antes de aplicar
recubrimientos protectores. Diseñado de acuerdo con la norma ISO
8502-3, el kit PosiTest DT Dust Tape Test se puede utilizar como
prueba de conformidad o como medio para proporcionar un registro
permanente del polvo de una superficie.
Estas instrucciones proporcionan los procedimientos resumi-
dos para ensayos de prueba de cinta de polvo. Consulte y siga la
norma aplicable antes de realizar la prueba.
OTA:
Este método es adecuado para pruebas en sustratos de
acero después de su limpieza con un grado de óxido previo A, B o C,
según lo definido en la ISO 8501-1.
Apli a ión:
1. Antes de comenzar cada serie de pruebas, retire las tres primeras
vueltas de cinta del rollo y descártelas.
2. Corte un trozo de cinta de aproximadamente 20 cm (8”) de largo.
Corte la cinta con las tijeras incluidas.
OTA:
Para evitar contaminaciones, toque el lado adhesivo de la
cinta solo por los extremos.
OTA:
3. Presione aproximadamente 15 cm (6”) de la cinta sobre la
superficie de prueba utilizando uno de los siguientes métodos:
a. Pulgar – Con presión firme y velocidad constante, mueva el
pulgar sobre la cinta 3 veces en cada dirección. Cada
desplazamiento debe durar entre 5 y 6 segundos.
b. Rodillo para inta – Con la cinta situada entre las líneas
amarillas del rodillo con resorte, aplique sobre la cinta.
Presione sobre la superficie y desplace 3 veces en cada dirección
con velocidad constante para adherir la cinta. Cada desplazamiento
debe durar entre 5 y 6 segundos.
Cinta de prueba
Manual de instru iones

Inspe ión Visual:
Coloque la pla a transparente sobre la pla a de ontraste, en la tira
que proporcione mayor contraste (negra, blanca o de dos tonos).
Evalúe visualmente el tamaño de las partículas de polvo y clasifique
según las des rip iones de las partí ulas de polvo del
omparador. Si es necesario, utilice la lupa de 10 aumentos para
observar las partículas más pequeñas.
0. Partículas no visibles con 10 aumentos
1. Partículas visibles con 10 aumentos, invisibles
a simple vista o con visión corregida,
generalmente de menos de 50 µm (2 mils) de
diámetro
2. Partículas perceptibles a simple vista o con
visión corregida, por lo general, con diámetro
entre 50 µm y 100 µm (2 y 4 mils)
3. Partículas claramente perceptibles a simple
vista o con visión corregida: diámetro hasta
0,5 mm (20 mils)
4. Partículas con diámetro entre 0,5 mm y 2,5 mm (20 y 100 mils)
5. Partículas de más de 2,5 mm (100 mils) de diámetro
Clase Des rip ión de las partí ulas
Clases de partícu-
las por tamaño
Ø 0,5 mm
20 mils
Ø 2,5 mm
100 mils
4. Retire la cinta de la superficie y presiónela sobre la pla a
transparente con el pulgar.
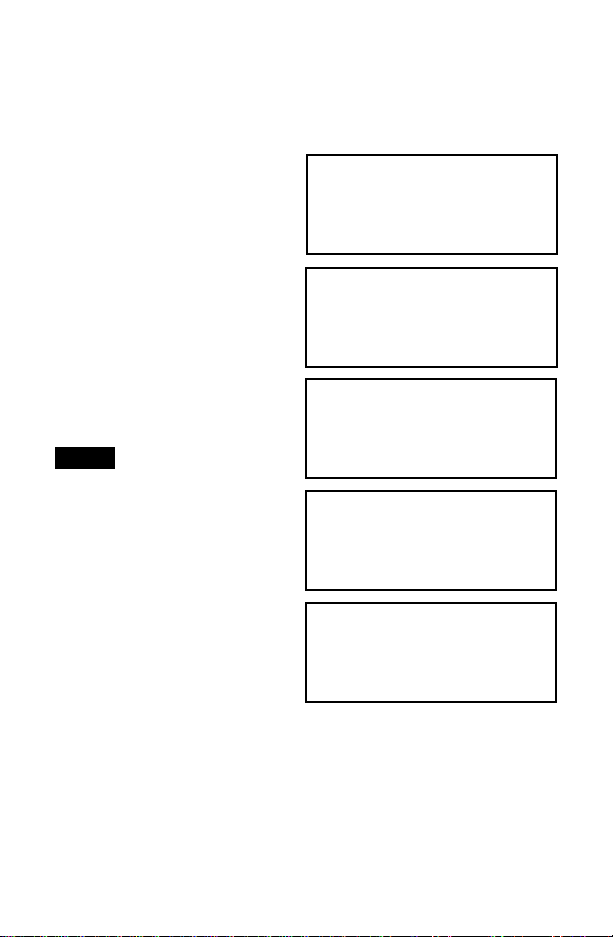
1
2
3
4
5
Evalúa la cantidad de polvo en la
cinta comparando visualmente la
cinta utilizada con áreas de
tamaño equivalente de las
representaciones que se muestran
a la derecha. Registra la
calificación de la referencia más
aproximada.
Es posible utilizar pasos
intermedios si es necesario un
informe más detallado.
Si la decoloración es total, indique
una cantidad nominal de 5 y clase
1 de tamaño de partícula.
Después de realizar la
prueba, es posible que la cinta
muestre una decoloración gen-
eral, normalmente de color teja o
negro, debido a la presencia de
partículas visibles discretas, de-
pendiendo del tipo de abrasivo uti-
lizado para la limpieza con chorro.
El polvo microscópico de la super-
ficie de prueba puede interferir de
manera importante en la adhesión
de la pintura y causar esta decol-
oración.
OTA:
Tasa de polvo ( antidad):
Inspeccione visualmente las partículas de polvo en cada cinta,
comparándola con las 5 referen ias uantitativas de polvo del
omparador.

La cinta adhesiva y los residuos de adhesivo deben elimi-
narse antes de la aplicación de recubrimientos.
OTA:
Consumibles Código de artí ulo
Placa de contraste, formularios del informe,
placa transparente
DTREPORT
Cinta adhesiva DeFelsko CHDTISOTAPE
Registro del Resultado:
Retire la cinta de la pla a transparente y colóquela en el formulario
incluido. En «Referencias cuantitativas de polvo» (Dust Quantity
Rating), indique el número de la referencia visual que mejor
corresponde a cada muestra de la prueba y, en «Clase de tamaño de
partícula» (Dust Size Class), el tamaño de la partícula según la
descripción que indica el omparador.
Realice el número de pruebas que sea necesario para evaluar
adecuadamente la superficie que desea analizar. Para cada tipo de
superficie, realice al menos 3 pruebas separadas. Si la referencia
cuantitativa de polvo difiere en más de una, realice otras dos pruebas
y calcule el promedio de todas ellas.

Der PosiTest DT Staubbandtest bewertet die Menge und Größe von
Staubpartikeln auf gestrahlten Oberflächen vor dem Auftragen von
Schutzbeschichtungen. Das in Übereinstimmung mit ISO 8502-3
entwickelte PosiTest DT Staubbandtest-Set kann entweder als Test
des Bestehens/ ichtbestehens oder als Mittel verwendet werden, den
auf einer Oberfläche vorhandenen Staub dauerhaft aufzuzeichnen.
Diese Anleitung liefert eine Zusammenfassung der Ver-
fahren, die verwendet werden, um die Menge und Größe von Staub-
partikeln auf gestrahlten Oberflächen vor dem Auftragen von
Schutzbeschichtungen zu bewerten. Sehen Sie vor der Prüfung in der
jeweiligen orm nach und befolgen Sie sie.
HI WEIS:
Anwendung:
1. Entfernen Sie vor Beginn jeder Testreihe die ersten drei
Bandumläufe von der Rolle und werfen Sie sie weg.
2. Schneiden Sie ein etwa 20 cm (8”) langes Stück mit der
mitgelieferten Schere von der Rolle ab.
3. Kleben Sie etwa 15 cm (6”) des Bandes auf die getestete
Oberfläche und verwenden Sie eine der folgenden Methoden:
a. Daumen – Streichen Sie mit festem Druck und konstanter
Geschwindigkeit mit dem Daumen dreimal in jeder Richtung über
das Band. Jedes Streichen sollte 5 - 6 Sekunden dauern.
b. Bandrolle – Drücken Sie die abgefederte Rolle auf das Band,
während Sie das Band zwischen den gelben Streifen an der Rolle
Diese Methode ist zum Testen auf Stahluntergründen
nach der Reinigung geeignet, die vor der Reinigung dem Rostgrad A,
B oder C gemäß der Definition in ISO 8501-1 entsprachen.
HI WEIS:
Um eine Verschmutzung zu vermeiden, berühren Sie die
Klebeseite des Bandes ausschließlich an den Enden.
HI WEIS:
Staubbandtest
Bedienungsanleitung
Table of contents
Languages:
Other DeFelsko Test Equipment manuals

DeFelsko
DeFelsko PosiTector SST User manual

DeFelsko
DeFelsko PosiTector UTG User manual

DeFelsko
DeFelsko PosiTest AIR User manual

DeFelsko
DeFelsko PosiTest AIR User manual

DeFelsko
DeFelsko PosiTest AT User manual

DeFelsko
DeFelsko PosiTest AIR User manual

DeFelsko
DeFelsko PosiTest AT-A User manual

DeFelsko
DeFelsko PosiTest AT-A User manual

DeFelsko
DeFelsko PosiTector SPG User manual

DeFelsko
DeFelsko PosiTector SST User manual


