CYP CPLUS-V8PT User manual

CPLUS-V8PT
4K UHD+2×8 HDMI Splitter
Operation Manual
Operation Manual


DISCLAIMERS
The information in this manual has been carefully checked and
is believed to be accurate. Cypress Technology assumes no
responsibility for any infringements of patents or other rights of third
parties which may result from its use.
Cypress Technology assumes no responsibility for any inaccuracies
that may be contained in this document. Cypress also makes no
commitment to update or to keep current the information contained
in this document.
Cypress Technology reserves the right to make improvements to this
document and/or product at any time and without notice.
COPYRIGHT NOTICE
No part of this document may be reproduced, transmitted,
transcribed, stored in a retrieval system, or any of its part translated
into any language or computer le, in any form or by any means—
electronic, mechanical, magnetic, optical, chemical, manual, or
otherwise—without express written permission and consent from
Cypress Technology.
© Copyright 2018 by Cypress Technology.
All Rights Reserved.
TRADEMARK ACKNOWLEDGMENTS
All products or service names mentioned in this document may be
trademarks of the companies with which they are associated.

SAFETY PRECAUTIONS
Please read all instructions before attempting to unpack, install or
operate this equipment and before connecting the power supply.
Please keep the following in mind as you unpack and install this
equipment:
• Always follow basic safety precautions to reduce the risk of re,
electrical shock and injury to persons.
• To prevent re or shock hazard, do not expose the unit to rain,
moisture or install this product near water.
• Never spill liquid of any kind on or into this product.
• Never push an object of any kind into this product through any
openings or empty slots in the unit, as you may damage parts
inside the unit.
• Do not attach the power supply cabling to building surfaces.
• Use only the supplied power supply unit (PSU). Do not use the PSU
if it is damaged.
• Do not allow anything to rest on the power cabling or allow any
weight to be placed upon it or any person walk on it.
• To protect the unit from overheating, do not block any vents or
openings in the unit housing that provide ventilation and allow for
sufcient space for air to circulate around the unit.
REVISION HISTORY
VERSION NO. DATE SUMMARY OF CHANGE
RDV1 22/02/18 Preliminary release
VS1 19/03/18 Final technical review

CONTENTS
1. Introduction......................................................1
2. Applications.....................................................1
3. Package Contents ..........................................1
4. System Requirements......................................2
5. Features............................................................2
6. Operation Controls and Functions.................3
6.1 Front Panel ................................................. 3
6.2 Rear Panel.................................................. 4
6.3 OSD Menu.................................................. 5
6.4 RS-232 Control ......................................... 14
6.5 RS-232 Commands.................................. 14
6.6 EDID Management ................................. 25
6.6.1. EDID Controller .............................. 25
6.6.2. EDID Creator.................................. 27
6.6.3. System ............................................ 28
7. Connection Diagram ....................................29
8. Specications ................................................30
8.1 Technical Specications ........................ 30
8.2 Video Specications............................... 31
9. Acronyms .......................................................36

1
1. INTRODUCTION
This 4K UHD Switching Splitter with HDCP 2.2 is an advanced solution
providing high performance audio and video support including HDR
and other features dened by the HDMI 2.0a specication. 4K UHD
HDMI video sources, up to and including 4K@60Hz (4:4:4, 8-bit) as well
as 10/12-bit sources with HDR, are able to be passed along to the 8
outputs. Pass-through of multiple digital audio formats such as LPCM
7.1, Bitstream and advanced HD Bitstream with audio sampling rates
up to 192kHz are also supported. An independent HDCP management
engine for each output ensures stable HDCP performance.
This splitter also includes a special “Group Mode” which allows the
unit to function as two independent 1×4 splitters. When Group Mode
is enabled, each of the 2 HDMI inputs are routed to their own discrete
set of 4 outputs.
When a mixture of displays with different specications are
connected, each output can be congured to scale 4K to 1080p or
apply color space conversion (4:4:4 to 4:2:0), as appropriate. Support
for the CEC “active source” command to periodically reset input
selection on CEC-compatible connected displays is also included. This
unit provides an intuitive set of front panel controls with an OSD as well
as RS-232 control options.
2. APPLICATIONS
• Classroom and Lecture Hall Presentations
• Showrooms and Demo Rooms
• Hotel Lobby information Displays
• Public Commercial Displays
3. PACKAGE CONTENTS
• 1×HDMI Splitter
• 1×5V/3A DC Power Adapter
• 1×Terminal Block (3-Pin) to RS-232 (9-Pin D-Sub) Cable
• 1×Operation Manual

2
4. SYSTEM REQUIREMENTS
• HDMI source equipment such as media players, video game
consoles or set-top boxes.
• HDMI receiving equipment such as HDTVs, monitors or audio
ampliers.
• The use of “Premium High Speed HDMI” cables is highly
recommended.
5. FEATURES
• HDMI with HDR, 3D & 4K@60Hz support, DVI 1.0 compatible
• HDCP 2.2 and HDCP 1.x compliant
• Supports up to 4K UHD (18Gbps, 4K@50/60Hz 4:4:4, 8-bit) video
signals
• 8 output HDMI splitter with 2 selectable inputs and automatic input
switching support
• Special “Group Mode” allows the unit to function as two
independent 1×4 splitters in a single box
• Supports current 10-bit and 12-bit HDR (High Dynamic Range)
formats
• Supports pass-through of LPCM 7.1, Bitstream and advanced HD
Bitstream audio formats
• Per-output, selectable, 4K to 1080p down-scaling/color space
conversion (4:4:4 to 4:2:0)
• Independent HDCP management engine for each output ensures
stable performance
• Supports eight internal EDIDs, eight external EDIDs copied from
connected devices, and two user provided EDIDs
• Support for the CEC “active source” command to periodically reset
input selection on CEC-compatible connected displays
• Controllable via front-panel buttons with OSD and RS-232
3
6. OPERATION CONTROLS AND FUNCTIONS
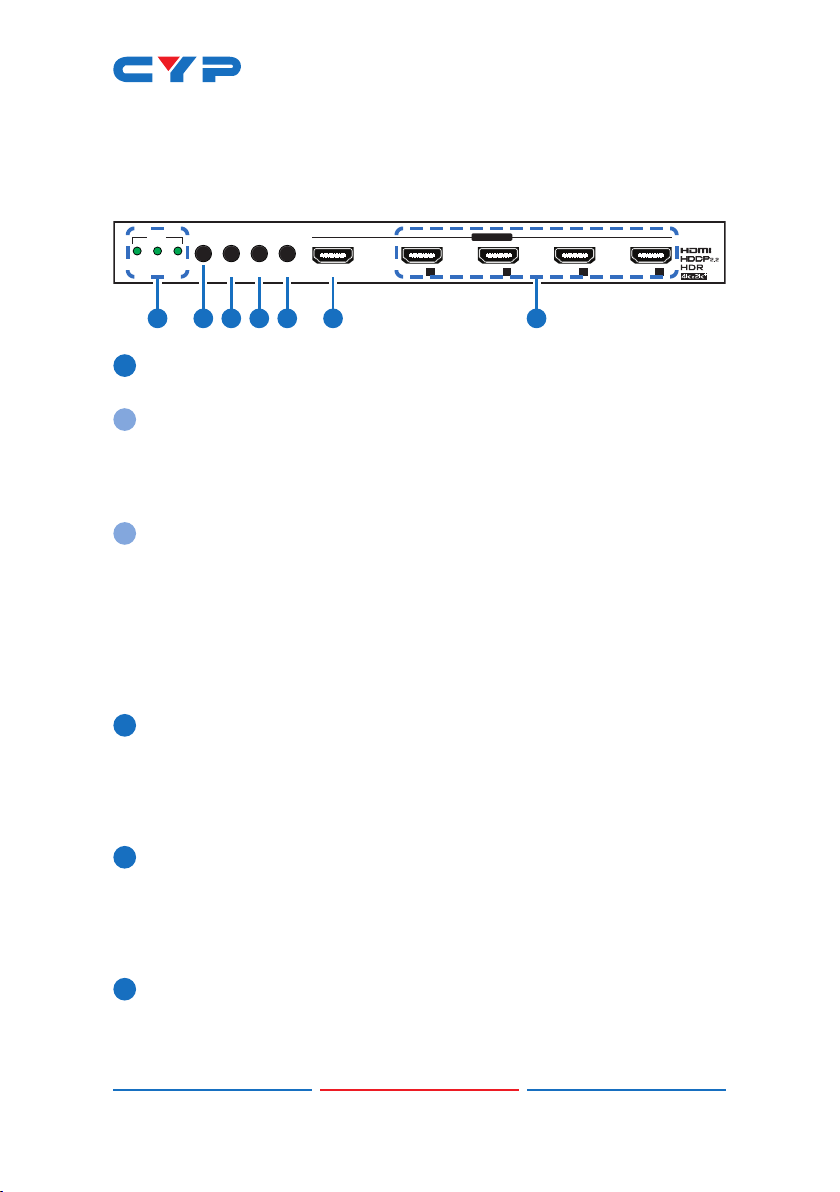
6.1 Front Panel
GROUP
21
IN
GROUPIN 2IN 1
MENU ENTER+
-
UHD+ 2X8 HDMI SPLITTER
IN 1
GROUP 1
OUT AOUT BOUT COUT D
21 3 4 5 76
1IN LEDs: The behavior of these LEDs depend on if Group Mode has
been enabled or not.
AGroup Mode Off
IN 1~2: The illuminated LED indicates which source is currently
selected.
GROUP: This LED will remain off.
BGroup Mode On
IN 1~2: These LEDs will illuminate to indicate that a live source
has been detected on the associated input port. If no source is
detected the LED will remain off.
GROUP: This LED will illuminate.
Note: When the front panel is locked, all 3 LEDs will blink after any
button press.
2MENU: Press to enter the OSD menu, or to back out from menu
items.
Note: Press and hold the “MENU” button for 3 seconds while
connecting the power supply to reset all settings to the factory
defaults.
3− & IN 1: Press to move down or adjust selections within OSD
menus. When not in the OSD menu, press this button to switch to
Input 1.
Note:Pressing“MENU”and“−”togetherwillforceInput1touse
theInternal“FHD,2CH”EDID.
4 + & IN 2: Press to move up or adjust selections within OSD menus.
When not in the OSD menu, press this button to switch to Input 2.
Note:Pressing“MENU”and“+”togetherwillforceInput2touse
theInternal“FHD,2CH”EDID.

4
5 ENTER & GROUP: Press to conrm a selection within the OSD or to
go deeper into a menu item. When not in the OSD menu, press this
button to toggle Group Mode on and off.
Note: Press and hold the “MENU” and “ENTER” buttons together for
3 seconds to lock or unlock the front panel.
6IN 1: Connect to HDMI source equipment such as a media player,
game console or set-top box.
7OUT A~D: Connect to HDMI TVs, monitors or ampliers for digital
video and audio output.
Note:WhenGroupModeisactive,theseoutputswilldisplayInput1.
6.2 Rear Panel
SERVICE RS-232
POWER
DC 5V
R
T
GROUP 2
IN 2
OUT HOUT GOUT FOUT E
1 2 3 4 5
1OUT E~H: Connect to HDMI TVs, monitors or ampliers for digital
video and audio output.
Note:WhenGroupModeisactive,theseoutputswilldisplayInput2.
2IN 2: Connect to HDMI source equipment such as a media player,
game console or set-top box.
3SERVICE: This port is reserved for rmware update use only.
4RS-232: Connect directly to a PC, laptop or other serial control
device with a 3-pin adapter cable to send RS-232 commands to
control the unit.
5 POWER LED & DC 5V: Plug the 5V DC power adapter into this
port and connect it to an AC wall outlet for power. The LED will
illuminate to indicate the unit is on and receiving power.

5
6.3 OSD Menu
All primary functions of this unit can be controlled by using the OSD (On
Screen Display) which is activated by pressing the Menu button on
the front of the unit. Use the + (PLUS), − (MINUS), and ENTER buttons to
navigate the OSD menu. Press the Menu button to back out from any
menu item and then press it again to close the menu.
MAIN MENU
Input Switch
Input Information
Output 4K Converter
Output Information
EDID Control
HDCP Control
CEC Control
Remote Control
OSD Setting
System Setting
The individual functions of the OSD will be introduced in the following
section. Items marked in BOLD are the factory default settings.
MAIN MENU LEVEL 2 LEVEL 3
Input Switch Switch to INPUT 1
Input 2
Auto Switch On
OFF
Group Mode On
OFF
1Switch to: Select the input to display when Group Mode is disabled.
Note:SelectinganInputwhenGroupModeisturnedonwill
disable Group Mode.
2Auto Switch: Enable or disable the auto switch function.
Table of contents
Other CYP Cables And Connectors manuals


