Corsair XENEON 27QHD240 User manual

Precautions 2
Package Contents 3
Assembly 4
Tilt, Swivel and Height Adjustment 5
Cable Management, Camera Mount (optional) & Other Mounting options 6
Connectivity 9
Operation 10
Controls 10
On-Screen Display (OSD) 10
OSD – Picture Settings 11
OSD – OSD Setting 13
OSD – System Setting 14
OSD – Audio 16
OSD – Input Select 17
OSD – Information 18
Frequently Asked Questions / Troubleshooting 19
Specications 22
Technical Specications 22
Supported Display Modes 23
Default Picture Preset Values 24
TABLE OF CONTENTS
ENGLISH
Scan QR code for Quickstart
guide and setup videos
1
ENGLISH

PRECAUTIONS
2
• Only use the accessories that are provided with the monitor or that which are recommended
by the manufacturer.
• Keep the plastic packaging bag for the product in a place that cannot be reached by
children.
• Before connecting the monitor to the power outlet, make sure that the voltage rating of the
power cable is compatible with the power specication in the country where you are located.
• The power cord plug must be connected to a properly wired and grounded power outlet.
• Do not touch the plug with wet hands, otherwise can easily cause electric shock.
• Place the monitor in a stable and well-ventilated place.
• Do not place the monitor near any heat sources such as electric radiators or direct sunlight.
• The holes or openings on the monitor are for ventilation. Do not cover or block the ventilation
holes with any objects.
• Do not use the monitor near water, drinks, or any type of liquids. Failure to do so may result
in electric shock or damage to the monitor.
• Make sure to unplug the monitor from the power outlet before cleaning.
• As the screen surface can be easily scratched, avoid touching the surface with any hard or
sharp object. Use a soft lint-free cloth instead of a tissue to wipe the screen. You may use a
glass cleaner to clean the equipment if required. However, never spray the cleaner directly
onto the screen.
• Disconnect the power cable if the equipment is not being used for a long period of time.
• Do not attempt to disassemble or repair the monitor yourself.
ENGLISH
XENEON 32QHD165 DISPLAY CONTENTS
3
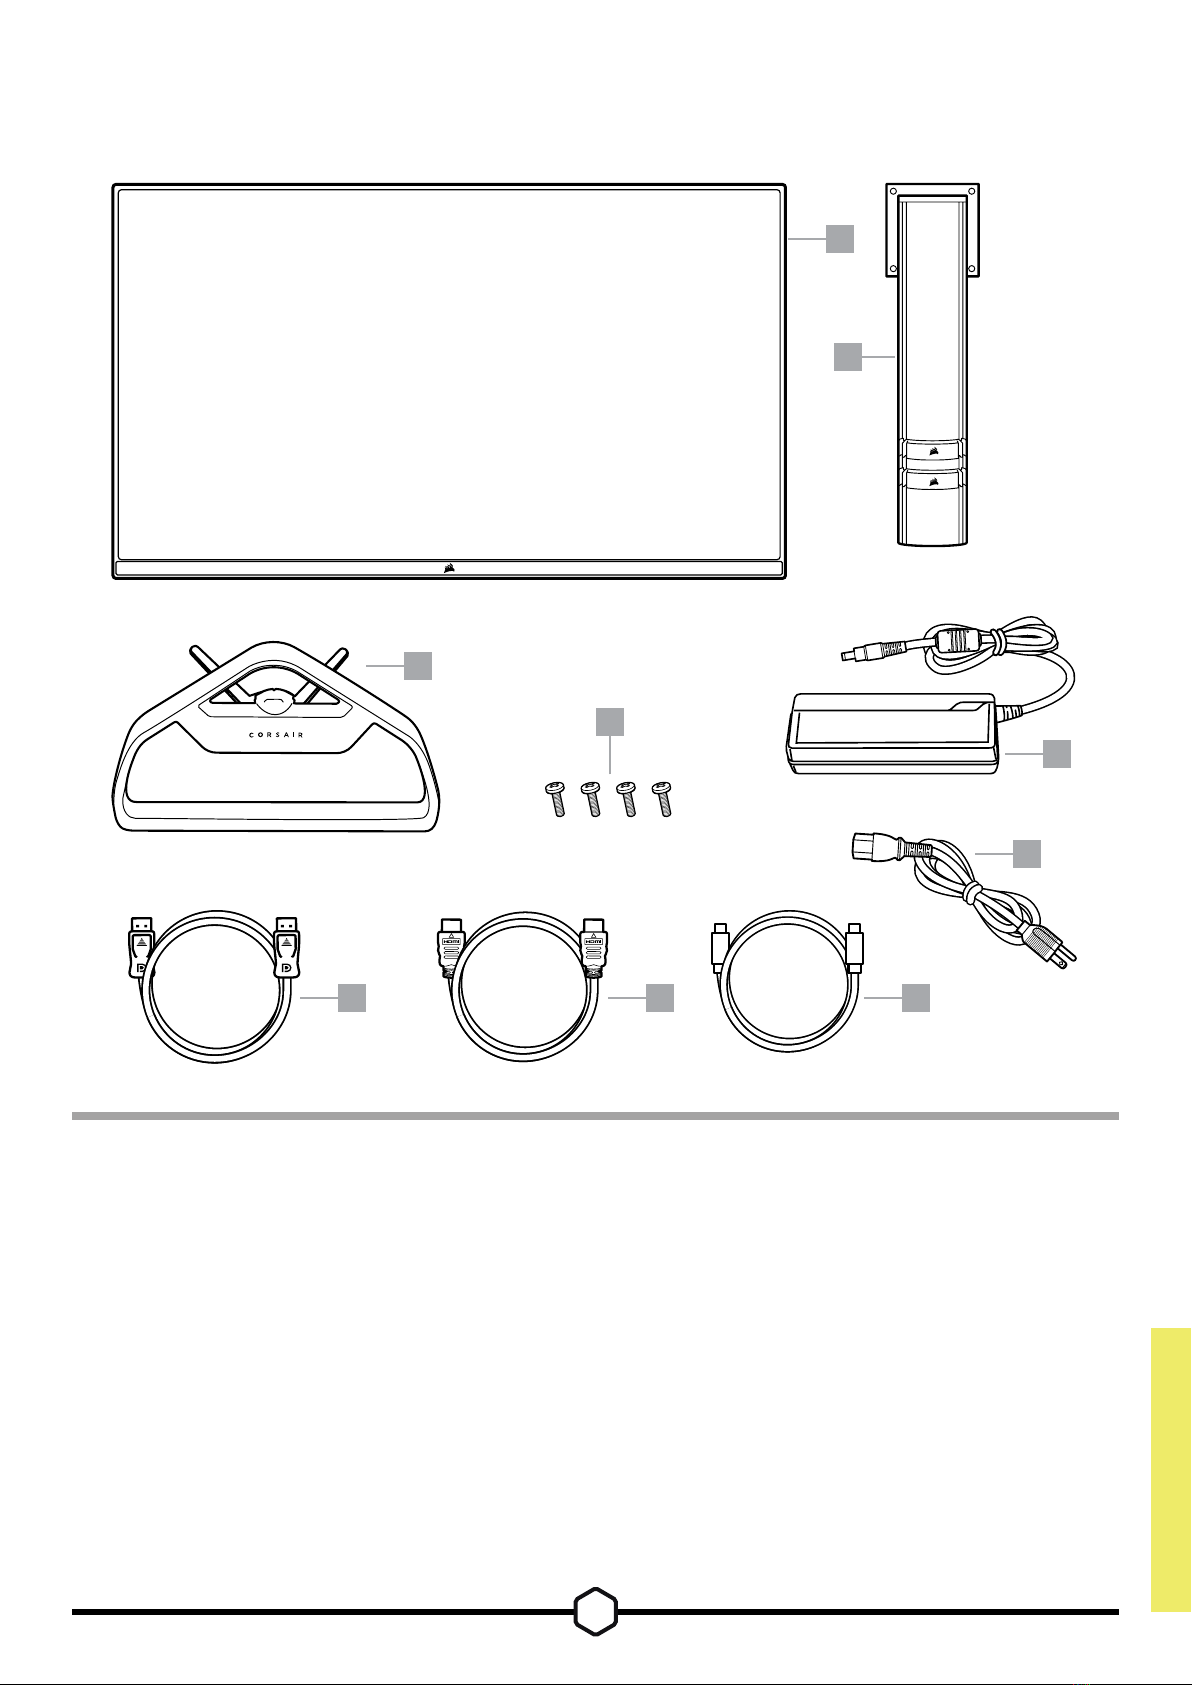
A — XENEON 32QHD165 DISPLAY PANEL
B— MOUNTING POST
C— STAND
D— MOUNTING SCREWS (X4)
E— AC ADAPTER
F— AC POWER CABLE
G— DISPLAYPORT CABLE (1.5M)
H— HDMI CABLE (1.5M)
I— USB-C CABLE (1.5M)
B
A
C
D
E
G H I
F
ENGLISH
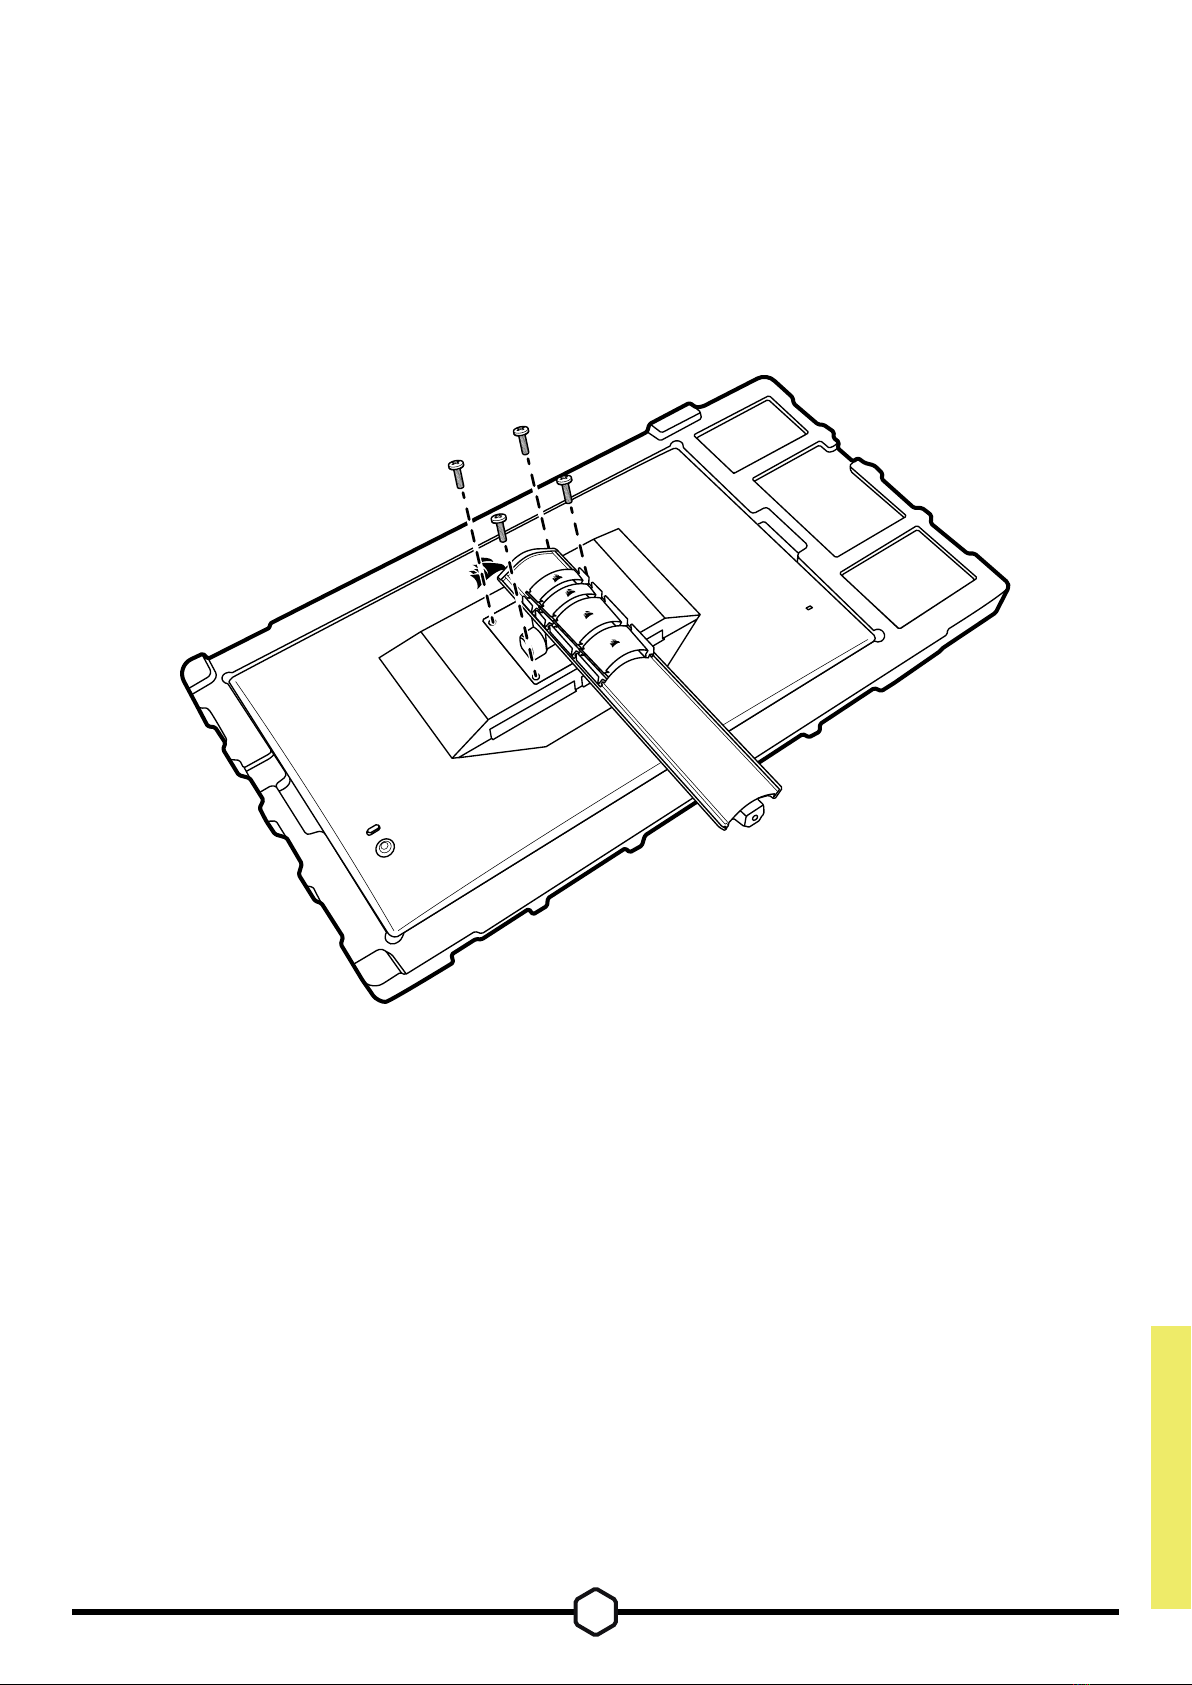
ASSEMBLY
4
1 2
3 4
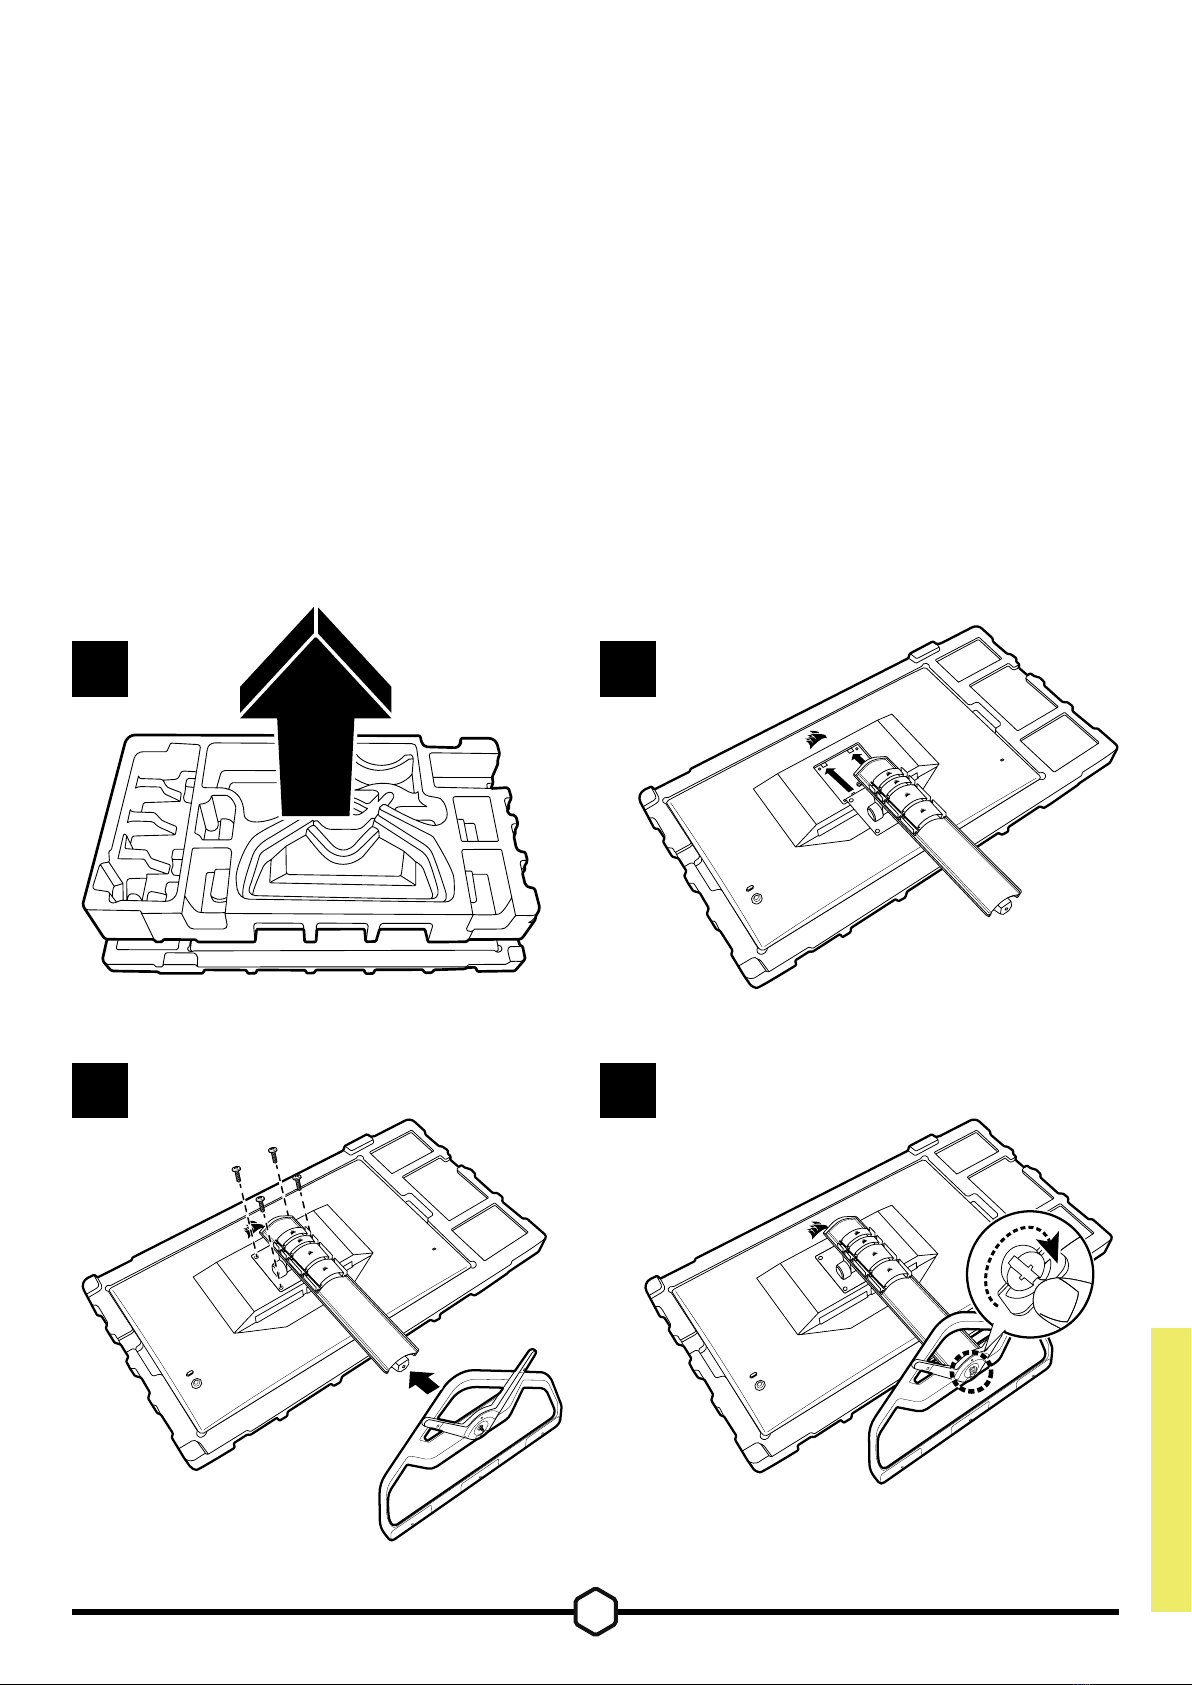
Before you begin, you will need a Phillips head screwdriver.
1. Remove top layer of foam (see image 1) that includes accessories and stand to expose
rear of panel.
2. Carefully open up the foam bag covering the panel to expose the mounting area. Do not
remove the panel from the bag
3. Align the monitor post with the mounting slots on the back of the panel (see image 2). Slide
the upper hooks into the mounting slots on the rear of the panel. Using a Phillips screwdriver,
secure the post to the panel with the 4 screws.
4. Attach the stand base to the monitor post (see image 3) and tighten the captive thumbscrew
into the bottom of the post (see image 4).
5. Slowly remove the monitor from the packaging and sit upright on your desk. Do not touch
the front of the panel while lifting the monitor.
ENGLISH
TILT, SWIVEL AND HEIGHT ADJUSTMENT
5
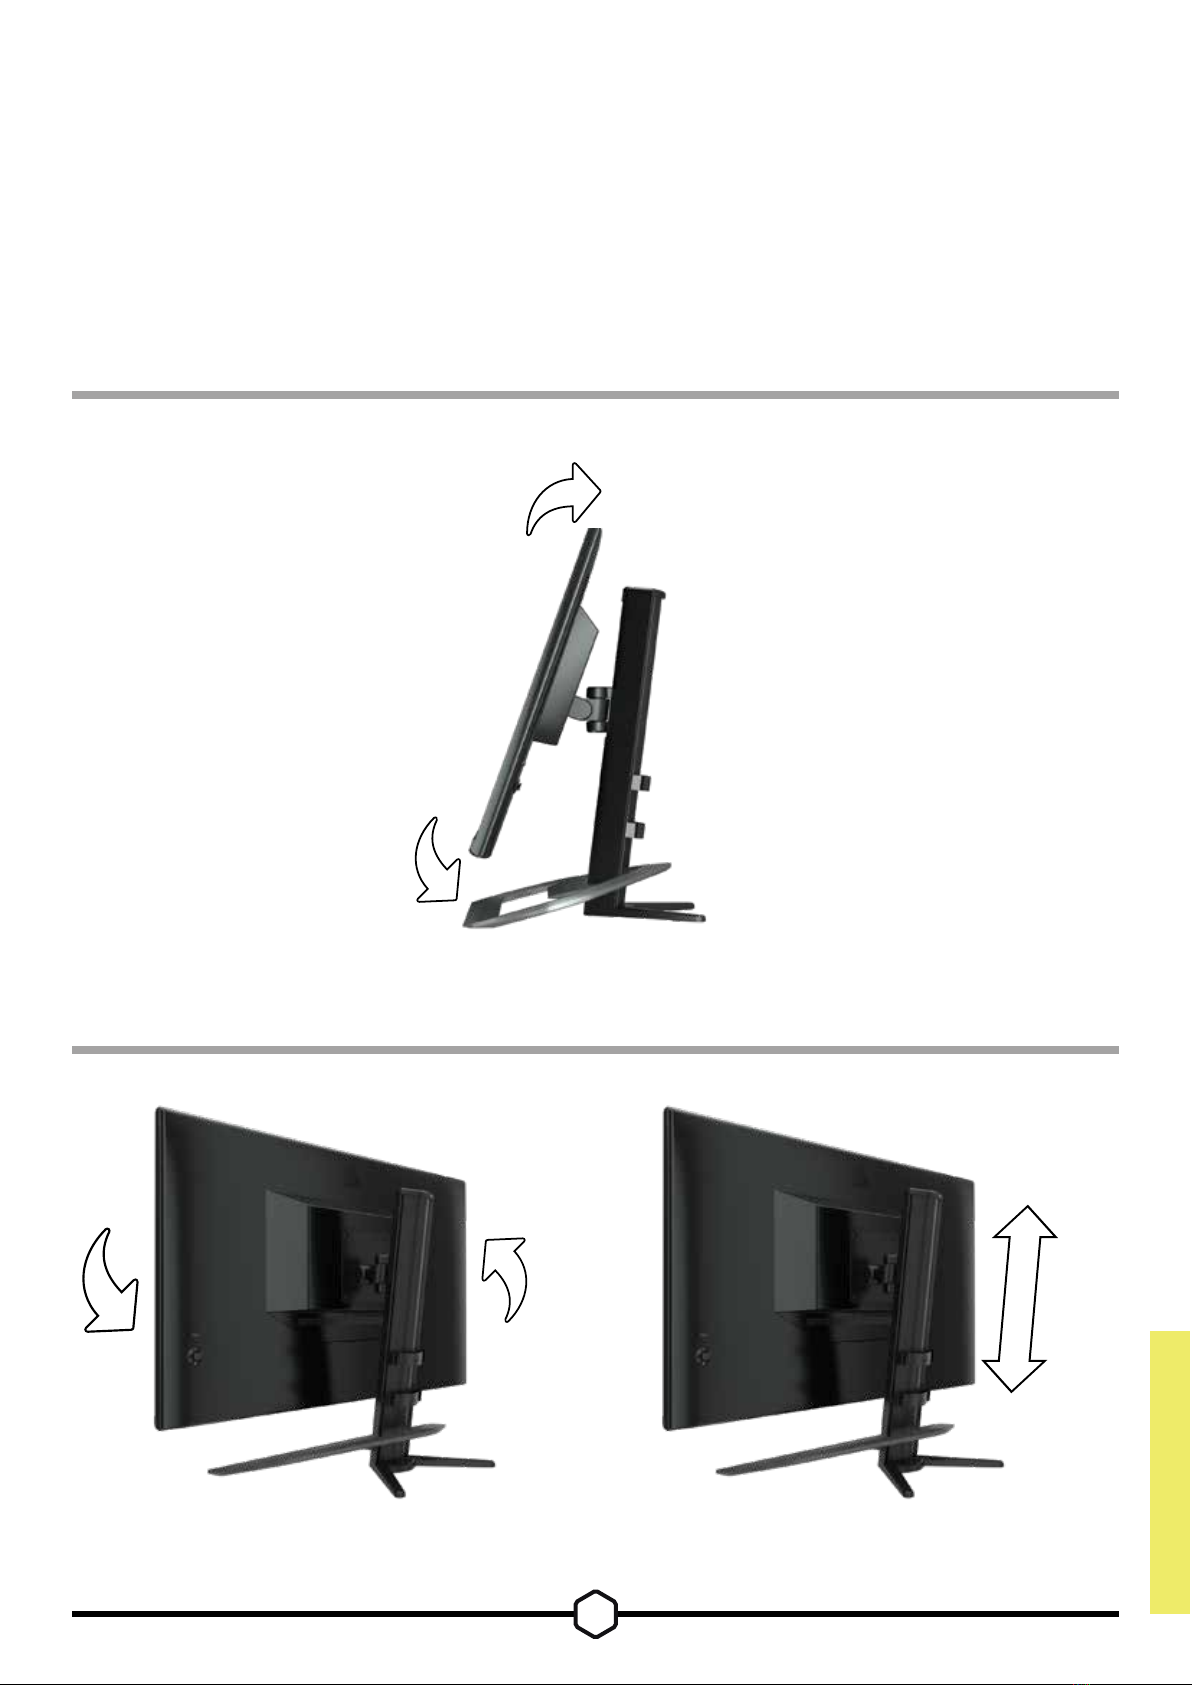
Your Xeneon display features a sturdy and stylish stand that offers
Tilt, Swivel and Height Adjustment
• Tilt -5 / +20 degrees
• Swivel ± 30 degrees
• Height Adjust Range 110mm (497mm ~ 607mm)
Tilt
Swivel & Height Adjustment
ENGLISH

CABLE MANAGEMENT, CAMERA MOUNT
(OPTIONAL) & OTHER MOUNTING OPTIONS
6
Your Xeneon display has built-in RapidRoute cable management to keep your desktop
tidy. There are 4 adjustable cable clips that slide up and down the monitor post to allow for
customizing your cable management needs. Open each cable clip by pressing the thumb
clasp to the left and pulling out on the cable clip.
If you need to remove the cable clips, remove the base from the post by sliding the cable
clips down and out of the channel guides.
ENGLISH
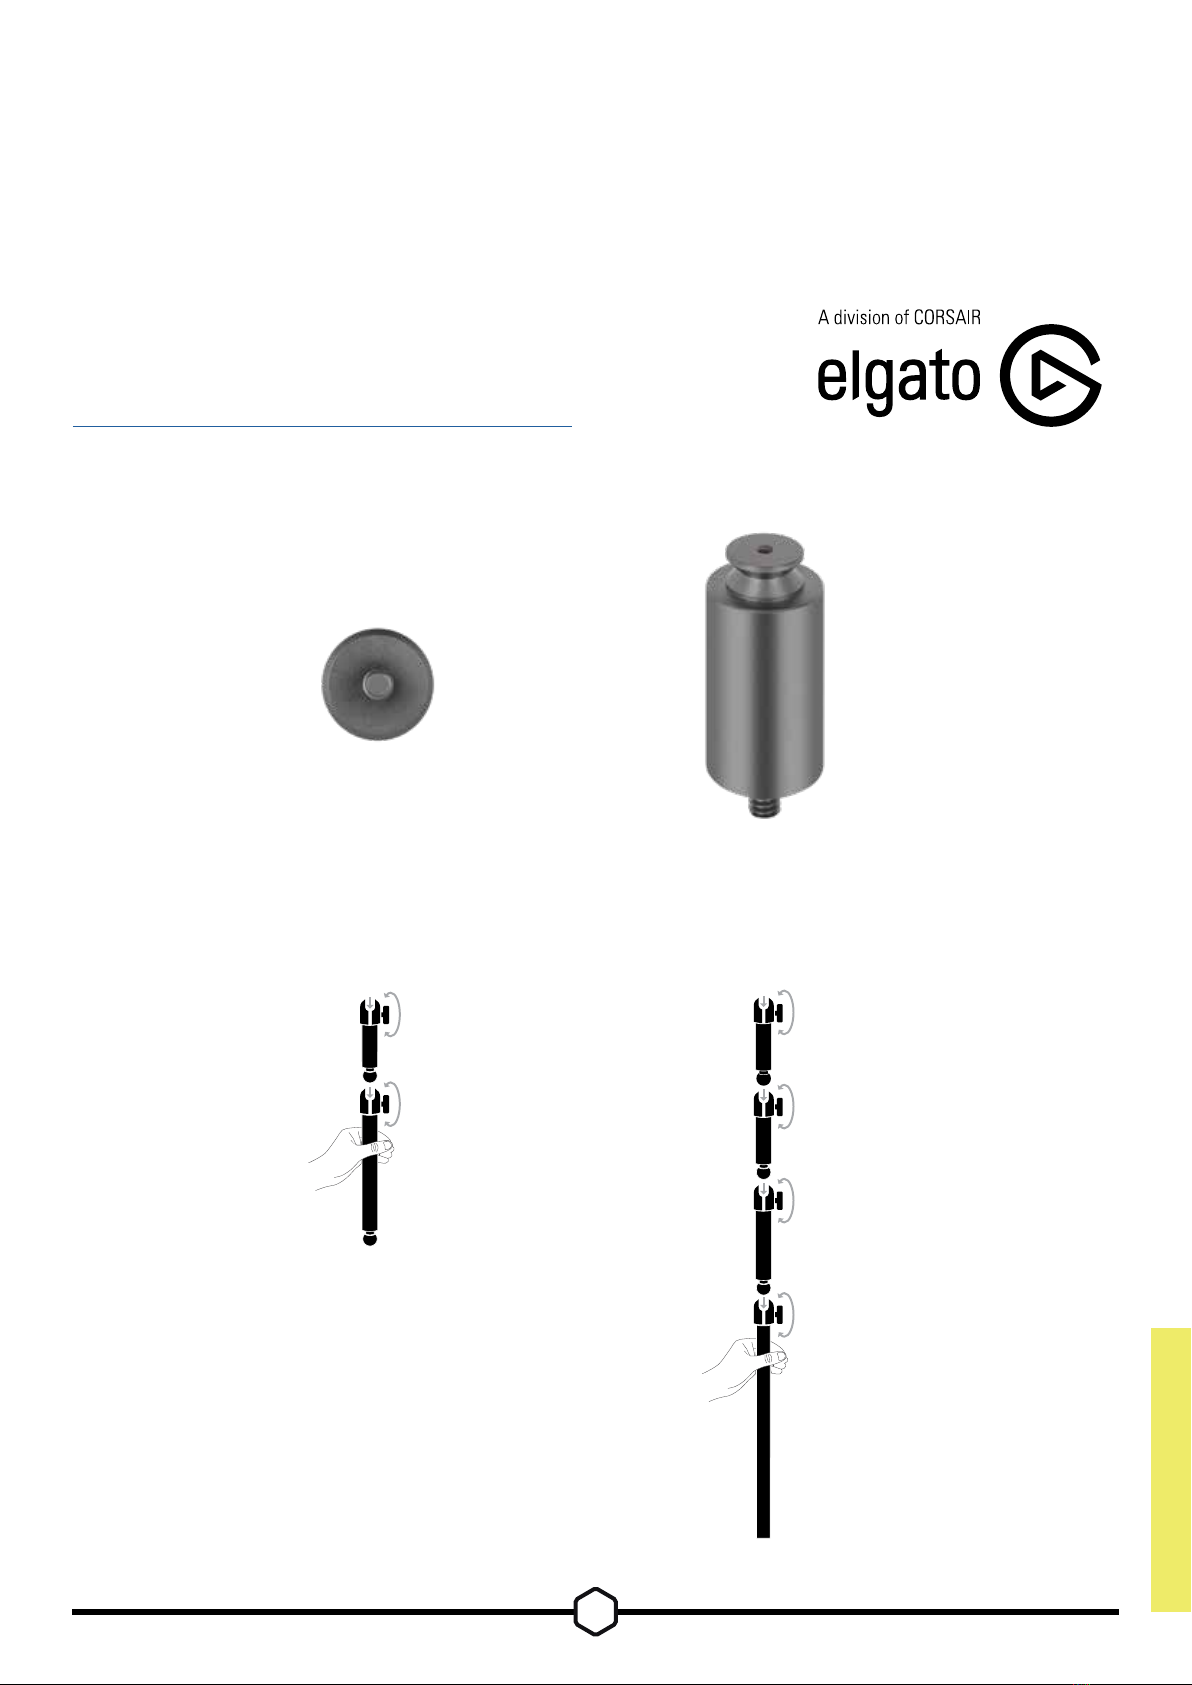
ELGATO FLEX ARM COMPATIBILITY
7
The top of the Xeneon display post features a ¼" connector to allow for the addition of the Elgato
Flex Arm and Camera Mounting Adapter Kit (sold separately) to attach a camera to the top of
your Xeneon display. These accessories are available to be purchased directly from Corsair.
• Xeneon Camera Adapter & Ball Mount Kit (CM-8900001)
• Elgato Flex Arm-S (10AAH9901) or Flex Arm-L (10AAC9901)
Setup video and instructions for Camera Mount is available at
https://www.corsair.com/xeneon-quickstart
FLEX ARM S FLEX ARM L
ENGLISH
WALL MOUNT COMPATIBILITY
8
Before mounting your display with compatible wall mount (VESA 100mm x 100mm),
make sure that:
• You have removed the stand from the display with a Phillips screwdriver
• The wall mount bracket that you purchased supports the weight of this display
Review the instructions that came with your wall mount for more information about how to
correctly mount your display.
WARNING: Your display has four VESA mounting holes on the back. You must secure a wall
mount bracket to all four holes. If you do not use all four holes, your display may fall and
cause property damage or personal injury.
Note: Wall-mount screws are not included. Screws: type M4, 10mm to 12mm length depending
on wall mount
ENGLISH
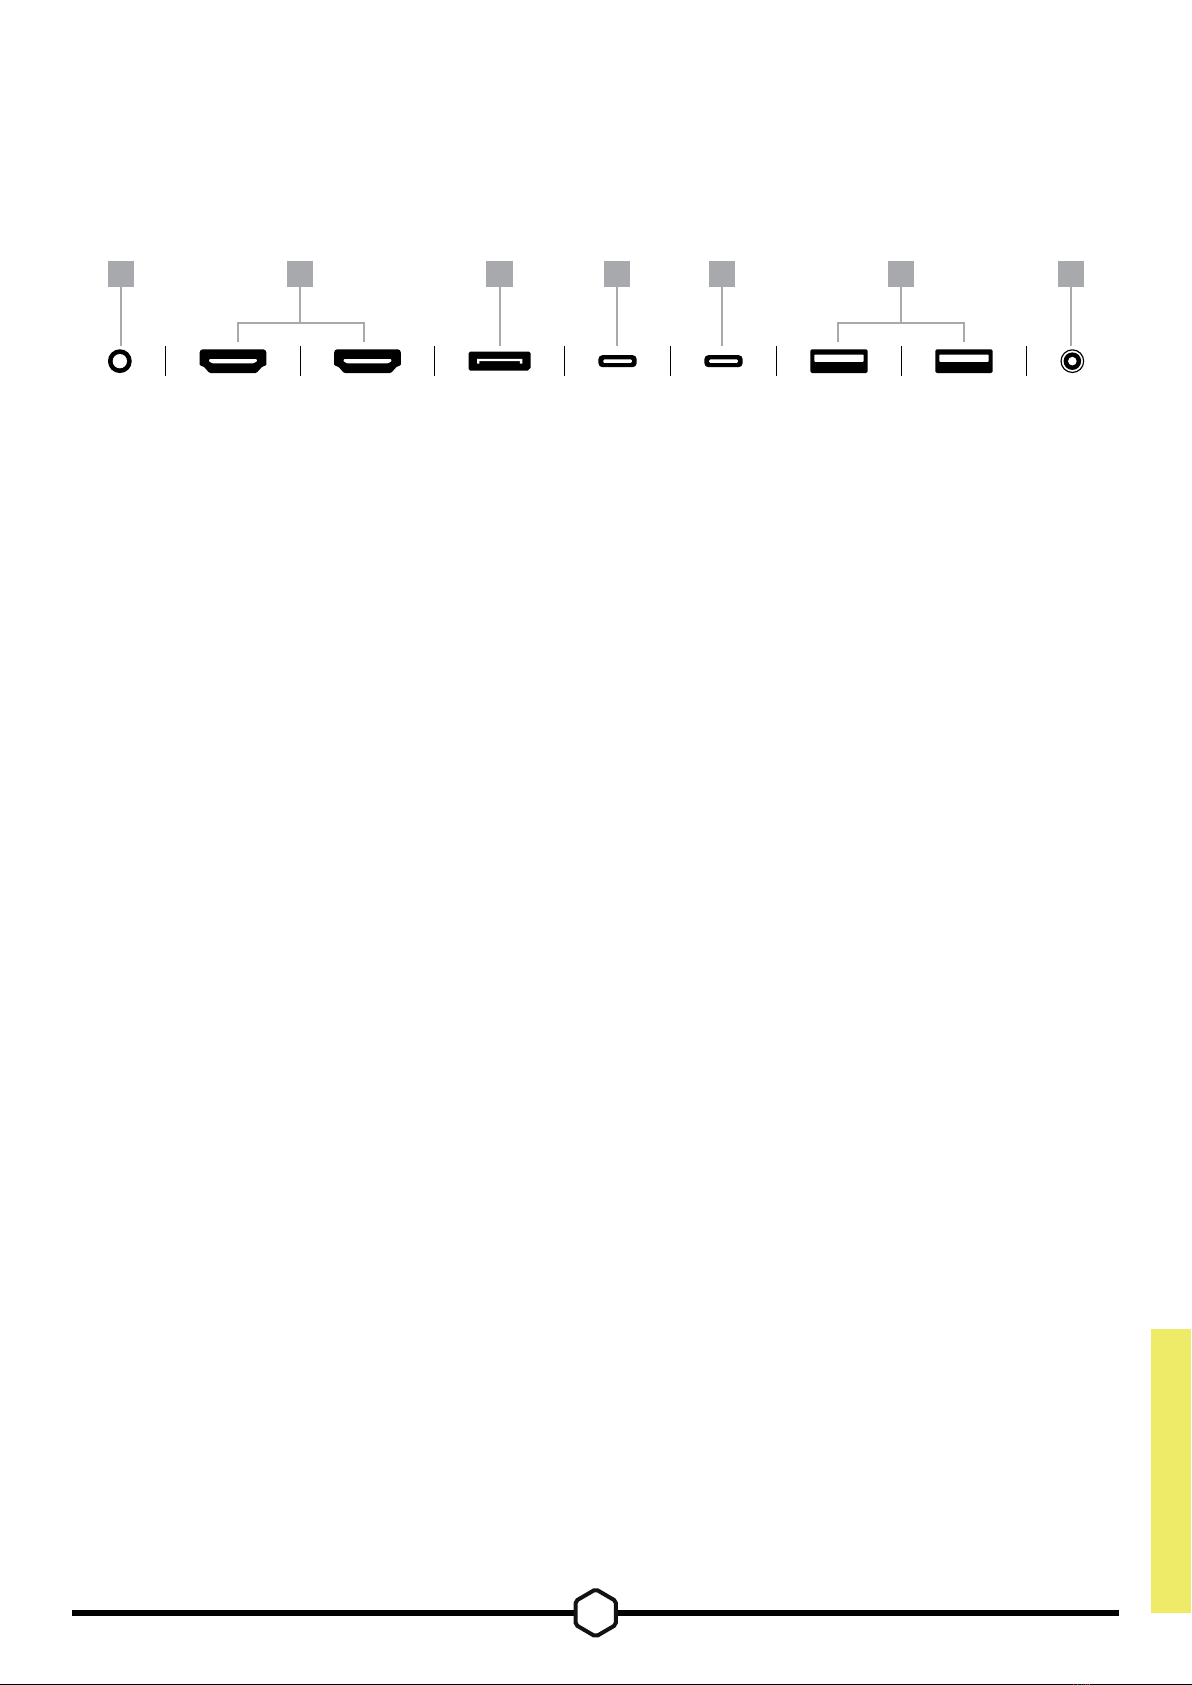
CONNECTIVITY
9
A B C D E F G
A. 3.5mm Audio Jack
Audio output from connected HDMI, DisplayPort, and USB-C Alt Mode devices.
B. HDMI 2.0 Ports
Dual HDMI inputs correspond to “HDMI-1” and “HDMI-2” inputs.
C. DisplayPort 1.4 Port
DisplayPort input corresponds to “DisplayPort” input.
D. USB Type-C Port
Supports DisplayPort Alt Mode and upstream USB input (connects to USB 3.0
ports). Corresponds to “TYPE-C” input. This port or the USB Upstream Port must
be connected to a USB-capable port on your host device to support CORSAIR iCUE
functionality and downstream USB 3.0 ports.
E. USB-IN Port
Upstream USB input port. This port or the USB Type-C Port must be connected to a
USB-capable port on your host device to support CORSAIR iCUE functionality and
downstream USB 3.0 ports.
F. USB 3.0 Ports
Dual Type-A 5Gbps USB ports.
G. DC In
Connects to included AC adapter.
HDMI-1 HDMI-2 DP TYPE-C
DP ALT
USB-IN USB 3.0 USB 3.0 DC IN
AUDIO
OUT
ENGLISH
This manual suits for next models
1
Table of contents
Languages:
Other Corsair Monitor manuals


