ConServ FR 1700SS-N User manual

Model - FR 1700SS-N
REFRIGERATOR
FREEZER
Read the instructions carefully and keep for future reference
OWNER’S MANUAL

installing as built-in
using solvents
Mishandling e.g. breakage of door handle or shelves
ConServ Appliances
(Conserv
Conserv
Conserv
Conserv
1-800-776-3538
Conserv
1

State of California Proposition 65 Warnings:
WARNING:This product contains one or more chemicals known to the State of California to cause cancer.
WARNING:This product contains one or more chemicals known to the State of California to cause birth defects or
other reproductive harm.
Do not puncture or damage refrigerant tubing.
Safe Disposal
Before discarding the refrigerator, remove doors and shelves in order to prevent risk
of child entrapment.
U
Use a dedicated power outlet and a three prong power socket, that is properly
grounded.
Do not use the power cord or plug if it is damaged.
When removing the power plug, do not pull on the cord. Grasp the plug firmly and pull
it out from the socket.
Unplug the unit first when doing maintenance or repair and when replacing the light
bulb.
Keep ventilation openings free of obstructions.
Dispose off this appliance in accordance with local regulations.
Do not use extension cords or ungrounded two prong adapters.
This appliance is not intended for use by children or persons with reduced physical,
sensory or mental capabilities, or lack of experience and knowledge, unless they have
been given supervision or instruction concerning use of the appliance by a person
responsible for their safety. Children should be supervised to ensure that they do not
play with the appliance.
Customer Service.
Do not put acid or flammable or volatile materials inside the appliance.
2

Placement
This unit is designed to be free standing and not built-in.
The unit should be placed in a ventilated and dry environment.
Do not put the unit in direct sunlight, and keep it as far as
possible from heat sources.
Don't put the unit in a cold area.
The unit should be placed on flat and stable ground. Keep the
unit level by adjusting the 2 front leg levelers.
There should be 5" (12.7cm) space around the top, sides and back
of the unit as shown, to allow proper ventilation.
Before Use
Before initially plugging in the refrigerator, keep the unit standing upright and stable for
6 hours. The refrigerator should be on for up to 4 hours and adequately cold, before
putting food in it.
It is recommended that you clean the interior of the unit before placing food inside.
5" (12.7cm)
5" (12.7cm)
Turn the leveling leg counter-clockwise as far as it will go, until
Slowly turn the leveling leg clockwise until the appliance is level.
the top of the foot is touching the bottom of the chassis.
1.
2.
The appliance ships with the handle inside the cabinet to protect it from damage.
The appliance should be unplugged before installing the handle.
1. Position the handle over the exposed door handle posts.
2. Remove the two screws from the side of door with a screwdriver, insert screws into the
handle bracket and fix it to the side of door and tighten it until firmly attached.
Handle Installation
5" (12.7cm)
3
This appliance is intended for household use.
This function should be used when the appliance is first turned on or when you want to reach
the coldest temperature as quickly as possible. Press and hold the fast freeze button for
three seconds until the LED indicator illuminates. To cancel the fast freeze function press
and hold the fast freeze button until the LED indicator turns off. When the fast freeze cycle is
completed or is canceled, the appliance reverts back to the last set temperature.
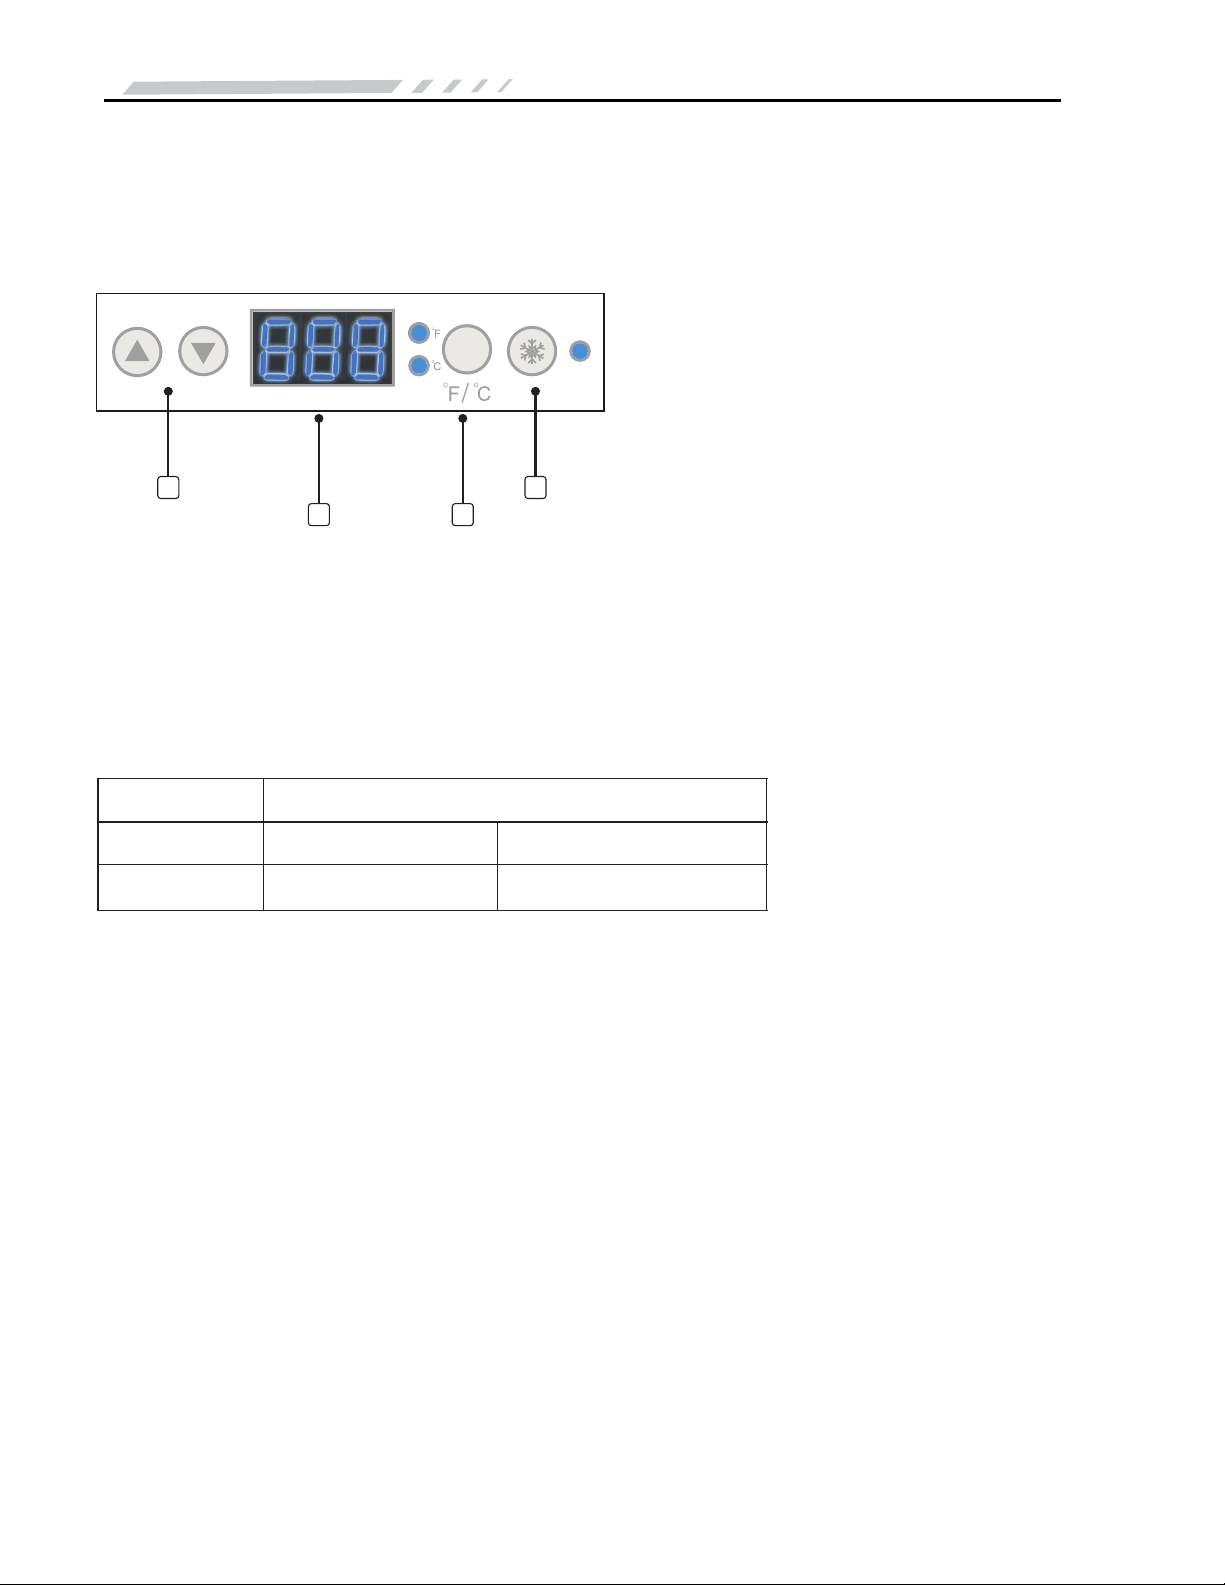
Control Panel
1
23
4
1. Up and Down arrows to select
2. Temperature display
3. Selection button for °F or °C
4. Fast Freeze button
This appliance can be used as either a refrigerator or a freezer. The table below shows the
temperature ranges. You can set the desired temperature by pressing the Up and Down
arrows on the control panel. The display window will show the selection.
Setting the Temperature
Operation
To switch between °C and °F, press the °F/°C button and the corresponding indicator light
will illuminate.
Temperature Range
Refrigerator
0°C to 8°C
32°F to 46°F
Freezer
-24°C to -14°C
-11.2°F to 6.8°F
Fast Freeze Function
This appliance is equipped with a door alarm that will sound if the door is left open for more
than 3 minutes. The alarm will beep and the display will flash continuously until the door is
closed.
Open Door Alarm
Operating Instructions
temperature
4

length of time during this process, it must be allowed
to remain upright for 6 hours before plugging it in to
avoid damage to the internal components.
1. Remove one screw from top hinge cover (A) and
then remove top hinge cover.
2. Remove four screws from top hinge (B) and then
remove top hinge, top door spindle (C) and top
hinge spacer (D).
3. Remove door from unit and set aside. Ensure
that you do not damage the bottom door
spindles (F).
4. Remove roller caps at bottom of unit (E).
5. Remove four screws each from both bottom
hinges and then swap the bottom hinges (J).
Ensure that the C-shaped hinge is on the side of
the unit opposite the handle.
6. Reinstall four screws each in both bottom
hinges (F).
7. Reinstall the bottom door spindles (F and G).
8. Reinstall the roller caps (E) at the bottom of the
unit.
9. Reinstall the door and ensure that the bottom
door spindle (F) is placed in the hole in bottom
hinge that is closest to the outside of the unit.
10. Replace hinge spacer (D), replace top door spindle
(C), reinstall top hinge with four screws (B). Ensure
that you fl ip the top hinge to its opposite side so
that the top door spindle is in the correct position.
11. Reinstall the top hinge cover (A) with one screw.
A top hinge cover for the opposite side of the unit
can be found in the accessory bag inside the unit.
Note: When installing the door, ensure that the top
of the door is level with the top of the cabinet. If the
door is not level, the rubber gasket will not make
a good seal with the cabinet which can cause the
appliance to malfunction.
Door Reversal Instructions
If the appliance is placed on its back or side for any
5

Clean inside, behind and around the refrigerator regularly, using water and mild
detergent, and a damp cloth (not wet).
Check and clean the door gasket regularly to ensure that the door closes and seals
properly.
Never use boiling water, harsh cleaning chemicals or abrasive materials.
Extended Absence or Vacation
The door must be left open and the unit must be placed in a well ventilated area to
avoid build up of odor.
If the unit will be switched off for a long time, the plug should be pulled out, and the unit
cleaned throughly.
Defrost
This unit is equipped with an automatic defrost function and does not require manual
defrosting. Do not use mechanical devices to defrost the appliance. Defrost water from
the appliance is channeled into a drip tray located above the compressor. Heat transfer
from the compressor causes the defrost water to evaporate.
Maintanance
Simply
The following phenomenon is normal
6

POSSIBLE CAUSEPROBLEM
The unit does not work
• A fuse may be blown or the circuit breaker
tripped
• Plug not fully inserted into the wall outlet
Internal temperature not cold
enough
• Temperature setting is too warm
• Door is not shut properly or opened frequently
• Exhaust vent is obstructed
• A large quantity of warm food has been placed
in the unit
• Close proximity to heat source or direct sunlight
• Ambient temperature or humidity is very high
Appliance runs continuously • Temperature setting is too cold
• Door not shut properly or opened frequently
• Exhaust vent is obstructed
•
• Close proximity to heat source or direct sunlight
• Ambient temperature or humidity is very high
Internal temperature is too cold • Temperature setting is too cold
Noises • Parts are expanding and / or the refrigerant is
circulating; this is normal
•
•
•
Doors cannot be closed properly •
•
A large quantity of warm food has been placed
in the unit
Troubleshooting
Power is not on or the unit is not connected to
power
Low voltage
Floor is not flat, and the unit is not placed in a
stable position.
The door is obstructed by items inside the unit.
The door gasket is not providing a good seal.
Heat the gasket with a hair dryer.
ERROR CODES - Shown on control panel display
E1: Sensor failure
E2: Defrosting sensor failure
E3: Sensor failure and defrosting sensor failure
H: High temperature
7

FR 1700SS-N
Upright - Freezer
No Frost
110V~60Hz
180 W
3.5 A
R600a (72g / 2.57oz)
189 lbs / 85.7 kg
67.3x30x28.5 / 171x76x72.4 cm
Weight
Energy Class DOE
Refrigerant, Amount
Rated Current
Rated Power
Rated Voltage/Frequency
Refrigerating Mode
Category
Model No.
Overall Space Required In Use (H*W*D) inches
Dimensions (H*W*D) inches
P
72.3x35x33.5 / 183.6x88.8x85 cm
E D
Foaming Agent CyclopentaneCyclopentane
8
Table of contents
Other ConServ Refrigerator manuals

ConServ
ConServ MDRF 1010ESE User manual

ConServ
ConServ CT 375 User manual

ConServ
ConServ CREF 26 SS User manual

ConServ
ConServ FR1700EL User manual

ConServ
ConServ RF 1012 DC S User manual

ConServ
ConServ TMRI 180 S User manual

ConServ
ConServ CRF 450 B User manual

ConServ
ConServ FR1350SS User manual

ConServ
ConServ MDFR 280WE User manual

ConServ
ConServ FR 1400SS-N User manual