Clevo XMG-U706 User manual


Preface
V
Preface
Instructions for Care and Operation
The notebook computer is quite rugged, but it can be damaged. To prevent this, follow these suggestions:
1. Don’t drop it, or expose it to shock. If the computer falls, the case and the components could be damaged.
2. Keep it dry, and don’t overheat it. Keep the computer and power supply away from any kind of heating element. This
is an electrical appliance. If water or any other liquid gets into it, the computer could be badly damaged.
3. Follow the proper working procedures for the computer. Shut the computer down properly and don’t forget to save
your work. Remember to periodically save your data as data may be lost if the battery is depleted.
Do not expose the computer
to any shock or vibration.
Do not place it on an unstable
surface.
Do not place anything heavy
on the computer.
Do not expose it to excessive
heat or direct sunlight.
Do not leave it in a place
where foreign matter or mois-
ture may affect the system.
Don’t use or store the com-
puter in a humid environment.
Do not place the computer on
any surface which will block
the vents.
Do not turn off the power
until you properly shut down
all programs.
Do not turn off any peripheral
devices when the computer is
on.
Do not disassemble the com-
puter by yourself.
Perform routine maintenance
on your computer.

Preface
VI
Preface
4. Avoid interference. Keep the computer away from high capacity transformers, electric motors, and other strong mag-
netic fields. These can hinder proper performance and damage your data.
5. Take care when using peripheral devices.
Power Safety
The computer has specific power requirements:
• Only use a power adapter approved for use with this computer.
• Your AC adapter may be designed for international travel but it still requires a steady, uninterrupted power supply. If you are
unsure of your local power specifications, consult your service representative or local power company.
• The power adapter may have either a 2-prong or a 3-prong grounded plug. The third prong is an important safety feature; do
not defeat its purpose. If you do not have access to a compatible outlet, have a qualified electrician install one.
• When you want to unplug the power cord, be sure to disconnect it by the plug head, not by its wire.
• Make sure the socket and any extension cord(s) you use can support the total current load of all the connected devices.
• Before cleaning the computer, make sure it is disconnected from any external power supplies.
Use only approved brands of
peripherals.
Unplug the power cord before
attaching peripheral devices.
Do not plug in the power
cord if you are wet.
Do not use the power cord if
it is broken.
Do not place heavy objects
on the power cord.
Removal Warning
When removing any
cover(s) and screw(s)
for the purposes of de-
vice upgrade, remem-
ber to replace the
cover(s) and screw(s)
before restoring power
to the system.
Also note the following
when the cover is re-
moved:
• Hazardous mov-
ing parts.
• Keep away from
moving fan blades
Power Safety
Warning
Before you undertake
any upgrade proce-
dures, make sure that
you have turned off the
power, and discon-
nected all peripherals
and cables (including
telephone lines and
power cord). You must
also remove your bat-
tery in order to prevent
accidentally turning the
machine on.

Preface
VII
Preface
Battery Precautions
• Only use batteries designed for this computer. The wrong battery type may explode, leak or damage the computer.
• Do not continue to use a battery that has been dropped, or that appears damaged (e.g. bent or twisted) in any way. Even if the
computer continues to work with a damaged battery in place, it may cause circuit damage, which may possibly result in fire.
• Recharge the batteries using the notebook’s system. Incorrect recharging may make the battery explode.
• Do not try to repair a battery pack. Refer any battery pack repair or replacement to your service representative or qualified service
personnel.
• Keep children away from, and promptly dispose of a damaged battery. Always dispose of batteries carefully. Batteries may explode
or leak if exposed to fire, or improperly handled or discarded.
• Keep the battery away from metal appliances.
• Affix tape to the battery contacts before disposing of the battery.
• Do not touch the battery contacts with your hands or metal objects.
Battery Guidelines
The following can also apply to any backup batteries you may have.
• If you do not use the battery for an extended period, then remove the battery from the computer for storage.
• Before removing the battery for storage charge it to 60% - 70%.
• Check stored batteries at least every 3 months and charge them to 60% - 70%.
Battery Disposal
The product that you have purchased contains a rechargeable battery. The battery is recyclable. At the end of its useful life, under var-
ious state and local laws, it may be illegal to dispose of this battery into the municipal waste stream. Check with your local solid waste
officials for details in your area for recycling options or proper disposal.
Caution
Danger of explosion if battery is incorrectly replaced. Replace only with the same or equivalent type recommended by the manufacturer.
Discard used battery according to the manufacturer’s instructions.
Battery Level
Click the battery icon in the taskbar to see the current battery level and charge status. A battery that drops below a level of 10%
will not allow the computer to boot up. Make sure that any battery that drops below 10% is recharged within one week.

Introduction
1 - 2 Overview
1.Introduction
Specifications
Latest Specification Information
The specifications listed here are correct at the
time of sending them to the press. Certain items
(particularly processor types/speeds) may be
changed, delayed or updated due to the manu-
facturer's release schedule. Check with your
service center for more details.
CPU
The CPU is not a user serviceable part. Ac-
cessing the CPU in any way may violate your
warranty.
Processor Options
Intel® Core™ i7 Processor
i7-6700K (4.00GHz)*
8MB L3 Cache, 14nm, DDR4-2133MHz, TDP 91W
Intel® Core™ i5 Processor
i5-6600K (3.50GHz)*
6MB L3 Cache, 14nm, DDR4-2133MHz, TDP 91W
i5-6500 (3.20GHz)
6MB L3 Cache, 14nm, DDR4-2133MHz, TDP 65W
i5-6400 (2.70GHz)
6MB L3 Cache, 14nm, DDR4-2133MHz, TDP 65W
*Support Intel® XTU over-clocking technology
LCD Options
17.3" (43.94cm), 16:9, FHD (1920x1080)
Video Adapter Options
NVIDIA® GeForce GTX 980M PCIe Video Card
8GB GDDR5 Video RAM on board
NVIDIA® GeForce GTX 970M PCIe Video Card
6GB GDDR5 Video RAM
NVIDIA® GeForce GTX 965M PCIe Video Card
4GB GDDR5 Video RAM
Core Logic
Intel® Z170 Chipset
BIOS
AMI BIOS (64Mb SPI Flash-ROM)
Memory
Four 260 Pin SO-DIMM Sockets Supporting DDR4 2133MHz
Memory
(The real memory operating frequency depends on the FSB
of the processor.)
Memory Expandable from 4GB (minimum) up to 64GB
(maximum)
Pointing Device
Built-in Touchpad (scrolling key functionality integrated)
Keyboard
Full Color Illuminated Full-size Winkey Keyboard (with
numeric keypad and anti-ghost keys)
Audio
High Definition Audio Compliant Interface
S/PDIF Digital Output
Two Speakers
Sound Blaster Audio
ANSP™3D Sound Technology on Headphone Output
Built-In Array Microphone
Sub-Woofer
External 7.1CH Audio Output Supported by Headphone,
Microphone, Line-In and S/PDIF Out Jacks
Storage
Two changeable 2.5" (6cm) 7.0mm (h)/ 9.5mm (h) SATA
(Serial) Hard Disk Drives/Solid State Drives (SSD) support-
ing RAID level 0/1
(Factory Option) Two M.2 SATA 2280 SSDs supporting
RAID level 0/1
Or
(Factory Option) Two M.2 PCIe
Gen3 x4 2280 SSDs supporting RAID level 0/1
Security
Security (Kensington® Type) Lock Slot
BIOS Password
(Factory Option) Fingerprint Reader Module
Trusted Platform Module 2.0

Introduction
Overview 1 - 3
1.Introduction
Interface
One USB 3.1 Port/Thunderbolt Port
Three USB 3.0 Ports
One eSATA/Powered 3.0 USB Port
One HDMI-Out Port
Two DisplayPorts (1.2)
One S/PDIF Out Jack
One Headphone/Speaker-Out Jack
One Microphone-In Jack
One Line-In Jack
One RJ-45 LAN Jack
One DC-In Jack
M.2 Slots
Slot 1 for Combo WLAN and Bluetooth Module
Slot 2 for SATA or PCIe Gen3 x4 SSD
Slot 3 for SATA or PCIe Gen3 x4 SSD
Communication
Built-In Gigabit Ethernet LAN
2.0M FHD PC Camera Module
WLAN/ Bluetooth M.2 Modules:
(Factory Option) Intel® Wireless-N 7265 Wireless LAN
(802.11b/g/n) + Bluetooth 4.0
(Factory Option) Intel® Wireless-AC 3165 Wireless LAN
(802.11ac) + Bluetooth 4.0
(Factory Option) Intel® Wireless-AC 8260 Wireless LAN
(802.11ac) + Bluetooth 4.1
(Factory Option) Qualcomm® Atheros Killer™ Wireless-AC
1535 Wireless LAN (802.11ac) + Bluetooth 4.1
(Factory Option) Third-Party Wireless LAN 802.11b/g/n +
Bluetooth 4.0
Card Reader
Embedded Multi-In-1 Push-Push Card Reader
MMC (MultiMedia Card) / RS MMC
SD (Secure Digital) / Mini SD / SDHC/ SDXC (up to UHS-
II)
Environmental Spec
Temperature
Operating: 10°C - 35°C
Non-Operating: -20°C - 60°C
Relative Humidity
Operating: 20% - 80%
Non-Operating: 10% - 90%
Power
Removable 8-cell Smart Lithium-Ion Battery Pack, 82WH
Full Range AC/DC Adapter
AC Input: 100 - 240V, 50 - 60Hz
DC Output: 19.5V, 11.8A (230W)
(Factory Option) DC Output: 19.5V, 16.9A (330W)
Dimensions & Weight
418mm (w) * 282mm (d) * 16 - 38.9mm (h)
3.9kg (Barebone System with Video Card and 82WH Battery)

Introduction
1 - 4 External Locator - Top View with LCD Panel Open
1.Introduction
External Locator - Top View with LCD Panel Open
Figure 1
Top View
1. PC Camera
2. PC Camera LED
3. Built-In
Microphone
4. LCD
5. Speakers
6. Power Button
7. LED Lock
Indicators
8. Keyboard
9. TouchPad and
Buttons
10. Fingerprint
Reader (Optional)
2 1
8
9
76
5
4
5
3
10
3
7

Introduction
External Locator - Front & Right side Views 1 - 5
1.Introduction
External Locator - Front & Right side Views
Figure 2
Front Views
1. Light Bar
2. LED Power
Indicators
Figure 3
Right Side Views
1. USB 3.0 Port
2. S/PDIF-Out Jack
3. Headphone Jack
4. Microphone Jack
5. Line-In Jack
6. Security Lock Slot
1
Front
2
Right
12 3 4 5 6
Introduction
1 - 6 External Locator - Left Side & Rear View
1.Introduction
External Locator - Left Side & Rear View
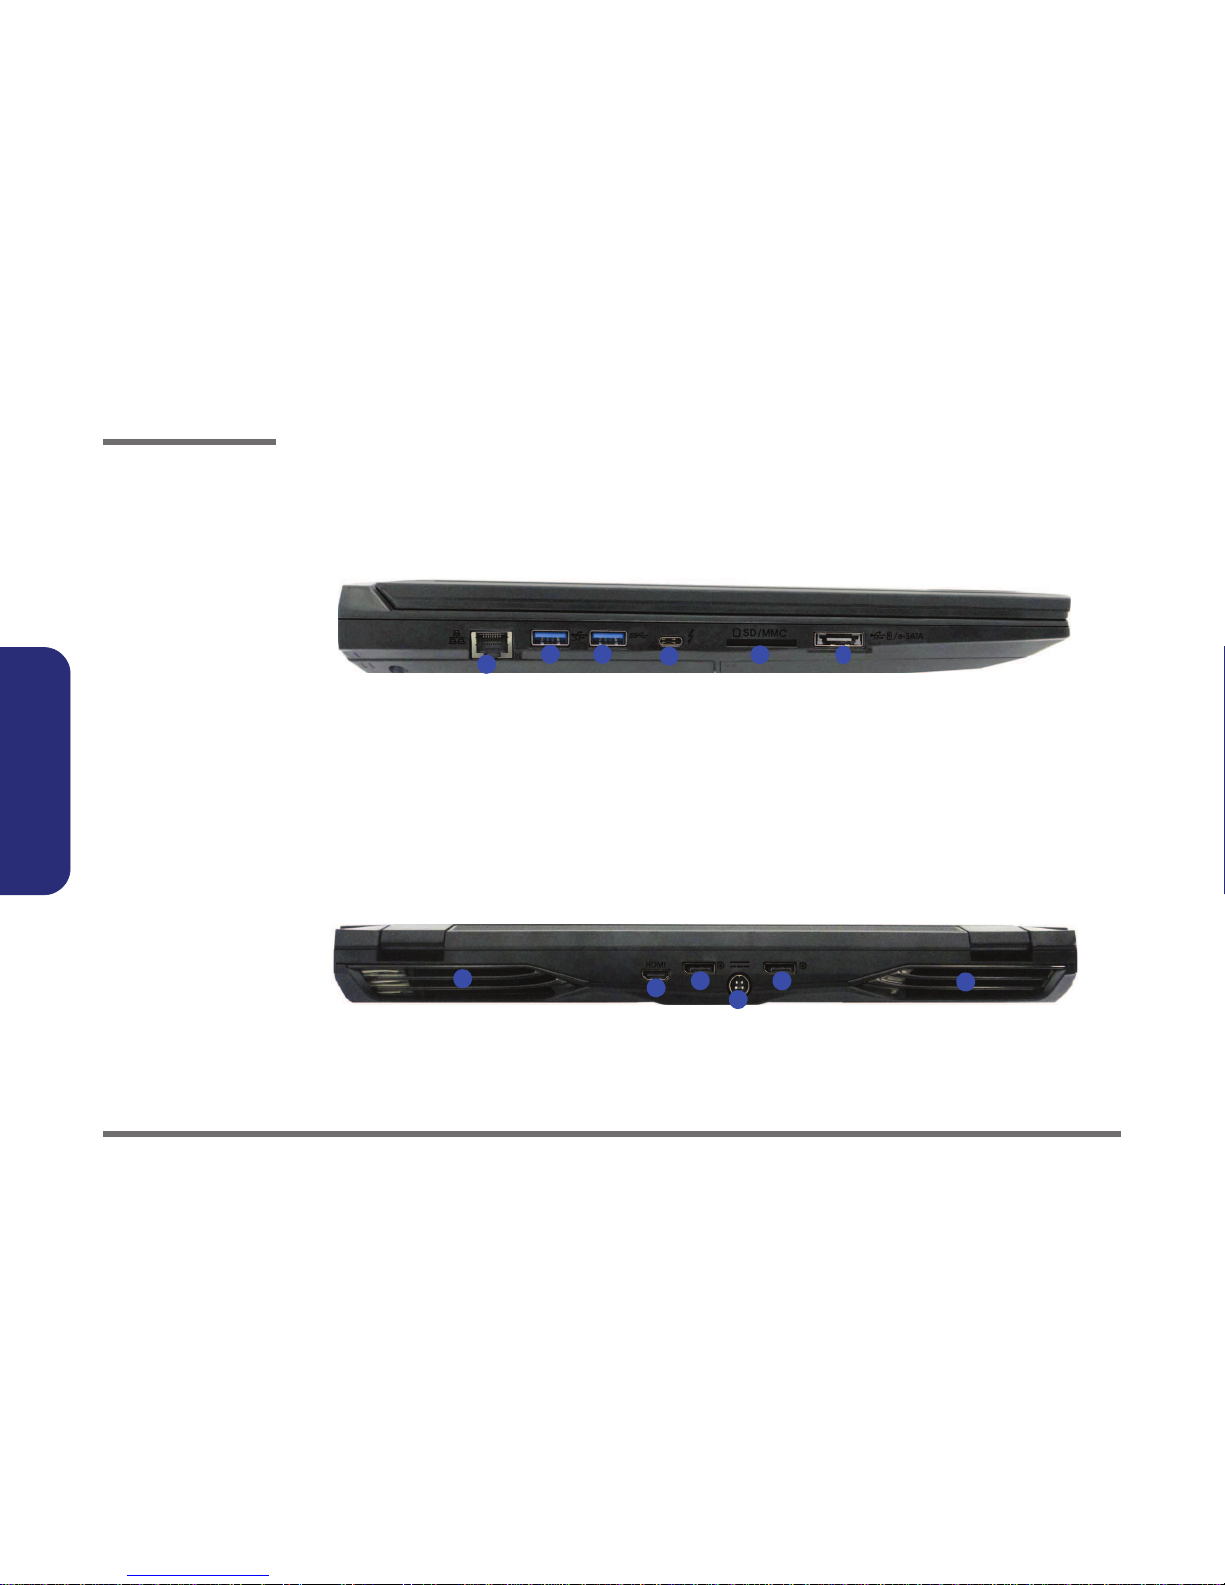
Figure 4
Left Side View
1. RJ-45 LAN Jack
2. USB 3.0 Ports
3. USB 3.1 Port
4. Multi-in-1 Card
Reader
5. Combined eSATA/
Powered USB 3.0
Port
45
123
Left
2
Figure 5
Rear View
1. Vent/Fan Intake
2. HDMI-Out Port
3. Display Ports
4. DC-In Jack
Rear
4
1231
3

Introduction
External Locator - Bottom View 1 - 7
1.Introduction
External Locator - Bottom View
Figure 6
Bottom View
1. Vent
2. Battery
3. Sub Woofer
4. HDD Bay
Overheating
To prevent your com-
puter from overheating
make sure nothing
blocks the vent/fan in-
takes while the com-
puter is in use.
3
2
1
4
111
1
1
This manual suits for next models
1
Table of contents
Other Clevo Laptop manuals