Clearly Hearing SmartAid Digital Premium User manual

The SmartAid Digital
Premium
Operating Instructions
Thank you for choosing Clearly Hearing and SmartAid Digital Premium for
your journey towards better hearing.
www.clearlyhearing.com 1
Please familiarize yourself with this guide to help you get the most out of your
hearing aids. This guide contains important instructions for proper use and
care, technical performance information, and other general information about
your hearing aids.

www.clearlyhearing.com 2
Thank you for placing your confidence in www.clearlyhearing.com to care for your hearing.
You have made an important decision to begin the process of using hearing aids. We are
excited to be part of your journey towards better hearing. Your new hearing aids are going to
allow you to hear some very pleasant sounds you may have been missing for a long time, like
the pleasant sounds that nature provides, from birds singing to water running and leaves
rustling. They’ll also allow you to hear conversation louder and clearer. There will be
challenges however, your hearing aids will make some sounds louder that you wish they
wouldn’t. Like the sounds of forks and knifes scraping on plates, traffic roaring and all the
extraneous chatter you wish you could continue to ignore. Don’t worry, the sounds you don’t
like will change over time. Before you know it the sounds that at first you find distracting
and bothersome will once again sound normal. It’s important to be patient with yourself as
you adjust to hearing aids. Often hearing loss develops for years before hearing aids are
worn and it can take several weeks to several months for hearing aid users to completely
adjust to new hearing aids.
We recommend that all of our clients download the ‘5 steps to better hearing’ booklet from
our website, which goes over the steps below. Please download the 5 Steps to Better
Hearing at:
www.clearlyhearing.com/pages/get-started
STEP 1
Deciding to seek
assistance for
my hearing loss
difficulties
STEP 2
Make a personal
commitment to
seek help with a
good attitude
STEP 3
Personal
education, learn
all I can about my
hearing loss
STEP 4
Set realistic
expectations
STEP 5
Practice, time
and patience

Table of Contents
Getting Familiar with SmartAid Digital Premium!4
Batteries!5
Inserting & Removing the Battery!5
Battery Warnings and General Information!6
Turning the Hearing Aid On and Off!6
Putting the Hearing Aid On!7
Removing the Hearing Aid!7
Changing Ear Tubes and Ear Buds!8
Adjusting the Volume!9
Using the Telephone while Wearing your SmartAid Digital
Premium!10
Cleaning, storing and taking care of your hearing aids!11
In Case of Malfunction!12
Troubleshooting Guide!13
Reprogramming!14
Reprogramming Form!15
Customer Support Contact Details!16
www.clearlyhearing.com 3

Getting Familiar with SmartAid Digital Premium
1. Ear Bud: We have included a variety of sizes of earbuds. You should use an earbud
that fits your ear canal comfortably. Earbuds without holes should only be used if you
require more volume or if you are experiencing feedback (whistling).
2. Ear Tube: We have included a variety of sizes of ear tubes. The ear tube should be
long enough to allow the earbud to sit comfortably in the ear canal and position the
hearing aid comfortably behind the ear. If it’s too short, it can put pressure on the ear,
and if it’s too long, the hearing aid can feel too floppy behind the ear.
3. Microphone: Sound enters through the microphone. You should be careful to keep
this area clean.
4. Smart Button: Push this button to change the volume. You have access to 3 unique
volume settings.
5. Battery Door & On / Off Control: The battery gets placed inside the battery door.
When the door is closed, the hearing aid is ‘On’; when the door is open, the hearing
aid is ‘Off’.
Color Options: Beige or Charcoal
www.clearlyhearing.com 4

Batteries
The SmartAid Digital Premium uses a #10 battery. Each battery should last
between 3-6 days depending on usage and lifestyle. We have included one free
package of batteries to get you started. More batteries are available for purchase
from our website.
Inserting & Removing the Battery
Remove the small adhesive tab on the battery BEFORE inserting the battery into
the hearing aid battery door.
There is a small edge on the battery door. Use this to flip open the battery door.
The battery must be placed with the plus side (+) in accordance with the plus sign (+) on
the battery door. The battery door will close easily when the battery is inserted properly.
If you put the battery in wrong, the battery door will not close easily. Stop, flip the
battery over and try again.
To remove a dead battery, simply open the battery door completely and remove the old
battery.
Inserting Battery Removing Battery
TIP: The SmartAid Digital Premium will beep twice rapidly when the battery is ready to
be changed. The batteries are nearly exhausted at this point and will be dead within
15-60 minutes. We recommend you always carry some spare batteries with you.
www.clearlyhearing.com 5

Battery Warnings and General Information
Battery life depends on a number of factors, including how loud the hearing aid is set to
during use, how loud the environments are, and the number of hours the hearing aid is
worn.
Do not use batteries on which there is a sticky residue from the tab. Also, do not use
any battery that is oxidizing or rusting as this can potentially damage the hearing device.
Please note the expiry date on the battery pack stating how long the batteries will be
good for. DO NOT remove the adhesive tabs on the individual batteries until just before
they are used. Removing this tab will allow the battery to activate and the battery life will
immediately start draining. Always operate your hearing aid with the same battery until
that battery is exhausted.
In rare cases, a new battery may be exhausted right out of a new package. If your
hearing aid does not work after you have inserted a new battery, try inserting another
one.
Never leave an exhausted battery in the hearing aid. They may leak and cause damage
to the device.
Turning the Hearing Aid On and Off
The battery door functions as the on and off switch. The hearing aid is turned on when
the door is closed with a battery inserted. It is turned off when the battery door is
opened. You can keep the battery in the door when the hearing aid is turned off.
TIP: Open the battery door when the hearing aid is not in use in order to reduce battery
consumption. This will help to extend the life of the battery. Remove the battery
completely if the hearing aid will not be used again soon.
WARNING: A hearing aid may whistle loud enough for people to hear if it’s not in your
ear with a battery inserted. Some people with hearing loss will not hear this whistle, but
others may.
www.clearlyhearing.com 6

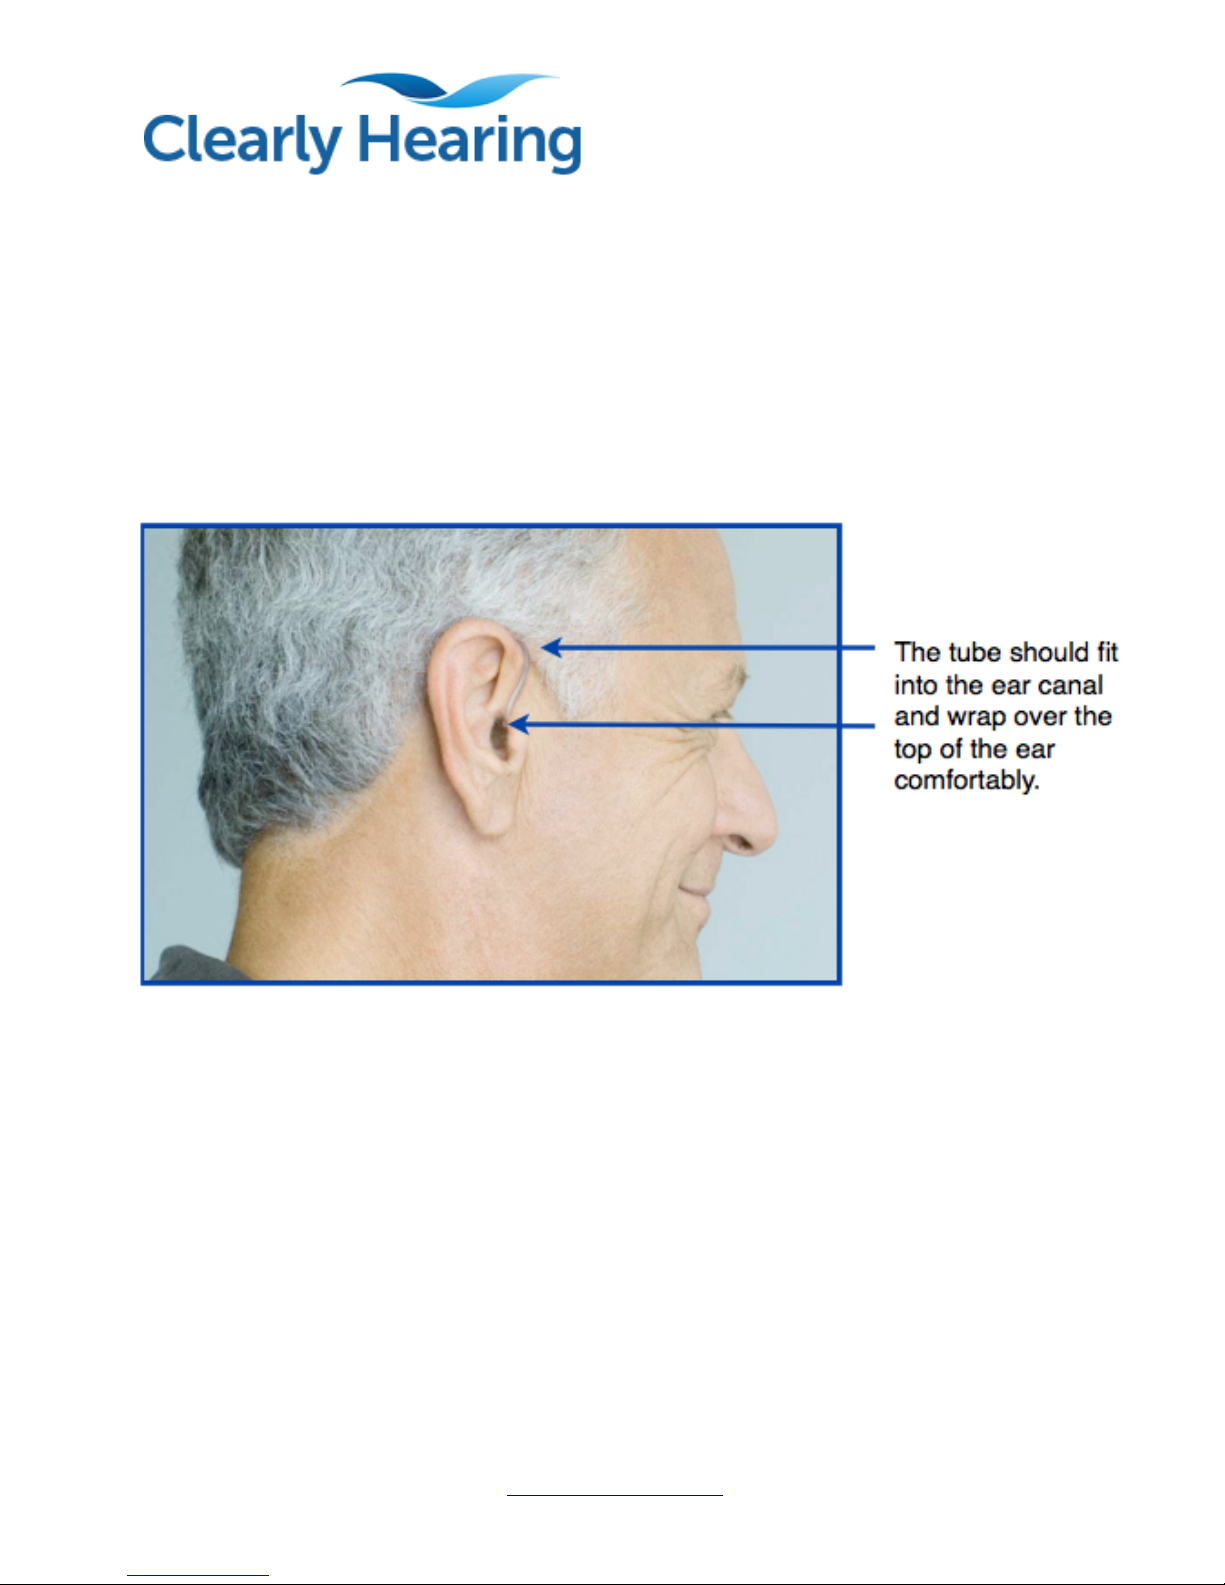
Putting the Hearing Aid On
TIP: Open the battery door prior to putting the hearing aid on for the first time. The
hearing aid may whistle loudly while you are putting it on if the battery is engaged.
When the hearing aid is in its correct position, close the battery door and enjoy hearing
better.
Removing the Hearing Aid
First remove the hearing aid from its position behind the ear. Carefully pull the ear-bud
out of the ear canal while holding the lower part of the tubing.
www.clearlyhearing.com 7
Changing Ear Tubes and Ear Buds
Ears come in all shapes and sizes, which is why we have shipped your hearing aids
with different tubing lengths and multiple sizes of earbuds. Change the ear tube if you
require a longer or shorter length to achieve a more comfortable fit. Do this by pulling
the tube closest to where it connects to the hearing aid while twisting slightly.
The ear buds come in several sizes and in two designs: with holes and without holes.
You should use an earbud that fits inside of your ear canal comfortably. If you want
more volume from your SmartAid Digital Premium hearing aids you can select an
earbud without holes. As well, if you experience feedback (whistling) from your hearing
aid, you can select an earbud without holes.
www.clearlyhearing.com 8
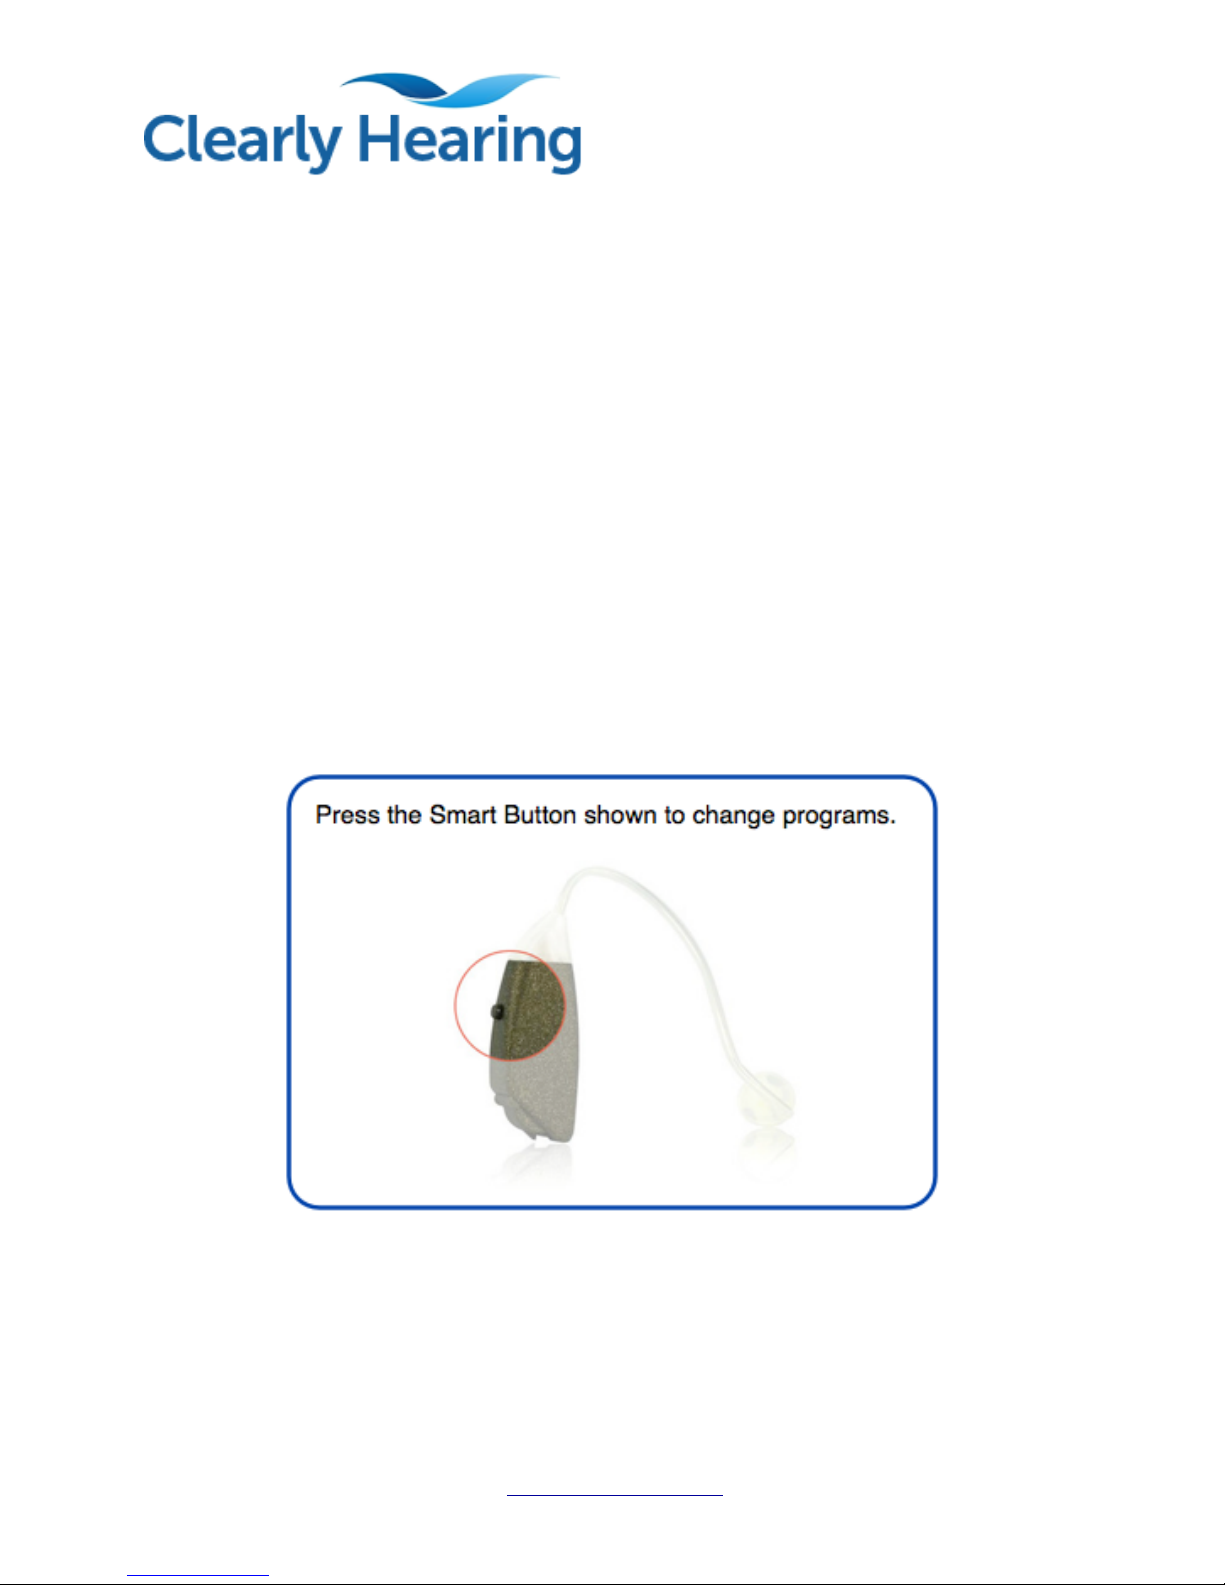
Adjusting the Volume
Our Clearly Hearing SmartAid is equipped with a computer chip designed to
automatically adjust its loudness to the environment that you are in. Several thousand
times per second, the SmartAid analyses the environment and tailors its sound levels
accordingly.
We’ve also provided you with 3 unique volume settings to give you control over how
much volume you receive. You can easily change between programs with a discreet
push of the Smart Button located right on the hearing aid.
You'll know which program you are on by how many beeps you hear:
Program 1 = 1 Beep (Lowest Volume)
Program 2 = 2 Beeps (Medium Volume)
Program 3 = 3 Beeps (Highest Volume)
TIP: Every time you open and close the battery door, the hearing aid restarts on
Program 1.
The programs always cycle from: Program 1, to 2, to 3 and then back to Program 1.
www.clearlyhearing.com 9

Using the Telephone while Wearing your SmartAid
Digital Premium
Place the phone up to your ear like you would if you were not wearing the hearing aid.
Do not press the phone against your ear with any force, as this may irritate your ear and
may cause feedback (whistling).
For some people, telephone use can cause feedback. This can be caused from the
severity of hearing loss, the shape of the ear and even the type of telephone. If you get
feedback while talking on the phone, you can try:
- Changing to a different program. See if any of the programs work better than others
on the telephone.
- Pull the phone away from your ear slightly, or angle the phone. Creating a small air
space between the hearing aid and the phone can prevent feedback.
www.clearlyhearing.com 10
Table of contents
Other Clearly Hearing Hearing Aid manuals


