Clas Ohlson PF173C2 User manual

ENGLISH SVENSKA NORSK SUOMI
Digital Photo Frame
Article number 38-2890
Model PF173C2

2

3
ENGLISH
3
Digital Photo Frame, art.nr 38-2890, model PF173C2
Please read the entire instruction manual before using the product and save it
for future reference. We apologise for any text or photographic errors and any
changes of technical data.
If you have any questions concerning technical problems please contact our
Customer Service Department (see address on reverse.)
Table of Contents
1. Safety.................................................................................................... 3
2. Product Description .......................................................................... 4
3. Buttons and Functions ..................................................................... 5
4. Getting Started .................................................................................. 7
5. Operating Instructions ..................................................................... 8
6. Settings ...............................................................................................11
7. Changing the Frame ........................................................................ 12
8. Care and Maintenance ................................................................... 13
9. Troubleshooting Guide ................................................................. 13
10. Disposal ........................................................................................... 13
11. Specications ................................................................................. 14
1. Safety
Warning: Do not open the casing! Certain components within the product’s casing
contain dangerous currents. Contact with these may give you an electric shock.
- The product should only be repaired by qualied service personnel.
- The product should not be taken apart or modied.
- Do not place product where it can fall into water or other liquid. Do not place
any objects which contain liquid on top of product, e.g. a ower vase or drink.
- Do not cover the ventilation holes. Do not place the product close to heat
sources such as on top of the radiator or TV, or on e.g. the sofa where the vent
ports are blocked.

4
ENGLISH
- Always unplug the adaptor from the electric outlet if the product is not to be
used for an extended period.
- The product is made for 8 – 10 hours continuous operation, avoid using it for
longer. Let the product rest between uses.
- The product is intended only for indoor use.
- Do not expose it to direct sunlight for long periods of time.
- Do not use the product in damp, dusty, or dirty environments.
- Only use a soft cloth lightly moistened with water and a little washing up liquid
to clean the screen.
- Handle the screen carefully to avoid scratching it.
- Do not disconnect the adaptor while the frame is in use. The connected
memory may be damaged. Neither should the connected memory be removed
when the frame is in use.
2. Product Description
- Digital Photo Frame 7˝ widescreen.
- Shows your digital photos without the need of a computer.
- Connector for USB memory or memory card (SD/MMC/MS).
- Supports music (MP3) and video (MPEG4) playback.
- Built-in speakers.
- Comes with remote control, mains adaptor and two interchangeable frames
(black and white).

5
ENGLISH
3. Buttons and Functions
Button/Connector Function
1. USB HOST Connector for USB memory, mp3 player etc. (USB 2.0)
2. DC Connector for adaptor (9 V DC, 1.5 A)
3. Play/Pause/Conrm
4. M Menu
5. Stop/End
6. Moves menu selector to the right. Rotates the image
90 degrees clockwise.
7. Moves menu selector to the left. Rotates the image
90 degrees anticlockwise.
8. A Down/Next
9. B Up/Previous
10. SD/MMC/MS Memory card slot
11. ON/OFF Set the switch to ON to turn on the device.

6
ENGLISH
The Remote Control
Button Function
1. POWER Turns the device on or off
2. LEFT Moves menu selector to the
left. Rotates the image 90
degrees anticlockwise.
3. FUNCTION Opens the main menu
4. |
Previous image/track
5. Rewind (music/video)
6. VOL+ Increases the volume
7. UP Moves menu selector up.
Rotates image horizontally.
8. SETUP Open/exit the settings menu
9. ENTER Conrm selection
10. RIGHT Moves menu selector to the
right. Rotates the image 90
degrees clockwise.
11. DOWN Moves menu selector down.
Rotates the image vertically
12. OSD Information about the image is
shown on the display.
13. PLAY/PAUSE Starts or stops the
slideshow/playback
14.
|Next image/track
15. STOP/EXIT Stops slideshow/playback.
Exits the menu.
16. Fast forward (music/video)
17. VOL- Decreases the volume
18. MUTE Shuts off the sound
7
ENGLISH
1
Open
Push
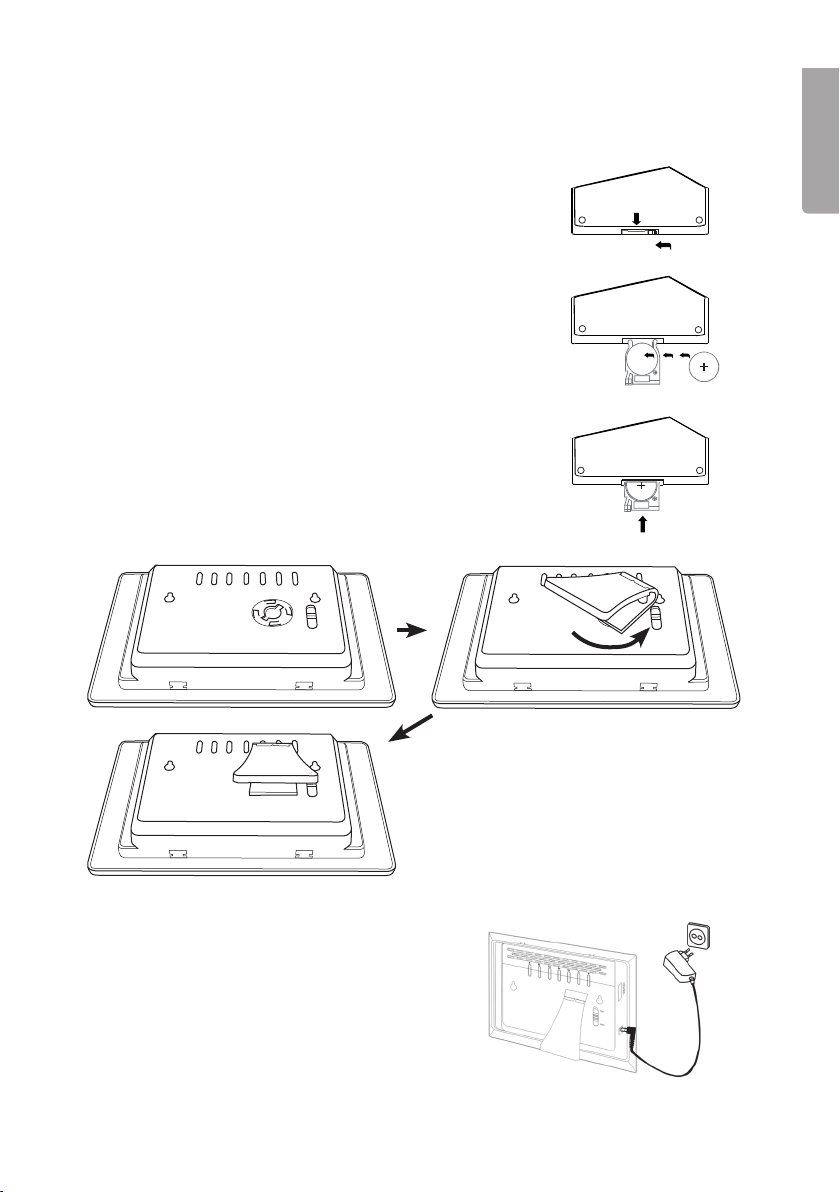
4. Getting Started
4.1 Inserting the battery into the remote control
Insert the battery as shown. Observe the polarity
marking (+) in the battery holder. Remove any
plastic lm from the battery before use.
Battery life
- The battery normally lasts for up to a year, but
this depends on how much the remote control
is used.
- Change battery when the remote control does
not work despite being held close to the digital
photo frame's sensor.
- The remote control operates on one
CR2025 (3 V) battery.
4.2 Assembling the table stand
4.3 Power supply
1. Plug the included adaptor into a wall socket.
2. Then connect the adaptor’s DC plug to the
connector marked DC on the photo frame.
3. Set the switch (11) to ON to turn on
the device.

8
ENGLISH
4.4 Inserting a memory card or a USB memory
4.4.1 Memory card
The following memory cards can be used:
- Secure Digital (SD)
- Multimedia Card (MMC)
- Memory Stick (MS)
If your digital camera uses any of the above men-
tioned memory cards you can connect the camera’s
memory card directly to the photo frame.
1. Insert the memory card into the slot marked
SD/MMC/MS (10). Carefully insert the card
into the slot.
2. Remove the card by pulling it straight out.
4.4.2 USB memory
USB HOST connection (1): USB equipment such
as a USB ash memory or an mp3 player with
USB connector can be connected.
NB! When a USB memory and a memory card
are connected at the same time, the USB memory
has priority. The memory card will automatically
be disregarded.
5. Operating Instructions
5.1 Main Menu
The main menu is displayed when the device is turned on.
- The instructions below describe usage of the remote control’s buttons.
- Use LEFT, RIGHT UP or DOWN to navigate the main menu. Conrm your
choice with ENTER.
- The menu can be returned to at any time by pushing FUNCTION or STOP/EXIT.

9
ENGLISH
5.2 Slideshow/Picture viewer(Photo)
The picture viewer can display photos in JPEG format.
1. Connect a USB memory or a memory card containing image les with a
JPG/JPEG format .
2. Select Photo in the main menu and then push ENTER to conrm.
3. The device will automatically locate picture les on the connected memory.
(If “Auto Play” is activated the slideshow will start automatically, in this case
skip steps 4 and 5.)
4. Select the desired image using LEFT, RIGHT, UP or DOWN.
5. Press ENTER or PLAY/PAUSE to start playback again.
6. Controls (for the slideshow):
|
/
|
- Select previous or next image.
PLAY/PAUSE - Pauses the slideshow.
ENTER – Zooms in.
LEFT / RIGHT – Rotates the image.
UP / DOWN – Rotates the image horizontally or vertically.
7. Press STOP/EXIT to return to the le list, press it once more to return to
the main menu.
5.3 Music playback (Music)
The music player can play music les in MP3 format.
1. Connect a USB memory or a memory card containing music les with
a MP3 format.
2. Select Music in the main menu and then push ENTER to conrm.
3. The device will automatically locate music les on the connected memory.
(If “Auto Play” is activated the playback will start automatically, in this case
skip steps 4 and 5.)
4. Select the desired audio le using LEFT, RIGHT, UP or DOWN.
5. Press ENTER or PLAY/PAUSE to start playback again.
6. Controls:
|
/
|
- Select previous or next track.
PLAY/PAUSE - Pauses playback.
VOL+ / VOL- – Adjusts the volume.
7. Stop playback by pushing STOP/EXIT, push it once more to return to
the main menu.

10
ENGLISH
5.4 Slideshow with background music (Photo+Music)
This function allows music to be played at the same time as a slideshow.
1. Connect a USB memory or a memory card containing image and audio les.
2. Select Photo+Music in the main menu and then push ENTER to conrm.
3. The device will automatically locate picture les on the connected memory.
The slideshow will automatically start as the music is played.
4. Controls:
|
/
|
- Select previous or next image.
PLAY/PAUSE - Pauses the slideshow.
VOL+ / VOL- – Adjusts the volume.
ENTER – Zooms in.
LEFT / RIGHT – Rotates the image.
UP / DOWN – Rotates the image horizontally or vertically.
5. Stop playback by pushing STOP/EXIT, push it once more to return to
the main menu.
5.5 Slideshow a lm (Movie)
The device can play video les in the MPEG-1/M-JPEG and MPEG-4 formats .
1. Connect a USB memory or a memory card containing video les.
2. Select Movie in the main menu and push ENTER to conrm.
3. The device automatically locates video les on the connected memory
(if “Auto Play” is activated, playback will start automatically and steps
4 and 5 can be skipped).
4. Select the desired le using LEFT, RIGHT, UP or DOWN.
5. Press ENTER or PLAY/PAUSE to start play again.
6. Controls:
|
/
|
- Select previous or next video.
PLAY/PAUSE - Pauses playback.
VOL+ / VOL- – Adjusts the volume.
7. Stop playback by pushing STOP/EXIT, push it once more to return to
the main menu.
Table of contents
Languages:
Other Clas Ohlson Digital Photo Frame manuals

Clas Ohlson
Clas Ohlson KD0805 User manual

Clas Ohlson
Clas Ohlson D3721 User manual

Clas Ohlson
Clas Ohlson PF-8DN-283V3RTC User manual

Clas Ohlson
Clas Ohlson KD0706-S08-UK User manual

Clas Ohlson
Clas Ohlson PF283A2 User manual

Clas Ohlson
Clas Ohlson PF-10DN-502V3RC User manual

Clas Ohlson
Clas Ohlson PF-7AW-103-UK User manual

Clas Ohlson
Clas Ohlson DPF-108P User manual

Clas Ohlson
Clas Ohlson 38-5196 User manual

Clas Ohlson
Clas Ohlson DP730AD-UK User manual


