CIS CIS-5009-8POE User manual

CIS-5009-8POE User Manual

2
Table of Contents
Welcome to Custom Integration Solutions ...............................................................................................................4
Overview...................................................................................................................................................................4
Package Contents....................................................................................................................................................4
Power........................................................................................................................................................................4
PoE Output ...............................................................................................................................................................4
Device Details...............................................................................................................................................................5
Ports..........................................................................................................................................................................5
LED Indicators..........................................................................................................................................................5
Buttons .....................................................................................................................................................................5
Quick Setup...................................................................................................................................................................6
Accessing the Web Interface.......................................................................................................................................7
The Status Page.......................................................................................................................................................8
Setting the Router’s Identity .................................................................................................................................8
Undo / Redo .............................................................................................................................................................9
Show / Hide Passwords ..........................................................................................................................................9
Rebooting the Device..............................................................................................................................................9
Changing the Default Password ..........................................................................................................................10
Setting the Time Zone...........................................................................................................................................10
IP Addressing.............................................................................................................................................................11
View the Router’s IP Addresses...........................................................................................................................11
The DHCP Client Tab ..............................................................................................................................................11
Renewing the WAN IP Address.............................................................................................................................12
The DHCP Server.....................................................................................................................................................12
Setting a DHCP Reservation .................................................................................................................................14
Changing the DNS Servers....................................................................................................................................15
Port Forwarding.........................................................................................................................................................16

3
View and Set Interfaces............................................................................................................................................18
Power Cycling an Ethernet Port ..........................................................................................................................18
WireGuard....................................................................................................................................................................19
Managing Access Points with the Wireless Manager.............................................................................................20
Viewing the Connected Access Points.................................................................................................................20
Viewing Connected Devices..................................................................................................................................21
Changing the SSID of Managed Access Points ...................................................................................................21
Changing the Wi-Fi Password of Managed Access Points................................................................................22
PoE Information and Settings..................................................................................................................................23
Enable/Disable PoE ...............................................................................................................................................23
Tools............................................................................................................................................................................24
IP Scan....................................................................................................................................................................25
Traceroute..............................................................................................................................................................25
Platinum Monitoring.............................................................................................................................................26
Torch.......................................................................................................................................................................26
Troubleshooting.........................................................................................................................................................27
Warranty Information................................................................................................................................................28
Contact Information..............................................................................................................................................28
4
Welcome to Custom Integration Solutions
Thank you for purchasing CIS devices. Our solutions make it easy for integrators to deploy networks in
home and business settings with minimal configuration. Our support team is here to assist with setting up
equipment and answering your network related questions.
Overview
The CIS-5009-8POE provides plenty of routing capability with its quad-core ARM CPU running at 1.4 GHz
and 1 GB of RAM. The CIS-5009-8POE router is equipped with a 2.5 Gigabit Ethernet port, 7 Gigabit
Ethernet ports and one SFP+ port, compatible with 10 Gb modules. The device is pre-configured with all
ports switched together. The CIS-5009-8POE provides 802.3af/at compatible PoE on all 8 ports.
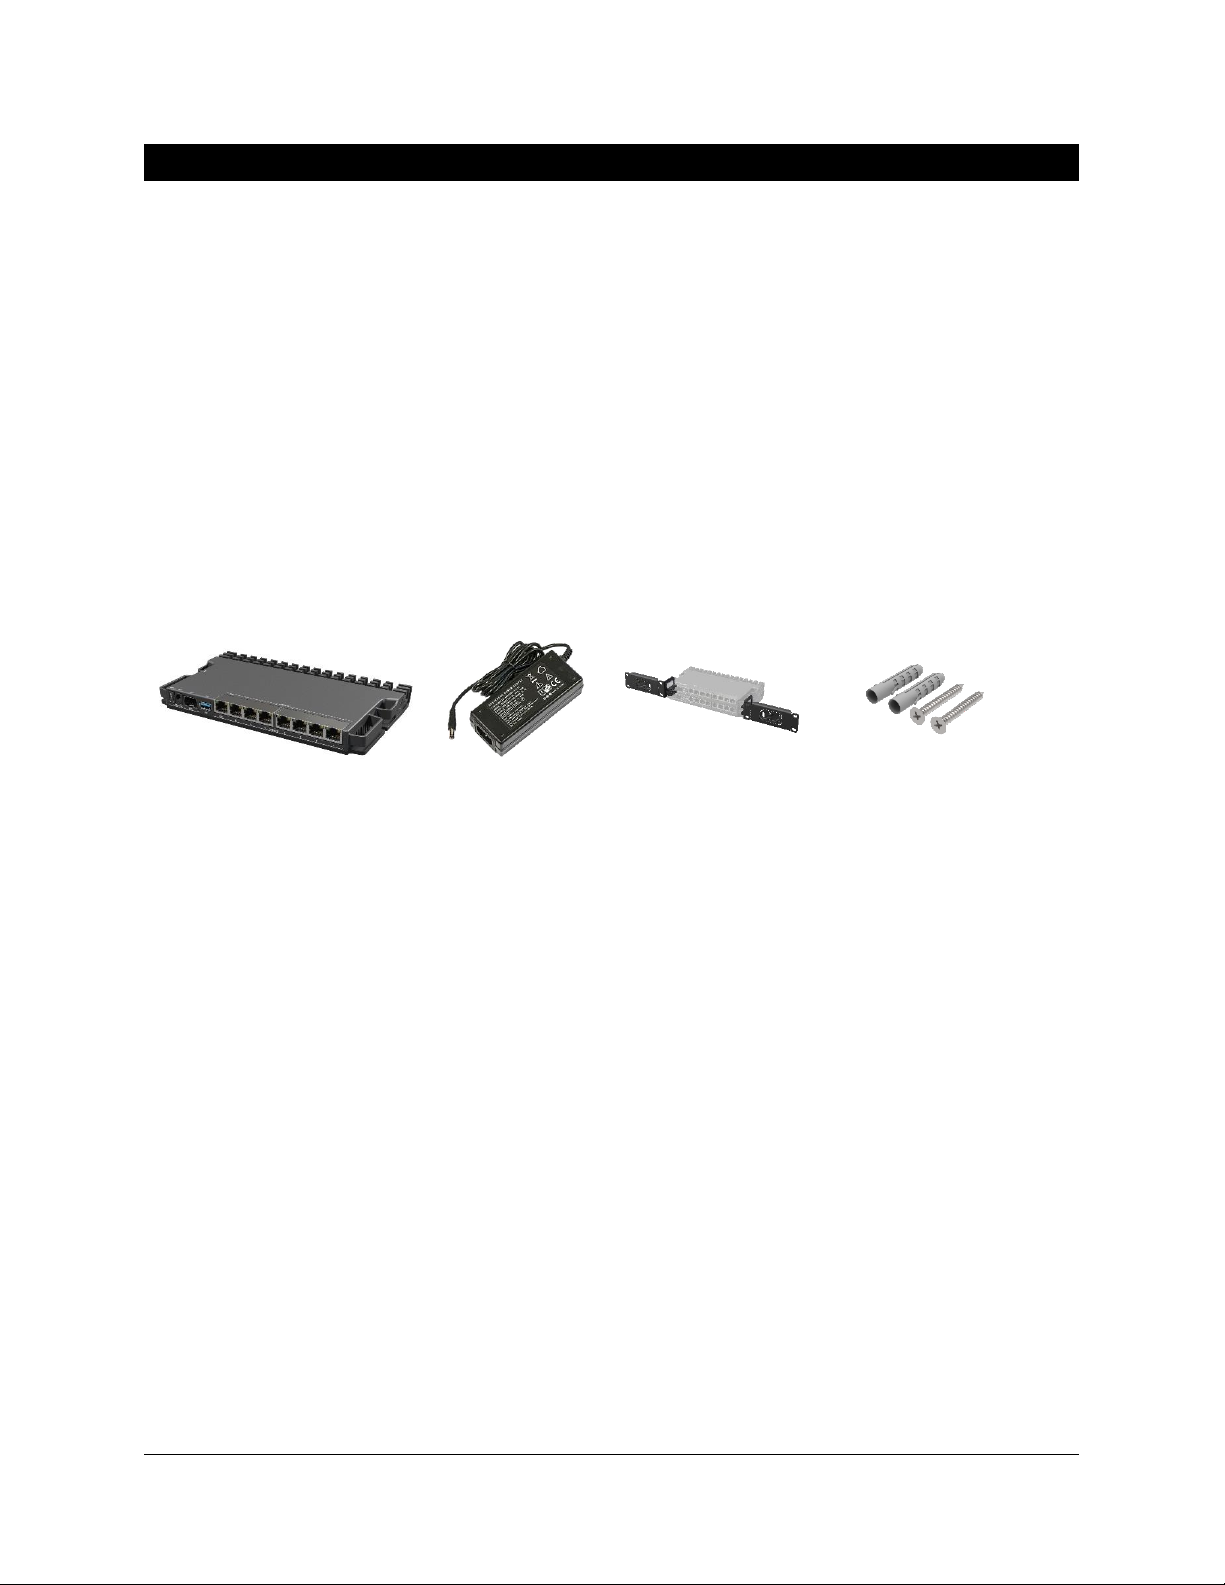
Package Contents
Router 48v DC Adapter Rack ears (2) Mounting Screws
Power
The CIS-5009-8POE can receive power from 3 different sources –the DC jack, the 2-pin terminal, or via
PoE-in on any Ethernet port. The device accepts 24-57v of power and will use the source with the highest
voltage.
PoE Output
The CIS-5009-8POE can supply PoE to external devices on all Ethernet ports. The included 48v adapter
provides power to your access points, cameras, touchpads and more.
By default, the PoE mode is set to auto. It will not damage non-PoE devices and will auto-detect devices
with PoE support and their required voltage. Once a PoE device is detected, it will be powered on.
The device consumes a maximum of 150w of power when fully loaded, or 15w without attachments.

5
Device Details
Ports
•1 2.5 Gigabit Ethernet port.
•7 Gigabit Ethernet ports.
•1 SFP+ cage, which accepts 10 GB SFP modules.
•USB 3.0 Port (disabled).
•DC Jack –connect the included 48v adapter.
•2 pin terminal –(optional) –the router can be powered by an external power supply.
LED Indicators
•1 –Indicates the DC jack is providing power to the router.
•2 –Indicates the 2-pin terminal is providing power to the router.
•SFP+ - Indicates SFP+ activity.
•Ethernet 1—8 —Indicates network activity on Ethernet ports 1 through 8.
Buttons
Reset button: If you would like to reset the router, it is highly recommended you contact CIS. Resetting
your CIS router will remove all custom configuration, including services you may have paid for.

6
Quick Setup
1. Connect the power to the DC jack on the front of the router.
2. Connect the ISP’s modem to the 2.5G port on the front of the router with an Ethernet cable.
3. Connect your remaining devices to the Ethernet ports.
4. (Optional) Use the SFP+ port to connect to a switch.

7
Accessing the Web Interface
1. Connect the ISP’s modem to the port labelled “2.5G”. Connect your laptop to any remaining port
on the front of the CIS router. Ensure your computer is set to DHCP mode.
2. In a web browser, navigate to 10.100.1.1 (the default IP address). If you have requested a
different network address, enter it or open a command window and use the ipconfig command to
get the default gateway. Enter this value in the browser.
3. To login, enter the username cis and password integration.
4. Integrators may use the Get TeamViewer link if remote assistance is required.
integration

8
The Status Page
The status page provides basic diagnostic information. There is a CIS Support Address should you
require assistance. The router’s Identity will show you which device you are accessing on your network.
You can view uptime, memory usage and load on the CPU.
Setting the Router’s Identity
The identity is used to identify your device on the network. It is essential to set the router to the name of
the client using the format below, as CIS will use it to identify the router when connecting for updates
and troubleshooting.
The Identity setting can be found in the System tab in the left toolbar.
CIS Router

9
Undo / Redo
Undo and Redo buttons are located in the left toolbar. You may use them to quickly undo/redo any
changes made to configuration.
Show / Hide Passwords
Selecting the Hide Passwords button in the left toolbar will toggle the displaying of passwords related to
Wi-Fi, Hotspot, and more.
Rebooting the Device
If you are having ongoing issues with your network and suspect a reboot will help, the Reboot option
can be found in the System tab in the left toolbar. Clicking reboot will ask for confirmation before
proceeding.

10
Changing the Default Password
After you log in for the first time, please create a new a password to increase the security of the device.
Enter the old password in the top field and a secure password in the new and confirm password fields.
Setting the Time Zone
You can find the Clock settings under the System tab in the left toolbar. Select your time zone from the
drop-down menu.
Table of contents
Other CIS Network Router manuals


