4
ASSEMBLY INSTRUCTIONS
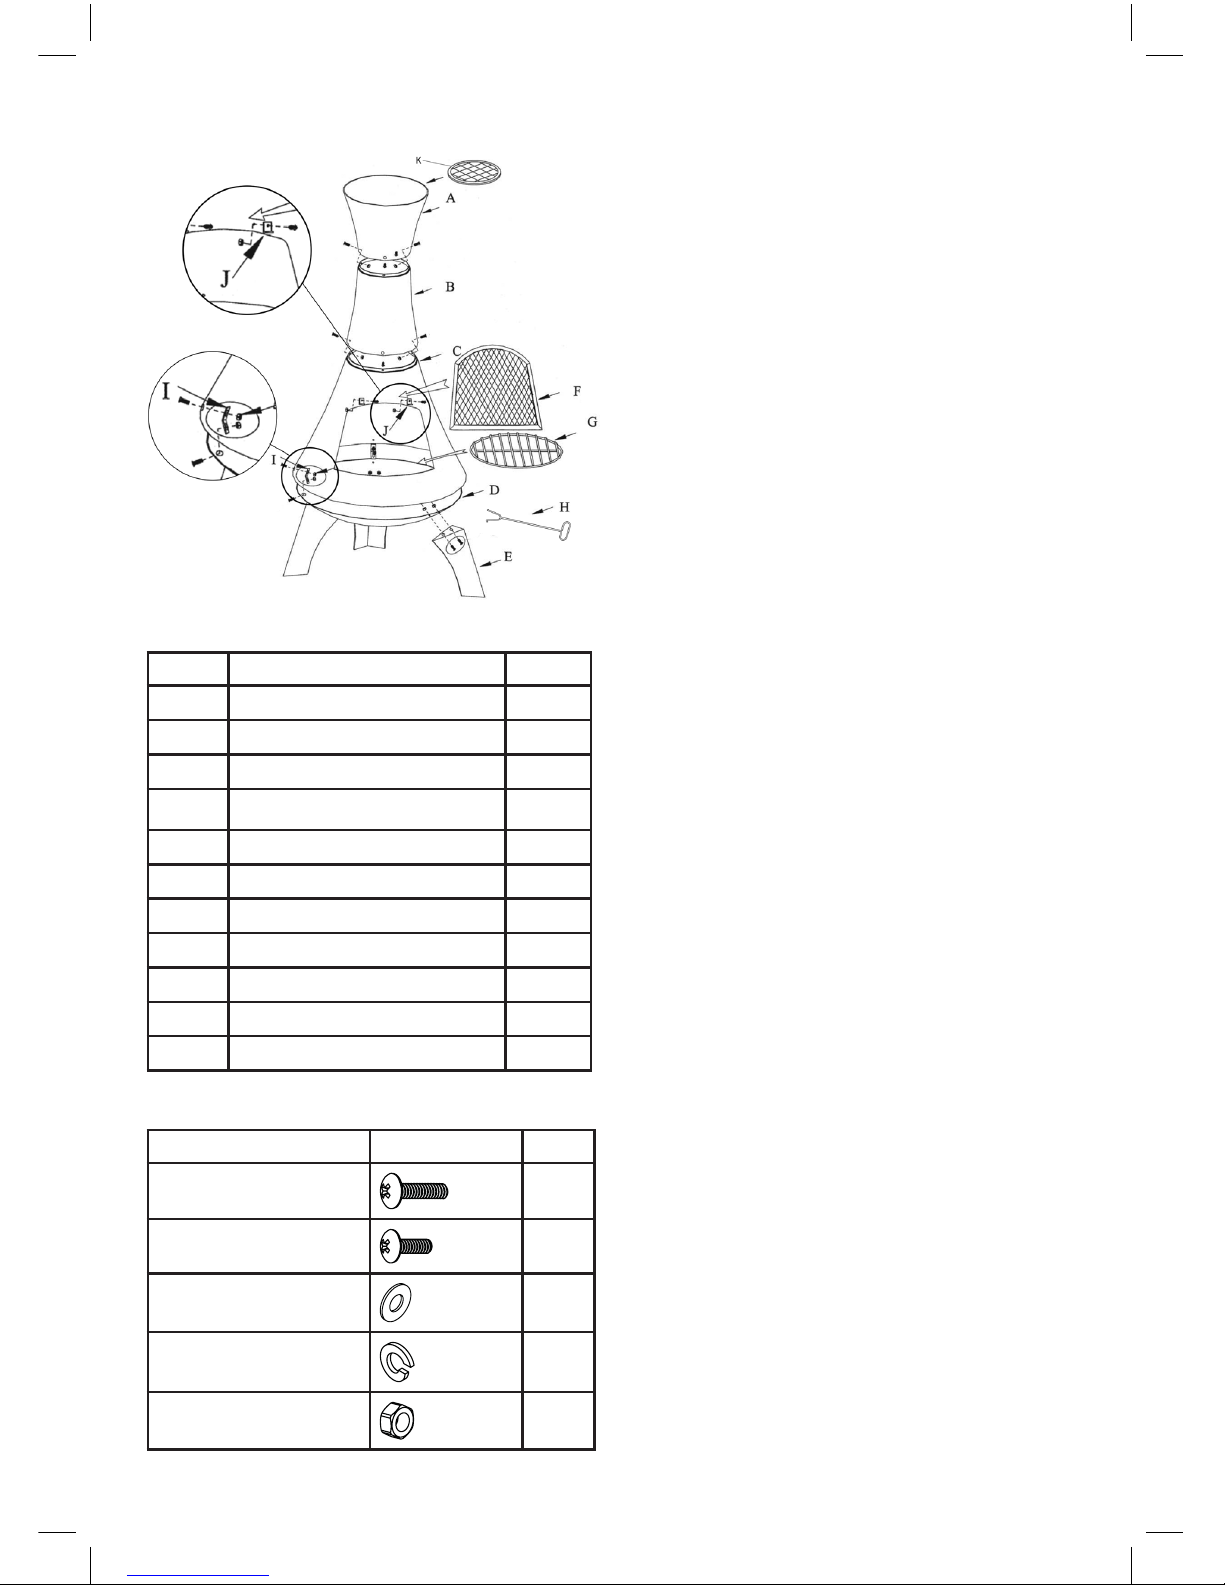
Step 4
Screw the centre ue (B) to the upper ue (A)
using 3pcs M6 x 30 bolts, 3pcs Ø6 washers, 3pcs
Ø6 spring washers and 3pcs M6 nuts.
Step 5
Now position the ue (A+B) on the combustion
chamber (C) and secure in place using 3pcs M6
x 30 bolts, 3pcs Ø6 washers, 3pcs Ø6 spring
washers and 3pcs M6 nuts.
Step 6
Suspend the safety door (F) in the designated
brackets (J).
Step 7
Lay the spark guard (K) in the Flue (A).
OPERATING INSTRUCTIONS
5. Now place a match or lighter to the dry paper
at the base of Chimenea. You can light it in a
couple of places. The volume of smoke and
ame will increase as the paper catches the
match stick thick twigs alight and in turn this
lights the pencil thick twigs.
6. When the ames appear through the top
of the loaded Chimenea fuel then you can
add the thumb thick wood with care, a few
pieces at a time, to build up the fuel supply
in the Chimenea. Once a good ember bed is
established thicker wood can be added.
Note: Split wood generally burns better than
round wood. All wood should be dry. Burning
green wood will lead to a smoky ‘cold’ re. Do not
burn plastic as it gives off harmful smoke for both
you and the environment.
Charmate®is a registered trademark of: Sitro Group Australia Pty Ltd www.gasmate.com.au
Aber, Hamilton, N.Z. www.charmate.co.nz
CLEANING AND CARE
CAUTION: All cleaning and maintenance should
be done when Chimenea is cool and with the fuel
supply removed.
Check the Chimenea regularly to ensure it is safe
to use. If there is any sign of damage DO NOT use
until repairs are made.
Abrasive cleaners will damage this product. Never
use oven cleaner to clean any part of Chimenea.
1. Wipe surfaces clean with mild dishwashing
detergent or baking soda.
2. For stubborn surfaces use a citrus based
degreaser and a nylon scrubbing brush.
3. Rinse clean with water.
When not in use store in a dry location, and if
possible cover the Chimenea to protect it from the
elements.
It is quite normal for the Chimenea to develop
an aged look after several res. Over time it may
develop surface rust, which is normal and due to
natural weathering, particularly if it is left outdoors
uncovered.
This Chimenea is designed for use only with wood.
Before rst use make sure all labels, packaging
and protective lms have been removed from the
Chimenea.
Lighting
The secret to lighting the Chimenea successfully is
good preparation of the re and using dry fuel.
1. Begin with a base of single sheets of dry
newspaper formed into st sized balls. Place
these into the base of the Chimenea.
2. Get dry kindling about matchstick thickness.
It is important they are dry - manuka twigs
are ideal. Place this kindling on top of the
newspaper taking care not to crush the paper
down as this will reduce the air gap and starve
the re of oxygen.
3. On top of the match stick thick kindling add
two good handfuls of sticks about pencil
thickness.
4. Finally have to hand a good supply of dry wood
about thumb thickness. Keep this to one side
for now.