Carbide 3D Shapeoko HDZ 4.0 User manual

support@carbide3d.com docs.carbide3d.com
07/13/2020 Version 4.0
1
ASSEMBLY GUIDE
HDZ 4.0

[email protected] docs.carbide3d.com
07/13/2020 Version 4.0
2
Introduction
If you encounter any issues during assembly, please contact us at:
.
This assembly process is uniform for the Shapeoko 3, 3XL, and 3XXL. The installation process is also the same across all
HDZ units.
Prior to Installation
Before you assemble or install the HDZ, check the rotation of the ball screw. To test, stand the HDZ on end, grasp the
sides with both hands, and press down on the top of the Z-carriage plate with both thumbs. Move the carriage plate
through its full range of motion, both up and down. With moderate pressure the carriage will glide smoothly and the
ball screw will rotate freely.
We request that you do not attempt to diagnose or dismantle the HDZ. If you cannot move the carriage plate by hand,
or if you encounter any movement issues, please contact us at [email protected].
IMPORTANT Software Information
You must run Carbide Motion 4.17 or later with the HDZ.
Download Carbide Motion from:
https://carbide3d.com/carbidemotion/download/.
WARNING: After installing the HDZ, you must update your GRBL settings. DO NOT HOME UNTIL YOUR
SETTINGS HAVE BEEN UPDATED!
Assembly Video
An assembly and installation overview video can be found here:
https://youtu.be/ojVpMMRCeVU
.
NOTE: The only components you now need to carry over from your existing X/Z-carriage are the X- and Z-
homing switches, X- and Z-motors, spindle mount, and spindle/router.
Required Tools
A basic mechanical know-how and an understanding of how the Shapeoko is assembled is required. Installation will
take approximately 2 hours.
Required tools:
• Metric hex keys: 1.5mm – 6mm
• Wrenches: 8mm and 10mm
• 2 flat head screw drivers for prying
• Needle nose pliers
• Permanent marker
• Masking tape

[email protected] docs.carbide3d.com
07/13/2020 Version 4.0
3
Inventory
HDZ Kit Contents
The HDZ comes with the components
listed in the table below and show in
Fig. 1
.
Item
Description
Qty
A
HDZ (Heavy-Duty Z/X Carriage)
1
B
EZTram Plate
1
C
M5 x 18mm Socket Head Cap Screw
2
D
M5 x 10mm Button Head Cap Screw
2
E
HD Eccentric Spacer (non-threaded)
2
F
M5 x 25mm Male-Female Threaded Standoff
4
G
M5 x 10mm Socket Head Cap Screw
8
H
Z-Motor Shaft Coupling
1
I
Replacement V-Wheel
4
J
M5 Washer (Shim)
4
K
M5 x 25mm Socket Head Cap Screw
4
L
HD Eccentric Nut (threaded)
2
M
M8 Guide Bearing
4
N
M8 Spacer
2
O
M8 Washer
2
P
M8 x 30mm Bolt
2
Figure 1
[email protected] docs.carbide3d.com
07/13/2020 Version 4.0
4
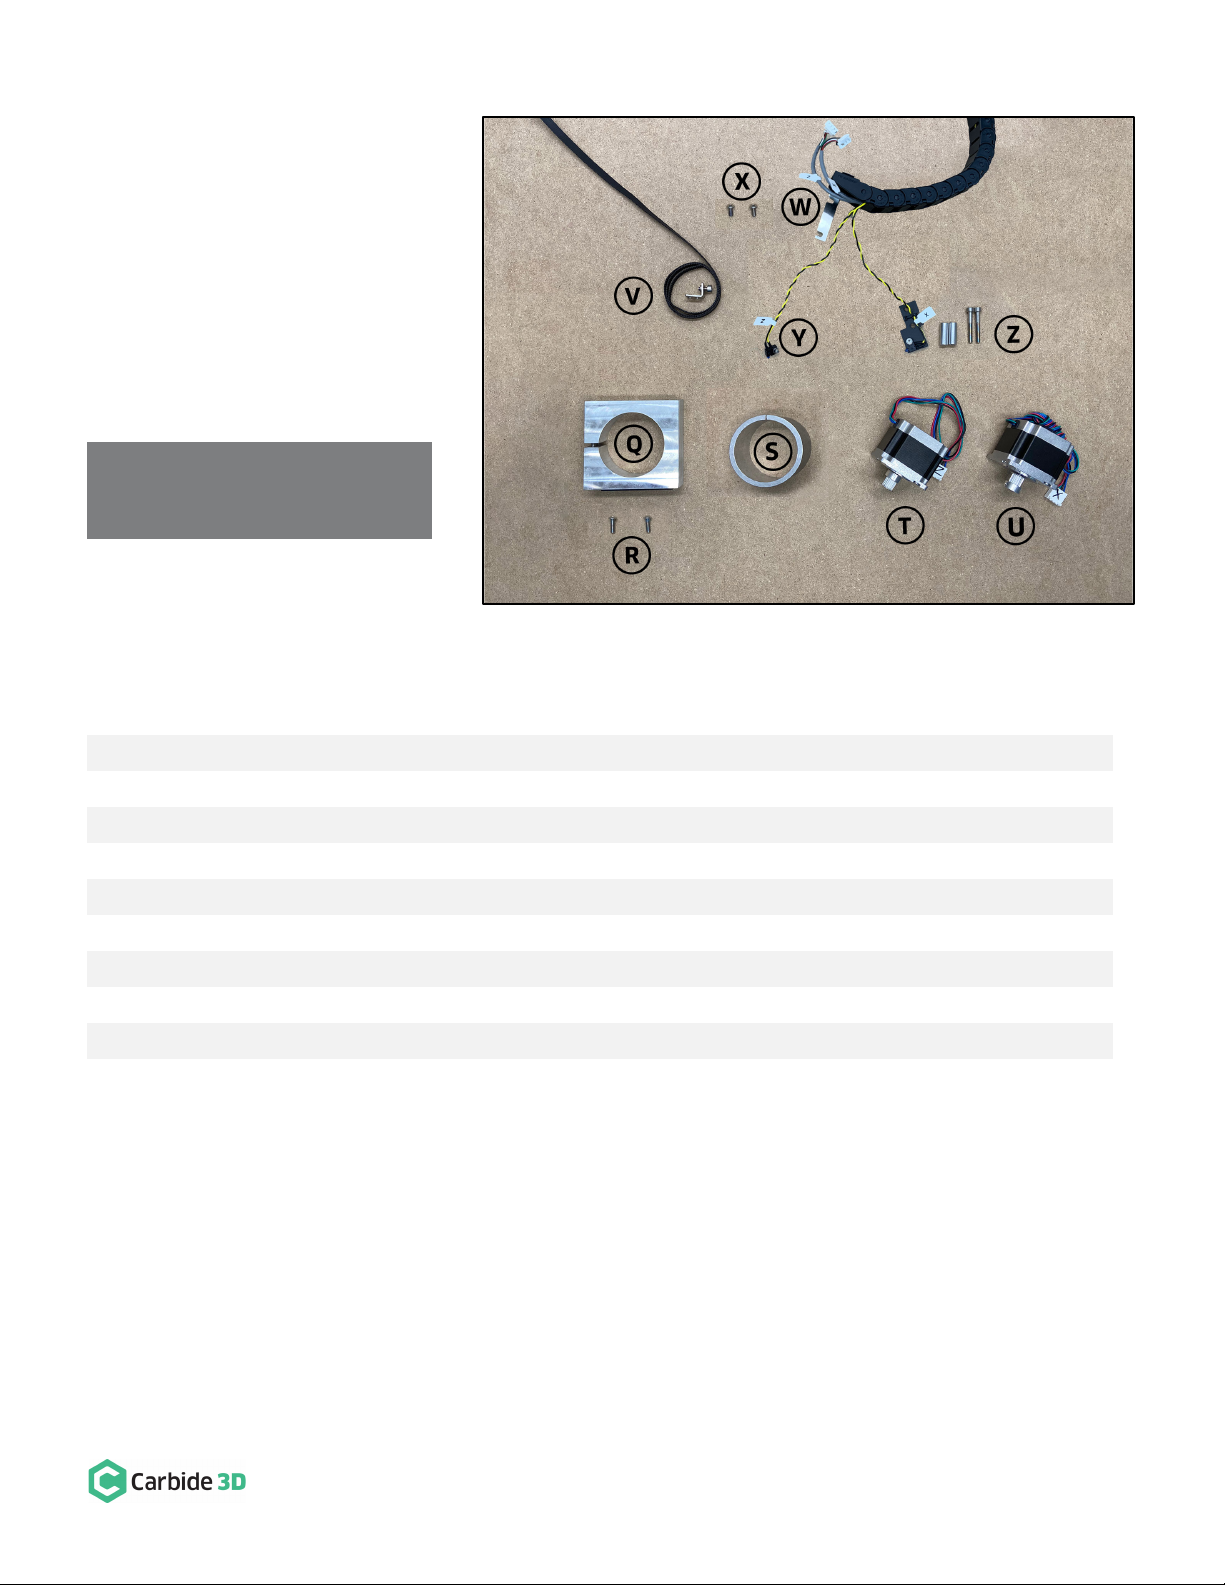
Shapeoko Carryover
Components
The HDZ utilizes several parts from the
existing machine. All components and
hardware to be carried over are listed
in the table below and shown in
Fig. 2
.
Throughout this guide, carryover parts
will be called out by the words:
CARRY OVER
.
NOTE: It is important to use the
screws provided in the HDZ kit.
Item
Description
Qty
Q
Spindle/Router Mount
1
R
M5 x 16mm Button Head Cap Screw
2
S
Router Mount Adapter Ring (optional)
1
T
Z-Motor
1
U
X-Motor
1
V
X-Rail Belt
and Hardware: Belt Clip (1) and M5 x 10mm Socket Head Cap Screw (1)
3
W
X-Axis Drag Chain Bracket (attached to drag chain)
1
X
M5 x 10mm Button Head Cap Screw
2
Y
Z-Axis Homing Switch
and Hardware: M3x12mm Socket Head Cap Screw (1) and M3 Washer (1)
3
Z
X-Axis Homing Switch Assembly
and Hardware: 1-inch Round Spacer (2), M5 x 35mm Socket Head
Cap Screw (2) [Switch Assembly Includes: X-Axis Homing Switch (1), Mounting Plate (1),
M3 x 12mm Socket Head Cap Screw (1), M3 Washer (1), M3 Nylon Lock Nut (1), Cable Tie (1)]
10
Figure 2

[email protected] docs.carbide3d.com
07/13/2020 Version 4.0
5
Disassemble and Remove the Existing X/Z-Carriage
NOTE: As you complete the disassembly process, you may find it helpful to keep each carryover component
and its associated hardware together and away from the new HDZ parts to avoid any mix ups.
Disconnect Cables and the X-Axis Belt
1. Turn off your machine, unplug it, and disconnect the USB and power cables.
2. Unplug the router/spindle and remove it from the spindle mount.
a. Use a 4mm hex key to loosen the two (2) M5x55mm SHCS, if necessary.
3. Free the Y2-end of the X-Axis belt from the Y2-carriage. (No need to remove the Y1-end).
a. Use a 4mm hex key to remove the M5x10mm SHCS securing the belt clip.
b. Remove the clip from the end of the belt and pull the belt free from the X-motor pulley and idlers.
c.
CARRY OVER
the
belt
,
M5x10mm SHCS
, and
belt clip
.
4. Label male/female ends of the white X- and Z-motor connectors behind the X/Z-carriage and disconnect.
a. Use a permanent marker or piece of tape to mark both male/female connectors.
WARNING: Do NOT disconnect motor connectors by pulling on the wires or by prying at the latch. Use pliers to
gently grip the base of each white connector and pull apart.
Remove the Homing Switches, Drag Chain, and V-Wheels
1. Label the X- and Z-Axis homing switches with a piece of tape (if needed).
2. Remove the Z-Axis homing switch from the front of the X/Z-carriage.
a. Use a 2.5mm hex key to remove the M3x12mm SHCS.
b.
CARRY OVER
the
Z-Axis homing switch
,
M3x12mm SHCS
, and
M3 washer
.
3. Remove the X-Axis homing switch plate (keep switch attached to plate) from the rear of the X/Z-carriage.
a. Use a 4mm hex key to remove the M5x35mm SHCS and 1-inch spacers.
b.
CARRY OVER
the
X-Axis homing switch assembly
,
M5x35mm SCHS
, and
1-inch
spacers
.
4. Remove L-shaped X-Axis drag chain bracket (keep drag chain attached to bracket) from rear of X/Z-carriage.
a. Use a 3mm hex key to remove the M5x10mm BHCS securing the L-bracket.
b.
CARRY OVER
the
bracket
and
M5x10mm BHCS
.
5.
Remove the lower two V-wheels of the X/Z-carriage.
a. Use a 3mm hex key and 8mm wrench to remove the lower two V-wheels.

[email protected] docs.carbide3d.com
07/13/2020 Version 4.0
6
6. Lift the X/Z-carriage away from your Shapeoko.
Disassemble the X/Z-Carriage
In this section you will remove and
CARRY OVER
the
X-Axis stepper motor
,
Z-Axis stepper motor
, and the
router/spindle mount and hardware
. You will also remove the motor pulley from the Z-Axis stepper motor drive shaft.
Separate the Z-Carriage from the X-Carriage
1. Remove the springs from both sides of the X/Z-carriage.
2. Loosen the belt tensioning screw at the bottom of the X-carriage.
a. Use a 3mm hex key to loosen the tensioning screw.
3. Loosen the idler assembly at the bottom of the X-carriage and free the belt.
a. Use a 4mm hex key and a 10mm wrench to loosen the nut holding the idler in place.
4. Slide the small Z-carriage down and off the larger X-carriage.
Remove the Router/Spindle Mount
5. Remove the router/spindle mount from the Z-carriage plate.
a. Use a 3mm hex key to remove the two M5x16mm BHCS securing the mount.
b.
CARRY OVER
the
M5x16mm BHCS
, and
router/spindle mount
.
Remove the Stepper Motors
6. Remove the X-motor (lower motor) from the back of the X-carriage.
a. Use a 4mm hex key to remove the four M5x10mm SHCS securing the motor.

[email protected] docs.carbide3d.com
07/13/2020 Version 4.0
7
b.
CARRY OVER
the
X-motor
.
7. Remove the Z-motor (upper motor) from the
back of the X-carriage.
a. Use a 4mm hex key to remove the
M5x10mm SHCS securing the motor.
8. Remove the drive pulley from the Z-motor
drive shaft. (The Z-motor has the shorter lead
cables.)
a. Use a 1.5mm hex key to loosen the
two set screws on the drive pulley.
b. Use even pressure to pry off the drive
pulley with a couple of screwdrivers,
needle nose pliers, or both.
DO NOT
BEND THE DRIVE SHAFT
. See
Fig. 3
.
c.
CARRY OVER
the
Z-motor
.
Figure 3

[email protected] docs.carbide3d.com
07/13/2020 Version 4.0
8
Assemble and Install the HDZ
HDZ Assembly Tips
We recommend assembling as much of the HDZ as possible before installing it onto the Shapeoko; this process is
described in the steps below.
NOTE: The application of a blue (i.e. light/medium grade) thread locker is at your discretion. We suggest
adding it post-assembly if any screws happen to work their way loose during use.
Insert the Eccentric Nuts
Located in HDZ Kit:
Item
Description
Qty
L
HD Eccentric Nut
2
1. Insert the two HD eccentric nuts into
the bottom of the HDZ. See
Fig. 4
.
a. Rotate the eccentric nuts into
their fully open position with
the dimple facing up.
NOTE: Be careful not to confuse the HD
spacers and the HD eccentric nuts. The HD
eccentric nuts are threaded, the HD
eccentric spacers are non-threaded.
Figure 4

[email protected] docs.carbide3d.com
07/13/2020 Version 4.0
9
Install the Z-Motor and
Coupling
HDZ kit + Carryover Components:
Item
Description
Qty
H
Z-Motor Shaft Coupling
1
G
M5 x 10mm Socket Head
Cap Screw
4
T
Z-Motor*
[CARRYOVER]
1
*Z-Motor has shorter lead cables and bare drive shaft.
1. Install the Z-motor coupling onto the
ball screw at the top of the HDZ. See
Fig. 5
.
a. Use a 2.5mm hex key to loosen
both set screws.
b. Press the Z-motor coupling
onto the ball screw shaft until
fully seated.
c. Tighten the bottom set screw.
2. Install the Z-motor at the top of the
HDZ. See
Fig. 6
.
a. Insert the motor drive shaft
into the coupling (position
motor with leads toward the
back of the HDZ).
b. Use a 4mm hex key and four
M5x10mm SHCS to secure the
motor.
Figure 5
Figure 6

[email protected] docs.carbide3d.com
07/13/2020 Version 4.0
10
d. Use a 2.5mm hex key to secure
coupling to Z-motor drive shaft.
See
Fig. 7
.
NOTE: Ensure both set screws on the
coupling are tight. Failure to do so will
lead to slippage. Using a small amount of
blue thread lock on the motor shaft and
ball screw shaft is acceptable.
Assemble and Install Idlers
HDZ Kit:
Item
Description
Qty
P
M8 x 30mm Idler Bolt
2
O
M8 Washer
2
M
M8 Guide Bearing
4
N
M8 Spacer
2
1. Assemble the two idlers in this order:
a. M8x30mm idler bolt
b. M8 washer
c. M8 guide bearing, flange
TOWARD
bolt head
d. M8 guide bearing, flange
AWAY
FROM
bolt head
e. M8 spacer
2. Install idlers onto the back of the HDZ. See
Fig. 8
.
a. Use a 6mm hex key to secure the idlers to the two M8 screw holes in the center of the plate.
When fitted correctly the idler bolts will not protrude through the front of the plate.
Figure 7
Figure 8
Other manuals for Shapeoko HDZ 4.0
1
Table of contents


