Brookstone Rechargeable Hand Vac User manual

653949_INS_Rechargeable Hand Vac
Size:5”Wx4.75”H_Output:100%_Prints:1/1,Blk
Rechargeable Hand Vac
FOR QUICK CLEAN-UPS IN YOUR
HOME OR AUTO

1
Table of conTenTs
WarningsandCautions....................................................2
LocationofControls.......................................................6
Operation.................................................................7
ChargingBracket .........................................................7
ChargingtheVacuum......................................................9
UsingtheVacuum........................................................10
Maintenance.............................................................10
Specifications............................................................12
Troubleshooting..........................................................12
Warranty.................................................................13
2
IMPoRTanT safeTY InsTRUcTIons
All of the safety and operating instructions should be read, adhered to and followed
before the unit is operated.
caUTIon
• TO REDUCE THE RISK OF ELECTRIC SHOCK, DO NOT REMOVE COVER.
THERE ARE NO SERVICEABLE PARTS INSIDE.
• TO REDUCE THE RISK OF FIRE OR ELECTRIC SHOCK, DO NOT EXPOSE
THIS UNIT TO RAIN OR MOISTURE.
The lightning flash with arrow-head symbol within an equilateral triangle
is intended to alert the user to the presence of uninsulated “dangerous
voltage” within the unit’s enclosure that may be of sufficient magnitude
to constitute a risk of electric shock.
The exclamation point within an equilateral triangle is intended to alert
the user to the presence of important operating and maintenance
(servicing) instructions in the literature accompanying the unit.
save These InsTRUcTIons!
653949_INS_Rechargeable Hand Vac
Size:5”Wx4.75”H_Output:100%_Prints:1/1,Blk

DanGeR
To reduce the risk of electric shock, burns, fire or injury:
1. Do not use while bathing or in a shower.
2. Do not place or store unit where it can fall or be pulled into a tub or sink.
3. Do not place in, drop or submerge in water or other liquid.
4. Do not reach for the unit if it has fallen into water. Unplug it immediately.
5. Care should be taken so that objects do not fall and liquids are not
spilled onto the unit.
WaRnInG
1. Close supervision is necessary when this appliance/product is used by
or near children or mentally disabled individuals.
2. Use this unit only for its intended use as described in this manual.
3. Unplug this unit during lightning storms or when unused for long
periods of time.
4. Never drop or insert an object into any opening.
5. Protect the power cord from being walked on or pinched, particularly
at plug outlets and the point where it exits the unit.
6. Do not allow the cord to touch hot surfaces. Wrap the cord loosely around
the unit’s base when storing, or disconnect the adapter from the base and
store separately.
3

7. The unit should be situated away from direct sunlight or heat sources such
as radiators, electric heaters, heat registers, stoves or other units (including
amplifiers) that produce heat. Avoid placing on top of stereo equipment that
radiates heat.
8. Never block the air openings on the base with materials such as clothing,
plastic bags or papers, or place it on a soft surface such as a bed or couch,
where the air openings may be blocked.
9. Do not overload electrical outlets. Use only the power source as indicated.
10. Do not carry this unit by its cord or use its cord as a handle.
11. Never operate this unit if it has a damaged cord or plug, if it is not working
properly, or if it has been dropped or damaged, or dropped into water. If the
unit’s power supply cord, adapter or plug is damaged, do not attempt to fix
it yourself.
12. To avoid the risk of electric shock, do not disassemble the unit further than
the steps in this manual state or attempt to repair it if broken. Incorrect repair
can cause risk of electric shock or injury to persons when the unit is used.
13. Do not operate in the presence of explosive and/or flammable fumes.
14. Never remove the adapter from the outlet by pulling the cord.
15. Check the voltage indicated on the AC adapter and make sure it corresponds
to the local voltage before you connect the adapter to an electrical outlet.
4
653949_INS_Rechargeable Hand Vac
Size:5”Wx4.75”H_Output:100%_Prints:1/1,Blk

IMPoRTanT
Your vacuum cleaner requires a certain amount of maintenance to
function properly.
The following points should be observed:
• Check the voltage marked on the adapter and make sure it matches
the voltage to which you are connecting.
• Do not use the vacuum cleaner on surfaces that have been cleaned
with flammable solvents until the solvents have dried completely.
• Do not use your vacuum cleaner to remove hot or burning particles.
This may cause a fire.
• Never apply a lubricant to the motor unit.
• Do not leave the vacuum exposed to direct sunlight or in the vicinity
of a heat source.
If your vacuum cleaner is damaged in such a way that the batteries
become exposed:
• Do not leave the battery in the vicinity of strong heat.
• Do not short-circuit the battery.
• Do not remove the batteries if they are broken or leaking.
Dispose of the entire unit as you would a battery.
• Use only the original charger designed for the unit.
• Recharge your vacuum cleaner after each use.
5
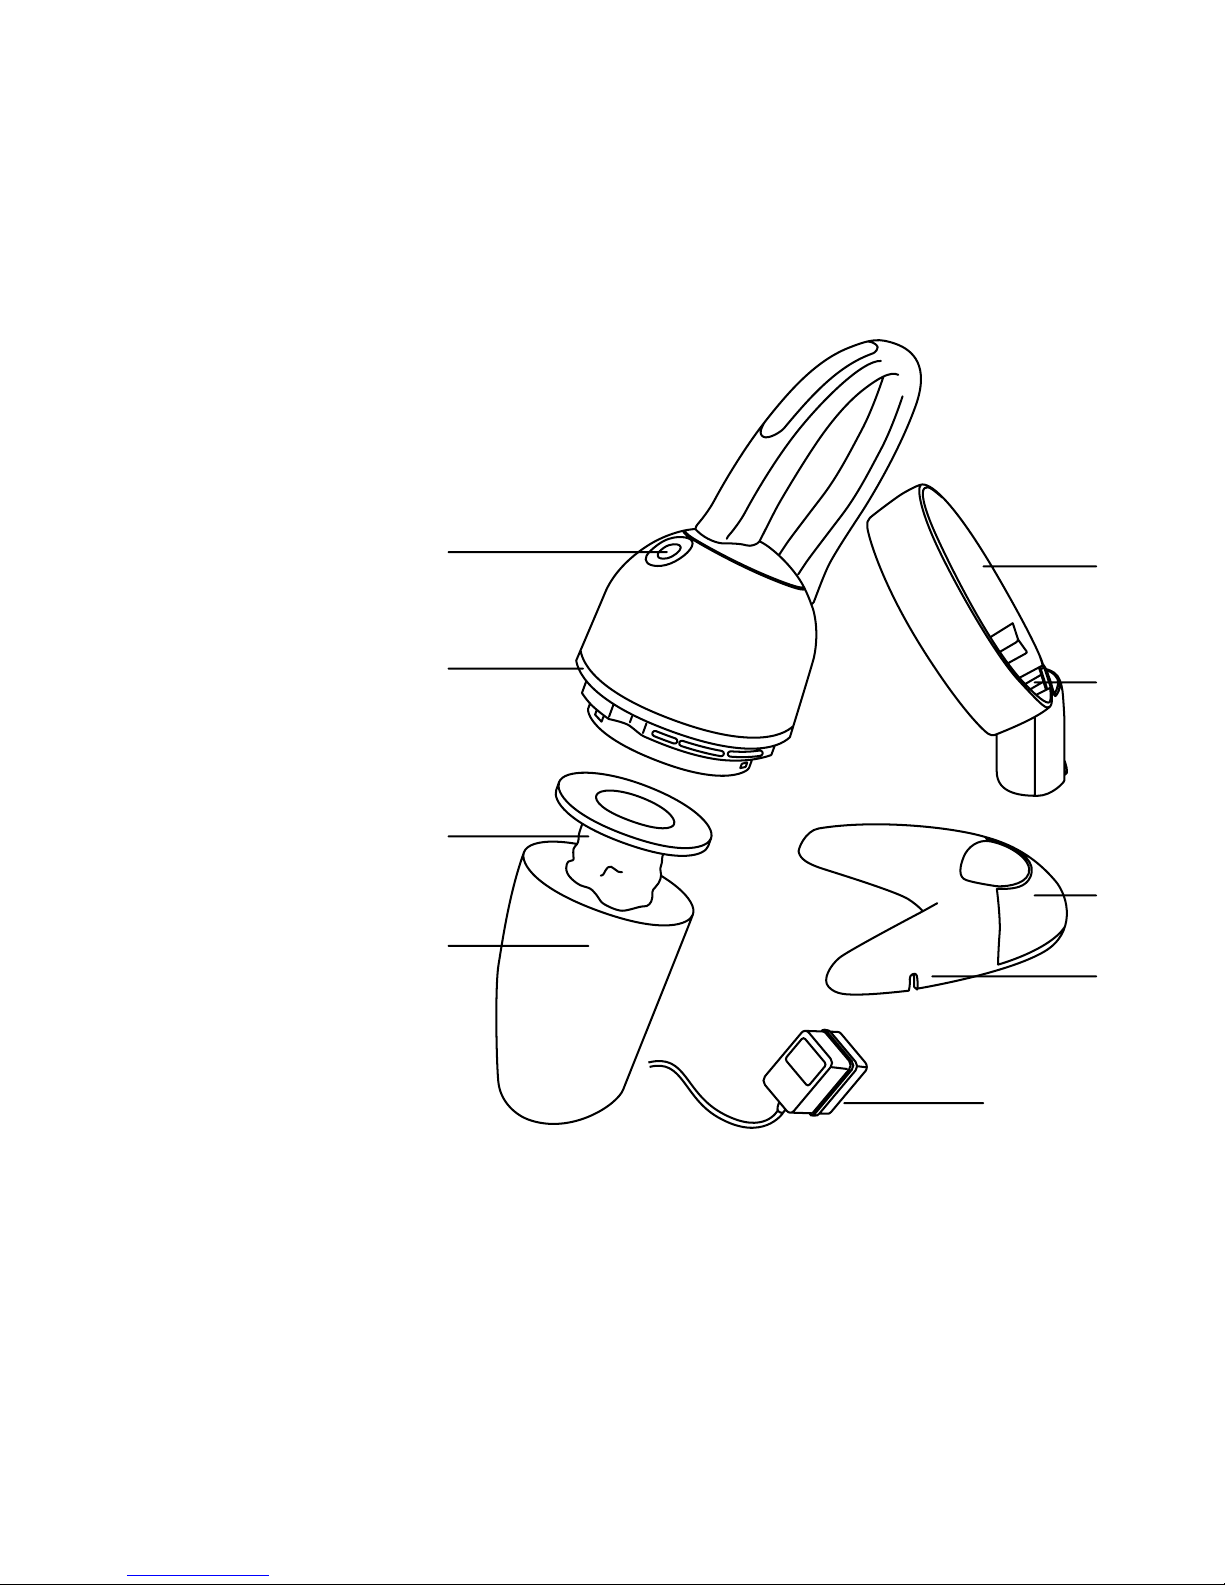
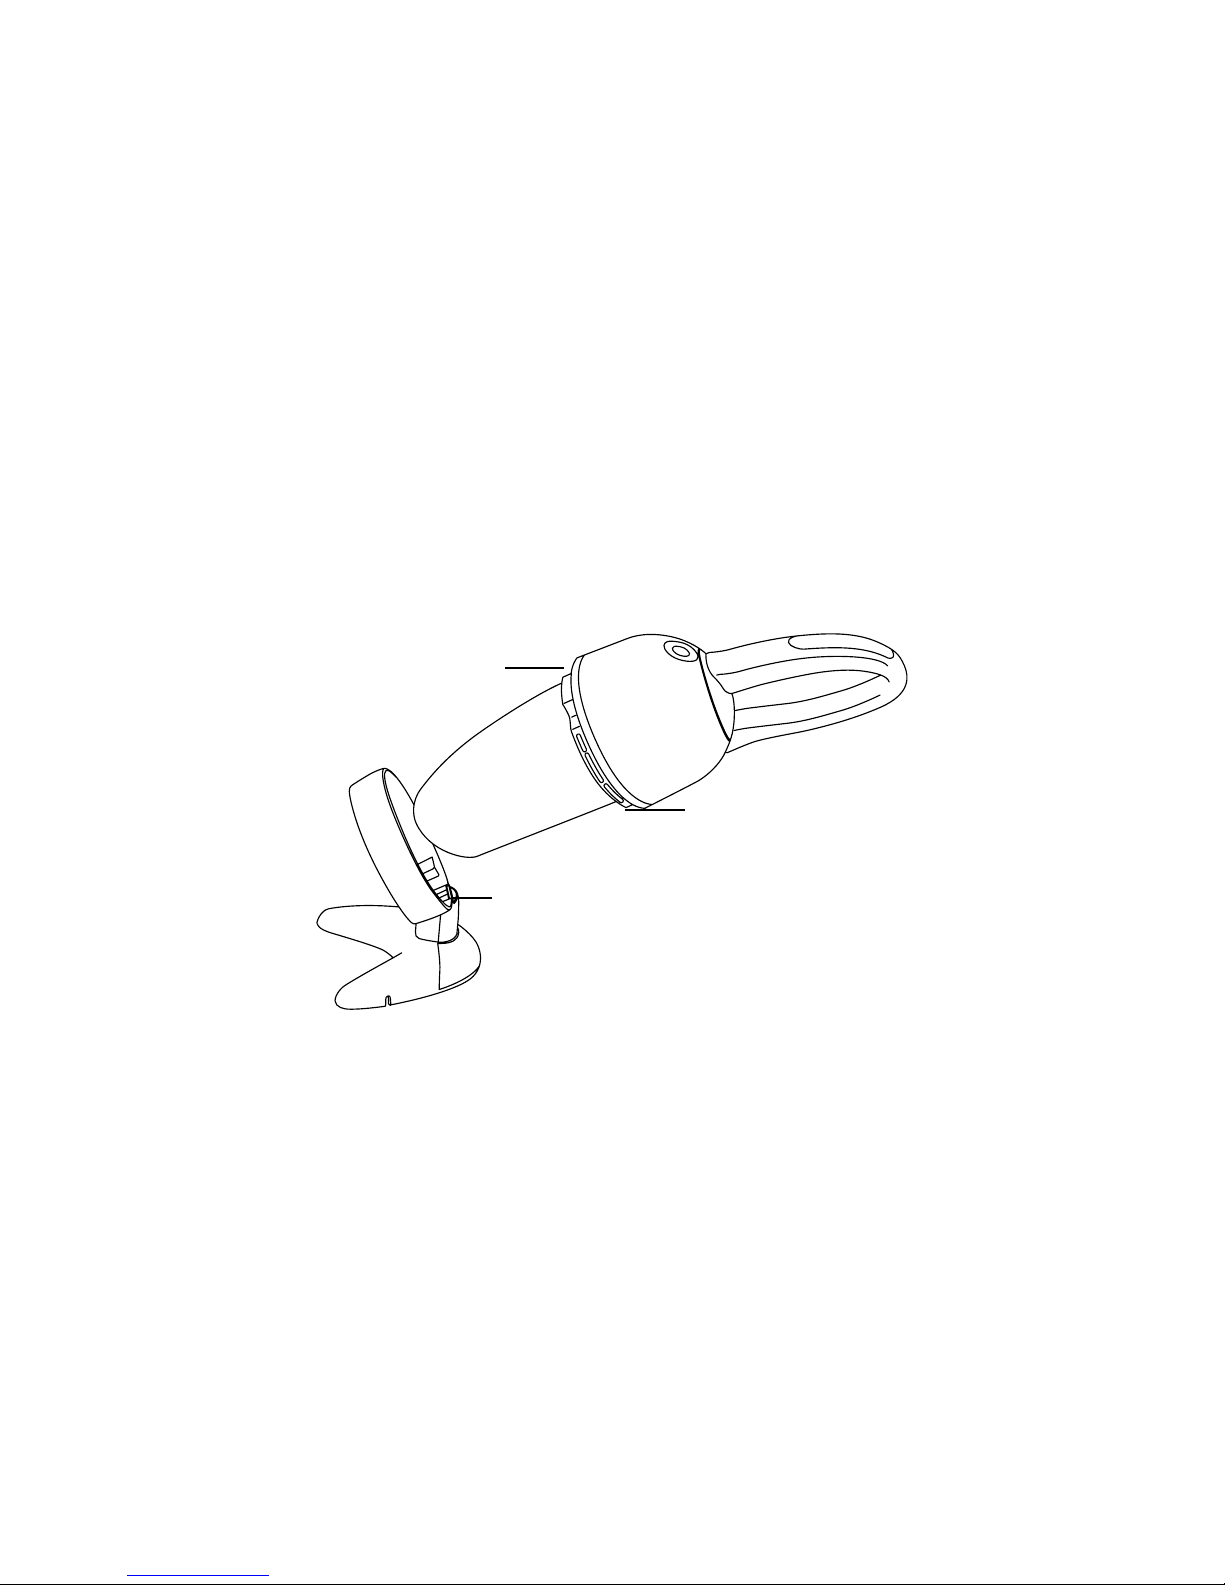
locaTIon of conTRols
1. On/Off switch
2. Charging LED
3. Filter
4. Nozzle
5. AC Adapter
6. Charging ring
7. Charging contact
8. Charging base cover
9. Charging base
6
5
9
8
7
6
4
3
2
1
653949_INS_Rechargeable Hand Vac
Size:5”Wx4.75”H_Output:100%_Prints:1/1,Blk
7
oPeRaTIon
IMPORTANT: Before using your vacuum cleaner for the first time,
make sure to charge the battery for approximately 16 hours.
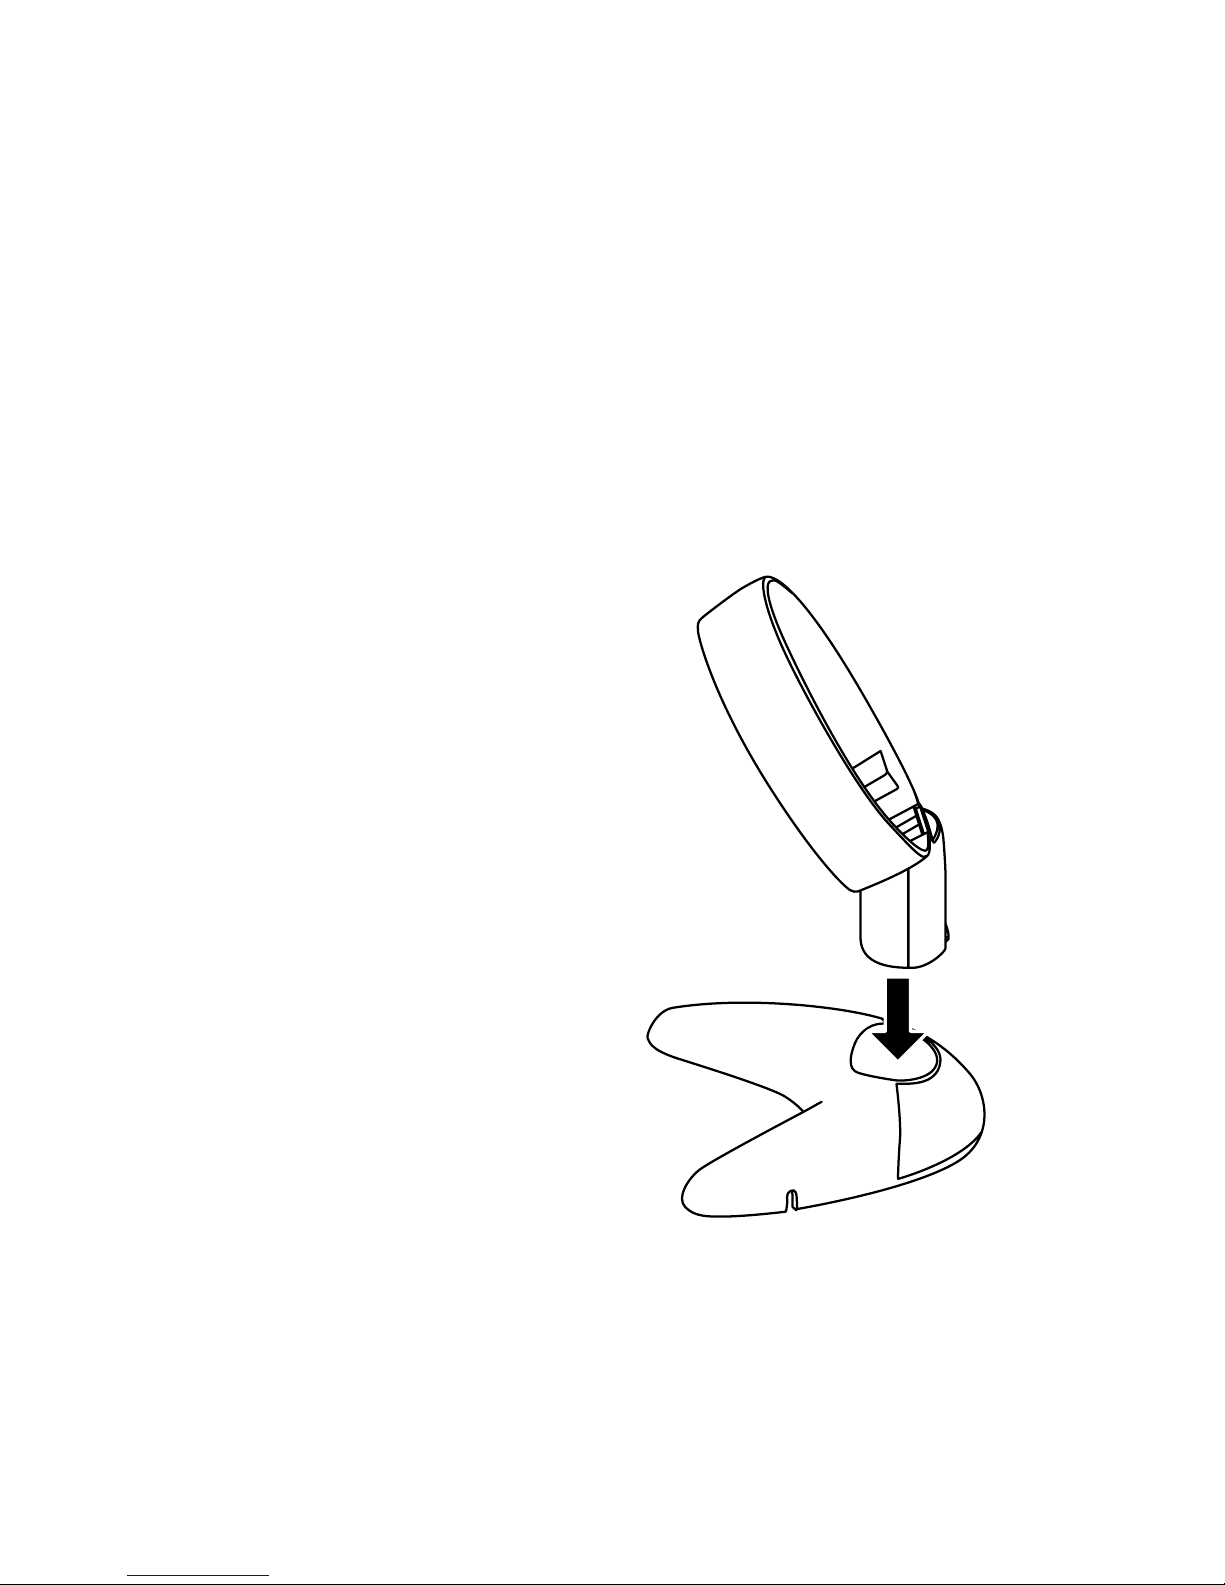
chaRGInG bRacKeT
ASSEMBLY
1. Insert the charging ring
into the base (see at right).
2. Place the assembled charging
bracket on a flat, level surface.
3. Plug the adapter jack into the
charging bracket DC input.
8
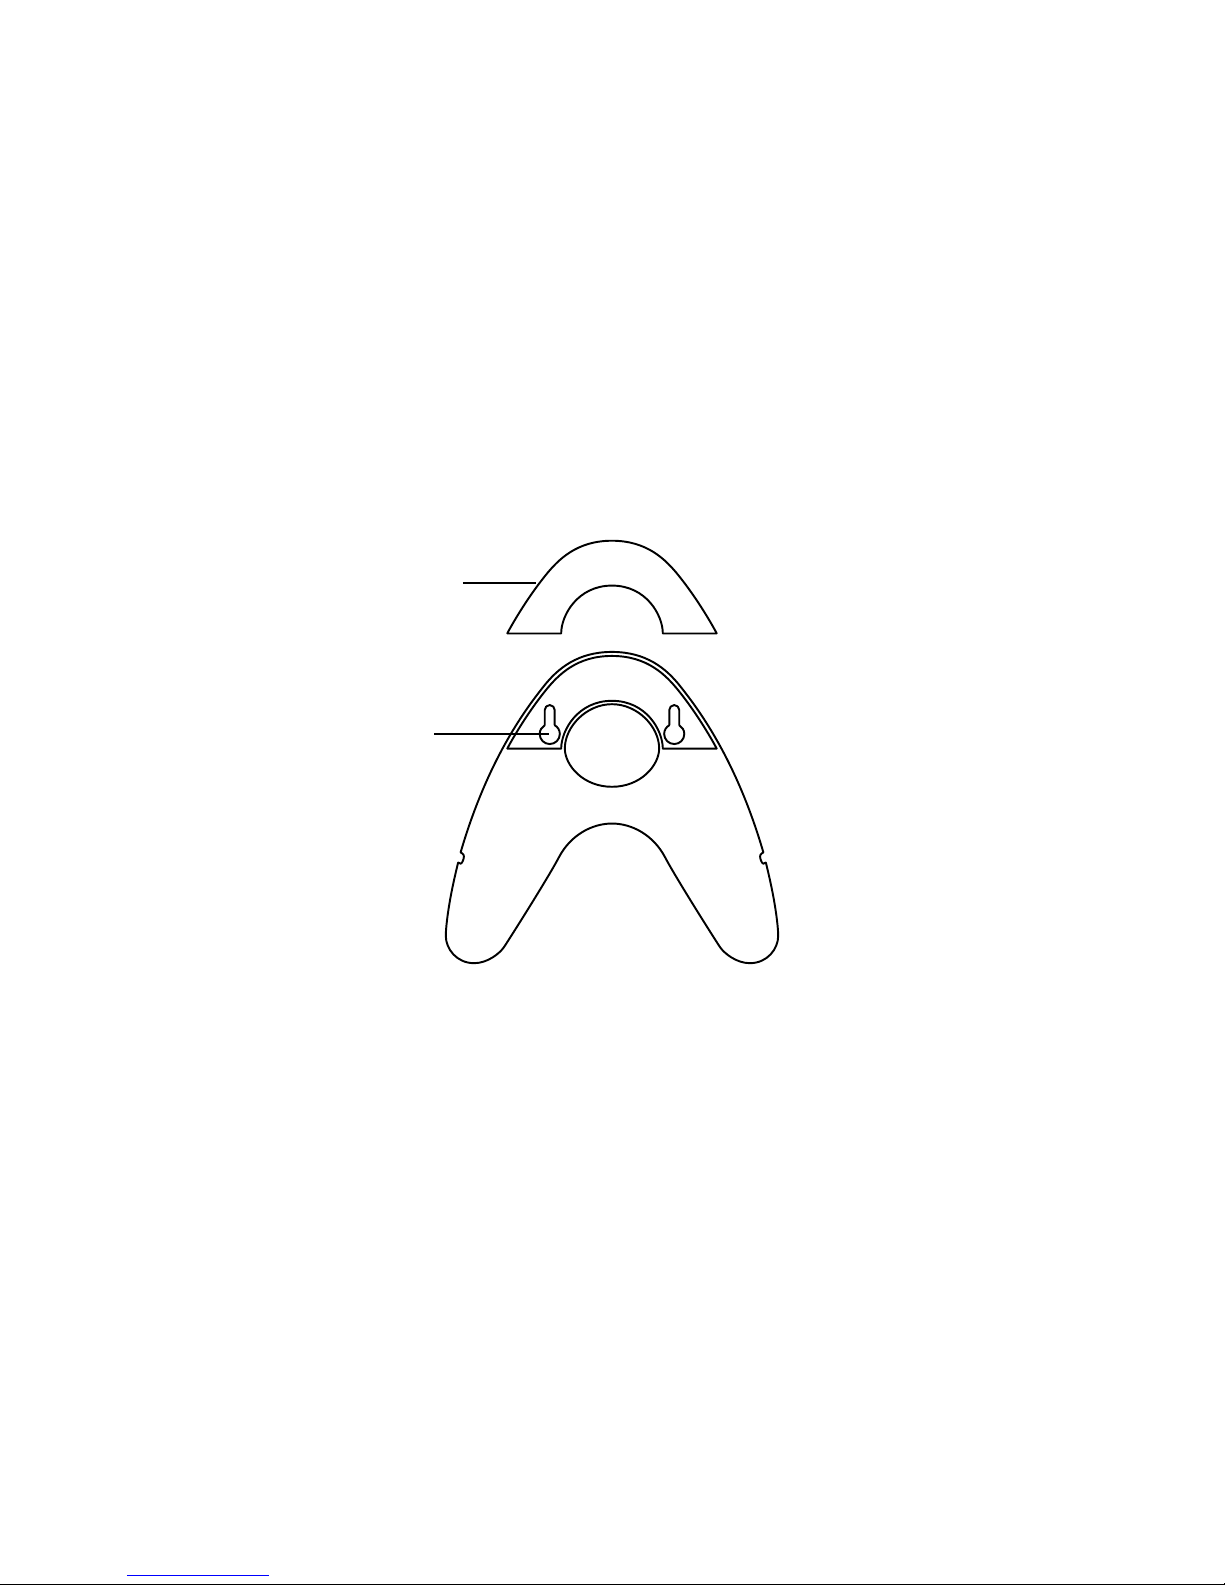
WALL MOUNTING (OPTIONAL)
IMPORTANT: Care should be taken to ensure that there are no dangerous
objects hidden beneath the wall surface (e.g.; electrical wires, pipes, etc.).
Remove rubber feet prior to screwing the bracket to the wall.
1. Remove all rubber feet from under the base.
2. Remove the cover of the base and mark the drill hole positions (see above).
3. Use a 5mm drill to drill the holes and then insert the anchors.
4. Insert the ring handle and plug in the adapter jack.
5. Screw the bracket onto the wall.
6. Install the base cover.
Base Cover
Mark drill hole positions
through these holes.
653949_INS_Rechargeable Hand Vac
Size:5”Wx4.75”H_Output:100%_Prints:1/1,Blk
9
chaRGInG The vacUUM
IMPORTANT: Charge your new vacuum cleaner for 16 hours prior to initial use.
1. Plug the adapter into the charging base and into an electrical outlet.
2. To charge, make sure that the On/Off switch on the vacuum is in the “Off”
position and place the vacuum cleaner into the charging bracket (see below).
Make sure the metal charging contact on the vacuum cleaner is touching the
metal charging contact on the charging station.
3. The charging LED on the vacuum will illuminate. If the charging light LED does
not illuminate, the switch on the vacuum may be “on”. Press the On/Off switch
on the vacuum once to switch it to “off”.
Vacuum Charging
Contact
Base Charging
Contact
Charging LED
Table of contents
Other Brookstone Vacuum Cleaner manuals


