
Bravo OS V12 User manual

User Interface Manual
Rev 011520

2 of 127
Contents
Copyright Notice 6
BRAVO OS V12 Version Changes 7
v12.01.XXX 7
Cart Assembly 10
Optional Tray Assembly 14
Unpacking the Machine 15
Setting up the Machine 15
Install the Machine User Interface and X-Beam End Caps 18
Machine Overview 19
Software Activation & Deactivation 20
Lite 20
Product Activation 20
Product Deactivation 21
Machine Connections 22
Do Not Share Networks 22
Connecting the Power Cables 22
Connecting the Network Cable 23
Selecting The Connection 24
Powering Up the Machine 25
Initial Power Up Sequence 25
Upper Threading 26
Threading the Machine for the First Time 26
Quick Thread Change 28
Upper Thread Path 30
Bobbin Threading and Tensioning 34
Removing the Bobbin Case 34
Cleaning the Bobbin Case 34
Inserting a New Bobbin in the Bobbin Case & Checking the Tension 35
Table of Contents

3 of 127
Bobbin Case Tension Gauge 36
Inserting the Bobbin Case 39
Initial Maintenance 40
User Interface 41
Main Screen Overview 41
Machine Status 42
Loading A Design 43
Resetting a Design 46
Move & Rotate 47
Moving 47
Rotating A Design 48
Move to Color 48
Move to Stitch 48
Laser Alignment (Design Registration) 49
Color Sequence 51
Setting Up the Thread Tree 52
Setting the Color Sequence 54
Adding Machine Commands to the Sequence 56
Hoop Selection 58
Choosing the Appropriate Hoop for the Job 59
Material Thickness 61
Selecting a Material Thickness 61
Adjusting Material Thickness 62
Machine Speed 64
Settings 66
Bobbin Detect 66
Wide Angle Driver Color 66
Presser Foot Adjustment 67
Maintenance 67
Table of Contents

4 of 127
Advanced Settings 68
Advanced Settings Button 68
Connections 68
Restart in BRAVO OS Advanced Interface 68
Machine Reset 69
Check for Update 69
Deactivate Product 69
Hooping 70
Adjusting the Hoop Tension 70
Hooping the Garment or Fabric 72
Hooping Tips 74
Attaching or Moving the Hoop Support Arms 75
Attaching the Hoop Support Arms 75
Removing the Hoop Support Arms 77
Adjusting the Spring Clips 77
Loading a Hoop onto the Machine 78
Adjusting the Presser Foot 79
Keypad Operations 81
One Touch Controls 81
Key Combinations 82
LED Indicator 85
Needle Types and Replacements 86
Replacing a Needle 86
Choosing a Needle 87
Sewing Caps 90
Selecting the Wide Angle Driver and Hoop 90
Installing & Removing the Wide Angle Driver 91
Red Wide Angle Driver Cap Support Wings (Option) 95
Adjusting the Red Wide Angle Driver 100
Hooping a Cap on the Conventional Cap Frame 103
Hooping a Cap on the Wide Angle Cap Frame 108
Loading/Removing a Hoop with the Wide Angle Driver 117
Table of Contents


6 of 127
Copyright Notice
© Copyright Melco, 2020
ALL RIGHTS RESERVED. No part of this publication may be reproduced,
stored in a retrieval system, or transmitted in any form or by any means
(electronic, mechanical, photocopying, recording or otherwise) without pri-
or written approval from the author. The author reserves the right to revise
this publication and to make changes in it at any time without obligation
of the author to notify any person or organization of such revisions or
changes.
All precautions have been taken to avoid errors or misrepresentations of
facts, equipment, or products. However, the manufacturer does not assume
any liability to any party for loss or damage caused by errors or omissions.
The machine technology is protected by - but not limited to - the following
patents:
• Pat. US 6,445,970 B1
• Pat. US 6,823,807
• Pat. CH 693569 A5
• Pat. US 6,736,077 B2
• Pat. US 6,732,668 B2
• Pat. US 6,871,605
• Pat. US 6,983,192 B2
• Pat. US 7,308,333 B2
• Pat. US 7,513,202
• Pat. US 8,851,001 B2
• Pat. US 9,702,070
• Other patents pending
Table of Contents

7 of 127
BRAVO OS V12 Version Changes
v12.01.XXX
• Simplied user view along with tradition BRAVO OS view. This is
optimized for a touch screen Windows device.
• Time based maintenance (this is done while in the simplied user
view in BRAVO OS)
• Simplied hoop selection by hoop type categories. For example:
square hoops, round hoops, etc. (Simplied user view in BRAVO
OS)
• Simplied acti-feed selection by just selecting a product type. For
example: if the user is sewing a polo shirt they can just select the
t-shirt in product type in the simplied user view in BRAVO OS.
• Simplied position screen. User can easily do things like rotate a
design 180 degrees by just a single click (Simplied user view in
BRAVO OS)
• Simplied load design window (Simplied user view in BRAVO OS)
• Simplied color sequence window. This also includes a color se-
quence repeat function. This can be applied when doing applica-
tions like step and repeat (Simplied user view in BRAVO OS)
• Thread break sensor calibration tool. This allows you to ne tune
the thread break sensor so that false thread breaks can be eliminat-
ed (Advanced Interface view in BRAVO OS)
• New colorized status bar. This allows the user to see from a dis-
tance what is going on with each machine without walking over to
the PC screen (Simplied user view in BRAVO OS)
• Presser foot adjustment button (Simplied user view in BRAVO OS)
• Removed the monthly maintenance from the recommended initial
maintenance steps.
• Security Updates
• Bobbin tension changes
• The machine may automatically slow for longer stitch movements in X,
Y, or now Z. Longer stitches, as well as higher thread feed values, may
affect speed.
Table of Contents

8 of 127
• Stitches in complex lls will no longer be removed upon rotation in OS.
• Corrected machine head up timeout issue.
• Corrected an issue that would allow the machine to move X/Y while the
needle was in the fabric.
• Resolved an issue that would occasionally cause a machine to fall ofine
from the software when a maintenance procedure was ignored.
• As of this update, the user must check for updates. No automatic noti-
cation will be presented.
• Corrected an issue that would cause the orientation of the design or
design elements on screen to be different than the design being sewn.
• Moving the hoop in X after a trace will no longer cause the hoop to
also move in Y.
• If closed early, the software will not prevent the user from launching
the software again.
• Corrected issue where acti-feed setting would change after a larger
number of color changes.
Table of Contents

9 of 127
• Added hoops:
• Allied Hoops:
• 7.0” x 6.5” (17 x 16 cm)
• 6.0” x 5.5” (15 x 14 cm)
• 3.5” (12 cm) round
• 5.9” (15 cm) round
• 7.1” (18 cm) round
• Mighty Hoops:
• 16.625” x 17.25” (41.3 x 43.8 cm)
• 10” x 5” (25.4 x 12.7 cm)
• 6” x 9” (15.25 x 22.86 cm)
• 12” x 15” (30.5 x 38.1 cm)
• 4.25” x 16” (10.8 x 40.6 cm)
• 19” x 10” (48.25 x 25.4 cm)
• 16” x 14” (40.6 x 35.6 cm)
• Slim Line 2:
• 6.5” x 6.5” (16.5 x 16.5 cm )
• 8” x 5” (20.3 x 12.7 cm)
• Slim Line 1:
• Hat Side Right Clamp
• Hat Side Left Clamp
• Red Driver
• Back of Cap Clamp XL
Table of Contents
10 of 127
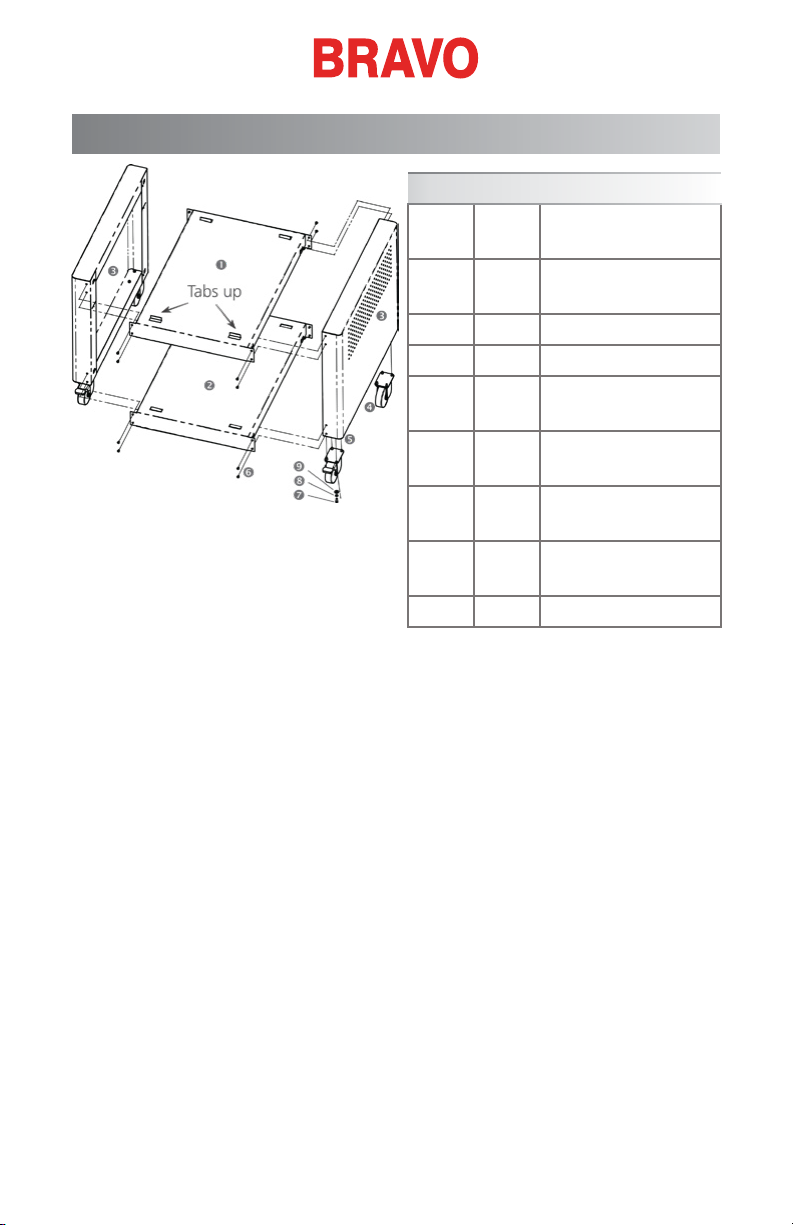
Cart Assembly
Item Qty. Description
1 1 Upper Support
Shelf (Tabs Up)
2 1 Lower Support
Shelf (Tabs Flat)
3 2 Cart Leg
4 2 Swivel Caster
5 2 Swivel Caster with
Lock
6 16 M5 Button Head
Screw
7 16 M6 Socket Head
Screw
8 16 M6 Split Lock
Washer
9 16 M6 Fender Washer
The cart (Melco PN: 34262) consists of the items assembled as shown in
the gure to the right. This assembly requires a 3mm and 5mm hex wrench
included in your Operator’s Kit.
Note: If you did not purchase the cart option with your machine, you will
nd a bench top pad (Melco PN: 33423) in the options box. Please ensure
that you place the machine on this pad to secure the machine.
Table of Contents
Table of contents
Popular Industrial Electrical manuals by other brands

Rexroth Indramat
Rexroth Indramat DURADRIVE SYSTEM200 Project planning manual

Abtech
Abtech HVJB Series Installation, operation & maintenance instructions

Murata
Murata GRM0335C1H8R1DA01 Series Reference sheet

SAF-HOLLAND
SAF-HOLLAND CBX 5415.5 Installation and operation manual

Eaton
Eaton Ulusoy HMH24-04 user manual

Newlong
Newlong NP-7H NSTRUCTION MANUAL/PARTS LIST

Murata
Murata GJM0335C1E4R4BB01 Series Reference sheet

Stahl
Stahl 8575/12 operating instructions

SI
SI Pegasus installation instructions

Murata
Murata GRM1555C1H2R7CA01 Seies Reference sheet

Murata
Murata GRM0225C1E6R4BA03 Series Reference sheet

Cooper Power Systems
Cooper Power Systems VXE15 Installation and operation instructions


