Brandt BCR160P User manual
EN INSTRUCTIONMANUAL
FR NOTICED’UTILISATION
NL GEBRUIKERSHANDLEIDING
ES MANUALDEINSTRUCCIONES
CZ NÁVODKOBSLUZE
SK NÁVODNAOBSLUHU
CLOCK RADIO
RADIO RÉVEIL
WEKKERRADIO
RADIO DESPERTADOR
RADIOBUDÍK
RÁDIOBUDÍK
BCR160P
Downloaded from www.vandenborre.be

WARNINGS
This appliance is intended for domestic household use only
and should not be used for any other purpose or in any other
application, such as for non-domestic use or in a commercial
environment.
Prior to cleaning or other maintenance, the appliance must be
disconnected from the supply mains.
The ventilation should not be impeded by covering the ventilation
openings with items, such as newspapers, table-cloths, curtains,
etc.
No naked ame sources, such as lighted candles, should be placed
on the apparatus.
The apparatus shall not be exposed to dripping or splashing and
that no objects lled with liquids, such as vases, shall be placed on
the apparatus.
Ventilation
Allow at least a 10 cm gap all around the product.
This apparatus is not suitable for use in a tropical climate.
Batteries (battery pack or batteries installed) shall not be exposed to
excessive heat such as sunshine, re or the like.
CAUTION
Danger of explosion if battery is incorrectly replaced. Replace only
with the same or equivalent type.
To protect the environment, use local recycling facilities for battery
disposal.
Where the MAINS plug or an appliance coupler is used as the
disconnect device, the disconnect device shall remain readily
operable.
EN-1
Downloaded from www.vandenborre.be

IMPORTANTSAFETYINSTRUCTIONS
• This equipment is designed to operate from a 230 Volt, 50 Hz
AC mains supply.
Other power sources may damage it.
• In case of malfunction due to electrostatic discharge, the
apparatus has to be reset by disconnecting it from the mains
socket.
• The marking plate is located at the bottom of the apparatus.
Symbols
Batteryhandlingandusage
Only adults should handle the battery. Do not allow a child
to use this unit unless the battery cover is securely
attached to the unit.
The battery type used in the unit s one CR2032 3V Lithium
battery which is accessible and can be replaced.
Remove the screw that keep the battery cover to the unit.
Remove the battery cover to remove the battery.
This equipment is double insulated and
an earth connection is not
Required.
This mark is applied to show the
equipment conforms to European
safety and electro-magnetic
compatibility standards.
Li
EN-2
Downloaded from www.vandenborre.be

LOCATION OF CONTROL
Buttons:
1. SNOOZE/SLEEP/DIM 6. / AL. 1
2. ON/OFF 7. / AL. 2
3. 180 FLIP 8. M+/NAP, SET/MEM
4. 9.
5.
10. Display
11. Projector
12. Speaker
13. Power cord
14. Wire aerial
15. Battery cover
EN-3
Downloaded from www.vandenborre.be
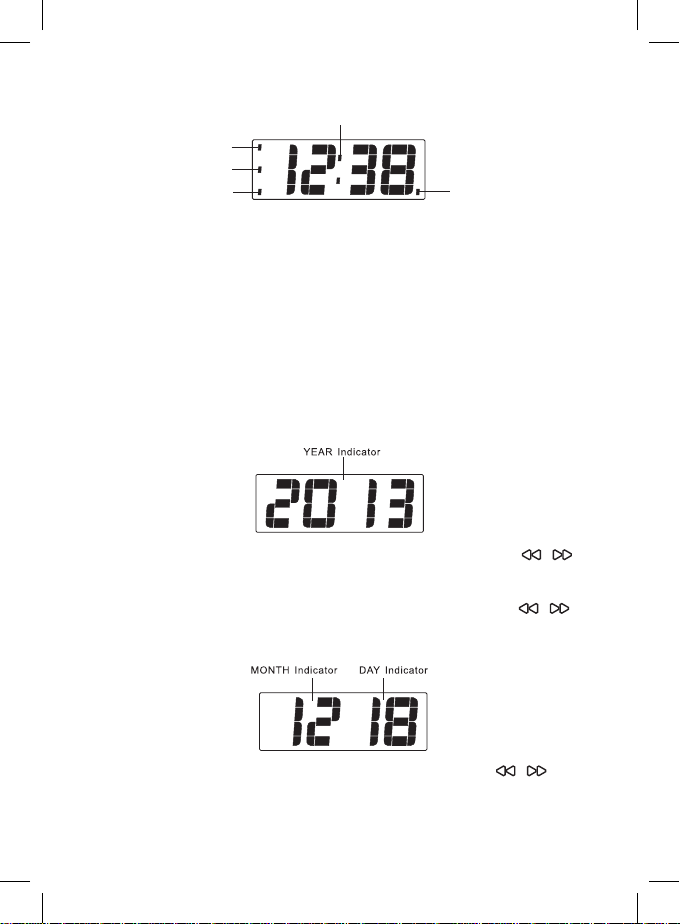
DISPLAY
BATTERYBACKUP
The clock and alarm settings can be protected against AC power
failure with the battery for a short period of time. If no backup
battery is installed or the power failure is prolonged, you will need to
set the clock and alarm settings again.
SETTINGTHECALENDARANDTIME
1. Place the unit on a at stable surface. Plug the unit into the
mains socket.
• The display will show 0:00.
2. Press and hold SET/MEM until the time ashes on the display.
• The year digits will ash on the display.
3. Whilst the year digits are ashing, press or press & hold /
until the desired year appears. Press SET/MEM to conrm.
• The month digit will ash on the display.
4. Whilst the month digit is ashing, press or press & hold /
until the desired month appears. Press SET/MEM to conrm.
• The day digit will ash on the display.
5. Whilst the day digit is ashing, press or press & hold / until
the desired day appears. Press SET/MEM to conrm.
• The 12 or 24-hour format will ash on the display.
EN-4
PM Indicator
Display on/off indicator
ALARM 1 Indicator ALARM 2 Indicator
TIME Indicator
Downloaded from www.vandenborre.be
6. Whilst the hour format is ashing, press / to select 12 or
24 hour display.
7. Press SET/MEM to conrm.
• The hour digit will ash on the display.
8. While the hour digit is ashing, press or press & hold /
until the desired hour appears. Press SET/MEM to conrm.
• In 12 hour format a “PM” indicator will appear for PM time.
• The minute digits will ash on the display.
9. While the minute digits are ashing, press or press & hold /
until the desired minutes appear. Press SET/MEM to conrm.
POWERON/RADIOMODE
Press to switch the unit on and enter the radio mode.
• The radio frequency will briey appear on the display and then
return to clock time.
LISTENINGTOTHERADIO
1. Tune in to the desired station by repeatedly pressing / .
• The wire aerial located on the rear of the unit is for FM
reception. The wire should be fully extended and positioned
for optimum reception.
• Press and hold / for 2 seconds and then release the
button, the unit will scan the frequencies until a broadcasting
station strong enough for good reception is found.
2. Adjust the volume by pressing or pressing & holding / .
3. The radio can be switched off by pressing .
PRESETTINGYOURFAVOURITERADIOSTATION
Up to 10 FM radio stations can be preset.
1. Follow steps in “LISTENING TO THE RADIO” and tune in to the
station that you wish to preset.
2. Press and hold M+/NAP for 2 seconds, “P01” will ash on the
display.
3. Repeatedly press / to select the desired memory slot.
4. Press M+/NAP again to store the station.
5. Repeat steps above to store desired stations.
To listen to preset radio stations, repeatedly press M+/NAP to select
the desired radio station.
EN-5
Downloaded from www.vandenborre.be
DUALALARMSOPERATION
Before setting the alarm time, make sure the Clock has been set.
SettingAlarm1orAlarm2
1. In clock time state, press AL.1/AL.2 once and the display will
show the alarm time.
2. Press and hold AL.1/AL.2 until the hour digits ash on the
display.
3. While the hour digits are ashing, set hours by repeatedly
pressing or pressing & holding / .
4. Press AL.1/AL.2 to conrm.
• The minute digits will ash.
5. Whilst the minute digits are ashing, set minutes by repeatedly
pressing or pressing & holding / .
6. Press AL.1/AL.2 to conrm.
• The display will show “1-5”.
7. Whilst the weekday is ashing, set the alarm to sound on the
desired day(s) by repeatedly pressing or pressing & holding /
.
1-5: all ve weekdays
1-7: weekdays & weekends
6-7: weekends
1-1: one day of the week
• If 1-1 is selected, set the specic day by repeatedly pressing
/ .
8. Press AL.1/AL.2 to conrm.
• “bu” will ash on the display.
9. Press AL.1/AL.2 to conrm and the alarm will be set to wake
to buzzer.
• If you want to set the alarm to wake to radio, while “bu” is
ashing on the display, press / to show the radio
frequency. Press AL.1/AL.2 to conrm. The volume level
will ash on the display.
• While the volume level is ashing, select the desired volume
level by repeatedly pressing / . Press AL.1/AL.2 to
conrm.
10. The alarm will sound every day at the preset time for 30
minutes. To switch off the alarm press .
EN-6
Downloaded from www.vandenborre.be

Tocheckalarmtime, press AL.1/AL.2, the alarm time will ash
briey then return to clock time.
Tocancelthealarmfunction, when the display shows clock time,
press and hold AL.1/AL.2 until the alarm indicator light goes out
on the display.
Snoozefunction
This function can be used to stop the alarm temporarily for about 9
minutes once the alarm is activated. When SNOOZE/SLEEP/DIM
is pressed, the alarm sounds will stop and sound again after about
9 minutes.
SLEEPTIMER
The sleep function is designed to automatically turn off the Radio.
In Radio mode, press SNOOZE/SLEEP/DIM to select the desired
sleep time from 90, 60, 30 or 15 minutes.
The radio will be turned off after the set sleep time has elapsed.
Tocheckremainingsleeptime, press SNOOZE/SLEEP/DIM.
Tocancelsleeptimer, press SNOOZE/SLEEP/DIM until “OFF” is
shown.
Toturnofftheradio before the sleep time has elapsed, press .
DST(DaylightSavingTime)
In clock time state, press and hold SNOOZE/SLEEP/DIM for 3
seconds. The clock will advance by one hour.
To deactivate the function, press and hold SNOOZE/SLEEP/DIM for
3 seconds again.
DISPLAYLIGHTAUTOON/OFF
In clock time state, press and hold for 3 seconds, the display
on/off indicator will appear on the display and after 15 seconds the
display will turn off. The unit will enter the standby state.
Press any button to maintain the display for 15 seconds.
Tocancelthefunction,press and hold for 3 seconds, the
display on/off indicator will disappear on the display.
EN-7
Downloaded from www.vandenborre.be

AUTODISPLAYCHANGE
Press and hold until “ON” shows on the display to enter auto
display change mode.
The year, date and current time will appear in the following order.
“Year” (about 5 seconds) → “month and date” (about 5 seconds) →
“current time”
(about 5 seconds)
To cancel the function, press and hold until “OFF” shows on the
display.
DISPLAYBACKLIGHTDIMMER
In order to adapt the intensity of the display to suit the ambient room
lighting, in clock time state repeatedly press SNOOZE/SLEEP/DIM
to select the dimmer brightness from high, medium to low.
NAPTIMER
The nap timer allows you to set the buzzer to wake you after a
preset interval (up to 90 minutes) without needing to set the alarms.
1. In clock time state, repeatedly press M+/NAP to select the
desired nap time in minutes - 10>20>30>40>50>60>70>80>90.
2. When the selected nap time has elapsed, the buzzer will sound
for 30 minutes and then shut off automatically.
• To stop the buzzer, press .
To cancel the function, repeatedly press M+/NAP until “OFF”
appears on the display.
PROJECTION
With this projection function, you can conveniently project the clock
time onto a surface e.g. walls.
• To focus the projected time, turn the projector wheel.
• To change the projection slightly to a different angle, rotate the
projector ball.
• To ip projected time 180°, press 180FLIP.
EN-8
Downloaded from www.vandenborre.be

NOTE:
If projection is illuminated, do not look directly into the projector.
The maximum projection distance is 3-9 feet.
SPECIFICATIONS
FM frequency: 87.5-108 MHz
Power supply: AC230V~ 50Hz
Power consumption: 5W
Battery back up: DC 3V 1 x CR2032 (not included)
We apologise for any inconvenience caused by minor
inconsistencies in these instructions, which may occur as a result of
product improvement and development.
Darty Plc © UK: EC1N 6TE 06/02/2014
EN-9
Downloaded from www.vandenborre.be
Table of contents
Languages:
Other Brandt Clock Radio manuals


