Bond 52147 User manual

Owner’s Manual
ASHLAND 35" GAS FIRE PIT
HYFP50095
Item# 52147
Model# HYFP50095-3
DANGER
WARNING
WARNING
Improper installation, adjustment, alteration, service or maintenance can cause injury or
property damage. Refer to the owner's information manual provided with this appliance.
For assistance or additional information consult a qualified installer, services agency or
the gas supplier.
FIRE OR EXPLOSION HAZARD
If you smell gas:
Shut off gas to the appliance.
Extinguish any open flame.
If odor continues, leave the area immediately.
After leaving the area, call your gas supplier
or fire department.
Failure to follow these instructions could
result in fire or explosion, which could cause
property damage, personal injury, or death.
Do not store or use gasoline or other flammable
vapors and liquids in the vicinity of this or any
other appliance. An LP-cylinder not connected
for use shall not be stored in the vicinity of
this or any other appliance.
WARNING: If the information in this
manual is not followed exactly, a fire or
explosion may result causing property
damage, personal injury, or loss of life.
•
•
•
•
DANGER CARBON MONOXIDE HAZARD
This appliance can produce carbon
monoxide which has no odor.
Using it in an enclosed space can kill you.
Never use this appliance in an enclosed
space such as a camper, tent, car or
home.
INSTALLER: Leave this
manual with the appliance.
CONSUMER: Retain this
manual for future reference.
or the gas supplier.
by a qualified installer, service agency,
Installation and service must be performed
WARNING:For Outdoor Use Only.

SAFETY INFORMATION
Before you assemble or operate this unit, please carefully read this entire manual. Failure to do so
may result in a re, explosion, injury or death.
WARNING
•
•THIS UNIT IS INTENDED FOR OUTDOOR USE ONLY! This product shall be used outdoors, in a
ventilated space and shall not be used in any enclosed area.
•This unit is to be used with propane gas only! (sold separately)
•Do not attach a remote gas supply to this unit.
•Only use propane gas for this unit.
•Solid fuels shall not be burned in this appliance.
•
•LP GAS WARNING: Do not use any more than 1/4in depth lava rocks/pumice stones/LavaGlass®
above the bur
•If the propane gas tank is leaking gas, you may hear, see, or smell a hiss. Do the following:
e department for help.
•Applying too much propane may result in gas pooling and will not burn. Allow fresh air into the unit
so that the remaining gas may escape.
•
•Manifold pressure: 11 inch w.c. (2.74kPa).
•
•You must use a propane tank that has a collar to protect the gas valve.
•
•The tank system must be set up for vapor withdrawal.
•Discontinue use if any part of the propane tank is damaged. Rust and dents may be hazardous and
should be inspected by a gas supplier.
•
•
rocks/pumice stones/LavaGlass®could pop out and cause injury. Should any rocks pop out, discard
them.
•Always ensure that lava rocks/pumice stones/LavaGlass®are completely dry before use. Failure to
do so will cause them to crack or pop.
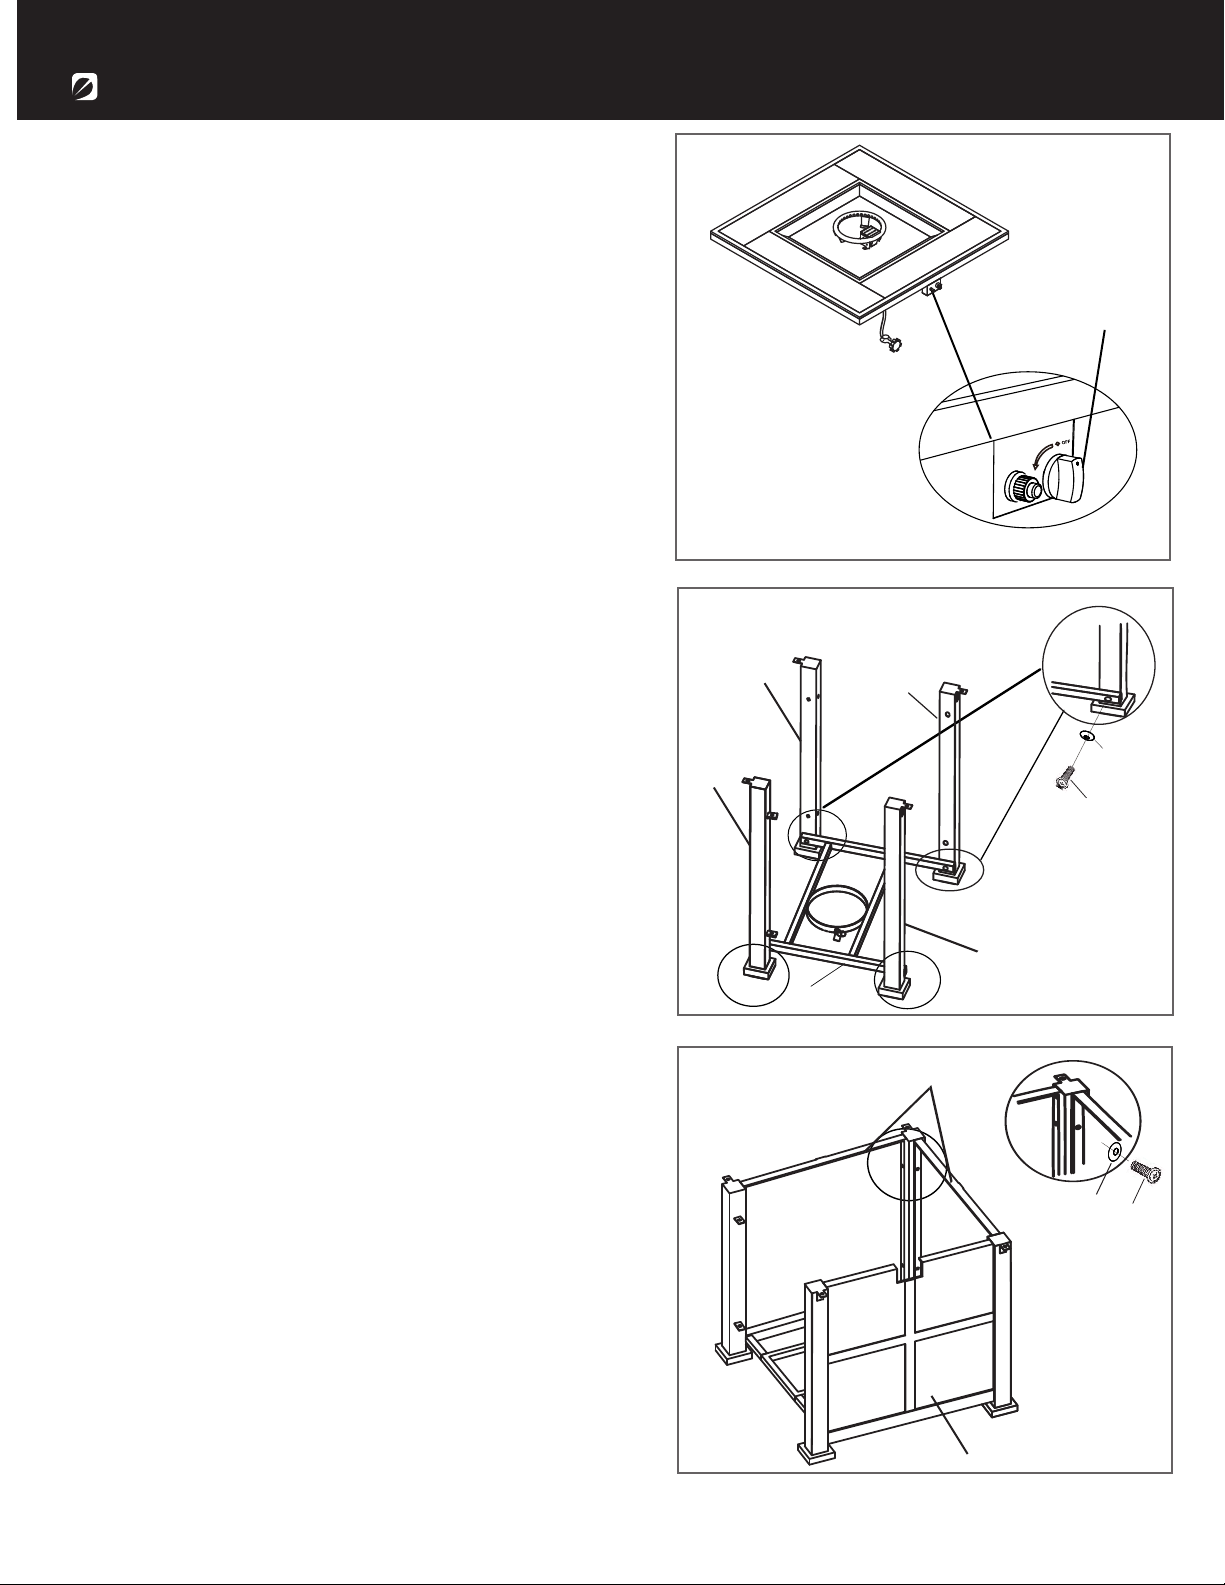
•Do not operate unit until all parts are fully assembled.
•Do not paint or color any part of this heating unit.
•Unit may be hot while in use, do not attempt to move it while in use.
•Never leave this heating unit unattended while in use.
•This unit is not intended for cooking.
•
•Keep a safe distance to avoid burning skin or clothing.
•Do not sit or rest hands or feet on this heating unit.
•
•Keep all electrical cords and fuel supply hose away from heated surfaces.
Use LP propane tanks with the following dimensions: diameter 12 in, height 18 in - capacity 20 lbs.
The installation of this unit must adhere to local codes or Propane Storage and Handling Code,
CSA B149.2.
Bond Manufacturing Co., Inc. | Page 2

1-866-771-2663 | Page 3
IF APPLICABLE:
•Allow heating item to cool completely before placing on lid.
•DO NOT use heating item while lid is installed. Always remove the lid while heating item is in use.
•Combustible material should not be within 60 inches of the top of the unit, or within 48 inches
around the entire unit.
•Keep the appliance area clear and free fr
vapors and liquids.
•
•Do not add water into the unit.
•Do not operate unit if any part has been under water. Immediately call a qualied service technician
to inspect the appliance and replace any part of the control system and any gas control that has been
under water.
•Do not disconnect any part while unit is in use.
•Do not store a spare propane tank on or near this unit.
•If the heating unit is indoors, detach the propane tank and leave outdoors.
•Always remove protective cover before operating (if applicable).
•Do not set the protective cover over the unit until it is turned off and completely cooled down.
•Check for leaks after not using the unit for long periods of time.
•Children should never operate this unit. Children must be supervised while near this unit.
•Keep gas tank at least 5 feet away from unit when lit. (if external tank)
•Maximum gas supply:250 psi; Min. gas supply:10 psi.
inspected annually and cleaned regularly.
•Inspect all elements of this heating unit before each use. If there is damage, the burner must be
replaced.
•Keep the hose out from any pathways to eliminate any accidental damage. (if external tank)
•Be aware of the hazards of high temperatures and stay away from the unit to avoid any burns or
injury.
of the U.S. Department of Transportation or the National Standard of Canada CAN/CSA-B339, LP gas
tanks, spheres and tubes for Transportation of Dangerous Goods; and Commission.
gas tank connection.
cks.
•Children and adults should be alerted to the hazards of high surface temperatures and should
stay away to avoid burns or clothing ignition.
•Young children should be carefully supervised when they are in the area of the appliance.
near the appliance.
•Any guard or other protective device removed for servicing the appliance shall be replaced
prior to operating the appliance.
may be required as necessary. It is imperative that the control compartment, burners and
circulating airways of the appliance are kept clean.
(CGA791) LP

SAFETY INFORMATION
Min. Clearance
48 in. ( 121.9 cm )
Min. Clearance
60 in. (152.4cm )
Min. Clearance
48 in. ( 121.9 cm )
Combustible materials should not be within 60
inches of the top of the unit, or within 48 inches
around the entire unit.
Bond Manufacturing Co., Inc. | Page 4
valve is turned 'OFF'before assembling. Do NOT attempt to assemble without proper tools.
NOTE: You must follow all steps to properly assemble this heating item. Make sure the gas
Manufacturing Co., Inc. 1.866.771.2663.
the appliance. For assistance with repair or replacement of the burner or any other parts, calls Bond
Inspect the burner before use of this unit. If the burner shows any kind of damage, do not operate
supplied directly by Bond Manufacturing Co., Inc.
Only use the regulator and hose assembly provided with this unit. Replacement parts must be

1-866-771-2663 | Page 5
HARDWARE
Before beginning assembly of this product be sure all parts are present. Compare parts with
package contents list and hardware contents list. If any part appears to be missing or damaged do
not begin assembly of this product and call customer service immediately.
Estimated assembly time: 30 minutes
Tools required for assembly (not included): Phillips Screwdriver
AA BB CC
Item Description Qty
AA M6 x 12 Screw 17
BB M6 X 25 Screw 4
CC Washer 20

Item Description Qty
A Lid 1
B Table Top 1
C Door 1
D Front Panel 1
E Side Panel 2
F
Left Back Leg
G
Left Front Leg
1
H
Right Back Leg
1
I
Metal Stand
1
J
Lava Rocks 2 boxes ( 6 kg)
K
Protective Cover
1
L
Battery (AAA)
1
M
Control Knob (preassembled)
1
N
Guard (preassembled)
1
O
Firebowl (preassembled)
1
P
Burner (preassembled)
1
Q
Electronic Igniter (preassembled)
1
CONTENTS
Bond Manufacturing Co., Inc. | Page 6
R1
Right Front Leg
1
A
E
F
K
L
J
G
H
I
C
D
Q
M
BP
N
O
R

1-866-771-2663 | Page 7
3. Attach the 2 side panels (E) and front panel (D)
to the legs using 12 pcs M6 x 12 screws (AA)
and 12 pcs washers (CC).
ASSEMBLY INSTRUCTIONS
2. Attach left back leg (G), left front leg (H),
leg (F) and right front leg (I) to the metal stand (J)
using 4pcs M6 x 25 screws (BB) and 4 pcs washers
(CC).
right back
N
(APAGADO)
G
I
J
H
F
D
E
BB
CC
CC AA
before starting any assembly.
supply system is turned to the 'OFF'position
1.
Check that the control knob (N) for the gas

ASSEMBLY INSTRUCTIONS
5.Attach metal base to the bottom part of
the table top (B) using 4pcs M6 x 12 screws (AA)
and 4 pcs washers (CC).
Bond Manufacturing Co., Inc. | Page 8
B
AA CC
C
AA
6. Attach hose of regulator to the bracket and then
tighten the preassembled butterfly screw .
WARNING
M6 x 12 screw (AA).
.
Attach
the door
(C)
to
left
back
leg
using
1
pc
4
melt and cause fire.
otherwise may get touch with hot surface to
The
hose must
be
fixed in
the
bracket
always,

1-866-771-2663 | Page 9
7.Place propane gas tank (not included) into the
metal stand (J). Make sure the gas tank sits on
the metal stand (J) completely. Turn the
preassembled wing screw on the outer part of
metal stand (J) clockwise to secure the propane
gas tank tightly.
9.Remove the rubber cap on the electronic igniter
(R)by unscrewing and slide battery (M) into
the battery slot. Make sure the positive side of
the battery faces outwards. Screw the
electronic igniter cap (R) over the battery
tightly.
CYLINDER VALVE
PRESSURE
RELIEF VALVE
BLEED-OFF
VALVE
BLACK COUPLING NUT
REGULATOR
turn clockwise to connect
turn clockwise
to reseal
8.Turn the cylinder valve on the tank clockwise to
close the propane tank. Attach the preassembled
regulator from the table top (B) to the cylinder valve
by turning the regulator coupling nut clockwise.
Make sure it is fastened securely and tighten
connections by hand only.
R
M
J

Q
ASSEMBLY INSTRUCTIONS
CAUTION
To ensure proper function, the guard (O) on this
burner (Q) should be free of lava rocks at all
times.
P
O
Bond Manufacturing Co., Inc. | Page 10
Always ensure that lava rocks/pumice stones/
LavaGlass® are completely dry before use. Failure
to do so will cause them to crack or pop.
Keep away from the unit and allow the unit to burn
K
firebowl
(P).
10. Pour the box of lava rocks (K) into the
This manual suits for next models
1
Table of contents
Languages:
Other Bond Outdoor Fireplace manuals

Bond
Bond HYFP50085-26 User manual

Bond
Bond WOODLEAF HYFP50086-5 User manual

Bond
Bond 50120 User manual

Bond
Bond 51058 User manual

Bond
Bond HYFP50095-53 User manual

Bond
Bond 52168 User manual

Bond
Bond HYFP50085-23 User manual

Bond
Bond Castle Rock HYFP50095-84 User manual

Bond
Bond HYFP50095-35 User manual

Bond
Bond PGF6501-1 User manual


