Bodum Bibo Bar User manual
User’s manual

2
User’s manUal
Congratulations!
Congratulations and thank you for buying a BIBO Bar. You are moments away from enjoying pure, filtered water – boiling
and chilled – at the touch of a button.
We want you to get the most from your BIBO, so before you use it please read this manual carefully.
Please feel free to contact us if you have any further queries or to give any feedback on your BIBO Bar or our service.
Whatever you need, our support team is just an email or a phone call away.
Visit www.bibowater.co.uk/contact email [email protected] or call 0800 678 5969
Please note
The pictures and diagrams in this manual are for reference only, please refer to your BIBO Bar.
We reserve the right to make corrections or changes to the information provided in this manual without prior notice
being given.
The products, functions, structures and designs described in this manual have been patented by our company and are thus
protected by the UK & EU patent offices.
© Copyright BIBO 2014, All Rights Reserved

bibo brighter water
3
Contents
Meet your BIBO Bar pages 4, 5
•BIBO Bar overview
•The control panel
Using your BIBO Bar pages 6, 7, 8
•Important: before using your BIBO Bar for the first time
•Main features
•Energy saving
BIBO Bar information & maintenance pages 8, 9, 10
•How to replace the BIBO MAXI filter cartridge
•Technical information
•Cleaning your BIBO Bar
•Safety notes
Installing your BIBO Bar pages 10, 11
•Overview
•Water supply connection
•Troubleshooting
•Your warranty
Appendices pages 12, 13, 14
•Self-installation instructions
•Going on holiday
•Moving house
Please note that the pictures and diagrams in this manual are for reference only, refer to your BIBO Bar. We reserve the
right to make corrections or changes to the information provided in this manual without prior notice being given.
Manual version 01072014.
© Copyright BIBO 2014. All Rights Reserved.
4
User’s manUal
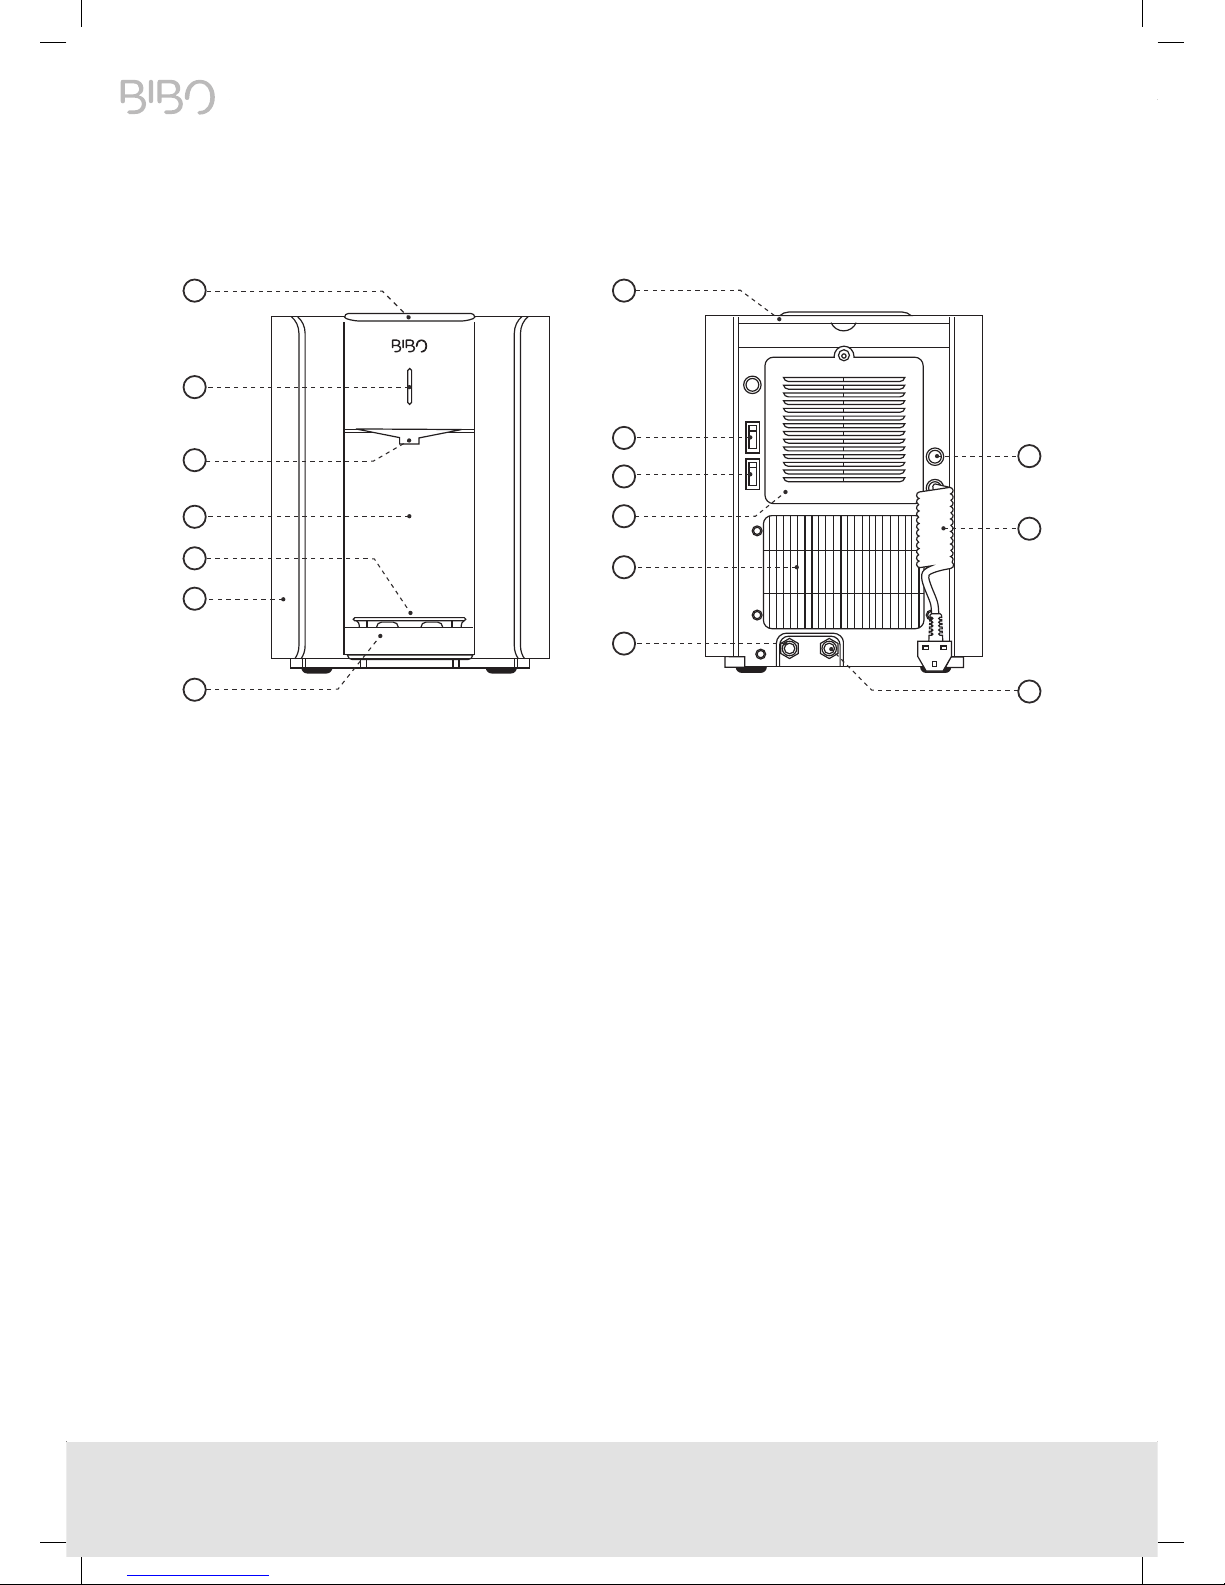
Meet your BIBO Bar
BIBO Bar overview
1. Control panel 9. Cold water switch
2. Indicator light 10. Hot water switch
3. Water outlet 11. Service cover
4. Front panel 12. Cooling vent
5. Removable drip tray cover 13. Water inlet
6. Side panel 14. Overflow outlet
7. Removable drip tray 15. Mains power cable
8. Lid 16. Mains fuse
12
13
8
9
10
11
15
16
14
1
2
4
5
6
7
3
bibo brighter water
5
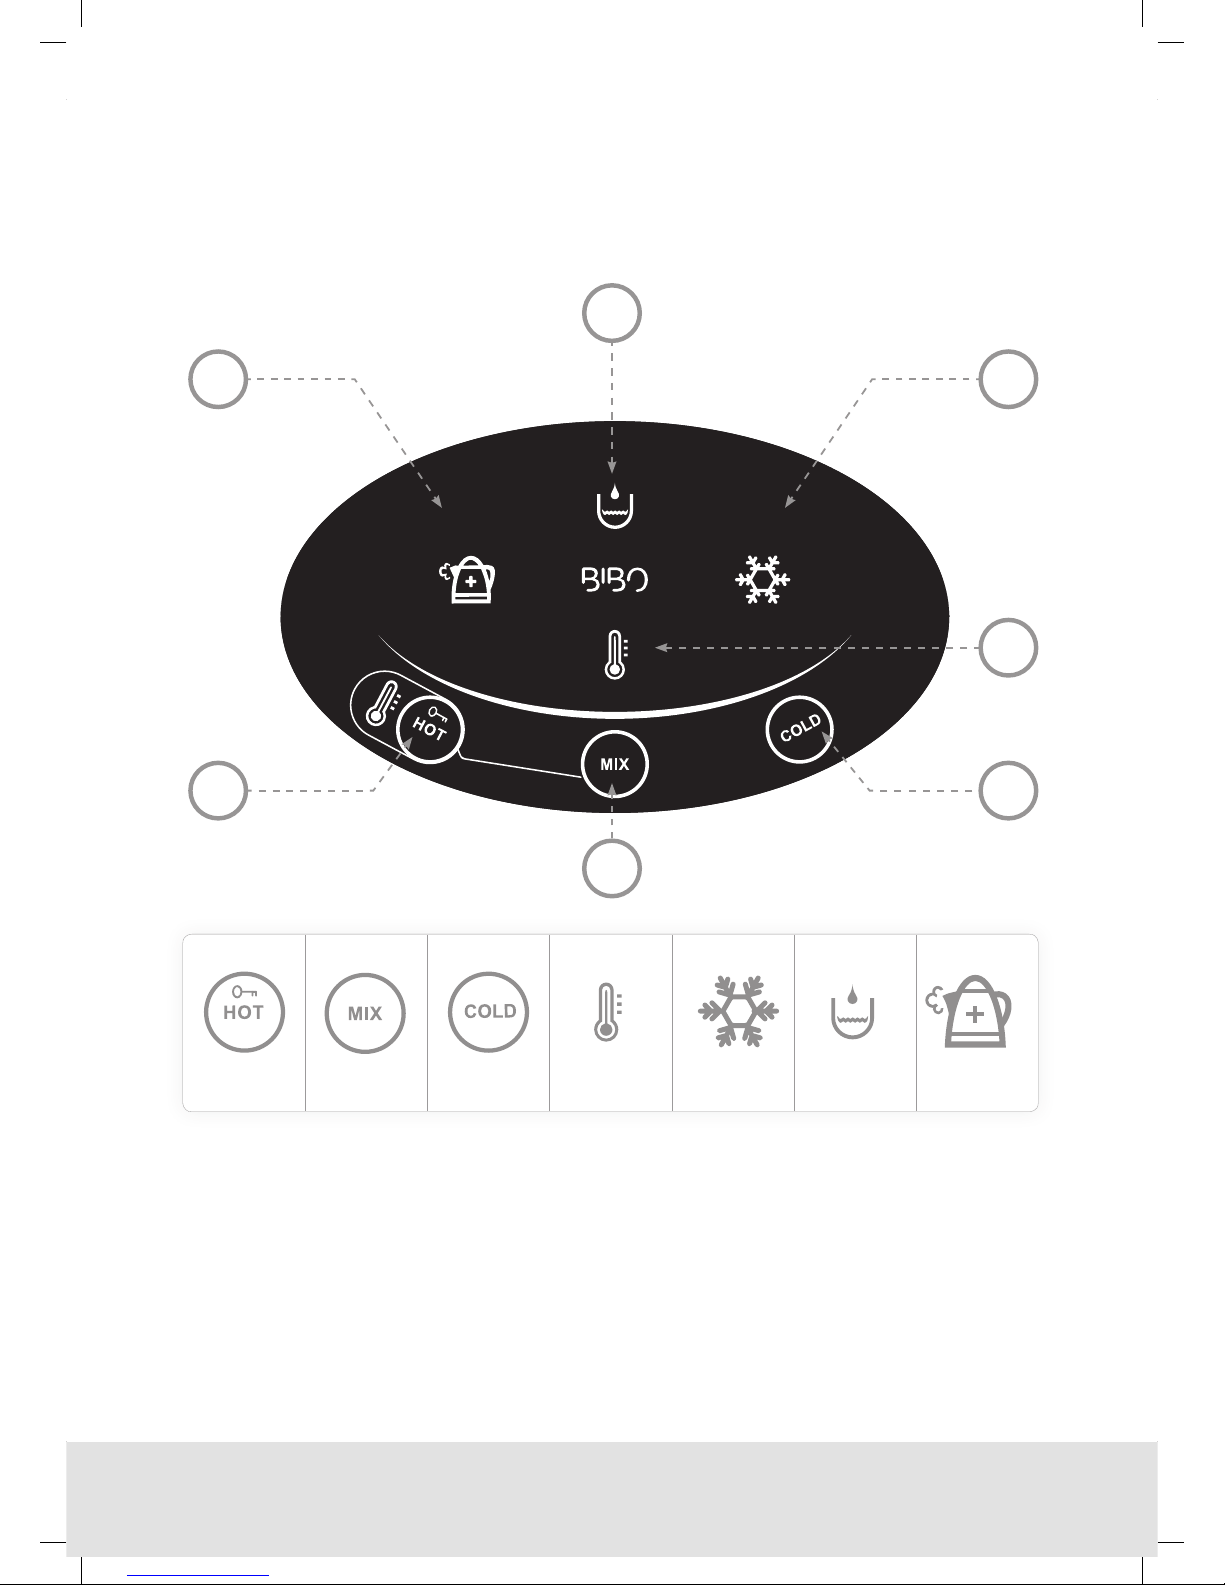
The control panel
1234567
Cold water
indicator
Extra-hot
water indicator
Hot water
indicator
Filling indicatorCold water keyMix water key
Unlock/Hot
water key
COLD
HOT
MIX
EXTRA
HOT
COLD
HOT
MIX
EXTRA
HOT
1
7
3
5
4
2
6

6
User’s manUal
Using your BIBO Bar
If you are installing your BIBO Bar yourself, please carefully read the self-installation instructions on page 12 of this manual.
Before using the BIBO Bar for the first time
Before plugging in and switching on the BIBO Bar ensure the hot tank switch (see page 4 of this manual) is in the OFF (‘0’)
position. Failure to do this before the hot tank is full and water is flowing from the water outlet may cause the hot tank
thermal overload switch to trip. Also ensure the cold tank switch is in the OFF (‘0’) position.
Hot Water System
Switch on the power supply and turn on the water supply to the BIBO Bar. The hot and cold water tanks will begin filling
automatically. As soon as the hot water tank is full you will be able to dispense water by touching the unlock key then
the mix water key . You can now turn on the hot water tank using the hot tank on/off switch on the back of the BIBO
Bar. The hot water indicator on the control panel lights up. When the maximum hot water temperature is reached the
indicator goes out.
Cold Water System
As soon as the cold water tank is full you will be able to dispense water by touching the cold water key . You can now
turn on the cold tank using the cold tank on/off switch on the back of the BIBO Bar.

bibo brighter water
7
Main features
Dispensing hot water
To dispense one cup of hot water
Touch the unlock/hot key the indicator light on the front of the BIBO Bar turns red, immediately touch the mix water
key to dispense one cup of hot water. If you require less water touch any key to stop the flow.
To dispense a larger quantity of hot water
Touch the unlock/hot key the indicator light on the front of the BIBO Bar turns red, immediately touch and hold the
mix water key for 3 seconds then hot water will be automatically dispensed for 1 minute (1ltr approx.) or you can
touch any key to stop the flow.
Dispensing extra hot water
Touch and hold the unlock/hot key for 3 seconds, if the hot tank is already at maximum temperature a ‘beep’ will be
heard, if not then the extra hot water indicator will illuminate and the hot tank will heat to approximately 97C. When the
maximum temperature is reached the extra hot water indicator will go out. Now follow the instructions above.
Dispensing cold water
To dispense one cup of cold water
Touch the cold water key the indicator light on the front of the BIBO Bar will turn blue and it will dispense one cup
of cold water. If you require less water touch any key to stop the flow.
To dispense a larger quantity of cold water
Touch and hold the cold water key for 3 seconds, the indicator light on the front of the BIBO Bar will turn blue and
the cold water will be automatically dispensed for 1 minute (1ltr approx.) or you can touch any key to stop the flow.
Dispensing ambient water
Touch the MIX water key , the indicator light on the front of the BIBO Bar will turn purple, the BIBO will dispense one
cup of ambient water. If you require less water touch any key to stop the flow.
8
User’s manUal
Energy saving
Sleep mode
To save energy your BIBO Bar will go to sleep (into a low power state) after 4 hours of non-use. The indicator light on
the front of the BIBO Bar will turn purple. When sleeping the cold water temperature will gradually rise to 10°C and the
hot water temperature will gradually drop to 75°C. Simply touch any key to wake it up again. The hot and cold water will
reach their optimum temperatures again after approximately 5 minutes and 15 minutes respectively.
BIBO Bar information & maintenance
Replacing the MAXI filter cartridge
To ensure the water from your BIBO Bar continues to taste good the MAXI filter cartridge should be replaced every 6
months. Don’t worry, we will remind you when the filter is due to be changed.
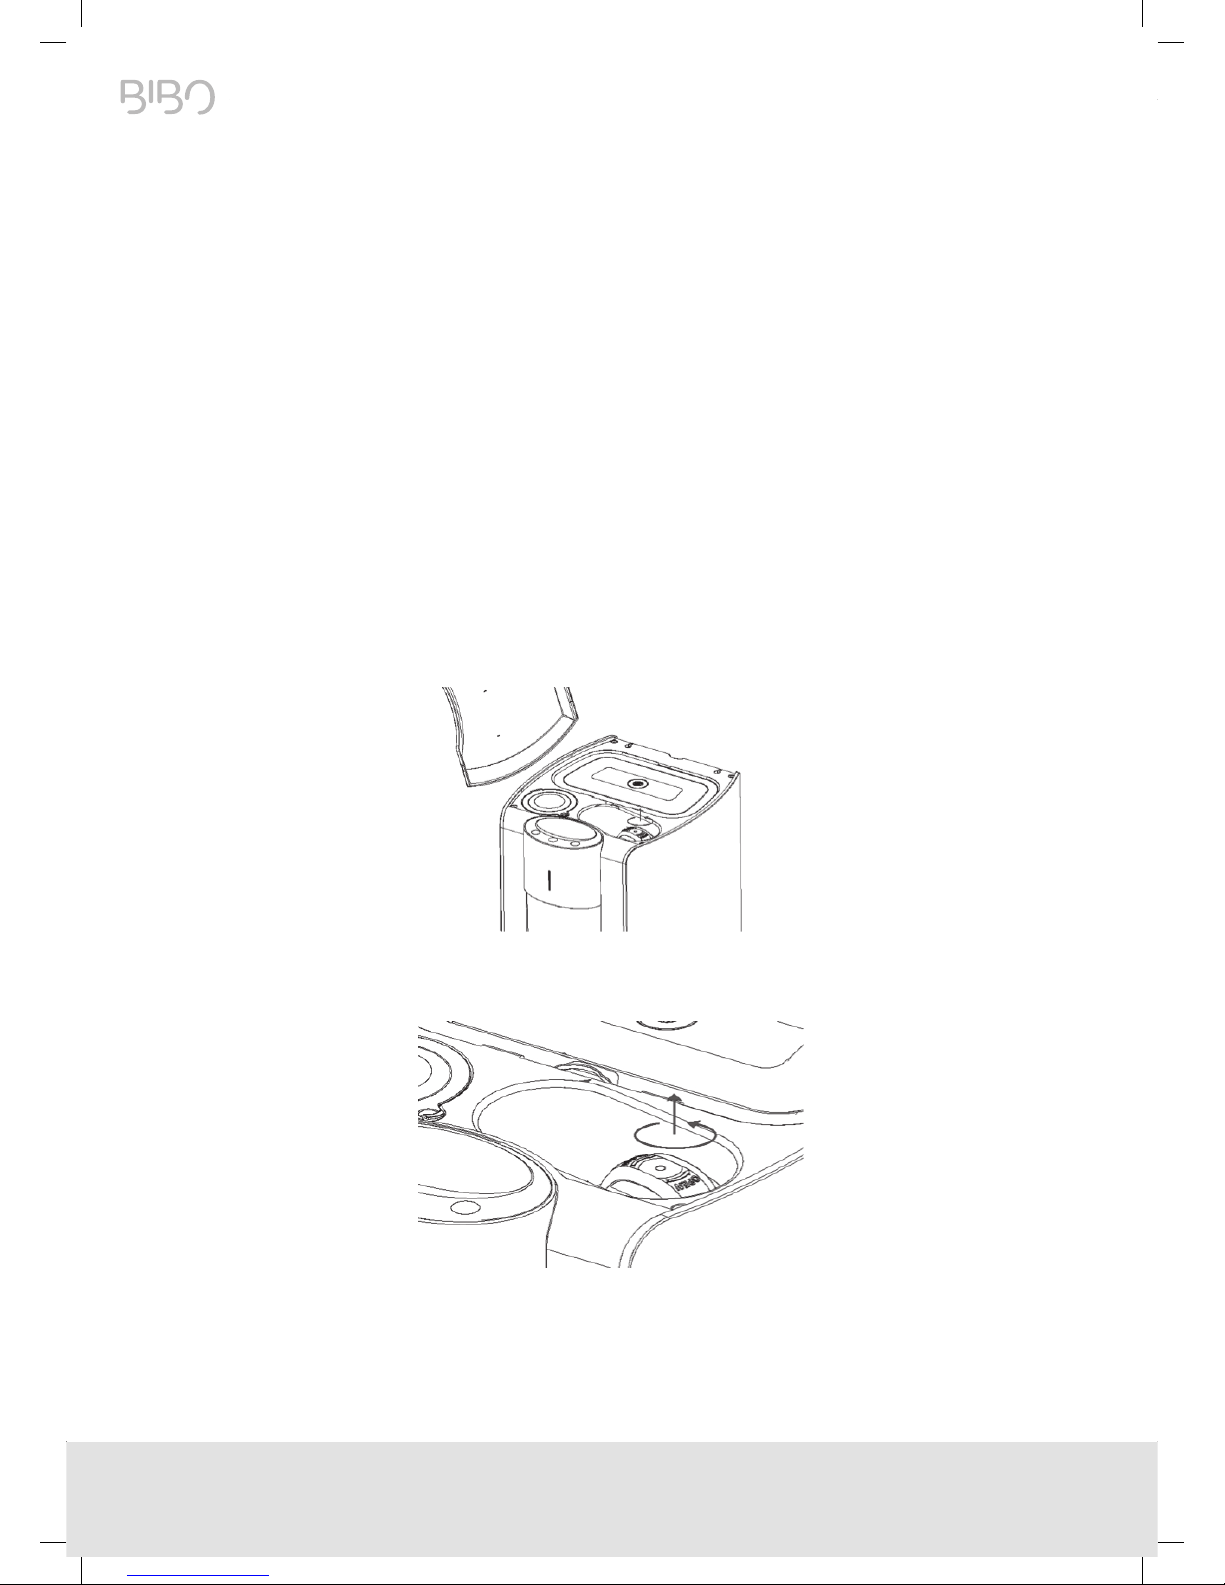
How to replace the MAXI filter cartridge
Remove the lid from the top of the BIBO Bar by lifting it from the back first.
To relieve the water pressure in the filter cartridge turn off the water supply to the BIBO Bar by twisting the blue tap at
the back of the BIBO Bar so that the lever is at right angles to the white water pipe. Dispense at least 500ml of cold water.
You will see the white top of the filter cartridge on the right hand side near to the front. It has a handle protruding from
the top. Turn the handle firmly anti-clockwise then pull the cartridge upwards and out.
Remove the new MAXI filter cartridge from its packaging and insert it. Turn it firmly clockwise to install it.
Turn the water supply to the BIBO Bar back on by twisting the blue tap at the back of the BIBO Bar so that the lever is in
line with the white water pipe.
bibo brighter water
9
Technical information
SPECIFICATION PARAMETER
Electrical specication
Voltage
Frequency
Power rating
Current rating
230 Volts
50 Hertz
1,000 Watts
5.8 Amps
Heating system
Hot tank volume
Power rating
Hot water capacity
Hot water temperature
1.5 Litres
900 Watts
10 Litres/hour*
Maximum 97°C
Chilling system
Cold tank volume
Power rating
Cooling current
Cold water capacity
Cold water temperature
1.5 Litres
120 Watts
0.8 Amps
3 Litres/hour*
Minimum 5°C
Filtration system
Activated carbon filter 5.0 Micron
Inlet water pressure
Minimum - Maximum I bar (14.5psi) – 6 bar (87psi)
Dimensions (mm) 375H X 350 D X 320 W
Weight (dry) 14 Kgs
Operating standards GB4706.1-2005 GB4706-13-2008
GB4706.19-2008 GB/T22090-2008
The maximum ambient working temperature is +38ºC
*The dispense capacity is calculated at an ambient and inlet water temperature of +25ºC

10
User’s manUal
Cleaning your BIBO
Clean your BIBO Bar by simply wiping it down with a damp cloth. Soap or any other gentle detergent can also be used if
you wish. The drip tray can be removed and cleaned in your dishwasher.
Please don’t use harsh detergents, concentrated washing up liquid or solvents to clean your BIBO. Avoid using anything
abrasive (such as steel brushes, scourers etc.) to clean the body as it will scratch.
It’s very important that you don’t wet the back of the machine whilst cleaning – remember it is
connected to an electrical supply.
Safety notes
•This BIBO Bar is for indoor use only. Avoid placing it in direct sunlight or next to flammable materials. Avoid placing the
BIBO Bar near other appliances that could get damaged if wet. Do not immerse the BIBO Bar in water.
•The BIBO Bar uses 230VAC voltage and should be used with a 13 amp fuse in the plug top.
• Important:whenusinganeworfreshlycleanedBIBOforthersttime,it’simportantthatwateris
owingwhenboththehotandcoldwaterkeysaretouched,beforeyouswitchonthehotwatertank.
•The BIBO Bar dispenses safe and great-tasting drinking water. The tanks are not pressurized and the hot tank is directly
connected to the hot water outlet. No valves are used so it is normal therefore for a small amount of excess water to
be released once water has been dispensed.
•The BIBO Bar can produce high temperature hot water. As with any kettle, pan or appliance capable of producing hot
water please use caution when dispensing hot water.
•When your BIBO Bar is turned on for the first time, or after a period of not being used, please run at least 2 litres of
water through both the hot and cold outlets before drinking any, to ensure the water is fresh.
•Warning: The BIBO Bar must be used with a reliable earth in the mains power supply socket.
•Warning: Always ensure the drip tray is fitted securely before filling a cup placed on it.
For further notes or detailed explanations on the operation of the machine, please contact BIBO via email at
Installation
Overview
•Install the BIBO Bar in a cool, dry place where it is well ventilated. It must be kept away from any heat source.
•Keep the rear of the BIBO Bar a minimum of 5cm (2”) away from the wall and ensure that this part of the dispenser is
well ventilated.
Table of contents
Other Bodum Coffee Maker manuals

Bodum
Bodum Travel Press User manual

Bodum
Bodum CHAMBORD 11174-16 User manual

Bodum
Bodum CHAMBORD 10616 User manual

Bodum
Bodum PEBO User manual

Bodum
Bodum 3000 SANTOS User manual

Bodum
Bodum POUR OVER User manual

Bodum
Bodum French Press User manual

Bodum
Bodum Travel Pres K11102-01 User manual

Bodum
Bodum ZP2018-000010 User manual

Bodum
Bodum CAFFETTIERA User manual

Bodum
Bodum BISTRO User manual

Bodum
Bodum Bistro 11001 User manual

Bodum
Bodum MOCCA Series User manual

Bodum
Bodum SANTOS User manual

Bodum
Bodum Bistro 11462 User manual

Bodum
Bodum SANTOS3001 User manual

Bodum
Bodum 11744 ePEBO User manual

Bodum
Bodum PEBO User manual

Bodum
Bodum SANTOS 3004 User manual

Bodum
Bodum 05-3000-IM01 User manual


