Blaupunkt IVTV-03 User manual

http://www.blaupunkt.com
In Car Video
IVTV-03 7 607 003 542
Operating and installation instructions

14
CONTENTS
Safety notices......................... 15
Notes on installation and
operation ................................ 16
Tuner connection ................... 16
Remote control....................... 18
Functions................................ 19
Cable TV channels ................. 20
Detecting the input signal....... 20
AV output................................ 21
Connection options ................ 21
Installation (antenna).............. 22
Diversity antenna system ....... 22
Safety circuit........................... 24
Accessories............................ 25
Specifications ......................... 25
Signal type ........................... 110
Frequency table for
cable TV ............................... 112

15
ENGLISH DEUTSCH
FRANÇAIS
ITALIANO
NEDERLANDS
SVENSKA
ESPAÑOL
PORTUGUÊS
DANSK
Thank you for choosing a Blaupunkt
product. We hope you enjoy using this
new piece of equipment.
Please read these operating instruc-
tionsbefore usingtheequipment for
the first time.
The Blaupunkt editors are constantly
working on making the operating in-
structions clearer and easier to under-
stand. However, if you still have any
questions on how to operate the equip-
ment, please contact your dealer or the
telephone hotline for your country. You
will find the telephone numbers printed
at the back of this booklet.
We provide a manufacturer guarantee
for our products bought within the Eu-
ropean Union. You can view the guar-
antee conditions at www.blaupunkt.de
or ask for them directly at:
Blaupunkt GmbH
Hotline
Robert-Bosch-Str. 200
D-31139 Hildesheim
SAFETY NOTICES
Safety notices
Please observe the following safety
noticesduringinstallation and whilst
making the connections.
-Disconnect the negative and positi-
ve terminals of the battery.
-When doing so, please observe the
safetynoticesprovidedbythevehicle
manufacturer.
-Before drilling the holes necessary
for mounting the equipment and for
layingcables,pleasemakesurethat
concealed cables, the fuel tank and
fuel lines cannot be damaged in the
process!

16
NOTES ON INSTALLATION AND OPERATION
Notes on installation and
operation
Tuner connection
-The tuner must first be installed in a
suitable location. You must make
surethat the device is fixed securely
in place and that it is not subjected
to moisture or dirt. You must not lay
the connecting cables in a way that
could cause the vehicle passengers
togetinadvertentlycaughtupinthem
and rip them out.
-Please note that the tuner must not
bepositionednearheatsources(e.g.
heating, direct sunlight) since this
could result in faulty behaviour as a
result of excess temperature.
-Connect all of the tuner’s audio,
videoandpower supplyconnections
(see connection diagram in the
following picture) that you need for
your system installation. When
positioningtheinfraredsensor,make
sure there are no objects positioned
between the sensor and the place
whereyouusuallykeep yourremote
control, since they could interfere
with the transmission of the infrared
signal.
Note:
The following diagram shows all of the
tuner’s connection options. Your car
system’s connections do not necessar-
ily have to be exactly the same as this.

17
ENGLISH DEUTSCH
FRANÇAIS
ITALIANO
NEDERLANDS
SVENSKA
ESPAÑOL
PORTUGUÊS
DANSK
NOTES ON INSTALLATION AND OPERATION
Tuner connection
4 cables:
1. Ground/GND
2. N.C.
3. +12V permanent
4. +12V ACC
A/V SOURCE 1
(VIDEO GAMES CONSOLE,
VCR or DVD PLAYER)
A/V SOURCE 2
(VIDEO GAMES CONSOLE,
VCR or DVD PLAYER)
IR sensor for the
remote control option
4 3
2 1
SAFETY
EXTERNAL
ANT.IN AV2 AV1
LRVIDEOLRVIDEO
ANT.1 ANT.2 ANT.3 ANT.4
EXT.IR
VIDEO R L
AV OUT
ANT.1ANT.2ANT.3ANT.4
Video output
Audio output (R)
Audio output (L)
RIGHT
DIVERSITY ANTENNA
LEFT DIVERSITY ANTENNA
To the SAFETY CIRCUIT
(refer to the notes on
correct and safe system
operation, page 24)

18
NOTES ON INSTALLATION AND OPERATION
Remote control
OK
123
456
9
87
0
DISP
CH
ADJ
ERASE
ESC
ADD
MENU
TV/AV
POWER
POWER
For switching on the
IVTV –03.
TV/AV
These buttons allow you to
select the available inputs
TV, CATV,AV 1, AV 2.
Start search to the previous
channel in the favourites list
Channel selection
UP / DOWN
CH
Channel fine tuning
ADJ
ERASE
Erase button for the pro-
gram memory assignments
ESC
Return without storing
Start search to the next
channel in the favourites list
Start search to the next
channel
Start search to the
previous channel
ADD
Open the channel storing
menu for the program selec-
tion buttons
MENU
Open the region menu
DISP
Display the TV standards
and channel information
Program selection buttons
for stored favourites..

19
ENGLISH DEUTSCH
FRANÇAIS
ITALIANO
NEDERLANDS
SVENSKA
ESPAÑOL
PORTUGUÊS
DANSK
Functions
POWER
To
switch on
the TV tuner, press the
POWER button.
To
switch off
the TV tuner, press the
POWER button again.
TV/AV
You can use theTV/AVbutton to switch
between the channel/input options TV,
CATV, AV1 andAV2.
CH
Channel search
> Press once to
switch to the next higher channel.
Channel search
> Press once to
switch to the next lower channel.
ADJ
Channel fine tuning
> Carries out fine
tuning once more.
Thisfunctionisnecessaryifthe channel
you are searching for lies outside the
standard frequency raster.
ERASE
Erase button
for thSelect the program
memory location, press the ERASE
buttonandconfirmtheeraseactionwith
the OK button.
ESC
Return without saving if you are in the
menuorafterpressingtheErasebutton.
ADD
Open the channel storing menu for the
programselection buttons
>Select the
channel, press the ADD button, then
enter the number of the memory
locationandconfirmbypressingtheOK
button.
MENU
Open the
region menu
> Briefly press
the menu button, use PRG / to
selectthereceivableregionandconfirm
by pressing the OK button.
Selection: PAL B/G, B/H, I, D/K, AUS;
SECAM L, L‘, DK, BG
DISP
Display the TV standards and channel
information.
Channel selection buttons 0 - 9
Program selection buttons for stored
favourites.
Thereareatotalof15 programmemory
locations available.
(01-15)
PRG
Channel search
Up/Down for stored
favourites.
Channel search
UP/Down
OK
Confirmation button in function menus.
FUNCTIONS

20
Detecting the input signal
Thetunersystemautomatically detects
whether a signal is being received and/
or whether a signal can be received in
everysignalinputmodeornot.Ifitdoes
not detect a signal, the “No Signal” sta-
tusis indicated. Ifa signal is received,a
corresponding display appears
immediately.
Cable TV channels
System TV Cable TV (CATV)
PAL B/G TV channels 2 ~ 69 Cable TV channels 1 ~ 57
PAL B/H TV channels 2 ~ 69 Cable TV channels 1 ~ 57
PAL I TV channels 12 ~ 69 Cable TV channels 1 ~ 44
PAL D/K TV channels 1 ~ 57 Cable TV channels 1 ~ 63
PALAUS TV channels 00 ~ 69 Cable TV channels
SECAM L TV channels 21 ~ 61 Cable TV channels 2 ~ 40
SECAM L‘ TV channels 1 ~ 10 Cable TV channels 2 ~ 40
SECAM DK TV channels 21 - 60 Cable TV channels 1
SECAM BG TV channels 02 - 61 Cable TV channels 2
Input source Description
AV1 External audio/video input 1
AV2 External audio/video input 2

21
ENGLISH DEUTSCH
FRANÇAIS
ITALIANO
NEDERLANDS
SVENSKA
ESPAÑOL
PORTUGUÊS
DANSK
AV output
Thisconnectionoption isusedforsend-
ing the audio signal directly to the car
sound system. In order to use this op-
tion, the car sound system must be
equipped with anAUX input. The video
output is used to connect additional
video screens and it only outputs the
video signal.
Connection options
FUNCTIONS
IVSC
AV output
IVTV
03
Monitor
Monitor
Audio R/L
Cable adapter 7 607 001 603
IVTV
03 RCA-Y adapter
7 607 001 507
RCA / ISO (10 pin)
7 607 001 508
RCA / ISO-C3 (8 pin)
7 607 001 509
IVMR
7001/
9002/
1042/
1542
Radio
oder
Amplifier
22
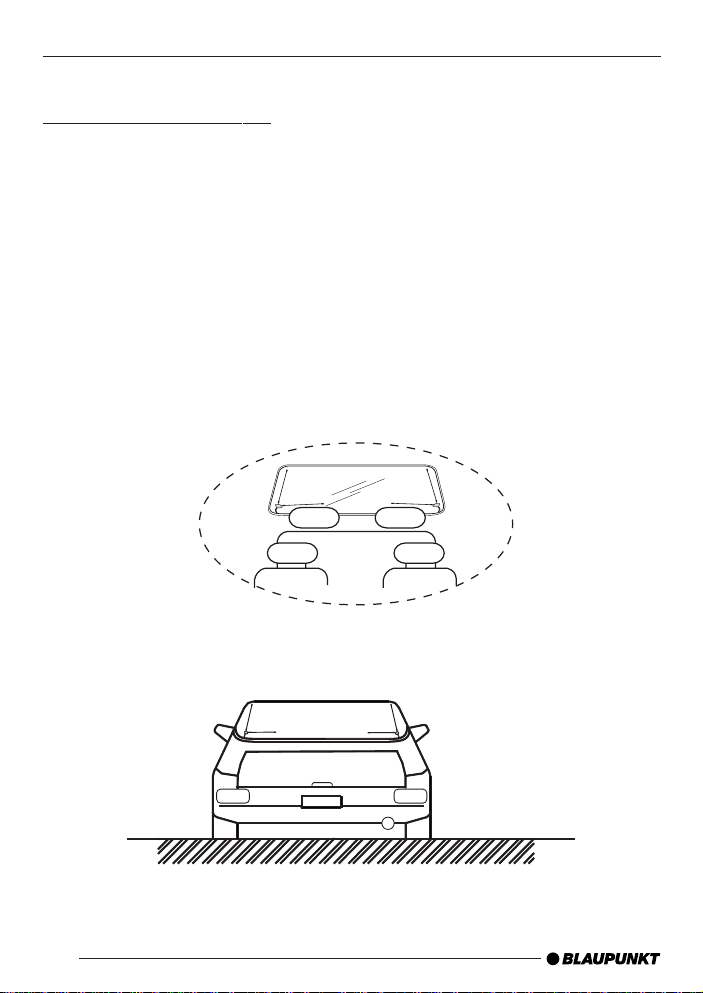
Installation
Diversity antenna system
The Diversity antenna system that is integrated in the tuner has been specially
developed for mobile applications and ensures optimum signal reception.
a. Installation
Remove the protective covering from the antenna foot and secure the adhe-
sive foot to the required position (the surface to which it is stuck must be free
from dust and grease).
b. Adjusting the angle
In order to achieve optimum reception quality, adjust the position of the an-
tennaso that (if possible)onerod is aligned horizontallyandone rod vertically.
c. Installation notes
-Installation on the rear window
INSTALLATION
-Installation on the windscreen
Table of contents
Other Blaupunkt TV Tuner manuals


