
Blanco BSO 660 User manual

Instructions
for the use and care
of BSO 660
Fan forced built-in oven
AU

2
Contents
Important: the installation of the oven and connecting it to electricity must
always be done by qualified installers and according to standards and regulation
currently in force.
Warnings andGuidance 3
Description of the appliance 4
Using the oven 5
When the appliance is first installed 7
Electronic Programmer 8
using the eat Probe 11
Conventional Cooking 12
Using the fan oven 14
Cleaning the oven 19
Replacing appliance components 20
Cleaning the hinged grill 22
Care of catalytic liners 23
What happens if something goes wrong 24
Technical data 24
Building-in 25
Connecting to electricity 26
Sales, Technical, Service and Spare Parts Assistance 27

3
Warnings and Guidance
It is most important that this instruction book should be retained with the appliance for future
reference. Should the appliance be sold or transferred, always ensure that the book is left
with the appliance in order that the new owner can get to know the functions of the appliance
and the relevant warnings.
These warnings are provided in the interest of safety. You MUST read them carefully before
installing or using the appliance.
Installation
This oven is heavy and care must be taken
when moving it.
Ensure that all packaging, both inside and
outside the oven, has been removed before
the oven is used.
The oven must be installed according to the
instructions supplied. Any electrical work must
be undertaken by a qualified electrician.
It is dangerous to alter the specifications in
any way.
After installation, please dispose of the
packaging with due regard to safety and the
environment.
Child Safety
This oven is designed to be operated by
adults and children under supervision. Young
children must not be allowed to tamper with
the controls or play near or with the oven.
Ovens become very hot, and retain their heat
for a long period of time after use. hildren
should be kept well away from the oven until it
has cooled.
AUTION - accessible parts, especially
around the grill area, may become hot when
the oven is in use. hildren should be kept
away until it has cooled.
During Operation
Do not use this oven if it is in contact with water
and never operate it with wet hands.
Ensure that the anti-tip shelf is installed in the
correct way (see instructions).
Take great care when heating fats and oils as
they will ignite if they become too hot.
This oven has been designed for cooking
edible foodstuffs only and must not be used
any other purposes.
Never place plastic or any other material
which may melt in or on the oven.
Only clean this oven in accordance with the
instructions.
Take care to follow the recommendations
given for tending the food when grilling. Use
the handles provided in the recommended
way.
Always grill with the oven door closed.
Always use oven gloves to remove and
replace food in the oven.
Ensure that you support the grill pan when
removing it from the oven.
Never line any part of the oven with aluminium
foil.
Do not allow heatproof cooking material, e.g.
roasting bags, to come into contact with oven
elements.
Always stand back from the oven when
opening the oven door, to allow any build-up
of steam or heat to release.
Stand clear when opening the drop down
oven door.
Do not allow it to fall open - support it using
the door handle, until it is fully open.
Do not place sealed cans or aerosols inside
the oven. They may explode if they are heated.
Do not hang towels or clothes from the oven
or its handle. They are a safety hazard.
After Use
Ensure that all control knobs are in the OFF
position when not in use.
For hygiene and safety reasons, this oven
should be kept clean at all times. A build-up
fats or other foodstuffs could result in a fire,
especially in the grill pan.
Only clean this oven in accordance with the
instructions.
Always allow the oven to cool down before
switching off at the wall prior to carrying out
any cleaning or maintenance work.
Do not leave utensils containing foodstuffs,
e.g. fat or oil in or on the oven in case it is
inadvertently switched ON.
Under no circumstances should you attempt
to repair the appliance yourself. Repairs
carried out by inexperienced persons may
cause injury or serious malfunctioning. Refer
to your local Service entre. Always insist on
genuine spare parts.
Your safety is of paramount importance.
Therefore, if you are unsure about any of
the meanings of these WARNINGS,
contact the Customer Care Department
4
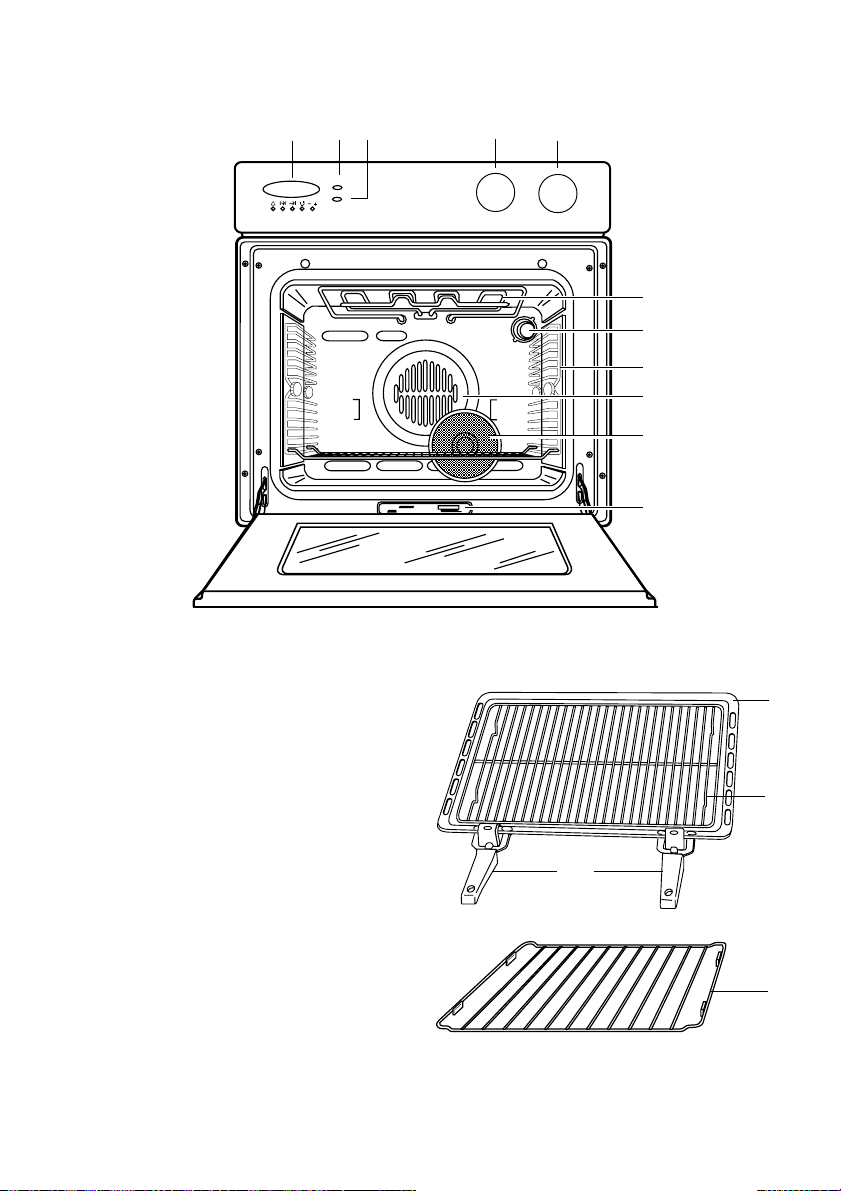
Description of the appliance
1. Electronic programmer
2. Oven function control light
3. Thermostat control light
4. Function control knob
5. Thermostat control knob
6. Hinged grill element
7. Oven lamp
8. Removable shelf supports
9. Fan
10. Removable grease filter
11. Rating plate
12. ripping pan - large
13. Reversible grill pan insert
14. Removable handles (2 of)
15. Anti tip shelves (2 of)
12
13
14
15
12345
6
7
8
9
10
11
5
Using the oven
This multifunction oven makes it possible to
carry out various types of cooking, depending
on the nature of the food, its firmness and
volume.
All cooking must be done with the oven door
closed.The oven light remains on with all
cooking functions. The oven control knob
symbols are listed together with a brief
description of the functions.
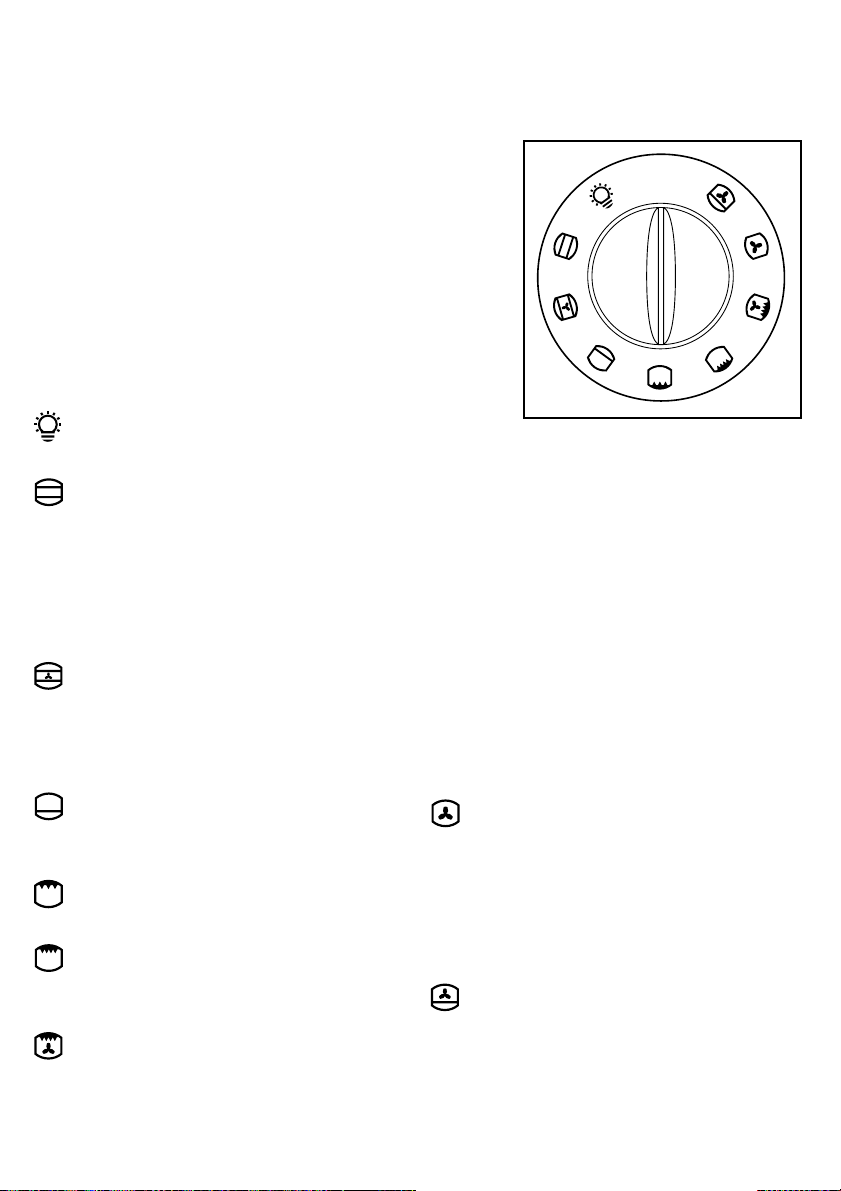
Function control knob (fig.1)
By turning this control knob, you can select
any of the following functions:
Oven light, this will turn on
whenever the oven is in use.
Conventional cooking, uses
the top and bottom element; this
function will enable you to use your
favourite recipes without having to
adapt the temperatures. It is
necessary to pre heat the oven in
this instance.
Fan assist cooking, the top
and bottom elements heat the oven
cavity and the fan circulates hot air
around your dishes. Best for baking
cakes, biscuits or bread.
Bottom element ,
enables you to finish off dishes on
the bottom only.
Economy g ill, can be used for
grilling small quantities.
Dual g ill, the full grill element will
be on. Recommended for large
quantities
Fan g ill, gives a spit
roast effect to all joints. Using this
(Multifunction)
Fig.1
system eliminates the need to turn
food during cooking, although large
food items may require to be turned
half way through the cooking
time.Select a max temperature of
200 °C.
Fan fo ced cooking; this fan
ducted system will allow you to
roast or bake at the same time with
very little flavour transference, and
on any shelf. For this function the
circular element and fan behind the
back wall of the oven are used.
Pizza/Bake cooking; The
bottom element provides direct heat
to the base of pizzas, quiches or pies,
while the fan ensures air is
circulated to cook the pizza
toppings or pie fillings.
0
FO 2472
Please note that in ovens with stainless
steel aesthetics the symbols are situated in
reverse order.
6
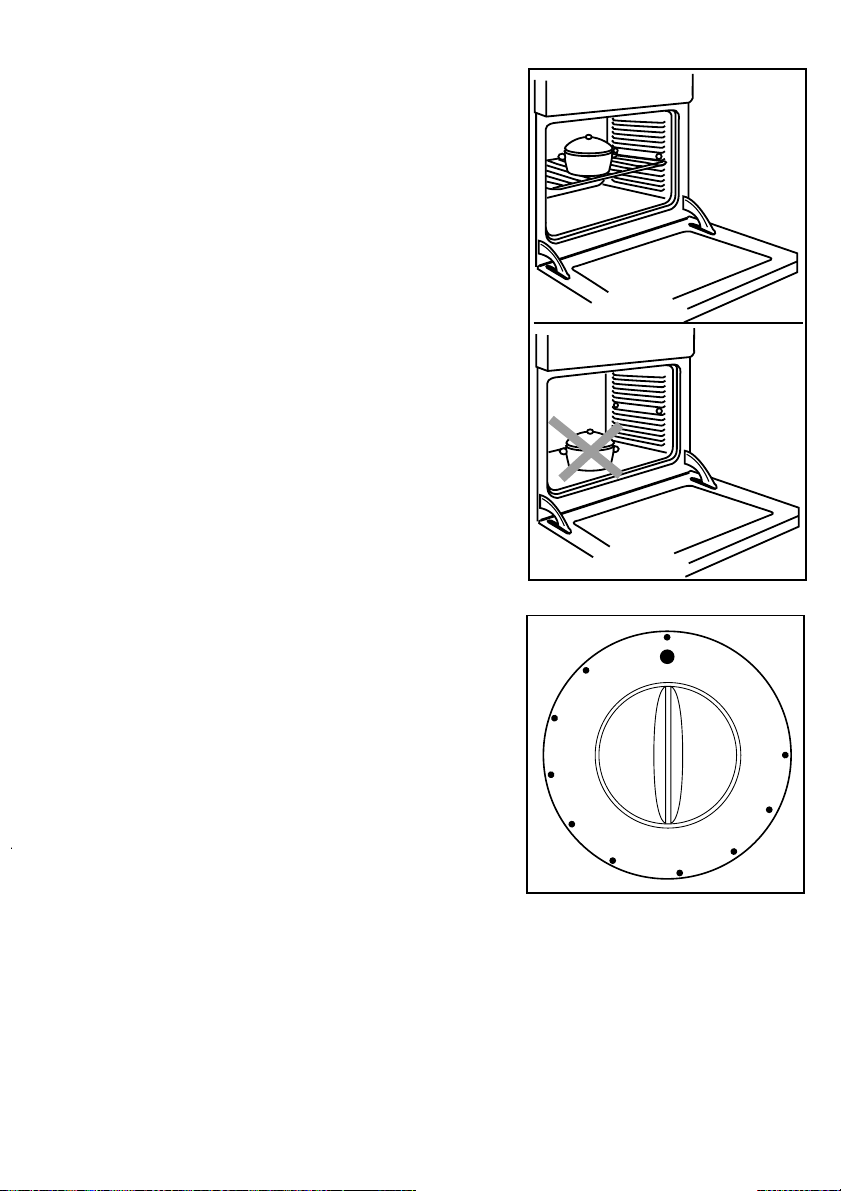
Thermostat control knob
(fig.3)
By turning the thermostat control knob
clockwise you select the cooking tempera-
ture. Temperature selection starts at 50°C
and is marked in 25°C increments up to
maximum where the temperature at the
centre of the oven will reach approximately
250°C. The thermostat controlling the tem-
perature is totally variable so it is possible to
select temperatures between those marked.
The MAX setting is particulary suitable for
conventional grilling. Once the oven tempe-
rature has been selected the temperature
light will come on and remain on until the
oven has reached the correct setting; after
that it will turn on and off with the thermostat
showing how the temperature is being
maintained.
During cooking the oven door should be
opened as little as possible to avoid heat
loss and so excessive electricity
consumption.
Safety thermostat
Should the main oven thermostat fail the
oven is protected by a safety thermostat
which will operate if the temperature within
the oven reaches too high a level.
Once the temperature has returned to a safe
level the main oven thermostat will function.
In cases where there is a permanent failure
it is necessary to contact the nearest Service
Centre.
Fig. 3
100
150
200
MAX
50
FO 2011
NO
YES
Fig. 2
Attention
Do not place pans dripping pans biscuit
pans or aluminium foil on the oven bottom
(fig. 2). This could cause a heat build-up
which would affect the baking results and
damage the oven enamel.
Please note that in ovens with stainless
steel aesthetics the symbols are situated in
reverse order.

7
Once the oven is installed it is important to
remove the protective materials which were
put on in the factory.
Remove the plastic film from these parts,
then wipe with a cloth dipped in methylated
spirit.
Switch the oven control to and the
thermostat control to MAX, then leave it to
run empty for 30 minutes to burn off any other
protective materials.
his will also remove any unpleasant smells.
When the appliance is first
installed
Cooling fan
he cooling fan is designed to cool the walls
of the oven and the components of the oven
itself.
he fan switches on automatically after a
few minutes of cooking.
Warm air is blown out through the aperture
near the oven door handle.
When the oven is switched off, the fan will
remain on in order to cool the oven and
kitchen cabinets properly, after which it
switches off automatically.
NOTE: he fan may run up to 45 minutes
after cooking has been completed. Leaving
the door ajar will lessen the cooling time.

8
The electronic timer can indicate the time of
day and automatically operate the oven.
Before the oven can be operated, the time of
day must be set on the electronic timer.
In case of loss of power, all the settings (time
of day, set program or program in operation),
will be cancelled. When the power is restored,
the numbers on the display will flash, and the
timer has to be reset.
Please note that this is a 24 hour clock. For
example, 2pm is shown as 14:00.
Time or
temperature
setting
Programming
controls
eat Probe
Temperature
Display
+
_
Electronic programmer
F
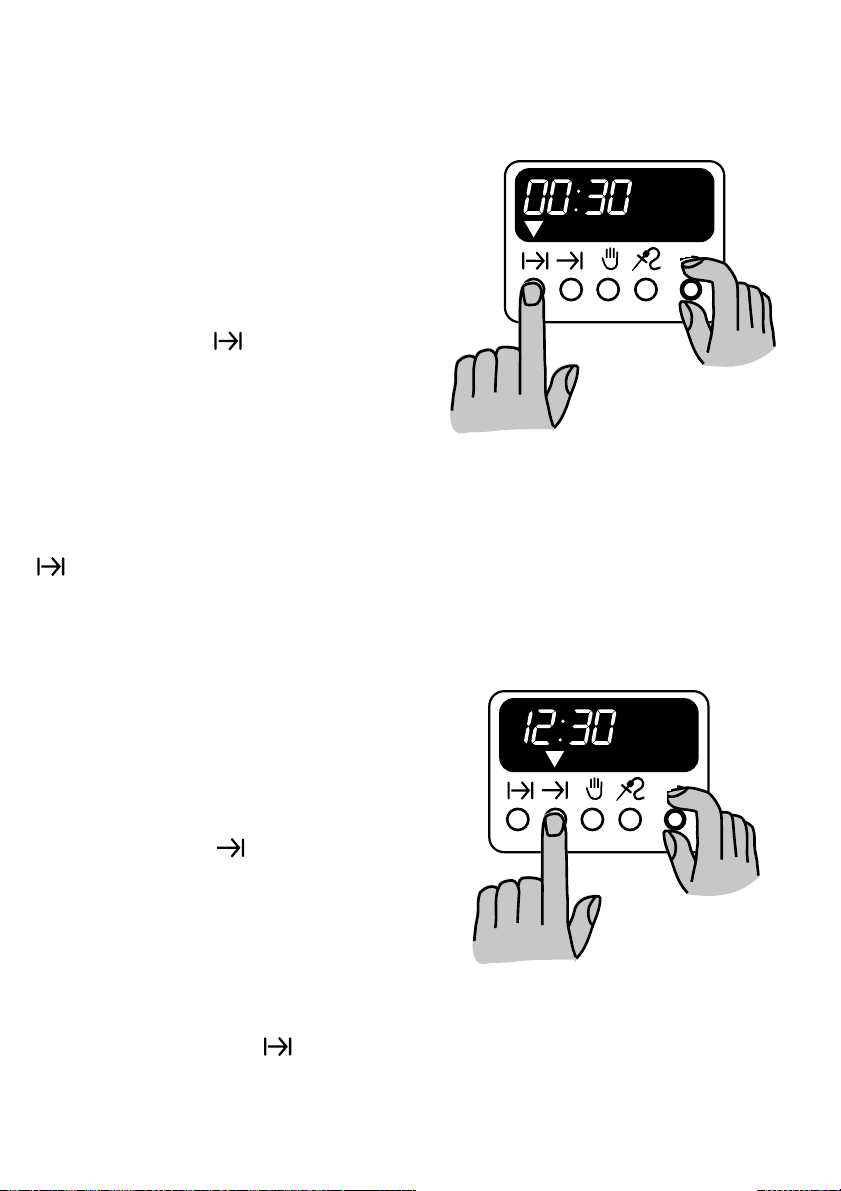
TO SET THE TI E OF DAY
Press buttons and and at the same
time turn the time setting knob until the
correct time of day is displayed.
NOTE: Clock ust be set for oven to
function.
F
ANUAL FUNCTION
Press button to set the oven for manual
function.
+
_
Cooking duration
End of cooking time
anual function
eat Probe
9
F
TO SET THE TI ER TO
SWITCH OFF ONLY
This is useful if you want to begin cooking
immediately but have the oven switch off
automatically.
1. Set the oven function control knob and
the thermostat control knob on the required
settings.
2. Place food in the oven.
3. Press button and, at the same
time, turn the time setting knob until the
required cooking duration is displayed.
Our diagram shows the timer set for 30
minutes.
At the end of the cooking time the oven will
switch off and an alarm will sound. Turn the
oven function and thermostat control knob to
zero. To switch off the alarm press button
.
F
TO SET THE TI ER TO
SWITCH THE OVEN ON AND OFF
1. Ensure the clock is showing the right
time of day.
2. Carry out steps 1, 2 and 3 as explained
in "To set the timer to switch off only".
3. Press button and at the same
time turn the time setting knob until the end
cooking time is displayed.
Our diagram shows the end cooking time set
for 30 minutes past noon. At the end of the
cooking time the oven will switch off and an
alarm will sound. Turn the oven function and
thermostat control knob to zero. To switch
off the alarm press button .
_
_

10
F
TO SET THE TE PERATURE
FOR THE EAT PROBE
1. Insert the jack plug of the meat probe
into the socket situated on the left hand side
of the oven.
2. Insert probe into meat and close the
oven door.
3. Press button and, at the same
time, turn the temperature setting knob until
the required temperature is displayed. Our
diagram shows the meat probe temperature
set for 70°C.
4. Set the oven function control knob and
the thermostat control knob on the required
settings.
5. When cooking is completed, an alarm
will sound. To switch off the alarm press
button .
6. Remove the meat probe after use.
F
TO CANCEL A PROGRA E
1. Press button and, at the same
time, turn the time setting knob until the
cooking duration is set on "zero".
2. If the end cooking time has been set
too, press button and at the same time
turn the time setting knob until the end
cooking time is set on "zero".
_
Table of contents
Other Blanco Oven manuals

Blanco
Blanco FD6064WX Installation guide

Blanco
Blanco BOSE696XCOM User manual

Blanco
Blanco BOSE65XM User manual

Blanco
Blanco BOSE99XP User manual

Blanco
Blanco BOSE63 Installation guide

Blanco
Blanco BOSE608PX User manual

Blanco
Blanco BOSS382X Instruction Manual

Blanco
Blanco BODE 62X User manual

Blanco
Blanco BOSE652X User manual

Blanco
Blanco BOSE902 Installation guide

Blanco
Blanco BOSE65 Installation guide

Blanco
Blanco BFS60CX Installation guide

Blanco
Blanco Oven User manual

Blanco
Blanco BOSE709M User manual

Blanco
Blanco BOSE45X User manual

Blanco
Blanco BOSE607M User manual

Blanco
Blanco BOSE604X User manual

Blanco
Blanco BSO 633 User manual

Blanco
Blanco BOSE 617X Instruction Manual

Blanco
Blanco BOSE610PX User manual


