bintec elmeg be.IP swift User manual

USER MANUAL

2
Contents
Welcome!.........................................................................................6
1.1 Scope of delivery.............................................................................6
Router installation...........................................................................8
2.1 Standing (table)...............................................................................8
2.2 Wall mounting .................................................................................9
Putting be.IP swift into operation ............................................... 10
3.1 Connecting devices to the WLAN ............................................... 11
3.2 Meaning of the LEDs.................................................................... 13
3.3 Reset button ................................................................................. 14
Areas of application for your be.IP swift .................................... 15
4.1 be.IP swift IP router with integrated telephone system ............ 15
4.2 be.IP swift as IP router with separate ISDN telephone system 16
4.3 Changing the operation mode..................................................... 16
be.IP swift login............................................................................ 18
Home menu.................................................................................. 19
6.1 Home menu / System settings ................................................... 19
6.2 Home / Password menu.............................................................. 20
6.3 Home / Date and time menu ....................................................... 21
6.4 Home / Check for updates menu................................................ 22
Menu for telephony in operation as a telephone system .......... 23
7.1 Telephony / Connections menu .................................................. 23
7.1.1 Configuration of MagentaZuhause DeutschlandLAN IP
Voice/Data.................................................................................... 25
7.1.2 Configuration of DeutschlandLAN SIP Trunk.............. 26

3
7.1.3 Configuration of CompanyFlex SIP Trunk................... 27
7.1.4 Setting up a Cloud PBX port......................................... 29
7.1.5 Setting up a MagentaZuhause-Regio port................... 30
7.1.6 Configuration of a user-defined VoIP provider (single
number) 30
7.1.7 Configuration of a user-defined VoIP provider (direct
dial-in) 32
7.2 Telephony / User menu ............................................................... 32
7.3 Telephony / Internal Numbers menu .......................................... 34
7.4 Telephony / Terminals menu ...................................................... 35
7.4.1 Connecting a new analog telephone ........................... 36
7.4.2 Adding a new ISDN telephone...................................... 37
7.4.3 Connecting a VoIP telephone....................................... 38
7.5 Telephony / Calendar menu ........................................................ 40
7.6 Telephony / Call distribution menu............................................. 41
7.7 Telephony / Options menu .......................................................... 42
7.8 CompanyFlex Converter .............................................................. 43
Telephony Menu in Operation as a Media Gateway .................. 45
8.1 Telephony menu / First steps ..................................................... 45
8.2 Telephony menu / ports .............................................................. 46
8.2.1 Configuration of MagentaZuhause and
DeutschlandLAN Voice/Data ...................................................... 49
8.2.2 Configuration of DeutschlandLAN SIP Trunk.............. 50
8.2.3 Configuration of CompanyFlex SIP Trunk................... 51
8.2.4 Setting up a Cloud PBX port......................................... 53
8.2.5 Setting up a MagentaZuhause-Regio port................... 54
8.2.6 Configuration of a user-defined VoIP provider (SIP
single number) ............................................................................. 54

4
8.2.7 Configuration of a user-defined VoIP provider
(SIP Direct dial-in) ........................................................................ 56
8.3 Swyx IP ......................................................................................... 56
8.4 CompanyFlex Converter .............................................................. 58
WLAN menu ................................................................................. 60
9.1 WLAN menu / WLAN settings ..................................................... 60
9.2 WLAN / WLAN Timer menu......................................................... 62
9.3 WLAN guest network ................................................................... 62
Internet & Network menu............................................................. 65
10.1Internet & Network / Local Network menu ................................. 66
10.2Internet & Network / Internet Connections menu ...................... 67
10.2.1 Creating a new connection........................................... 68
10.2.2 WANoE backup ............................................................. 71
10.3Setting up VPN menu................................................................... 73
10.3.1 Scenario: Client to Site ................................................. 74
10.3.2 Scenario: Site to Site..................................................... 76
10.4Setting up port forwardings menu .............................................. 77
10.4.1 Port forwarding with Ipv6 addresses........................... 79
10.5IP/MAC Binding menu ................................................................. 80
Video instructions ........................................................................ 82
Licenses and conformity ............................................................. 83
12.1Open Source Code Licensing Notice .......................................... 83
12.2EU Conformity .............................................................................. 83
12.3Safety-related data....................................................................... 83
12.3.1 Interfaces ...................................................................... 83
12.3.2 Mains connection ......................................................... 83
12.3.3 Ambient conditions....................................................... 84

5
12.3.4 European regulations.................................................... 84
12.3.5 Disposal......................................................................... 84
Running services and their ports ................................................ 86
Safety instructions ....................................................................... 88

Welcome! 6
User manual
be.IP
swift
Welcome!
These instructions describe with examples the installation and initial
setup of the be.IP swift for operation on a Telecom DSL port with the
help of configuration wizards.
Additionally the following documents are available at
archive.bintec-elmeg.com:
•Advanced configuration: This manual describes the
configuration options for the menus that you can access via
the Show more link in the main menu.
•Operation via the telephone: This document explains how,
when operating as a telephone system, you can also control
many functions using shortcuts on a connected telephone.
Video instructions for special setup tasks can be found at
helpcenter.bintec-elmeg.com.
Important
Read these instructions carefully before using the router and
keep them for future reference. If necessary, pass these instructions
on to a new owner of the device.
Observe the safety instructions at the end of this document!
1.1 Scope of delivery
Unpack your be.IP swift and check the package contents for any
missing parts:

Welcome! 7
•be.IP swift
•Stand
•Plug-in power supply unit
•DSL cable RJ45-TAE
•Network cable RJ45-RJ45
•Wall mounting bracket
Check whether the components have been damaged during
shipping. If this is the case, do not put the router into operation and
contact your supplier.

Router installation 8
Router installation
2.1 Standing (table)

Router installation 9
2.2 Wall mounting
1. Attach the wall mounting bracket.
2. Attach the dowels and mount the router.
Dimensions in mm

Putting be.IP swift into operation 10
Putting be.IP swift into operation
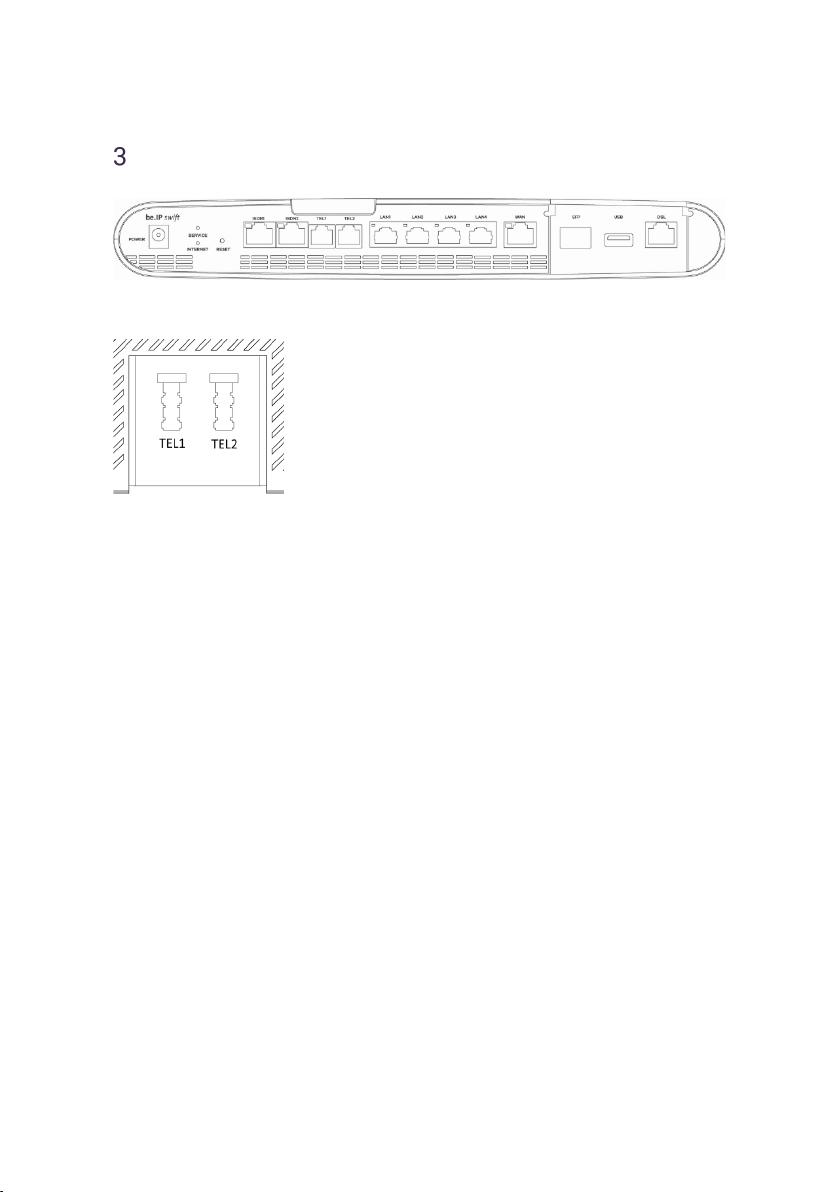
Ports on the bottom
Ports at the rear
1. Connecting DSL
Take the gray DSL cable (RJ45-TAE) and plug the RJ45
connector into the gray socket labeled DSL on your be.IP swift.
Insert the TAE plug of the cable into the middle socket labeled
For on the telephone home connection (telephone socket).
2. Connecting analog telephones
Take the telephone plug (TAE plug) of your DECT base station
(or analog telephones) and plug it into the socket labeled TEL1 or
TEL2 on the back of the router. Alternatively, you can also
connect telephones via the black RJ11 sockets labeled TEL1 or
TEL2.
3. Connecting ISDN terminals
You connect your ISDN telephones or your existing ISDN
telephone system via the black RJ45 sockets labeled ISDN. To
connect up to eight ISDN terminals (including a maximum of four
telephones), please use an additional ISDN distributor.
4. Connecting IP telephones
Wired IP telephones are connected via the yellow LAN sockets.
5. Connecting computers via LAN sockets
Other manuals for be.IP swift
1
Table of contents
Other bintec elmeg Network Router manuals

bintec elmeg
bintec elmeg RS300 Series User manual

bintec elmeg
bintec elmeg RM3000 User manual

bintec elmeg
bintec elmeg RM3000 User manual

bintec elmeg
bintec elmeg bintec 4Ge-LE User manual

bintec elmeg
bintec elmeg W2022ax User manual

bintec elmeg
bintec elmeg RM7000 User manual

bintec elmeg
bintec elmeg H2 Automotive+ User manual

bintec elmeg
bintec elmeg RXM7000 User manual

bintec elmeg
bintec elmeg RS123 User manual

bintec elmeg
bintec elmeg be.IP swift User manual