
beamUP 2211-U User manual

PRODUCT MANUAL
6
beamLabs.io

TABLE OF CONTENTS
Congratulations on purchasing your beamUP garage
door opener. It will provide you with many years of
security, safety and convenience. This installation and
owner’s manual contains complete instructions for
installing and operating your garage door opener.
For warranty registration
beamLabs.io/warranty
Carton Contents............................................1
Before You Begin.......................................... 2
Preparation + Tools Needed............................ 3
Rail Assembly .............................................. 4
Rail and Power Head Assembly ........................ 5
Trolley and Pulley Assembly............................. 6
Installing Chain and Cable .............................. 7
Attaching Sprocket Cover ............................... 8
Mounting Header Bracket............................... 9
Attaching Rail and Mounting Door Bracket ......... 10
Mounting Power Head to Ceiling ..................... 11
Attaching Door Arms.................................... 12
Emergency Release Handle............................ 13
Connecting Photo Eye Safety System ................ 14
Connecting Power and Aligning Photo
Eye Safety System........................................ 15
Connecting Deluxe Door Control..................... 16
Enabling/Disabling Motion Sensing
Security Lighting ......................................... 17
Connecting Standard Door Control .................. 18
Travel Limit Adjustment – UP Limit .................... 19
Travel Limit Adjustment – DOWN Limit.............. 20
Setting the Force ......................................... 21
Final Adjustments and Testing ........................ 22
Handheld Remote Control ............................ 23
Wireless Keypad ........................................ 24
beamUP Smart Garage Door Controller ............ 25
Using your Garage Door Opener .................... 26
Troubleshooting......................................... 30
Maintenance ............................................. 32
Warranty .................................................. 33
Spare Parts ............................................... 37
Opener Assembly Parts................................ 38

beamLabs.io 1-800-436-9186 1
CARTON CONTENTS
(BSBHF%PPS0QFOFS6
Clevis Pin
Lag Screw
5/16"- 1/1/2"
Bolt
5/16” - 18x1"
Hitch Pin
Anchors
Flange Nut Self-Threading
Screw - 1/4” x 5/8”

2beamLabs.io 1-800-436-9186
BEFORE YOU BEGIN SAFETY INSTRUCTIONS
To reduce the risk of severe injury or death:
1. READ AND FOLLOW ALL INSTALLATION INSTRUCTIONS.
2. Install only on a properly balanced garage door. An improperly balanced
door has the potential to inflict severe injury. Have a qualified service
person make repairs to cables, spring assemblies, and other hardware
before installing the opener.
3. Remove all ropes and remove or make inoperative all locks connected to
the garage door before installing opener.
4. Where possible, install the door opener 7 feet (2.13 m) or more above the
floor. For products having an emergency release, mount the emergency
release within reach, but at least 6 feet above the floor and avoiding con-
tact with vehicles to avoid accidental release.
5. Do not connect the opener to source of power until instructed to do so.
6. Locate the control button: (a) within sight of door, (b) at a minimum height
of 5 feet so small children are not able to reach it, and (c) away from all
moving parts of the door.
7. Install the Entrapment Warning Label next to the wall-mount control button
in a prominent location. In case the adhesive not adhere on the surface,
the label should be attached to the by mechanicals means.
8. Aer installing the opener, the door must reverse when it contacts a
1-1/2 inch (3.8 cm) high object (or a 2x4 board) laid flat on the floor.
WARNING
Measure door height. Check mounting
locations.
Are additional
reinforcement material
needed?
If over 7.5 feet (2.28 m),
rail extension kit will be
needed. See page 3 See page 3
Check your toolbox. Do
you have all the tools
needed?
h
7.5 feet
(2.28 m)

beamLabs.io 1-800-436-9186 3
PREPARE GARAGE DOOR FOR INSTALLATION TOOLS NEEDED
DO NOT REUSE PARTS AND
WIRING FROM AN OLD
OPENER!!!
BEFORE beginning
installation:
1. Disable locks and disengage
trolley from current opener.
2. Perform the following door
test to ensure your door
is balanced and in good
working condition.
Make sure garage door is fully
closed before you start the installation
To test your garage door:
1. Raise and lower the door to check if there is any sticking or binding.
2. Check for loose hinges, damaged rollers, frayed cables and damaged or
broken springs.
3. Li the door approximately halfway and release. The door should stay at
that point under proper spring tension.
Call a qualified garage door service technician if your door binds, sticks or
is unbalanced.
Step Ladder
Ratchet with
5/16", 7/16" and
1/2" sockets
Level
Pencil
Screwdriver
Hack Saw
Tape Measure
Adjustable Wrench
Rubber MalletDrill 3/16" and
5/16" Drill Bits
Pliers
Hammer

4beamLabs.io 1-800-436-9186
RAIL ASSEMBLY
Look in the box for:
Rubber Mallet
Rail – Middle Segments x3
Rail – End Segments
Tools needed:
Connect rails starting with the rail header segment. To apply additional force tap gently on the end of the rail
with a rubber mallet or on padded flooring.
Rail- Middle
Segment
Right
Wrong
Loosely connected
Rail – Header Segment
3BJM
M
)FBEFS4FHNFOU
3BJM
3B
J
M
.JEEMF4FHNFOUTY
3BJM&OE4FHNFOU
&O
E
4F
HN
F
4UPQ#PMU
4U
PQ
#
PM
U
ed
Rail- Header
Segment
Securely connected by applying force
Rail- Header Segment
Rail- Middle Segments x3
Rail- End Segment
Stop Bolt

beamLabs.io 1-800-436-9186 5
3BJM#SBDLFU
Rail Bracket
RAIL AND POWER HEAD ASSEMBLY
Look in the box for:
(BSBHF%PPS0QFOFS6
Opener Carton
Clevis Pin
3/8" x 1-3/4"
Hitch Pin
Use garage door opener carton to assemble rail to power head. Use packing material as protective base for
power head.
Align and slide rail into rail
bracket as shown.
Insert clevis pin into rail
bracket as shown.
Insert hitch pin into clevis pin
as shown.
(BSB
H
F%PPS0QFOFS6
p
U

6beamLabs.io 1-800-436-9186
Z
Clevis Pin
3/8" x 1-3/4"
Hitch Pin
Insert pulley into the rail slot. Insert clevis pin through rail
hole and pulley.
Insert hitch pin into clevis pin.
TROLLEY AND PULLEY ASSEMBLY
Look in the box for:
Trolley
Pulley
Slide Trolley onto the rail. Make sure the arrow on the trolley points toward the door.

beamLabs.io 1-800-436-9186 7
$IBTTJT
-PDLMFWFS
CBDLVQ
INSTALLING CABLE AND CHAIN
Look in the box for:
Chain/Cable Assembly
Master Link
Align end of chain around sprocket and extend chain past chassis. Pull chain with box along the rail towards
trolley and then remove box.
Trolley in engaged
position
WARNING
To prevent SERIOUS INJURY:
• DO NOT connect power until instructed.
• Keep hands and fingers clear from sprocket during
operation.
• Wear gloves when installing chain and cable.
• Keep hands and fingers away from joints and
possible sharp edges.
Insert cable through circular
hole in trolley. Pull cable
through pulley slot and
toward power head.
Pull trolley lock lever down
to unlock. Insert trolley sha
into trolley. Lock trolley sha in
trolley by pulling lever back up.
Bring cable and chain
together and connect cable
and chain with master link.
Chassis
8beamLabs.io 1-800-436-9186
5JHIUFOVOUJM
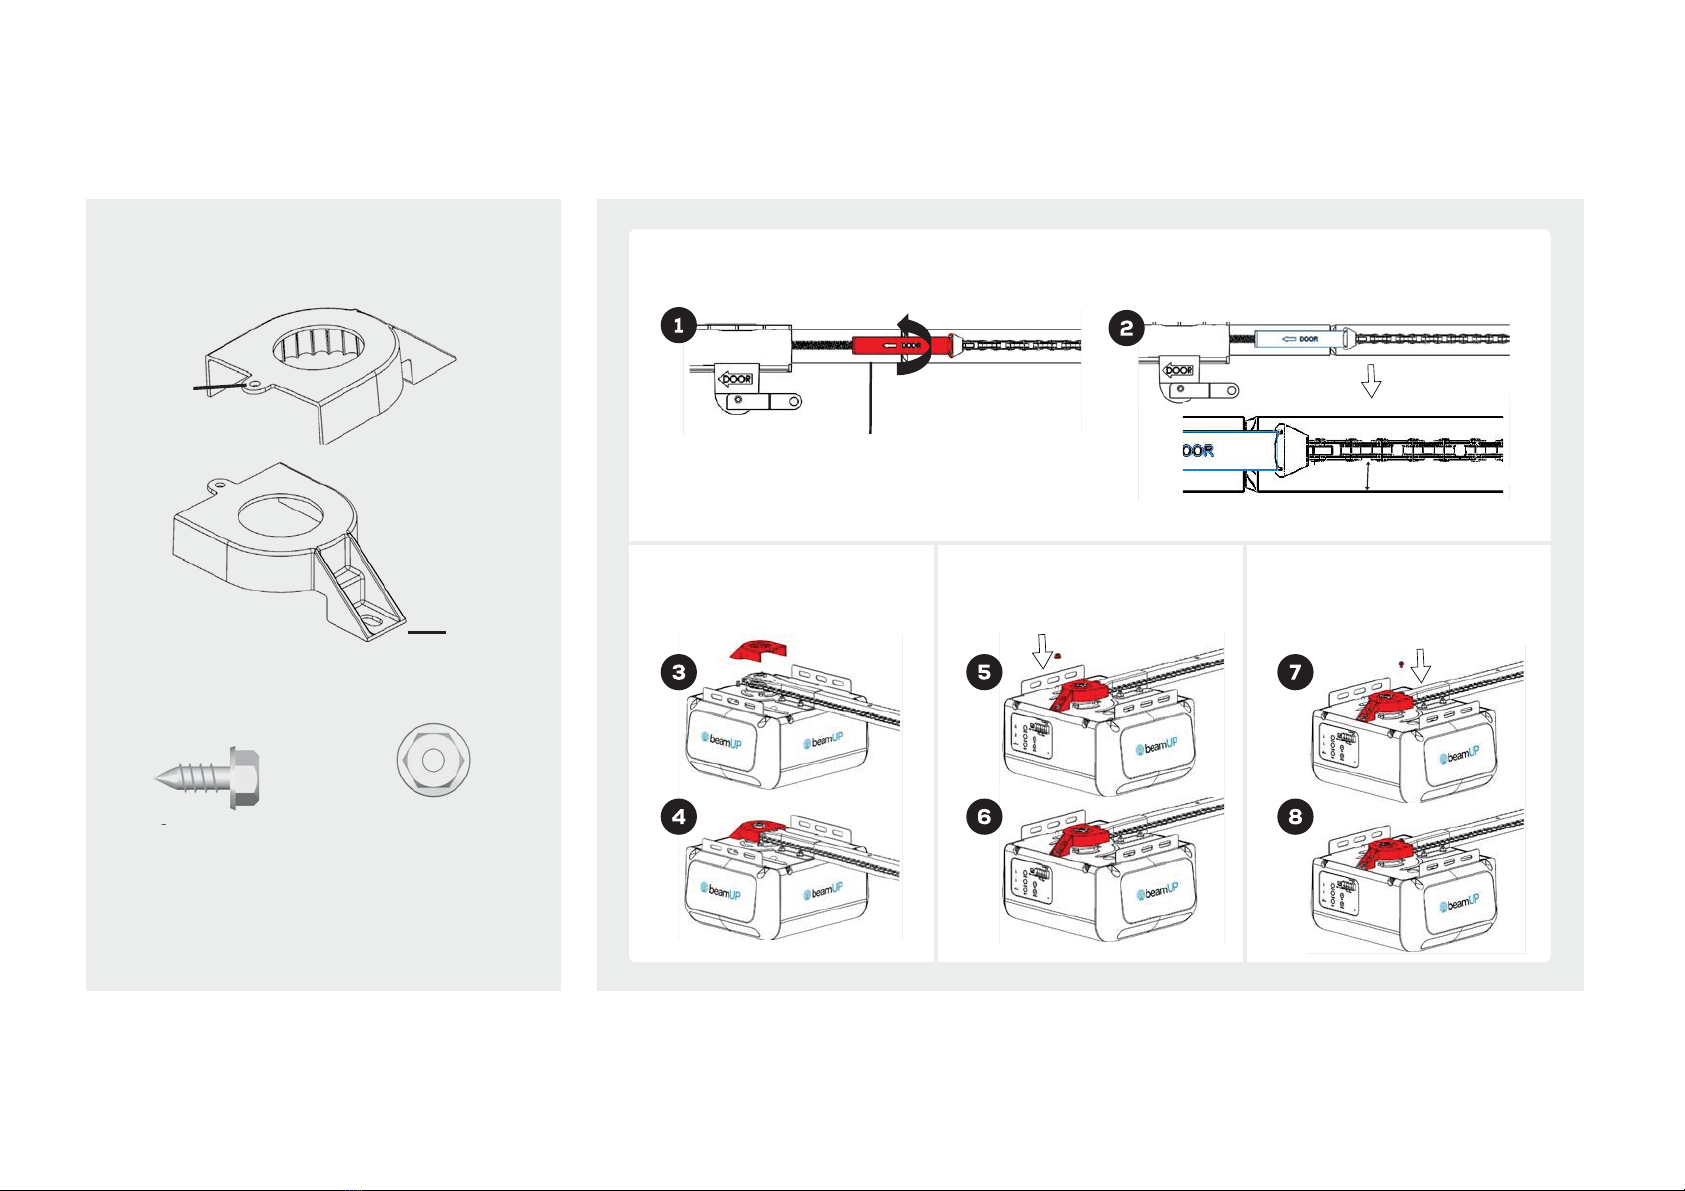
INSTALLING CABLE AND CHAIN/ATTACHING SPROCKET COVER
Look in the box for:
Sprocket Cover
Front
Tab
Rear Tab
Turn chain-to-cable connector on trolley sha until chain is about 1/4 inch (.64 cm) above the base of rail.
Chain-to-cable connector
Self-Threading
Screw - 1/4" x 5/8"
Flange Nut
Attach sprocket cover to
power head.
Fasten rear tab with flange nut
on top of steel chassis.
Fasten front tab with self-
threading screws to hole on
top of steel chassis.
G
Tighten until...
1/4 inch (.64 cm)
Table of contents
Other beamUP Garage Door Opener manuals

Popular Garage Door Opener manuals by other brands


Craftsman
Craftsman 139.53924 owner's manual

Chamberlain
Chamberlain MyQ 940ESTD owner's manual

Automatic Technology
Automatic Technology GDO-9V1 SecuraLift installation instructions

Westfalia
Westfalia 19 36 07 instruction manual

Chamberlain
Chamberlain HD520EVP manual

Cardin
Cardin BL Series instruction manual