
Beadalon Jewel Loom User manual

®
INSTRUCTION BOOKLET
MANUEL D’INSTRUCTIONS
MANUAL DE INSTRUCCIONES
Jewel Loom
by/par/por Julianna C. Avelar
Patent • Brevet • Patente: D676,879
®

2ENGLISH
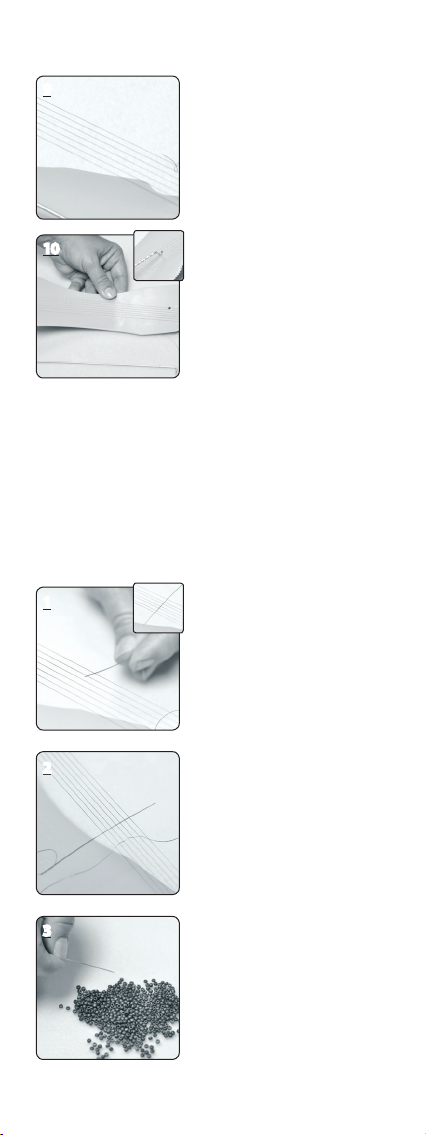
Step 1 – Bowing the Loom
Hold Loom in hand and insert one
end of metal rod into bottom hole
on top of Jewel Loom.
Slightly bend top of loom to insert
opposite end of rod into top hole
on loom. This will create a bow in
the loom, which is necessary for
operation. It also creates a nice
tension of the warp threads while
creating your beaded base.
2
1
The loom is now ready for thread.
3
Bring thread to the lower left end
and insert into groove #1.
2
The warp threads are lengthwise and form the foundation to all of
your bead loom projects. Determine the width of your project rst,
(2–46 beads wide). For your rst project I suggest that you start small
with 6 beads wide by 5–7 inches long. Use Nymo® or WildFire™ to
create your warp threads.
Step 2 - Setting up the Warp Threads
Working from the spool of thread
begin tying a knot and attaching
it to the top left inside of button.
Make sure thread is secure by
tying several knots.
1

3
ENGLISH
Bring thread down and around
back post...
3
...and back up, inserting thread in
the #3 bottom groove counting
from the left .
4
Bring thread to top of the
opposite side of the loom and
place thread in top #3 groove
counting from the left.
5
Tie o end around back post and
secure tightly with knots.
8
Continue to warp threads
following the above directions
and skipping a groove in-between
each warp. You will have 7 warp
threads when completed. Add
more threads if you wish to create
a wider design.
7
Bring thread down around top
post and back up placing thread
in groove #5 counting from the
left.
6
4ENGLISH
Finished warp threads.
9
Carefully remove metal rod.
10
Note: When determining the length of your band, keep in mind that
the clasp will add approximately 1 inch. Therefore, if your wrist
measures 6 inches then build your base 5 ½ inches. The extra inch
from the clasp will make it hang correctly on your wrist. You can
adjust this according to your desire of t.
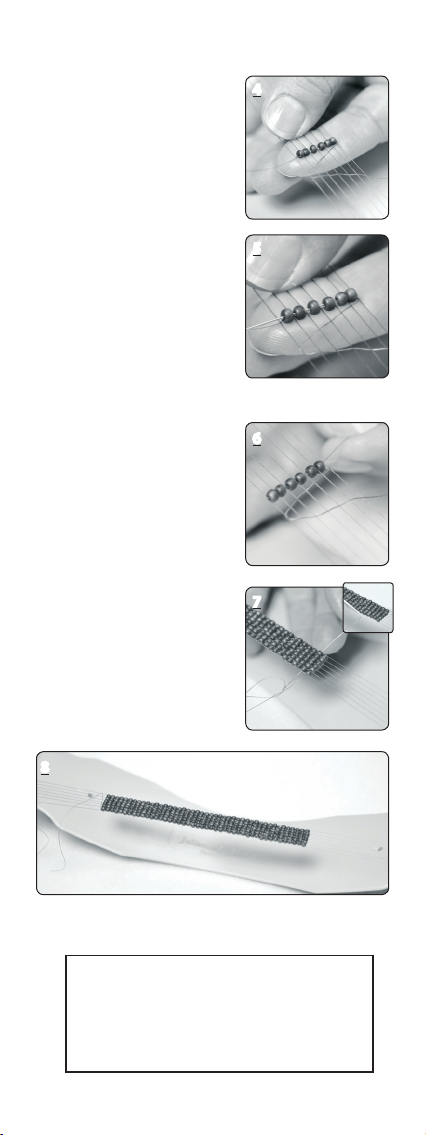
Step 3 - Adding Bead Base
Bring Needle over the rst warp
thread and repeat under over
process until you weave needle
back to left side of loom.
2
Cut a piece of thread 2 yards long
and thread it through needle.
Working from Left to Right, start
by weaving needle under rst
warp thread and then over second
warp thread, repeat the under
over process until you go all the
way through to the last warp
thread.
1
Bring needle and thread under
all warp threads and out to right
side of loom. Pick up 6 Size 8/0
seed beads and slide to the end of
the thread.
3
5
ENGLISH
With left forenger, press the
beads up between the warp
threads (one bead going into each
space).
4
Run needle from right to left
going through the beads and on
top of the warp threads.
5
Pull thread tight and straighten
row.
6
Finished base.
8
Pass needle back under warp
threads and pick up 6 beads
repeating steps above until your
bracelet has reached desired
length making sure to keep rows
straight and tension tight. Weave
excess thread back into previous
rows and trim o.
7
When beading thread gets short, run it through a
few previous rows and cut. Thread a new needle.
Bring needle through a few previous rows, make a
knot on left warp thread and continue beading
Tip: Adding New Beading Thread

6ENGLISH
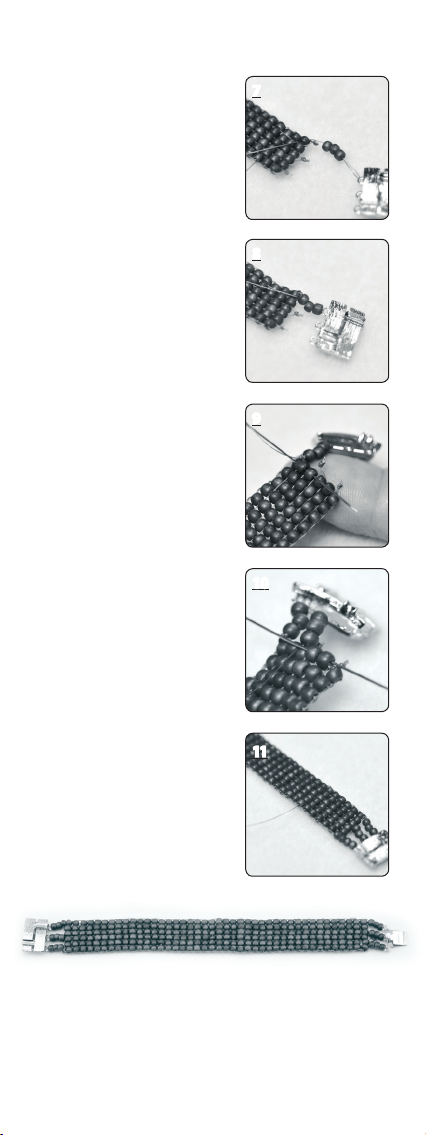
Removing Bracelet From Loom
and Adding Clasp
To remove base from loom, turn
loom over and cut warp threads
at back post.
1
To add a clasp, divide the threads
on one end, grouping two
strands, three strands, and two
strands. Tie each group of threads
close to the base beads and cut o
excess threads.
2
Count 3 rows down on the right
side of base. Insert a needle and
thread through row 3 and back
through rows 2 and 1. Your needle
will end up on left side.
5
Repeat above to opposite end of
bracelet. Cut o excess ends close
to the knots.
4
Apply small amount of Beadalon
GS Hypo to each knot, let dry.
3
Pick up 3 size 8/0 beads with
needle and then run needle and
thread through rst eye in clasp.
6
7
ENGLISH
Finished base.
Bring needle and thread back
through size 8/0 beads and then
back through the right side of the
rst bead in row 1.
7
Repeat running needle and thread
through beads and eye of rst
clasp two times. Pull needle and
thread taut so that all beads are
snug against base beads.
8
To secure thread, weave needle
and thread through rows 1, 2,
and 3, or through entire base for
added security. Cut o excess
thread and secure end with
Beadalon Adhesive.
11
Pick up 3 size 8/0 beads and
repeat Step 2 to sew through
third eye on clasp coming up and
through 5th and 6th bead.
10
Bring needle and thread up
between 3rd and 4th bead on the
1st row. Pick up 3 size 8/0 beads
and repeat step 2 to sew through
middle eye on clasp.
9
Watch the companion video of these
instructions here:
www.beadalon.com/tools/206S-064.asp

8FRANÇAIS
Étape 1 – Installer le métier en archet
Tenez le métier dans une main
et insérez une extrémité de la
tige métallique dans l’encoche
inférieure de la partie supérieure
du métier à bijoux.
Recourbez légèrement la partie
supérieure du métier pour
insérer l’extrémité opposée de la
tige dans l’encoche supérieure
du métier. Cette opération
formera le métier en archet,
ce qui est indispensable à son
fonctionnement. Elle permet
également d’assurer une bonne
tension des ls de chaîne pendant
la création de votre base de
perles.
2
1
Le métier est maintenant prêt pour l’enlage.
3
Passez le l jusqu’à l’extrémité
inférieure gauche et insérez le
dans la première rainure.
2
Les ls de chaîne sont placés dans le sens de la longueur; ils
constituent la base de toutes vos créations sur le métier à perles.
D’abord, déterminez la largeur de votre bijou (de 2 à 46 perles). S’il
s’agit de votre première fois, il est recommandé de commencer avec
une largeur de 6 perles et une longueur de 12 à 17 cm. Utilisez le l
Nymo® ou WildFire™ pour créer vos ls de chaîne.
Étape 2 – Préparer les ls de chaîne
À partir de la bobine de l, faites
d’abord un nœud et attachez-le
à la partie supérieure gauche
intérieure du bouton. Assurez
vous que le l est bien en place en
faisant plusieurs nœuds.
1

9
FRANÇAIS
Amenez le l vers le bas et
faites-le passer autour du bouton
arrière...
3
... puis ramenez le vers le haut en
l’insérant dans la troisième rainure
inférieure à partir de la gauche.
4
Tirez le l vers la partie supérieure
du côté opposé du métier et
insérez-le dans la troisième
rainure supérieure à partir de la
gauche.
5
Attachez l’extrémité autour du
bouton arrière et xez la bien en
la nouant.
8
Continuez à enler les ls en
suivant les instructions ci dessus
et en sautant une rainure entre
chaque chaîne. À la n, vous aurez
7 ls de chaîne. Ajoutez plus de ls
si vous souhaitez créer un modèle
plus large.
7
Ramenez le l vers le bas
autour du bouton supérieur,
puis ramenez le vers le haut en
l’insérant dans la cinquième
rainure à partir de la gauche.
6

10 FRANÇAIS
Fils de chaîne installés.
9
Retirez prudemment la tige
métallique.
10
Remarque : Au moment de déterminer la longueur de votre
bracelet, gardez à l’esprit qu’il mesurera environ 2,5 cm de plus
lorsque le fermoir sera xé. Ainsi, si votre poignet mesure 14 cm,
tissez une bande de 13 cm pour que la bande avec le fermoir s’ajuste
correctement à votre poignet. Vous pouvez ajuster cette longueur
comme vous le souhaitez.
Étape 3 – Ajouter une base de perles
Insérez l’aiguille au-dessus du
premier l de chaîne et répétez
le procédé en passant le l en
dessous et par-dessus jusqu’à ce
que l’aiguille atteigne encore une
fois la partie gauche du métier.
2
Coupez une longueur de l de 1,8
m et enlez le dans l’aiguille. De
gauche à droite, commencez à
tisser sous le premier l de chaîne,
puis au-dessus du deuxième.
Répétez le procédé en passant
le l en dessous et par-dessus
jusqu’au dernier l de chaîne.
1
Faites passer l’aiguille sous tous
les ls de chaîne vers la droite du
métier. Prenez 6 petites perles
de taille 8/0 et glissez les vers
l’extrémité.
3
Table of contents
Languages:


