Atlona AT-HDSync User manual

www.atlona.com
Toll free: 1-877-536-3976
Local: 1-408-962-0515
User Manual
HDMI Recorder, Writer and Hot Plug Simulator
with RS232 control
AT-HDSync

1www.atlona.com
Toll free: 1-877-536-3976
Local: 1-408-962-0515
1. Introduction .................................................. 2
2. Features .................................................. 2
3. Package Contents .................................................. 2
4. Specifications .................................................. 3
5. Panel Description .................................................. 4
6. Installation .................................................. 5
7. Software Operation .................................................. 6
8. Safety Information .................................................. 9
9. Warranty .................................................. 10
10. Atlona Product Registration .................................................. 11
TABLE OF CONTENTS

2www.atlona.com
Toll free: 1-877-536-3976
Local: 1-408-962-0515
Atlona Technologies AT-HDSync HDMI™ EDID Recorder-Writer with Serial Control is a device that can emulate
the EDID (Extended Display Identification Data) information. It stores and recalls a default EDID setting in non-
volatile memory and supports HDCP handshaking. ATHDSync allows your HDMI™ source boot directly from
AT-HDSync, and users can detach HDMI™ monitor at any time while installing AT-HDSync between HDMI™
source and monitor. It can also read and store the EDID of your HDMI™ display and even let you modify the
EDID and upload the modified EDID to displays.
Note: Extended Display Identification Data (EDID) is a standard data format that contains basic information
about a monitor and its capabilities, including vendor information, maximum image size, color characteristics,
factory pre-set timings, frequency range limits, and character strings for the monitor name and serial number.
The information is stored in the display and is used to communicate with the system through a Display Data
Channel (DDC), which sites between the monitor and the PC graphics adapter. The system uses this informa-
tion for configuration purposes, so the monitor and system can work together.
• HDMI 1.3c, DVI 1.0 and HDCP 1.1 compliant
• Built-in default EDID
• Able to read and store the EDID of monitors/projectors
• Prevent computers from deactivating inactive HDMI ports
• Able to write EDID into the AT-HDSync or the DVI monitors/projectors
• Maintain HDMI™ video resolution
• 1x AT-HDSync unit
• 1x 5V DC power supply unit
• 1x User’s manual
INTRODUCTION
FEATURES
PACKAGE CONTENTS
3www.atlona.com
Toll free: 1-877-536-3976
Local: 1-408-962-0515
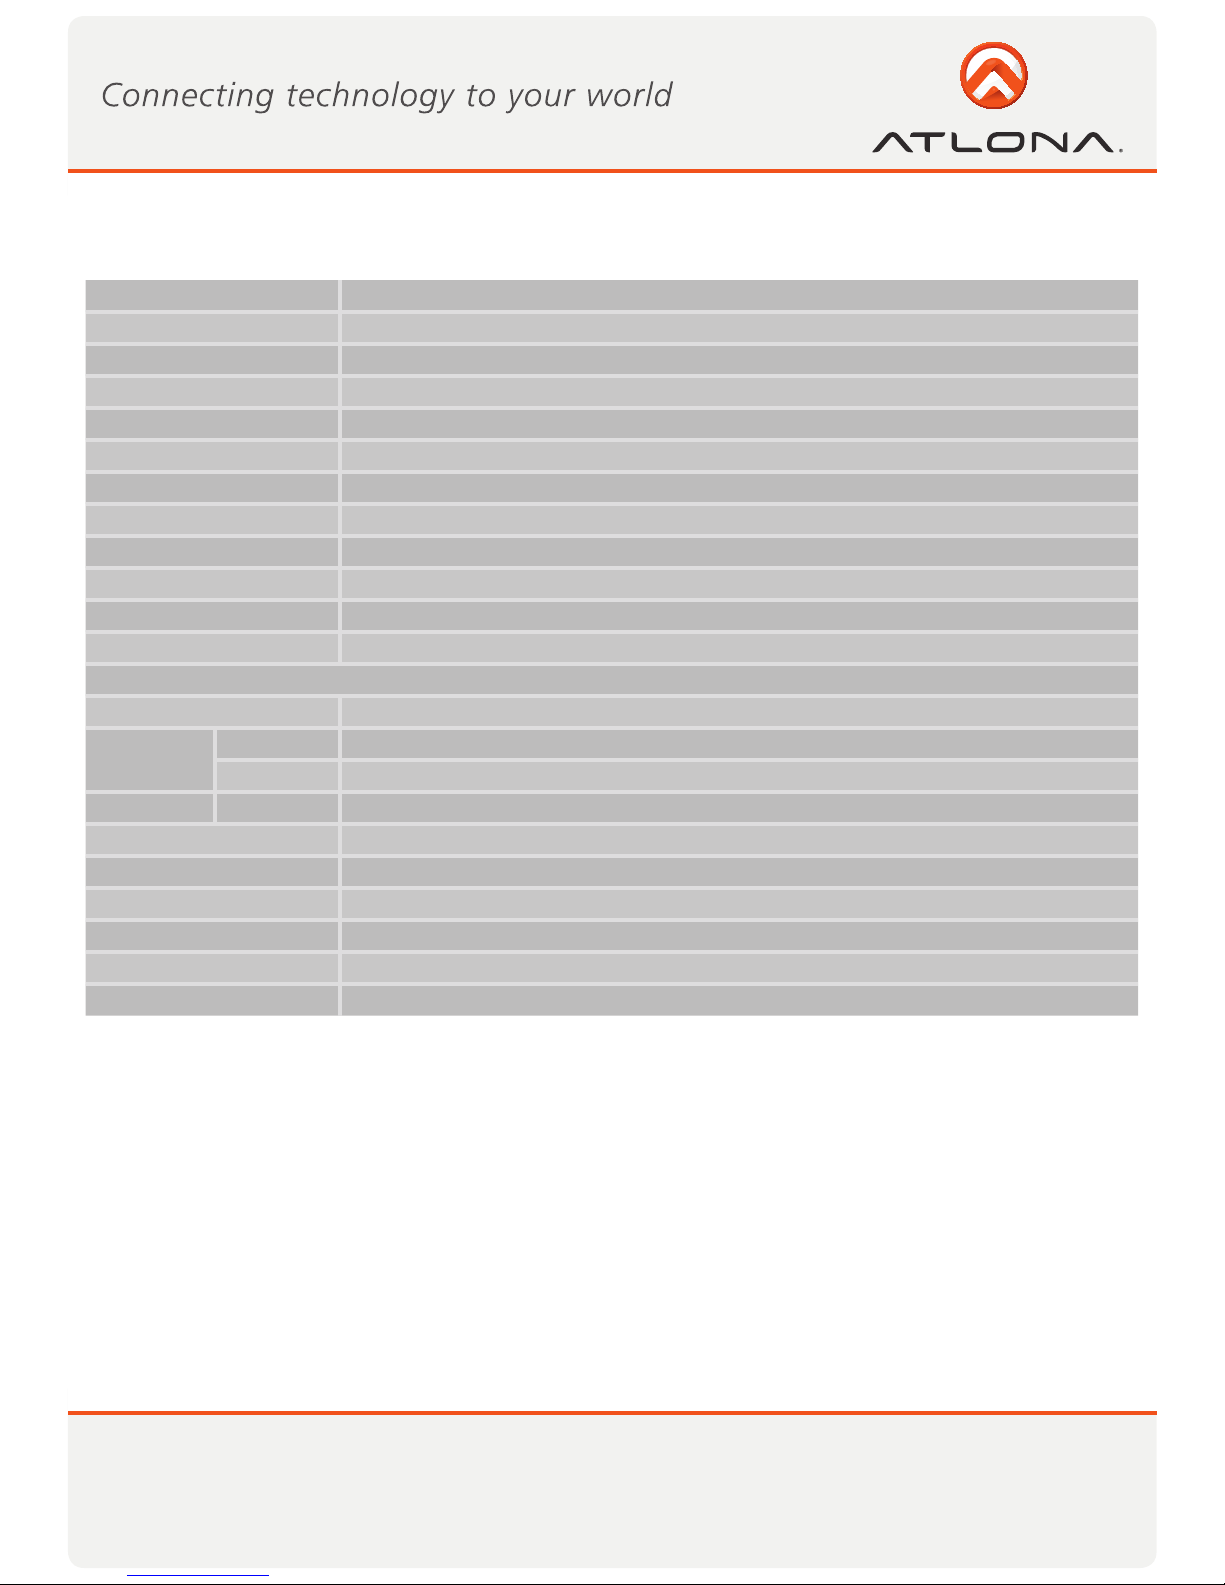
Model Name AT-HDSync
Technical
HDMI™ compliance HDMI™ 1.3c
DVI compliance DVI 1.0
HDCP compliance Yes
Video bandwidth Yes
Video support Yes
Input 1x HDMI™ + 1x RS-232
Output 1x HDMI™
HDMI™ connector Type A (19-pin female)
RS-232 connector DE-9 (9-pin D-sub female)
Flash EEPROM 256 byte (non-volatile)
Mechanical
Housing Metal enclosure
Dimensions
[L x W x H]
Model 91 x 80 x 27mm (3.6” x 3.1” x 1.1”)
Package 270 x 175 x 80mm (10.6” x 6.9” x 3.2”)
Weight Model 240g (8.5oz)
Fixedness Wall-mounting case with screws
Power supply 5V DC
Power consumption 4 Watt (max)
Operation temperature 0~40°C (32~104°F)
Storage temperature -20~60°C (-4~140°F)
Relative humidity 20~90% RH (no condensation)
SPECIFICATIONS
4www.atlona.com
Toll free: 1-877-536-3976
Local: 1-408-962-0515
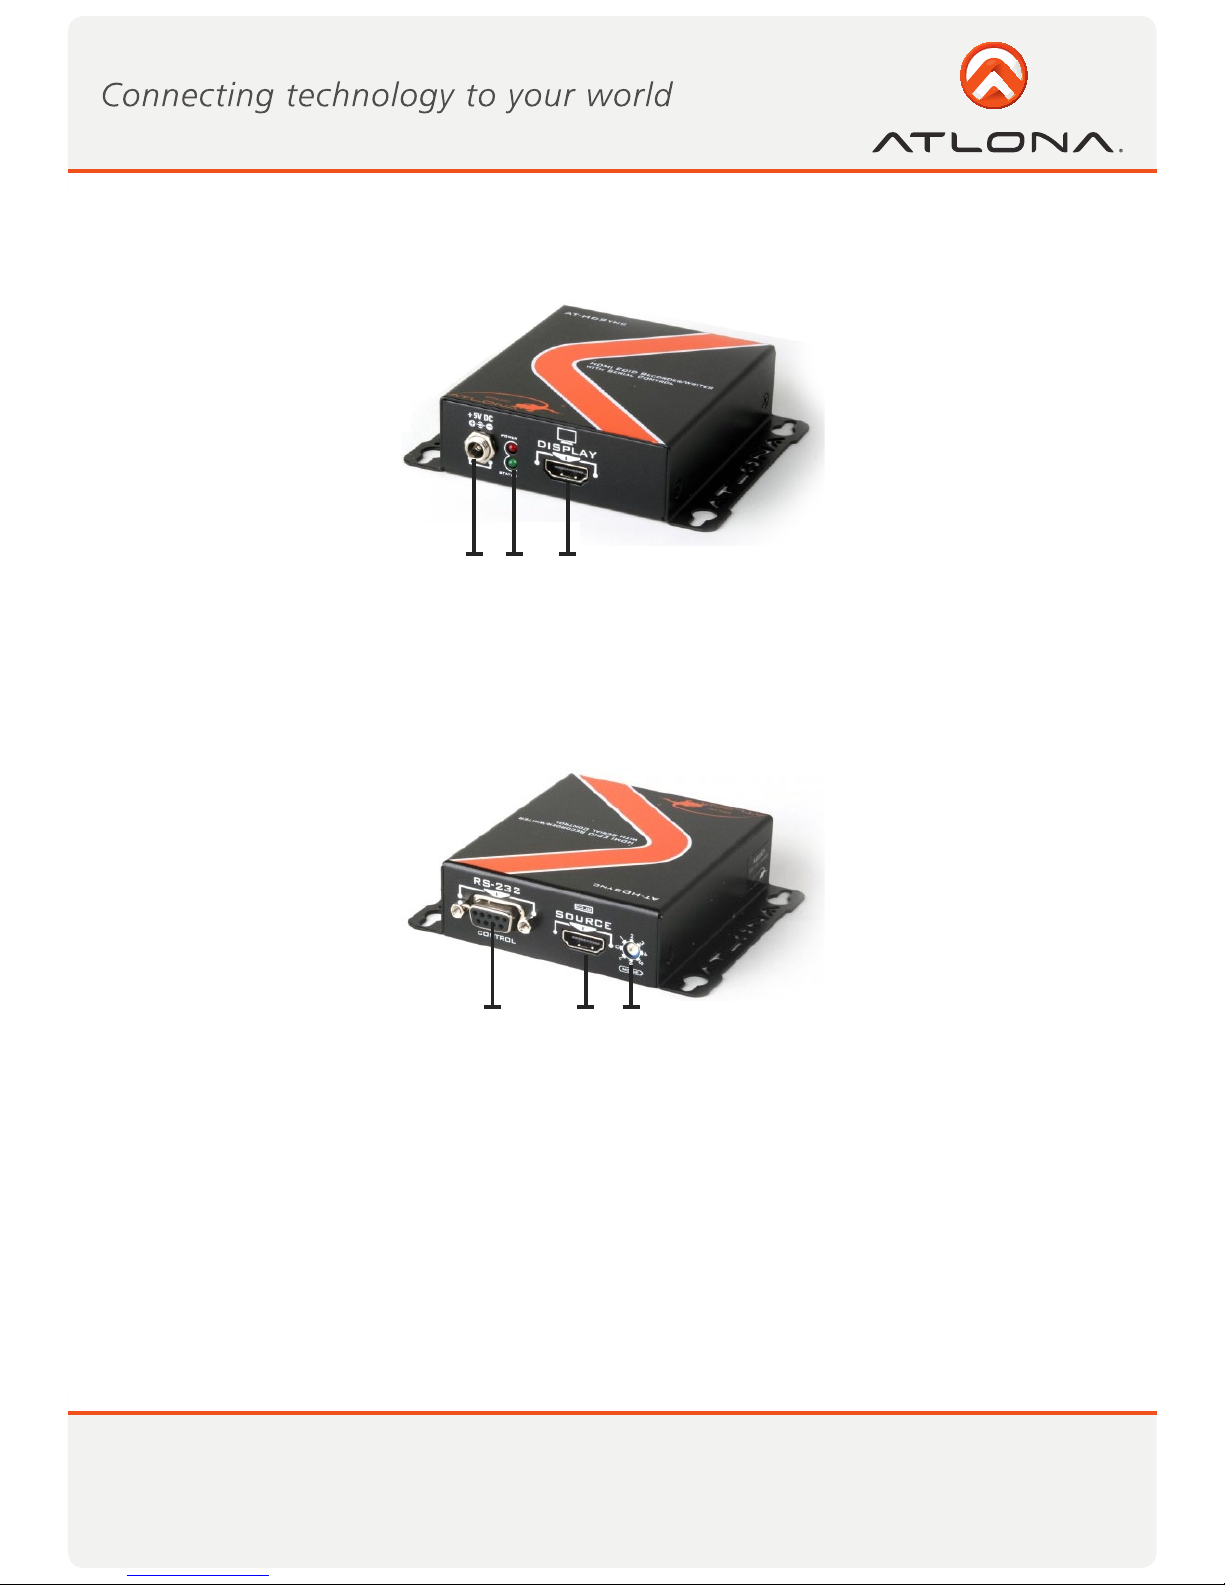
Display Side
1. Connect to a 5V DC power supply unit.
2. Red light indicates the power on/off status. Green light indicates if the AT-HDSync is in the process of
reading or writing EDID or sync detection.
3. Connect to a HDMI™ display.
Source and Control Side
1. Connect to a PC for RS-232 serial control to read/write EDIDs from/ to the display
2. Connect to a HDMI™ source device so the AT-HDSync will be the bridge between the HDMI™ source
and display
3. Mode 0 = [Video] – supports up to HDMI 1.3 output. [Audio] – supports up to 7.1ch output
Mode 1 = [Video] – supports up to HDMI 1.3 output. [Audio] – lock to stereo audio output
Mode 2 = [Video] – locks to HDMI 1.2 output. [Audio] – supports up to 7.1ch output
Mode 3 = [Video] – locks to HDMI 1.2 output. [Audio] – lock to stereo audio output
Mode 4 = [Video] – DVI display mode. [Audio] – no audio output
Mode 5 = [Safe Mode] – uses default EDID with video supported up to 1080p
Mode 6 = [Recording Mode] – Learning EDID from HDMI output manually
Mode 7 = [Serial Control Mode] – Control the AT-HDSync by software via RS-232
1 2 3
PANEL DESCRIPTION
1 2 3

5www.atlona.com
Toll free: 1-877-536-3976
Local: 1-408-962-0515
INSTALLATION
I. Read the EDID manually from a HDMI™ monitor or projector
1. Connect the HDMI™ display device to the AT-HDSync via the DISPLAY port.
2. Plug in the 5V DC power supply unit.
3. Set AT-HDSync to MODE 6.
4. The EDID reading sequence is done when the green LED lights off.
5. Switch the rotary switch back to MODE 0-4 based on your system setting.
DO NOT let the rotary arrow pass by Mode 5 which will erase the EDID just learned and restore the de-
fault EDID.
II. Recall the default universal EDID
1. Set AT-HDSync to MODE 7.
2. Connect the HDMI™ display device to the AT-HDSync via the DISPLAY port.
3. Plug in the 5V DC power supply unit.
4. Connect the AT-HDSync to the serial port of PC and run the control software.
5. Click on “HDMI Monitor Reader” button to read the EDID information from the HDMI™ display.
6. The EDID reading sequence is done when the green LED lights off.
III. Write an EDID to a HDMI™ monitor or projector
1. Set AT-HDSync to MODE 7.
2. Connect the HDMI™ display device to the AT-HDSync via the DISPLAY port.
3. Plug in the 5V DC power supply unit.
4. Connect the AT-HDSync to the serial port of PC and run the control software.
5. Click on “HDMI Monitor Writer” button to write the EDID information to HDMI™ display.
6. The EDID reading sequence is done when the green LED lights off.
Note: The AT-HDSync may not work on the monitors with EDID write-protection.
6www.atlona.com
Toll free: 1-877-536-3976
Local: 1-408-962-0515
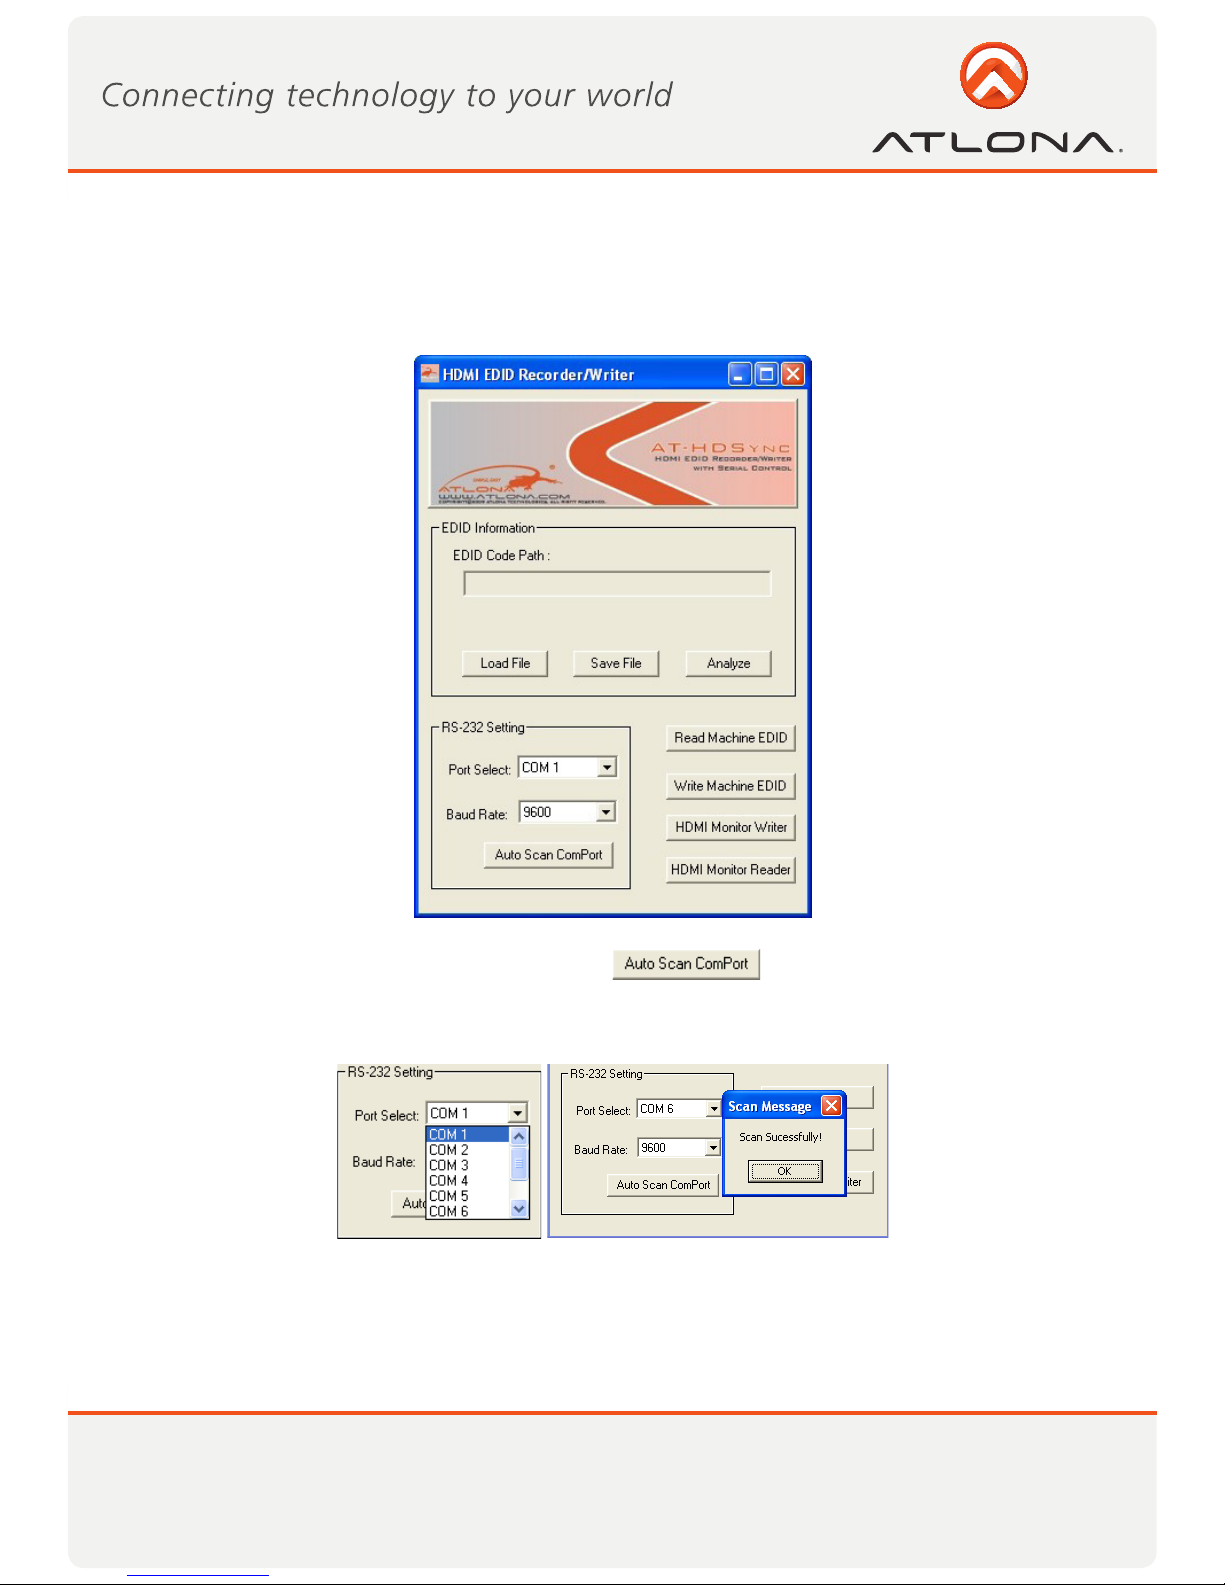
Before running the software, please make sure the rotary switch is set to MODE 7.
1) Getting started
1. Firstly, make sure of the correct setup, and click on
If the installation is done successfully, the following pop-up message window will show up to
indicate the RS-232 serial port is automatically detected and successfully connected.
2. If the error message as shown below appears, inappropriate setup has occurred. Check
at the power supply and RS-232 serial port connection.
SOFTWARE OPERATION

7www.atlona.com
Toll free: 1-877-536-3976
Local: 1-408-962-0515
2) Read EDID from AT-HDSync
1. If users would like to read EDID info from the AT-HDSync, simply click ”Read Machine EDID.”
You can see the following message to inform you the correct reading of the EDID has been done.
2. Click and make a quick analysis on the EDID information just read, which users are capable of
monitoring or modifying.
3. To save the EDID information for your future reference, please click .
The pop-up window will guide you to save the EDID information within the PC.
3) Write EDID into AT-HDSync
4. 1. You can modify EDID content in the pop-up window after you click “Analyze”. You can also
5. load the previously saved EDID information in the analysis window by clicking “Load File”.
6. 2. While you finish editing EDID content, you can click “Write Machine EDID” to write the EDID
7. profile to the AT-HDSync. After the writing action is completed, the following message
8. window will show up.
8www.atlona.com
Toll free: 1-877-536-3976
Local: 1-408-962-0515
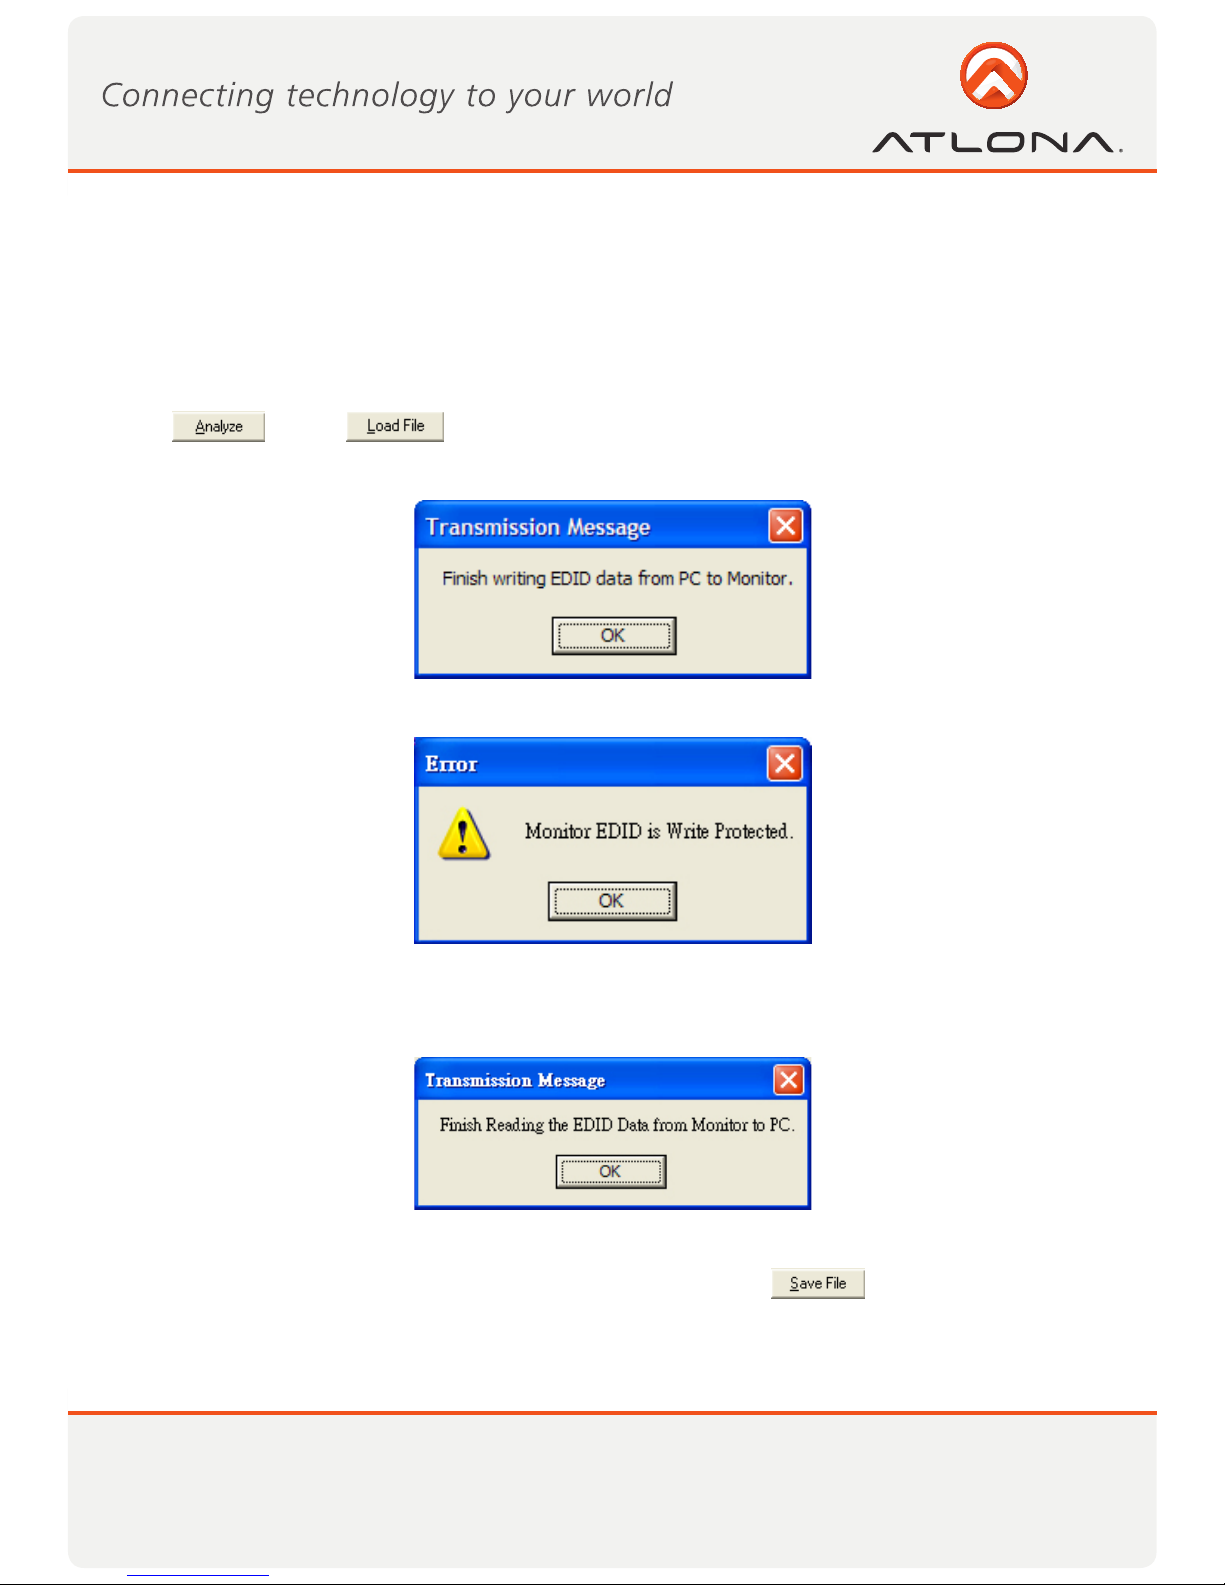
4) Write EDID into a HDMI™ monitor/projector
Executing “HDMI Monitor Writer” might cause damage to your monitor’s EDID. For instance, the sudden
power surge or the disconnection of the serial port while updating EDID may result in an incomplete update
process. Therefore, it is not recommended to use this function. If users would like to update the monitor’s
EDID content and acknowledge such risk, please make a backup copy of the original EDID, and make sure
there is no damage to your monitor’s EDID.
1. Click or click to load the pre-saved EDID profile in the analysis window.
2. Click “HDMI Monitor Writer” Click “HDMI Monitor Writer” and wait for the following message window
showing up.
3. The AT-HDSync may not work on the monitors with EDID write-protection. At this time , you can see the
following error message window showing up .
5) Read EDID from a HDMI™ monitor/projector
1. Click ”HDMI Monitor Reader” and wait for the following message window showing up.
2. Click “Analyze” and make a quick analysis on the EDID information just read, which users are capable of
monitoring or modifying.
3. To save the EDID information for your future reference, please click .
The pop-up window will guide you to save the EDID information within the PC.
Note: The AT-DVISync may not work on the monitors with EDID write-protection.
9www.atlona.com
Toll free: 1-877-536-3976
Local: 1-408-962-0515
Safeguards
Precautions
FCC regulations state that any unauthorized changes or modifications to this equipment, not expressly
approved by the manufacturer, could void the user’s authority to operate this equipment.
Operate this product using only the included external power supply. Use of other power supplies could impair
performance, damage the product, or cause fires.
In the event of an electrostatic discharge this device may automatically turn off. If this occurs, unplug the device
and plug it back in.
Protect and route power cords so they will not be stepped on or pinched by anything placed on or against
them. Be especially careful of plug-ins or cord exit points from this product.
Avoid excessive humidity, sudden temperature changes or temperature extremes.
Keep this product away from wet locations such as bathtubs, sinks, laundries, wet basements, fish tanks, and
swimming pools.
Use only accessories recommended by Atlona to avoid fire, shock, or other hazards.
Unplug the product before cleaning. Use a damp cloth for cleaning and not cleaning fluid or aerosols.
Such products could enter the unit and cause damage, fire, or electric shock. Some substances may also
mar the finish of the product.
Never open, remove unit panels, or make any adjustments not described in this manual. Attempting to
do so could expose you to dangerous electrical shock or other hazards. It may also cause damage to your
AT-HDSync. Opening the product will void the warranty.
Do not attempt to service the unit. Disconnect the product and contact your authorized Atlona reseller or
contact Atlona directly.
To reduce the risk of electric shock, do not
expose this product to rain or moisture
If the wall plug does not fit into your local
power socket, hire an electrician to replace
your obsolete socket.
Do not modify the wall plug. Doing so will
void the warranty and safety features.
This equipment should be installed near
the socket outlet and the device should
be easily accessible in the case it requires
disconnection.
SAFETY INFORMATION
Other manuals for AT-HDSync
2
Table of contents
Other Atlona Recording Equipment manuals


