Asus Rampage IV Extreme User manual

ROG ASUS AI Suite II 1
D094
Republic of Gamers
AI Suite II User Manual
AI Suite II
Installing AI Suite II.......................................................................................... 2
Using AI Suite II............................................................................................... 2
TurboV EVO ................................................................................................................. 3
TurboV ....................................................................................................... 3
CPU Level Up ................................................................................................. 5
New DIGI+ Power Control........................................................................................... 7
EPU ........................................................................................................................ 9
Launching EPU ............................................................................................... 9
FAN Xpert................................................................................................................... 10
Launching FAN Xpert .................................................................................... 10
Using FAN Xpert ........................................................................................... 10
Fan setting .................................................................................................... 10
Probe II ...................................................................................................................... 11
Launching Probe II.........................................................................................11
Conguring Probe II .......................................................................................11
Sensor Recorder ....................................................................................................... 15
Launching Sensor Recorder ......................................................................... 15
Using Sensor Recorder................................................................................. 15
Using History Record .................................................................................... 15
USB 3.0 Boost............................................................................................................ 16
Launching USB 3.0 Boost............................................................................. 16
Conguring USB 3.0 Boost ........................................................................... 16
Ai Charger+................................................................................................................ 17
Monitor ...................................................................................................................... 18
Sensor ..................................................................................................... 18
CPU Frequency............................................................................................. 18
ASUS Update ............................................................................................................. 19
Launching ASUS Update .............................................................................. 19
Using ASUS Update...................................................................................... 19
MyLogo2..................................................................................................................... 20
Launching ASUS Update .............................................................................. 20
Using MyLogo ............................................................................................... 20
System Information................................................................................................... 22

2ROG ASUS AI Suite II
AI Suite II
AI Suite II is an all-in-one interface that integrates several ASUS utilities and allows users to
launch and operate these utilities simultaneously.
Installing AI Suite II
To install AI Suite II on your computer
1. Place the support DVD to the optical drive. The Drivers installation tab appears if your
computer has enabled the Autorun feature.
2. Click on the Utilities tab, then click AI Suite II.
3. Follow the onscreen instructions to complete installation.
Shortcut to the Auto Tuning
Mode under TurboV EVO
Click to select a utility
Click to monitor sensors or
CPU frequency
Click to update the motherboard BIOS
Click to show the
system information
Click to customize
the interface
settings
Using AI Suite II
AI Suite II automatically starts when you enter the Windows® operating system (OS). The AI
Suite II icon appears in the Windows® notication area. Click on the icon to open the AI Suite
II main menu bar.
Click on each button to select and launch a utility, to monitor the system, to update the
motherboard BIOS, to display the system information, and to customize the settings of AI Suite II.
• The CPU Level Up button appears only on models with the TurboV EVO function.
• The applications in the Tool menu vary with models.
• The screeshots of AI Suite II in this user manual are for reference only. The actual
screenshots vary with models.
• Refer to the software manual in the support DVD or visit the ASUS website
at www.asus.com for detailed software conguration.

ROG ASUS AI Suite II 3
TurboV EVO
ASUS TurboV EVO introduces TurboV that allows you to manually adjust the CPU frequency
and related voltages as well as CPU Level Up function that offers automatic and easy
overclocking and system level up. After installing AI Suite II from the motherboard support
DVD, launch TurboV EVO by clicking Tool > TurboV EVO on the AI Suite II main menu bar.
Refer to the software manual in the support DVD or visit the ASUS website at
www.asus.com for detailed software conguration.
TurboV
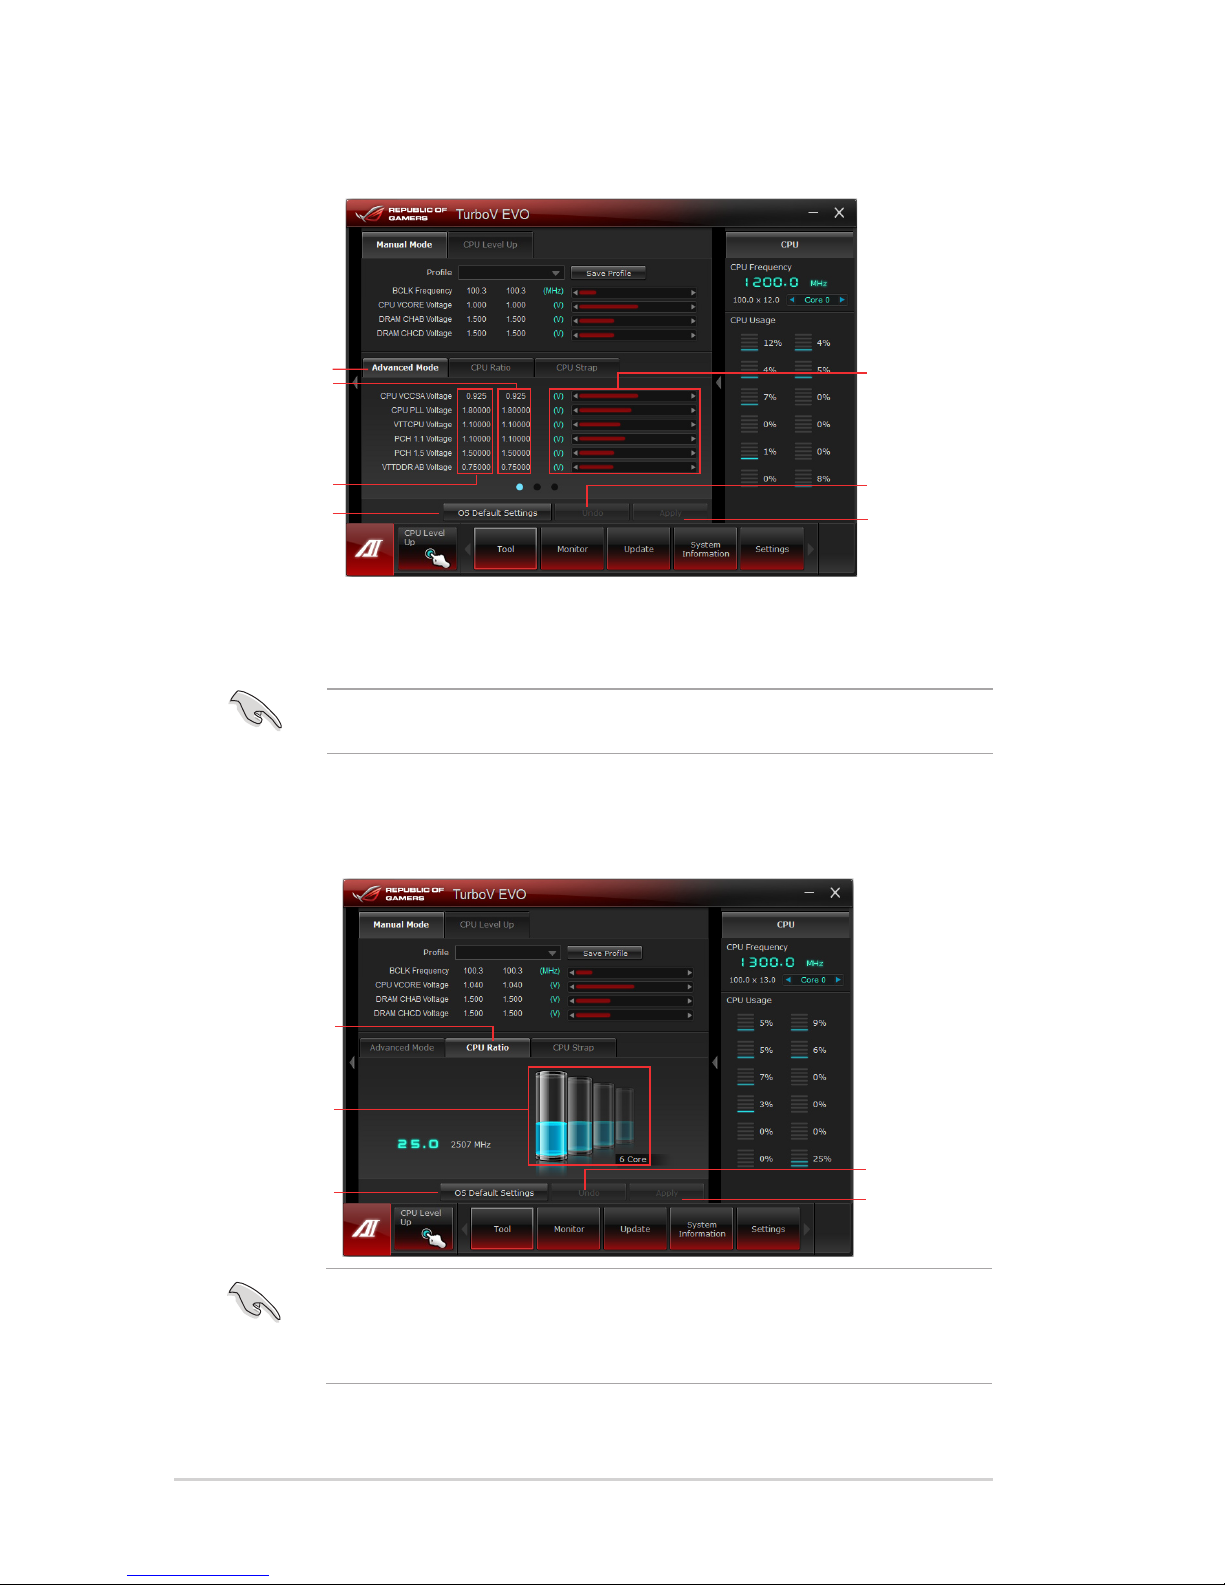
TurboV allows you to overclock the BCLK frequency, CPU voltage, IMC voltage, and DRAM
Bus voltage in Windows®environment and takes effect in real-time without exiting and
rebooting the OS.
Refer to the CPU documentation before adjusting CPU voltage settings. Setting a high
voltage may damage the CPU permanently, and setting a low voltage may make the
system unstable.
For system stability, all changes made in TurboV will not be saved to BIOS settings and
will not be kept on the next system boot. Use the Save Prole function to save your
customized overclocking settings and manually load the prole after Windows starts.
Save the
current settings
as a new prole
Voltage
Adjustment
bars
Current values
Target values
Load prole
Click to
select mode
Click to show
settings
Applies all changes
immediately
Undoes all
changes without
applying
Click to restore
all start-up
settings
4ROG ASUS AI Suite II
Using Advanced Mode
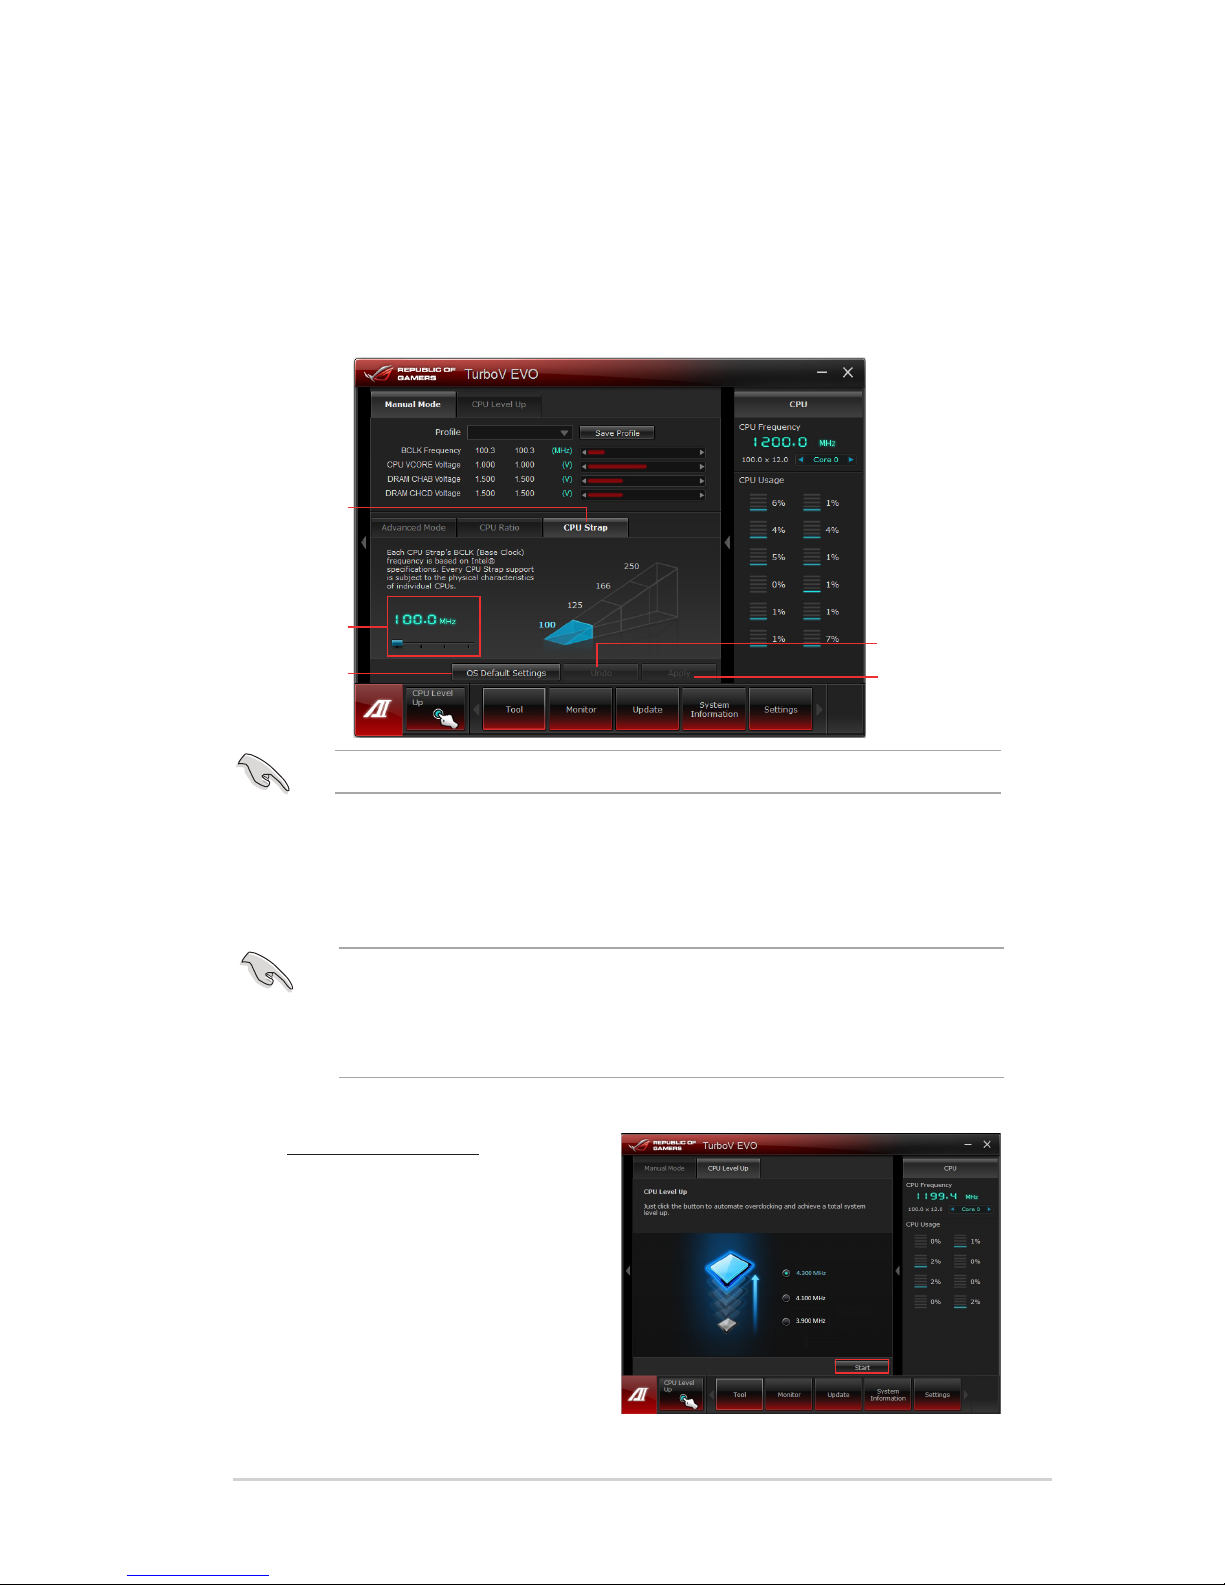
Click on the Advanced Mode tab to adjust the advanced voltage settings.
Advanced mode
Applies all changes
immediately
Undoes all changes
without applying
Click to restore
all start-up
settings
Current values
Target values
Voltage
Adjustment
bars
CPU Ratio
Allows you to manually adjust the CPU ratio.
The rst time you use CPU Ratio, go to AI Tweaker > CPU Power Management in BIOS
and set the Turbo Ratio item to [Maximum Turbo Ratio setting in OS].
1. Click on the CPU Ratio tab.
2. Drag the adjustment bar upwards or downwards to the desired value.
3. Click on Apply to make the change take effect.
CPU Ratio
Click to restore
all start-up
settings
Adjustment
bar
Applies all changes
immediately
Undoes all changes
without applying
• Set the CPU Ratio Setting item in BIOS to [Auto] before using the CPU Ratio function
in TurboV. Refer to Chapter 3 of your motherboard user manual for details.
• The CPU Ratio bars show the status of the CPU cores, which vary with your CPU
model.
ROG ASUS AI Suite II 5
CPU Level Up
ASUS TurboV EVO includes three CPU level up modes, providing the most exible auto-
tuning options.
• The overclocking result varies with the CPU model and the system conguration.
• To prevent overheating from damaging the motherboard, a better thermal environment
is strongly recommended
• The CPU Level Up modes depend upon the CPU installed in your system.
Using CPU Level Up
1. Click the CPU Level Up tab,
choose the mode, and click Start.
2. Read through the warning
messages and click OK to start
auto-overclocking.
CPU Strap
Allows you to manually adjust CPU Strap.
1. Click on the CPU Strap tab.
2. Click on the adjustment bar to the desired value. The graph on the right will change
value accordingly.
3. Click on Apply to make the change take effect.
CPU Strap
Click to restore
all start-up
settings
Adjustment
bar
Applies all changes
immediately
Undoes all changes
without applying
• Every CPU Strap support is subject to the physical characteristics of individual CPUs.

6ROG ASUS AI Suite II
3. TurboV automatically overclocks
the CPU, saves BIOS settings,
and restarts the system. After
re-entering Windows, a message
appears indicating successful
overclocking. Click OK to exit.

ROG ASUS AI Suite II 7
New DIGI+ Power Control
New DIGI+ PowerControl allows you to adjust VRM voltage and frequency modulation to
enhance reliability and stability. It also provides the highest power efciency, generating less
heat to longer component lifespan and minimize power loss.
After installing AI Suite II from the motherboard support DVD, launch DIGI+ Power Control
by clicking Tool > DIGI+ Power Control on the AI Suite II main menu bar.
Select CPU Power or DRAM Power to adjust the power control settings.
Function no. Function description
1CPU Load-line Calibration
It allows you to adjust the voltage settings and control the system
temperature. Higher load-line calibration could get higher voltage and
good overclocking performance but increases the CPU and VRM thermal.
2CPU Current Capability
CPU Current Capability provides wider total power range for overclocking.
A higher value setting gets higher VRM power consumption delivery.
3CPU Voltage Frequency
Switching frequency will affect the VRM transient response and
component thermal. Higher frequency gets quicker transient response.
4VCCSA Load-line Calibration
The behavior of the DRAM Controller is decided by the VCCSA Load-
line. Set to a higher value for system performance, or to a lower value for
better thermal solution.
5VCCSA Current Capability
A higher value brings wider total DRAM Controller power range and
extends the overclocking frequency range simultaneously.
6CPU Power Phase Control
Increase phase number under heavy system loading to get more transient
and better thermal performance. Reduce phase number under light
system loading to increase VRM efciency.
7CPU Power Duty Control
CPU Power Duty Control adjusts the current of every VRM phase and the
thermal of every phase component.
Application aids
Apply all changes
immediately
Undo all changes
without applying
1
CPU Power
2
3
6
7
45

8ROG ASUS AI Suite II
• The actual performance boost may vary depending on your CPU specication.
• Do not remove the thermal module. The thermal conditions should be monitored.
DRAM Power
Function no. Function description
1DRAM Current Capability
A higher value brings a wider total power range and extends the
overclocking frequency range simultaneously.
2DRAM Voltage Frequency
Allows you to adjust the DRAM switching frequency for system stability or
to increase OC Range.
3DRAM Power Phase Control
Select Extreme for full phase mode to increase system performance or
select Optimized for ASUS optimized phase tuning prole to increase
DRAM power efciency.
Application aids
Apply all changes
immediately
Undo all changes
without applying
1
2
3

ROG ASUS AI Suite II 9
EPU
EPU is an energy-efcient tool that satises different computing needs. This utility provides
several modes that you can select to save system power. Selecting Auto mode will have the
system shift modes automatically according to current system status. You can also customize
each mode by conguring settings like CPU frequency, GPU frequency, vCore Voltage, and
Fan Control.
Launching EPU
After installing AI Suite II from the motherboard support DVD, launch EPU by clicking
Tool > EPU on the AI Suite II main menu bar.
*• Select From EPU Installation to show the CO2 that has been reduced since you
installed EPU.
*• Select From the Last Reset to show the total CO2 that has been reduced since you
click the Clear button .
• Refer to the software manual in the support DVD or visit the ASUS website at
www.asus.com for detailed software conguration.
*Shifts between the
display of Total and
Current CO2 reduced
Displays the system
properties of each mode
Displays the following message
if no VGA power saving engine
is detected.
Advanced settings for each mode
Multiple system
operating modes
The items lighting up
means power saving
engine is activated
Displays the amount
of CO2 reduced
Displays the
current CPU power

10 ROG ASUS AI Suite II
Refer to the software manual in the support DVD or visit the ASUS website at
www.asus.com for detailed software conguration.
FAN Xpert
FAN Xpert intelligently allows you to adjust both the CPU and chassis fan speeds
according to different ambient temperatures caused by different climate conditions in
different geographic regions and your PC’s system loading. The built-in variety of useful
proles offer exible automatic and manual fan speed controls to achieve a quiet and cool
environment.
Launching FAN Xpert
After installing AI Suite II from the motherboard support DVD, launch FAN Xpert by clicking
Tool > FAN Xpert on the AI Suite II main menu bar.
Fan setting
• Disable: disables the FAN Xpert function.
• Standard: adjusts fan speed in a moderate pattern.
• Silent: minimizes fan speed for quiet fan operation.
• Turbo: maximizes the fan speed for the best cooling effect.
• Intelligent: automatically adjusts the CPU fan speed according to the ambient
temperature.
• Stable: xes the CPU fan speed to avoid noise caused by the unsteady fan rotation.
However, the fan will speed up when the temperature exceeds 70°C.
• User: Allows you to congure the CPU fan prole under certain limitations.
Using FAN Xpert
Click Fan Name to select a fan and then click Setting to select a preset mode for your
selected fan.
Click to select a fan type Click to select a fan prole
Click to apply the
settings
Click to discard the
settings
Other manuals for Rampage IV Extreme
2
This manual suits for next models
3
Table of contents
Other Asus Software manuals

Asus
Asus TC710 User manual

Asus
Asus A3Ac User manual
Asus
Asus Application User manual

Asus
Asus Intel Viiv User manual

Asus
Asus A3Ac User manual

Asus
Asus Z9PE-D16-10G Series User manual

Asus
Asus A3Ac User manual

Asus
Asus A3Ac User manual

Asus
Asus ASWM Enterprise User manual

Asus
Asus GigaX 1024P User's User manual