
Astera PLUTOFRESNEL User manual

PLUTO
Order Code: AF80 Manual Version: 1.0 Date of Issue: 14.07.2023
User Manual
Benutzerhandbuch
Manuale utente
Manual del usuario
Manuel d’utilisation
用户手册

TABLE OF CONTENTS / INHALTSVERZEICHNIS / INDICE DEI CONTENUTI
ÍNDICE / TABLE DES MATIÈRES / 目录
EN........................................................................................................................ 3
DE.......................................................................................................................18
IT........................................................................................................................36
ES.......................................................................................................................54
FR.......................................................................................................................72
CN 中文............................................................................................................90
Astera LED Technology GmbH
Schatzbogen 60
81829 Munich
Germany
www.astera-led.com

~
3
~
SCOPE OF DELIVERY
1 x PlutoFresnel (AF80)
1 x Fresnel Lens for PlutoFresnel (AF80-FL)
1 x Barndoor for PlutoFresnel (AF80-BD)
1 x Yoke for PlutoFresnel (AF80-YK)
2 x YokeBase for PlutoFresnel (AF80-YKB)
1 x TVMP Adapter (AX-TVMP)
1 x TrackHandle (AX-THD)
1 x Waterproof Protection Cover (PB15-PLG)
1 x User Manual
INTRODUCTION / INTENDED USE
The PlutoFresnel from ASTERA is a LED Fresnel for professional use in the event
and film industry. The PlutoFresnel is designed for direct or indirect illumination
of objects and people. Due to its built-in battery it can be quickly set up at places
where traditional lights cannot be mounted easily. It has the Titan LED Engine
and oers excellent color and light qualities. The PlutoFresnel generates white
or colored light and the color temperature can be adjusted in many ways. It can
be controlled with the AsteraApp or with wired DMX or wireless CRMX. It is also
possible to view and change settings via wireless RDM. The fixture can also be
controlled by the integrated display or by infrared remote control. Thanks to its
built-in Bluetooth it can be used as BluetoothBridge (BTB).
The PlutoFresnel can be used standing or hanging. For this purpose, the device is
equipped with AirlineTracks to attach the appropriate mounting accessories. The
PlutoFresnel can be used indoors and outdoors and has an IP55 rating.
Do not shake the device. Avoid brute force when installing or operating the
device. When choosing the installation spot, please make sure that the device is
not exposed to extreme heat or dust. Avoid direct sunlight for longer periods of
time. The specified ambient temperature must be maintained. Keep away from
direct insulation (particularly in cars) and heaters. Never use the device during
thunderstorms connected to the power mains. Over voltage could destroy the
device. Always disconnect the device during thunderstorms. Make sure that the
area below the installation place is blocked when rigging, derigging or servicing
the fixture. Always fix the fixture with an appropriate safety wire.
Operate the device only after having become familiarized with its functions. Please
consider that unauthorized modifications on the device are not allowed due to
safety reasons! If this device is operated in any way dierent from what is described
E

~
4
~
in this manual, the device may suer damages and the warranty may be void. The
disclaimer includes all damages, liability or injury resulting from failure to follow the
instructions in this manual. Furthermore, any other operation may lead to dangers
like short circuit, burns, electric shock, crash etc. This device is not for household
use and is not suitable for permanent installation.
SAFETY INFORMATION
Before you operate this unit read the manual carefully. Always make sure to
include the manual if you pass/rent/sell the unit to another user. Please use your
own caution when operating. This product is for professional use only. It is not for
household use.
• Do not operate the unit in areas of high temperature conditions or
under direct sunlight. It can cause abnormal behavior or damage the
product.
• Always use a suitable safety wire when mounting the light overhead.
• Connect the safety wire only to the intended safety mount.
• Always follow local safety requirements.
LI-ION Battery: A rechargeable lithium ion battery is built into this unit.
• Only authorized personal may service the battery.
• Do not place in fire or heat.
• Do not use or charge the light if it is damaged.
• Avoid bumping or plunging, it may cause fire or explosion.
• Never store the battery when fully drained. Always recharge
immediately when empty. Please do not charge unattended.
• Make sure to fully charge all units before storing them.
• Partially charged batteries will lose capacity.
• Fully recharge every 6 months if not used.
• The battery may only be replaced with an original spare part from
Astera.
• Follow applicable laws and regulations for transport, shipping,
and disposal of batteries. For details on recycling lithium, lithium-
phosphate, and lithium-ion batteries, please contact a government
recycling agency or your waste-disposal service.
• Always charge with flight case open.
• It is recommended to charge at a temperature between 15°C and
35°C.
Warning: In extreme cases, abuse or misuse of standard/rechargeable batteries
can lead to:

~
5
~
• Explosion
• Fire development
• Heat generation or smoke and gas development
• Do not look directly into the light.
• It can cause harm to your eyes.
• Do not look at the LEDs with a magnifying glass or any other optical
instrument that may concentrate the light output.
• Use only Astera approved accessories to diuse or modify the light
beam.
• Do not open the product housing.
• Do not apply power if the light is damaged.
• Do not submerge the light into any liquid.
• Do not replace the LED light source.
• Caution, risk of electric shock.
The PlutoFresnel shall be installed near a socket-outlet which must be
easily accessible.
Warning: risk of electric shock - Do not open device.
• The exterior surfaces of the light can become hot, up to 70°C (158°F)
during normal operation.
• Ensure that accidental physical contact with the device is impossible.
• Install only in ventilated locations.
• Do not cover the light.
• Allow all lights to cool before touching.
• Keep 0.3m (12") from objects to be illuminated.
SECONDARY SAFETY MOUNTING
The PlutoFresnel must always be secured by a
safety wire when used in a hanging position.
If the primary suspension fails, the device must not
fall more than 20cm.
CLEANING AND MAINTAINING
Caution: Liquids entering the housing of the device can cause a short
circuit and damage the electronics. Do not use any cleaning agents or
solvents. Only clean using a soft damp cloth.

~
6
~
PRODUCT OVERVIEW
Isometric view
Back view
USAGE
1. Integrated control panel
Use the menu buttons to navigate through the main menu. Settings for color
adjustment and brightness / runtime are directly accessible by two symbol buttons.
12 12
11 11
10 10
9 9
8 8
7 7
6 6
5 5
4 4
3 3
2 2
1 1
A
A
B
B
C
C
D
D
E
E
F
F
G
G
H
H
J
J
K
K
L
L
M
M
N
N
P
P
R
R
T
T
Tilt Lock
Barndoor
Zoom Knob
Multifunctional
Yoke
AirlineTrack
Fresnel Lens
Thread Adapter
BaseLock
Barndoor Lock
Control Panel with TouchSlider
Power / Data Input
Zoom Knob
Feet

~
7
~
Top navigation Inside main menu
On / O
MENU
Main menu Back to previous menu
Reset settings Scroll down
Change input select Scroll up
ENTER
Set DMX address Choose / Confirm
Color adjustment
Brightness and runtime control
TouchSlider
The PlutoFresnel has a touch slider. It is only active in certain menus and can also
be operated by tapping.
2. Switching On / O
A new PlutoFresnel needs a few seconds of charge to disable its shipping mode
before it can be switched on.
Press the power button for one second and release it to turn on
the PlutoFresnel. When you press the power button to turn on the
light, the display will not turn on until you release the button. To
turn o the light, press the power button once.
1x
3x 5x
1x 3x 5x
1x
3x 5x
1x 3x 5x
1x
3x 5x
1x 3x 5x
Active in these four menus:
+1
ENTER
-1
1s
3s 5s
ON
1x 3x 5x 6x 7x
OFF

~
8
~
3. Fan control
The PlutoFresnel has a built-in fan that can be controlled as follows. Navigate to
Fan Control menu. There you can choose between the following settings:
OFF: The fan always remains switched o. If the light becomes too hot, the
brightness is gradually reduced. (Ambient temperature dependent)
AUTO: The fan starts on demand and switches between the three speeds as
required. This is the default setting.
LOW:
MED:
HIGH:
Dierent speeds. The light never changes them by itself, but if the speed
is too low, the brightness is gradually reduced. (Ambient temperature
dependent)
4. More control options
On/O, Static Colors, Preprogrammed Eects
All settings, Complex eects, Talkback+, Updates
Control from DMX consoles via CRMX or Wireless DMX
Control from DMX consoles via Power/Data Combination Cable
DMX
RDM
Remote Device Management (RDM) wireless
5. Connect Bluetooth Bridge (BTB)
To control your lights with the AsteraApp,
first connect a Bluetooth Bridge (BTB). It
forwards the AsteraApp signal to paired
lights. You may use an AsteraBox as BTB
or choose a light with built-in BTB, like
PlutoFresnel, AX9, NYX Bulb, PixelBrick,
Titan Tube BTB, Helios Tube BTB.
Connect AsteraBox as BTB
Please power on the AsteraBox. Connect
the AsteraBox directly from the AsteraApp
main menu by following the instructions
there.

~
9
~
Connect light as BTB
Please note: This ONLY works for Astera lights with built-in Bluetooth.
Please power on the light. Hold down the
power button for 3 seconds until the light
flashes blue. In the AsteraApp press
„Manage Bluetooth Bridges“, then “+” and
follow instructions on screen to connect.
The light which is connected as BTB
shows a small Bluetooth icon in the
display.
6. Pair with lights
Once the AsteraApp is connected to a
BluetoothBridge, you can pair your lights with
the app:
Please power on the light(s). Then hold down
the power button for 3 seconds until the lights
flash blue. Go to “Pair with Lights” dialog in
the AsteraApp. Then press OK.
7. Linking to a CRMX transmitter
The PlutoFresnel can be controlled via Wireless DMX/ CRMX. To do this, it must
first be connected to a CRMX transmitter. There are two dierent methods to do
this: either the connection is established by pressing a button on the transmitter or
a linking key is set that matches the transmitter.
Linking via push button
1s
3s
5s
1. PlutoFresnel
1x
3x 5x 6x 7x
2. AsteraApp
Pluto 0001000
Tap to pair
1x
3x 5x 6x 7x
3. AsteraApp
Pluto 0001000
Pair with Lights
1x
3x 5x 6x 7x
2. AsteraApp
1s
3s
5s
1. PlutoFresnel
2.4 GHz
~
10
~
Linking via linking key
Alternatively, PlutoFresnel can also be connected to a CRMX transmitter using
a linking key, provided that the transmitter supports this linking option. To set a
linking key, navigate in the main menu to „DMX SETTINGS“. Under „CRMX LINK BY
KEY“ you can enter the desired eight-digit combination.
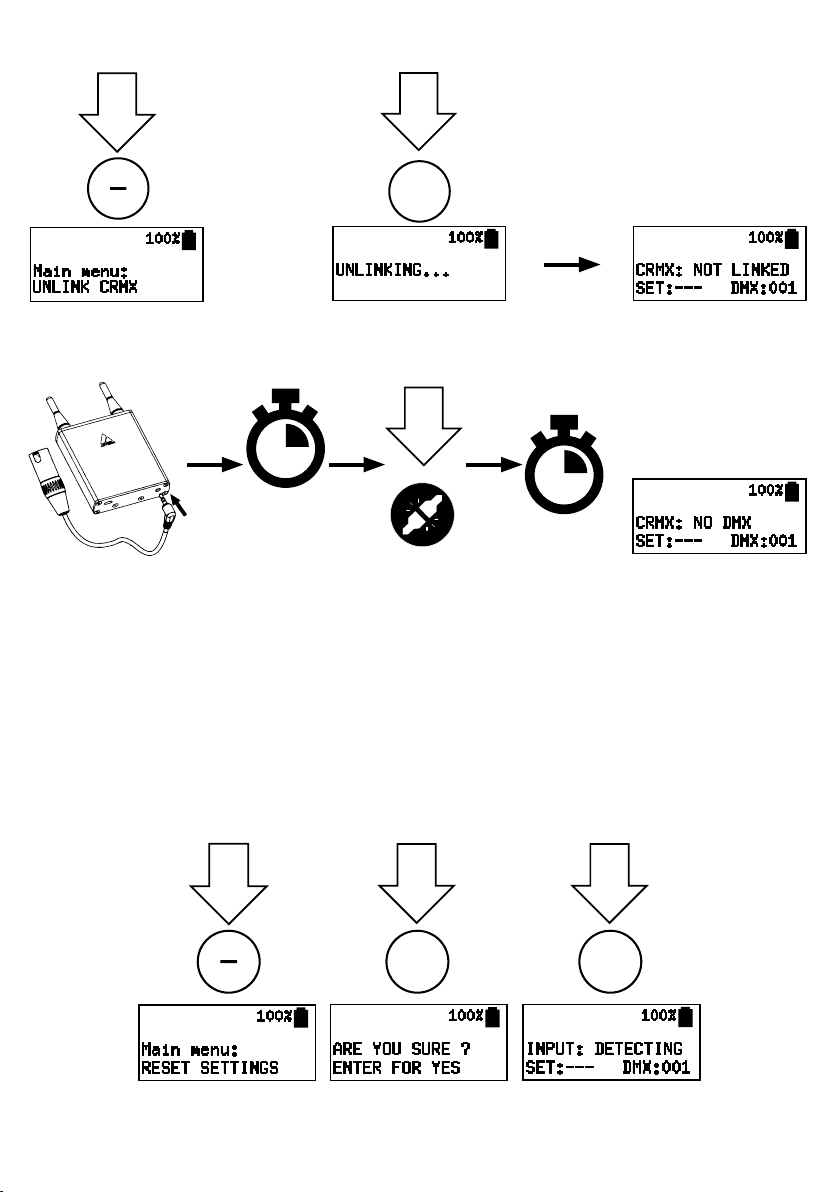
8. Reset
RESET sets „Input Select“ to „AUTO“ and runtime to 5h.
1x
3x 5x 6x 7x
1x
3x 5x
ENTER
1x
3x 5x
ENTER
1x 3x 5x
6x
7x
1. PlutoFresnel 3. PlutoFresnel
1x
3x 5x
ENTER
2. PlutoFresnel
5. PlutoFresnel4. AsteraBox
10 sec
1x
3x 5x
WAIT TILL
LINK
This manual suits for next models
1
Table of contents
Languages:
Other Astera Lighting Equipment manuals

Astera
Astera NYX BULB FP5-E27 User manual

Astera
Astera LEO FRESNEL User manual

Astera
Astera AX5 Triple PAR User manual

Astera
Astera Lightdrop AX3 User manual

Astera
Astera PixelBar AX2-50 User manual
Astera
Astera Lightdrop AX3 User manual

Astera
Astera ARC2 User manual

Astera
Astera Lightdrop AL3-series User manual
Popular Lighting Equipment manuals by other brands


Qazqa
Qazqa Suplux SL 3 Black 103062 instruction manual

Commercial Electric
Commercial Electric 54568141 Use and care guide

CREE LIGHTING
CREE LIGHTING 304 Series installation instructions

Goobay
Goobay 49867 user manual

ECOMAN ITALIA
ECOMAN ITALIA LED T8 instruction manual

Alkalite
Alkalite Krypton KT-81 user manual


