Asko OT86331BG User manual

INSTRUCTIONS FOR USE
OF A BUILT-IN OVEN
EN
OT86331BG

3Introduction ................................................
4Safety precautions .....................................
6Other important safety warnings ..............
7Appliance description ...............................
7Rating plate –product information ..............
8Control unit ...................................................
9Appliance equipment .................................
9Control lights ................................................
9Guides .........................................................
9Oven door switch .........................................
9Cooling fan ...................................................
10Oven equipment and accessories ...............
11Before first use ...........................................
12Switching on for the first time ..................
13Choosing the settings ...............................
13PROFESSIONAL MODE (pro bake) .............
19AUTOMATIC MODE (auto bake) .................
22
CHOOSING EXTRA FUNCTIONS (extra
bake) ............................................................
22Child lock .....................................................
24Starting the cooking process ...................
25
End of cooking and switching off the
oven .............................................................
26Choosing the general settings .................
28General tips and advice for baking ..........
29Cooking table .............................................
34Cooking with a temperature probe ..........
36
Recommended doneness levels for different
types of meat ...............................................
37Cleaning and maintenance .......................
38
Using the Aqua Clean program to clean the
oven .............................................................
39
Removing wire and fixed pull-out (extendible)
guides ..........................................................
40
Removing and replacing the oven door and
glass panes .................................................
42Replacing the bulb ......................................
43Troubleshooting table ...............................
43Special warnings and fault reporting ...........
44Disposal ......................................................
45Cooking test ...............................................
Contents

We thank you for your trust and the purchase of our appliance.
This detailed instruction manual is supplied to make the use of this product easier. The instructions
should allow you to learn about your new appliance as quickly as possible.
Make sure you have received an undamaged appliance. If you do find transport damage, please
contact the seller from which you purchased the appliance, or the regional warehouse from which
it was supplied. The telephone number can be found on the invoice or on the delivery note.
Instructions for installation and connection are supplied on a separate sheet.
The following symbols are used throughout the manual and they have the following meanings:
INFORMATION!
Information, advice, tip, or recommendation
WARNING!
Warning –general danger
It is important that you carefully read the instructions.
3
Introduction

IMPORTANT SAFETY PRECAUTIONS –CAREFULLY READ THE
INSTRUCTIONS AND SAVE THEM FOR FUTURE REFERENCE.
Appliance must be connected to fixed wiring which has incorporated
means of disconnection. Fixed wiring must be made in accordance
with the wiring rules.
Means for disconnection must be incorporated in the fixed wiring in
accordance with the wiring rules.
The appliance must not be installed behind a decorative door in
order to avoid overheating.
If the supply cord is damaged, it must be replaced by the
manufacturer, its service agent or similarly qualified persons in order
to avoid a hazard (only for appliances supplied with connection
cord).
During use the appliance becomes hot. Care should be taken to
avoid touching the heating elements inside the oven.
This appliance can be used by children aged 8 years and above,
and by persons with reduced physical, sensory or mental capabilities
or lack of experience and knowledge, if they have been given
supervision or instruction concerning the use of the appliance in a
safe way, and if they understand the hazards involved. Children shall
not play with the appliance. Cleaning and user maintenance shall
not be done by children without supervision.
WARNING: Accessible parts may become hot during use. Young
children should be kept away.
WARNING: The appliance and some of its accessible parts may
become very hot during use. Care should be taken to avoid touching
heating elements. Children less than 8 years of age shall be kept
away unless continuously supervised.
The appliance is not intended to be controlled by external timers or
separate remote controll system.
Only use the temperature probe recommended for use in this oven.
4
Safety precautions

Do not use harsh abrasive cleaners or sharp metal scrapers to clean
the oven door glass/ the glass of hinged lids of the hob (as
appropriate), since they can scratch the surface, which may result
in shattering of the glass.
Do not use steam cleaners or high-pressure cleaners to clean the
appliance as this may result in an electric shock.
WARNING: Before replacing the light bulb, make sure the appliance
has been disconnected from the mains power, in order to prevent
the hazard of an electric shock.
Never pour water directly on the bottom of the oven cavity.
Temperature differences could result in damage to the enamel
coating.
5
Safety precautions

The appliance is intended for household use. Do not use it for any other purpose, such as room
heating, drying of pets or other animals, paper, fabrics, herbs etc. As this may lead to injury or fire
hazard.
Appliance must be connected to fixed wiring which has incorporated means of disconnection. Fixed
wiring must be made in accordance with the wiring rules.
Do not lift the appliance by holding it by the door handle.
Oven door hinges may be damaged when under excessive load. Do not stand or sit on the open
oven door, and do not lean against it. Also, do not place any heavy objects onto the oven door.
If the power cords of other appliances placed near this appliance get entangled in the oven door,
they can be damaged, which in turn can result in a short circuit. Therefore, make sure the power
cords of other appliances are always at a safe distance.
Oven door become very hot during operation. A third glass is installed for extra protection, reducing
the temperature of the outside surface (only with some models).
Make sure the vents are never covered or obstructed in any other way.
Do not line the oven cavity with aluminium foil, and do not place any baking trays or other cookware
on the oven bottom. This would obstruct and reduce air circulation in the oven, slow down the baking
process, and destroy the enamel coating.
We recommend you avoid opening the oven door during baking, as this increases power consumption
and increases condensate accumulation.
At the end of the baking process, and during baking, be careful when opening the oven door, as
there is danger of scalding.
To prevent limescale accumulation, leave the oven door open after baking or using the oven, to
allow the oven cavity to cool down to room temperature.
Clean the oven when it has completely cooled down.
Eventual mismatches in colour shades between different appliances or components within a single
design line may occur due to various factors, such as different angles under which the appliances
are observed, different coloured backgrounds, materials, and room illumination.
Never pour water onto the oven cavity bottom. Temperature differences could result in damage to
the enamel coating.
Do not use the appliance if it is damaged. Call an authorized service centre.
WARNING!
Carefully read the instructions for use before connecting the appliance. Repair or any
warranty claim resulting from incorrect connection or use of the appliance shall not be
covered by the warranty.
6
Other important safety warnings

INFORMATION!
Appliance functions and equipment depend on the model.
Basic equipment of your appliance includes wire guides, shallow baking tray, and a wire rack.
5. Guides –cooking levels1. Control unit
6. Rating plate2. Door switch
7. Oven door3. Lighting
8. Door handle4. Temperature probe socket
Rating plate –product information
A rating plate with basic information about the appliance is attached to the edge of the oven.
5. Code/ID1. Serial number
6. QR code (depending on the model)2. Model
7. Technical information3. Type
8. Compliance indications/symbols4. Brand
7
Appliance description

Control unit
(depending on the model)
1. on I off key
2. (pro bake) professional mode key
3. (auto bake) automatic mode key
4. settings selection and confirmation knob
- rotate the knob to choose a setting
- press the knob to confirm the setting
5. (extra bake) key for extra functions and general appliance settings
6. (light) key for switching the oven lighting on and off
7. start I stop key for starting or pausing, and confirming settings
8. Display unit:
A. baking systems, step mode (STEP)
B. special baking systems, automatic programs, gratins
C. clock, timer functions, temperature probe, baking time
D. special programs, preheating
E. temperature, weight
INFORMATION!
For better key response, touch the keys with a large area of your fingertip. Each time you press
a key, this will be acknowledged by a short acoustic signal (if the function is available).
8
Appliance description

Control lights
Oven light: oven light is switched on when you open or close the oven door, when you switch on
the oven, at the end of the baking process, and when you touch the oven light key on the control
unit.
Guides
•The guides allow cooking or baking on 5 rack levels.
•The height levels of guides into which the racks can be inserted shall be counted from bottom
up.
•Guide levels 4 and 5 are intended for grilling/broiling.
•When inserting equipment, it should be correctly rotated.
•Always push the equipment all the way into the appliance.
Wire guides
In case of wire guides, always insert the wire
rack and the baking tray into the slot between
the upper and lower part of each guide level.
Oven door switch
(depending on the model)
If the oven door is opened during oven operation, the switch turns off the heater and fan in the oven
cavity. When the door is closed, the switch turns the appliance operation back on.
WARNING!
Using the oven with the door open and the door switch engaged (closed) is not allowed.
The oven will signal an error, and it will have to be reset.
Cooling fan
The appliance is fitted with a cooling fan that cools the housing, the door, and the appliance control
unit. After the oven is switched off, the cooling fan continues to operate for a short while in order to
cool down the oven.
9
Appliance equipment
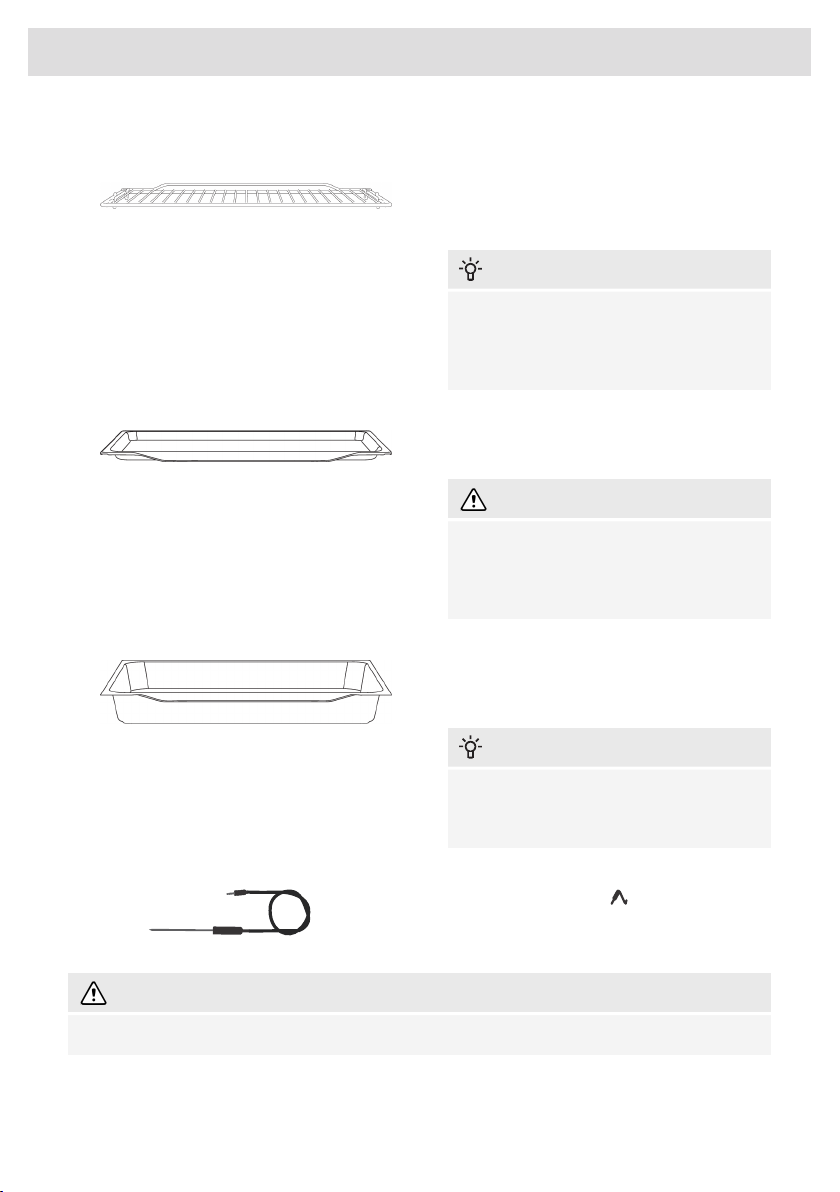
Oven equipment and accessories
(depending on the model)
The WIRE RACK is used for grilling/broiling
or as support for a pan, baking tray or baking
dish with the food you are baking.
INFORMATION!
There is a safety latch on the wire rack.
Therefore, the wire rack has to be lifted
slightly at the front when pulling it out from
the oven.
SHALLOW BAKING TRAY is used for flat and
small pastry. It can also be used as a drip tray.
WARNING!
The shallow baking tray may deform as
it heats up in the oven. Once it cools
down, it returns to the initial shape. Such
deformation does not affect its function.
The ALL-AROUND DEEP BAKING TRAY is
used for roasting vegetables and baking moist
pastry. It can also be used as a drip tray.
INFORMATION!
Never insert the all-purpose (or universal)
deep baking tray into the first guide during
baking.
Temperature PROBE ( BAKESENSOR).
WARNING!
The appliance and some of the accessible parts tend to heat up during cooking.
10
Appliance equipment
Table of contents
Other Asko Oven manuals


