Asda JC605-120 User manual

IMPORTANT: RETAIN FOR FUTURE REFERENCE
JC605-120 Vacuum Cleaner
User Guide

WARNINGS:
• Read these instructions thoroughly before using the
vacuum cleaner.
• This appliance can be used by children aged from 8 years
and above and persons with reduced physical, sensory or
mental capabilities or lack of experience and knowledge if
they have been given supervision or instruction concerning
use of the appliance in a safe way and understand the
hazards involved. Children shall not play with the appliance.
Cleaning and user maintenance shall not be made by
children unless they are older than 8 and supervised.
• To protect against electric shocks, do not put the mains
cord, plug or motor housing in water or any liquid. Never
operate the vacuum cleaner with wet hands.
• If the supply cord is damaged, it must be replaced by the
manufacturer,itsserviceagentorsimilarlyqualiedperson
in order to avoid hazard.
• Only use spare parts and accessories recommended by the
manufacturer.
• This cleaner is intended for household use only. Do not use
the cleaner for purposes other than its intended use.
• Never use this cleaner outdoors. This cleaner is only
intended for internal use.
• Do not use this vacuum to pick up water or any other
liquids.
• Do not use this vacuum to pick up any combustible
substances or hot / burning objects.
• This cleaner should not be used by children. Ensure that
children do not play with the cleaner.
• Only ever use the cleaner when it is fully assembled.
2

3
• Before storing the cleaner, ensure that the power button is
switched off, the plug has been removed from the mains
socket and the cable retracted.
• Always ensure the cleaner is switched off at the mains
before you change any of the accessories or perform any
maintenance on the cleaner.
• Neverplaceyourngersorotherobjectsintoanypartofthe
cleaner. Be aware that loose clothing or hair may become
trapped in the cleaner if improperly used.
• Never leave the cleaner unattended when switched on.
• Before use ensure that all of the air vents of the cleaner are
clearandthereisnorestrictionofairow.
• When in use, ensure the power cord does not become
trapped, pulled over or is left in close proximity to a strong
heat source. Do not run over or pull the power cord around
sharp edges.
• When cleaning stairs, ensure the cleaner is on the step
below you. NEVER place the cleaner above.
• Keep the appliance and its cord out of reach of children less
than 8 years.
• Caution: Exhaust air discharged from the rear of the
cleanermayextinguishagasre,pilotlightordisturbashes
inanopenre.Alwaysavoiddirectingthecleanertowards
nakedames.
• Important: This cleaner has a thermal safety device which
automatically cuts off the power supply in case of over
heating. If the safety device has switched the cleaner off,
unplug from the mains and allow the cleaner to cool down.
Once the cleaner has completely cooled down, plug it back
into the mains supply and switch on.

4
You should have
Vacuum cleaner, hose, extension
tubes, cleaner head & crevice tool.
How to...recognise the parts of the vacuum cleaner
Handle
Hose insert
Opening button
Rearlter
Dust container
Power cord
Hose
Air regulator
Crevice tool
Power
switch
Extension tubes
Cleaning head
Cable retrieval
switch
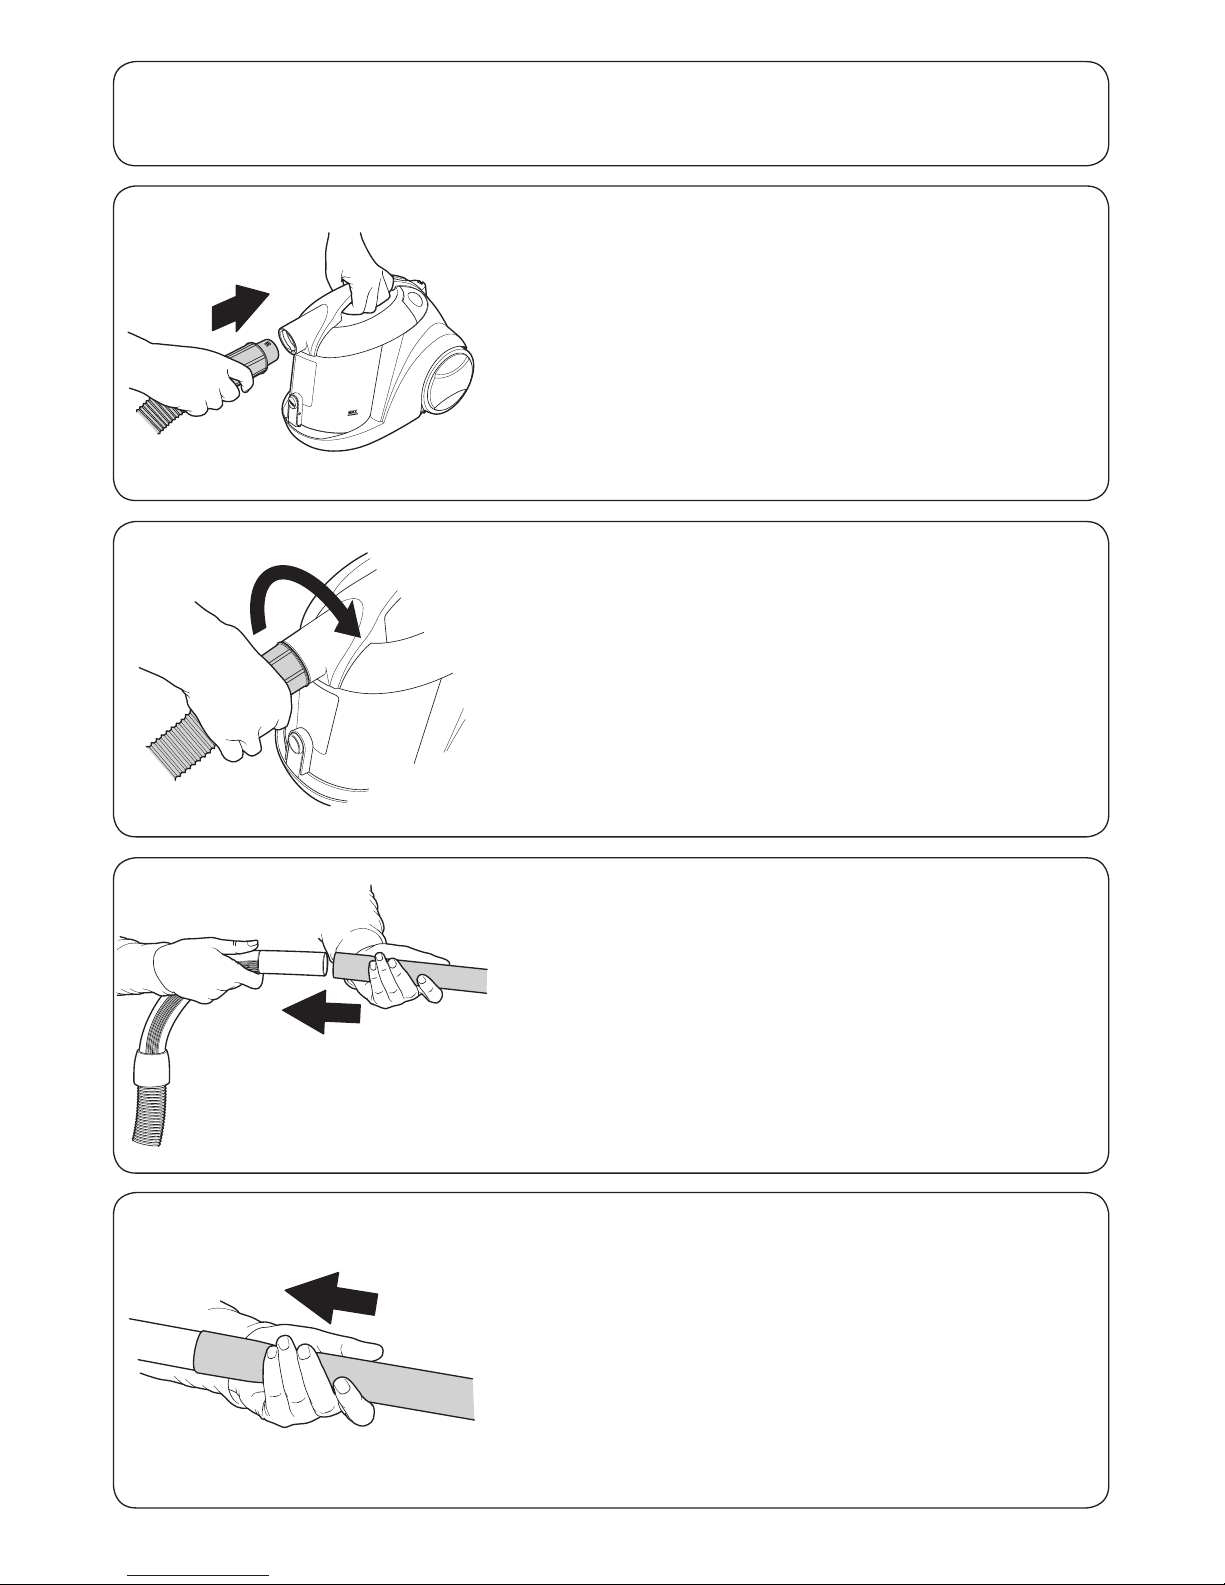
1. Insert the end of the hose into the front of the
vacuum cleaner.
2. Twist the hose clockwise to lock it into place.
3. Slot the wide end of one of the extension
tubes onto the other end of the hose.
4. Slot the wide end of the remaining extension
tubeontotheendofthettedextensiontube.
How to... assemble the cleaner
5

6
5. Slot the cleaning head onto the end of the
extension tube.
7. The cleaner head can be used in two modes:
Brushes down: This is for carpeted and
laminatedtypeoors.
Brushes up: This is for use on hard and
linotypeoors.
6. Removing hose: Twist the end of the hose
anti-clockwise (1), then pull the hose out of
the front of the vacuum cleaner (2).
8. To change the mode, check if the cleaning
head is in the mode you require. If it is not,
push the vertical tab on the top of the
cleaning head downwards.
How to... use the cleaning head
IMPORTANT: The brushes on the cleaning head may mark the surface of a
smoothoor.Specialcareshouldbetakenonsmoothoors.Specialcareshould
betakenwhenusingthecleanernearoronlaminatedoors.Makesurethe
brushes are upbeforeusetoavoidscratchesordamagingtheoor.

7
How to... use the crevice tool
How to... adjust the suction power of the cleaner
9. The crevice tool is for narrow gaps and hard
to get at places.
To attach the crevice tool, pull the cleaner
head off the end of the extension tube.
Slot the crevice tool onto the end of the
extension tube.
10.Thecrevicetoolhasabrushttedtotheend
for more delicate surfaces.
To use the brush, rotate the end of the crevice
tool clockwise.
OPEN
CLOSED 11. The air regulator is found at the top of the
handle of the hose.
To reduce the suction power push the air
regulator to the open position (as shown).
To increase the suction power push air
regulator to the closed position.

8
How to... use the cleaner
13. Push the plug into the socket and turn the
power on (if applicable).
14. Push the power switch on the side of the
cleaner down to switch on
To turn the cleaner off, push the power switch
down again.
15. Switch the power off at the socket (if
applicable) and pull the plug out.
Press the cable retrieval button on the side
of the cleaner down and hold until all of the
cable has been retrieved.
12. Pull the power cord out of the back of the
cleaner.

9
How to... empty the dust container
16. Press the release button on the top of the
vacuum cleaner inwards..
17. Lift the top section of the vacuum cleaner
upwards of the bottom section.
18. Whilst holding the dust container over a bin
or contained in a bin bag.
Push the button on the bottom of the dust
container inwards (1) to open the bottom
section of the dust container (2).
19.Removethelterbytwistingthebottomofit
anti-clockwise.Theltercannowberemoved
and the dust container emptied.
IMPORTANT: Be aware emptying the dust container may create a dust cloud.
You may wish to empty the dust container outdoors.

10
How to... retthedustcontainer
20.Slotthelterbackintothedustcontainerand
twist clockwise to lock in place.
21. Push the bottom of the dust container
upwards until it locks in place
22. Slot the vacuum cleaners top section back
onto the bottom section.
Push the top section down until it locks into
place.
23. Your vacuum cleaner is now ready for use.
Table of contents


