
Aroma Professional ARC-2000ASB User manual

Professional™
Questions or concerns about your
rice cooker?
Before returning to the store...
Aroma’s customer service experts are happy
to help. Call us toll-free at 1-800-276-6286.
Answers to many common questions and
even replacement parts can be found online.
Visit www.AromaCo.com/Support.
Instruction Manual
Rice Cooker Food Steamer Slow Cooker
ARC-2000ASB

With the Aroma® Professional™ Rice Cooker/Food Steamer/Slow Cooker you’ll be making fantastic, restaurant-quality rice at the touch of a button! This machine
is specially calibrated to cook all varieties of rice, including tough-to-cook brown rice, to uffy perfection. There’s no stirring or monitoring, just delicious rice made
automatically!
In addition to restaurant-quality rice, your new Aroma® Professional™ Rice Cooker is ideal for cooking complete, healthy meals. The convenient steam tray inserts directly
over the rice, allowing you to cook meats and vegetables at the same time, in the same pot. Steaming food locks in natural avors and nutrients that are often lost with
other methods of cooking. And with the Smart Steam feature, steaming favorite meats and vegetables has never been easier. Program the number of minutes needed to
steam and the Smart Steam feature does the rest.
The advanced Slow Cook feature includes both a High and Low setting to transform your rice cooker into a programmable 3-quart slow cooker! It sets from 2 to 10 hours
to easily prepare all of your family’s slow-cooked favorites. And once the cooking time has passed, the rice cooker will automatically go into Keep-Warm, so there’s no
need to worry about an over-cooked meal.
Your new rice cooker is also great for making soups, stews, stocks, oatmeal, gumbos, jambalaya, breakfast frittatas, dips and even desserts! See page 26 for information
on your free Cook’n Recipe Browser.
This manual contains helpful measurement charts for cooking rice and steaming. For more information on your Aroma® Professional™ Rice Cooker/Food Steamer/Slow
Cooker, or for more recipes, replacement parts, product service and other home appliance solutions, please visit us online at www.AromaCo.com.
Published By:
Aroma Housewares Co.
6469 Flanders Drive
San Diego, CA 92121
U.S.A.
1-800-276-6286
www.AromaCo.com
©2014 Aroma Housewares Company
All rights reserved.
See what’s cooking with Aroma online!
www.AromaTestKitchen.com AromaHousewares AromaHousewares AromaHousewares AromaHousewares

1. Important: Read all instructions carefully before rst use.
2. Do not touch hot surfaces. Use the handles or knobs.
3. Use only on a level, dry and heat-resistant surface.
4. To protect against re, electric shock and injury to persons, do not immerse
cord, plug or the appliance in water or any other liquid. See instructions for
cleaning.
5. Close supervision is necessary when the appliance is used by or near children.
6. Unplug from outlet when not in use and before cleaning. Allow unit to cool
before putting on or taking off parts and before cleaning the appliance.
7. Do not operate any appliance with a damaged cord or plug or after the
appliance malfunctions or has been damaged in any manner. Contact Aroma®
customer service for examination, repair or adjustment.
8. The use of accessory attachments not recommended by Aroma® Housewares
may result in re, electrical shock or injury.
9. Do not use outdoors.
10. Do not let cord touch hot surfaces or hang over the edge of a counter or table.
11. Do not place on or near a hot gas or electric burner or in a heated oven.
12. Do not use the appliance for other than its intended use.
Basic safety precautions should always be followed when using electrical appliances, including the following:
13. Extreme caution must be used when moving the appliance containing rice, hot oil
or other hot liquids.
14. Do not touch, cover or obstruct the steam vent on the top of the rice cooker as it
is extremely hot and may cause scalding.
15. Use only with a 120V AC power outlet.
16. Always unplug from the base of the wall outlet. Never pull on the cord.
17. The rice cooker should be operated on a separate electrical circuit from other
operating appliances. If the electrical circuit is overloaded with other appliances,
the appliance may not operate properly.
18. Always make sure the outside of the inner cooking pot is dry prior to use. If the
inner pot is returned to the cooker when wet, it may damage or cause the product
to malfunction.
19. Use extreme caution when opening the lid during or after cooking. Hot steam will
escape and may cause burns.
20. Rice should not be left in the inner pot with the Keep-Warm function on for more
than 12 hours.
21. To prevent damage or deformation, do not use the inner pot on a stovetop or
burner.
22. To disconnect, turn any control to OFF, then remove the plug from the wall outlet.
23. To reduce the risk of electrical shock, cook only in the removable inner cooking pot
provided.
SAVE THESE INSTRUCTIONS
IMPORTANT SAFEGUARDS
1

THIS APPLIANCE IS FOR HOUSEHOLD USE ONLY.
1. A short power-supply cord is provided to reduce the risks resulting from becoming entangled
in or tripping over a longer cord.
2. Longer extension cords are available and may be used if care is exercised in their use.
3. If a longer extension cord is used:
a. The marked electrical rating of the extension cord should be at least as great as the
electrical rating of the appliance.
b. The longer cord should be arranged so that it will not drape over the counter top or
tabletop where it can be pulled by children or tripped over unintentionally.
Short Cord Instructions
IMPORTANT SAFEGUARDS
Keep
Warm Keep
Warm
2
Polarized Plug
DO NOT DRAPE CORD!
KEEP AWAY
FROM CHILDREN!
This appliance has a polarized plug (one blade is wider than the other); follow the instructions below:
To reduce the risk of electric shock, this plug is intended to t into a polarized outlet only one way. If the plug does not t fully into the outlet, reverse the plug.
If it still does not t, contact a qualied electrician. Do not attempt to modify the plug in any way.
If the supply cord is damaged, it must be replaced by the manufacturer, its service agent or a similarly qualied person in order to avoid a hazard.
High
Low
Keep
Warm
Keep
Warm Keep
Warm
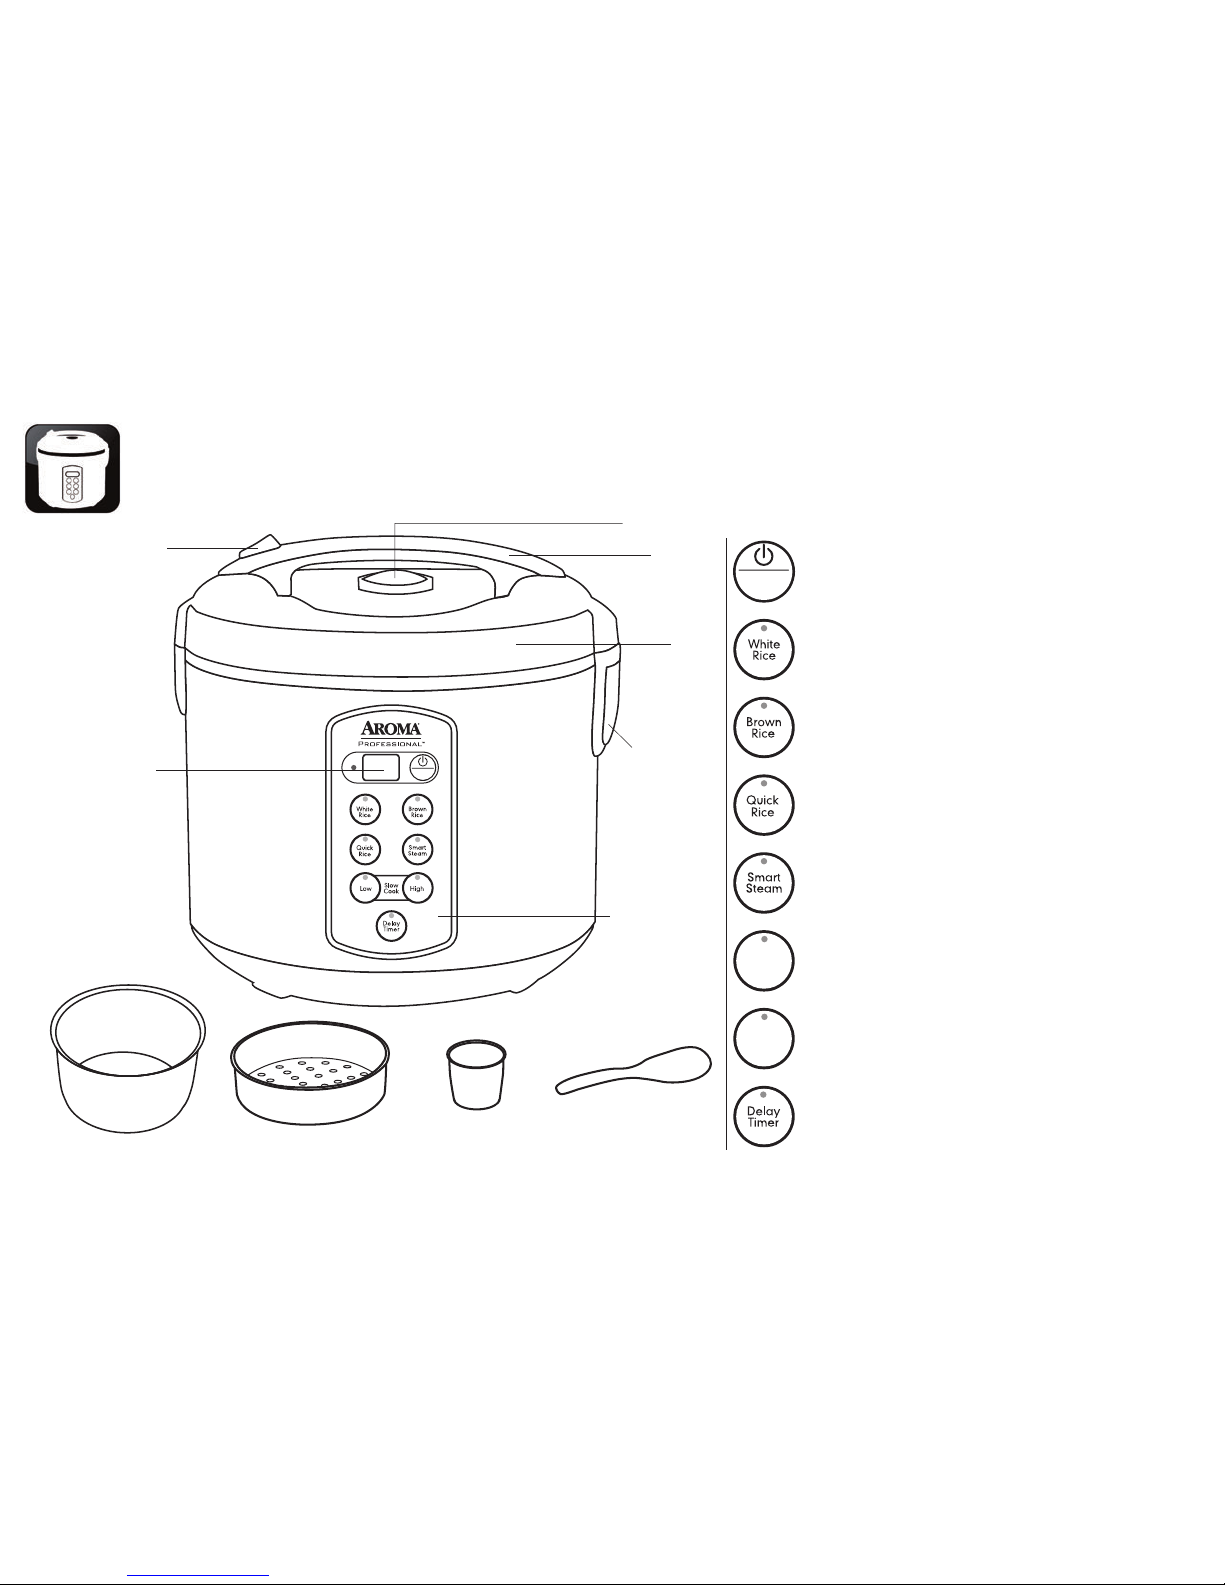
Inner Cooking Pot Steam Tray
Measuring Cup Serving Spatula
Steam Vent
Lid
Condensation
Collector
Lid Release
Button
Digital Display
Handle
Control Panel
PARTS IDENTIFICATION
3
Digital Controls
WHITE RICE
The WHITE RICE button cooks restaurant-quality rice
automatically.
BROWN RICE
The BROWN RICE button is ideal for cooking brown rice and
other tough-to-cook whole grains to perfection.
SMART STEAM
The SMART STEAM button is perfect for healthy sides and
main courses. Set the time food needs to steam, it will begin
to countdown once water reaches a boil and shut off once
time has elapsed.
LOW SLOW COOK
The LOW slow cook button sets to slow cook from 6 to 10
hours and reaches about 200°F.
HIGH SLOW COOK
The HIGH slow cook button sets to slow cook from 2 to 5
hours and reaches about 210°F.
QUICK RICE
The QUICK RICE button is a great time-saving option for rice in
a pinch. This setting foregoes the rice cooker’s Sensor Logic™
for faster cooking times, although cooked rice will not be to the
same quality of the White Rice and Brown Rice functions.
DELAY TIMER
The DELAY TIMER sets up to 15 hours for rice ready when it’s
needed. Add rice and water in the morning and set the timer
for mealtime at night.
POWER/KEEP WARM BUTTON
The POWER/KEEP-WARM button serves two purposes.
One press of the POWER/KEEP-WARM button will turn the
rice cooker on. A second press will set the rice cooker to its
Keep-Warm setting.

4
BEFORE FIRST USE
1. Read all instructions and important safeguards.
2. Remove all packaging materials and check that all items have been received in good condition.
3. Tear up all plastic bags as they can pose a risk to children.
4. Wash steam vent and all other accessories in warm, soapy water. Rinse and dry thoroughly.
5. Remove the inner cooking pot from rice cooker and clean with warm, soapy water. Rinse and dry thoroughly before returning to cooker.
6. Wipe body clean with a damp cloth.
NOTE
• Do not use abrasive cleaners or scouring pads.
• Do not immerse the rice cooker base, cord or plug in water at any time.
The provided rice cooker
cup is the equivalent to
a ¾ standard US cup.
3/4
US cups

5
HELPFUL
HINTS
Keep
Warm Keep
Warm
41 32
TO COOK RICE
NOTE
Using the provided measuring cup,
add rice to the inner cooking pot.
Place the inner cooking pot into the
rice cooker.
Fill with water to the line which
matches the number of cups of
rice being cooked. For example, if
cooking two cups of uncooked rice,
water should be lled to line 2 in the
inner pot.
Rinse rice to remove excess starch.
Drain.
• If you misplace the measuring cup, a ¾ standard US cup is an exact
replacement.
• To add more avor to rice, try substituting a favorite meat/vegetable
broth or stock. The ratio of broth/stock to rice will be the same as water
to rice.
• For approximate rice cooking times and suggested rice/water ratios, see
the “Rice/Water Measurement Table” on page 8.
• Before placing the inner cooking pot into the rice
cooker, check that the cooking pot is dry and free of
debris. Adding the inner cooking pot when wet may
damage the rice cooker.

6
NOTE
• Brown rice requires a longer cooking cycle than white rice due to
the extra bran layers on the grain. If it appears the rice cooker is
not immediately cooking this is due to the a low-heat soak cycle
that precedes cooking to produce ufer grains. The enhanced
Sensor Logic™ of this rice cooker will cook brown rice up to 25%
faster than other rice cookers.
TO COOK RICE (CONT.)
Plug the rice cooker into an available
outlet.
Keep
Warm Keep
Warm
7
Keep
Warm Keep
Warm
8
Keep
Warm Keep
Warm
6
Keep
Warm Keep
Warm
5
Press the POWER/KEEP-WARM
button to turn on the rice cooker.
Press the WHITE RICE or BROWN
RICE button, depending upon the
type of rice being cooked.
Close the lid securely.
• Short on time? Use the Quick Rice function. See more details on
this time-saving option on page 9.
• Want perfect brown rice without the wait? Use the Delay Timer.
Simply add rice and water in the morning and set the Delay Timer
to the number of hours when rice will be needed. See “To Use
Delay Timer” on page 10 for instructions.
HELPFUL
HINTS

7
TO COOK RICE (CONT.)
Keep
Warm Keep
Warm
9
The rice cooker will begin cooking.
The digital display will show a
“chasing” pattern.
Keep
Warm Keep
Warm
Keep
Warm Keep
Warm
1211
Keep
Warm Keep
Warm
10
For best results, stir the rice with
the serving spatula to distribute any
remaining moisture.
When nished serving rice, turn
the rice cooker off by pressing the
POWER/KEEP-WARM button and
unplug the power cord.
Once rice is nished, the rice cooker
will beep and automatically switch to
Keep-Warm. The digital display will
show the number of hours the rice
cooker has been on Keep-Warm,
beginning with “0.”
• Rice should not be left in the rice cooker on Keep-Warm for more than 12 hours.
NOTE

8
RICE/WATER MEASUREMENT TABLE
HELPFUL
HINTS
• Rinse rice before placing it into the inner pot to remove excess bran and starch. This will help reduce browning and sticking to the bottom of the pot.
• Want perfect brown rice without the wait? Use the Delay Timer. Simply add rice and water in the morning and set the Delay Timer to the number of
hours when rice will be needed. See “To Use Delay Timer” on page 10 for instructions.
• This chart is only a general measuring guide. As there are many different kinds of rice available (see “About Rice” on page 24), rice/water
measurements may vary.
UNCOOKED RICE RICE WATER LINE INSIDE POT APPROX. COOKED RICE YIELD COOKING TIMES
2 Rice Cooker Cups* Line 2 4 Rice Cooker Cups* WHITE RICE: 30-35 Min.
BROWN RICE: 65-70 Min.
3 Rice Cooker Cups* Line 3 6 Rice Cooker Cups* WHITE RICE: 33-38 Min.
BROWN RICE: 75-80 Min.
4 Rice Cooker Cups* Line 4 8 Rice Cooker Cups* WHITE RICE: 38-43 Min.
BROWN RICE: 80-85 Min.
5 Rice Cooker Cups* Line 5 10 Rice Cooker Cups* WHITE RICE: 40-45 Min.
BROWN RICE: 85-90 Min.
6 Rice Cooker Cups* Line 6 12 Rice Cooker Cups* WHITE RICE: 43-48 Min.
BROWN RICE: 88-93 Min.
7 Rice Cooker Cups* Line 7 14 Rice Cooker Cups* WHITE RICE: 45-50 Min.
BROWN RICE: 90-95 Min.
8 Rice Cooker Cups* Line 8 16 Rice Cooker Cups* WHITE RICE: 47-52 Min.
BROWN RICE: 92-97 Min.
9 Rice Cooker Cups* Line 9 18 Rice Cooker Cups* WHITE RICE: 48-53 Min.
BROWN RICE: 95-100 Min.
10 Rice Cooker Cups* Line 10 20 Rice Cooker Cups* WHITE RICE: 50-55 Min.
BROWN RICE: 100-105 Min.
* Cups referrenced are with the included measuring cup. The measuring cup included adheres to rice cooker industry standards and is not equal to a standard
U.S. measuring cup. The included measuring cup is equal to a standard ¾ US cup.
*1 Rice Cooker Cup = ¾ US Cups
Table of contents
Other Aroma Rice Cooker manuals

Aroma
Aroma ARC-150SB User manual

Aroma
Aroma ARC-1616 User manual

Aroma
Aroma gourmet ARC-790SD-1NG User manual

Aroma
Aroma ARC-820SW Use and care manual

Aroma
Aroma ARC-730G User manual

Aroma
Aroma Sensor Logic User manual

Aroma
Aroma ARC-900SB User manual

Aroma
Aroma ARC-560 User manual

Aroma
Aroma ARC-851 Use and care manual

Aroma
Aroma ARC-7578G User manual

Aroma
Aroma ARC-860NGP User manual

Aroma
Aroma MRC-903D User manual

Aroma
Aroma Got Rice? GRC-003 User manual

Aroma
Aroma ARC-753SG User manual

Aroma
Aroma ARC-900SB User manual

Aroma
Aroma ARC-930SB User manual

Aroma
Aroma ARC-980SB User manual

Aroma
Aroma ARC-727-1NG User manual

Aroma
Aroma ARC-703-G User manual

Aroma
Aroma ARC-830 TC User manual


