Armadillo ARSR4X4B User manual

SKYRACK : CONVERTIBLE
(2FT X 8FT / 4FT X 4FT)
ARSR4X4B
SCAN FOR ANIMATED
3D INSTRUCTIONS
ESCANEAR PARA
OBTENER
INSTRUCCIONES
ANIMADAS EN 3D
SCANNER POUR
VOIR LES
INSTRUCTIONS
ANIMÉES EN 3D
Assembly Instrucons /
Instrucons de montage /
Instrucciones de armado
Configuraon I
Configuraon I
Configuración I
Configuraon II
Configuraon II
Configuración II

2
www.armadillotough.comToll-Free: 888.549.1029 ( 9 AM-5 PM EST, MON-FRI )Email: [email protected]
Please read all instrucons carefully before assembling this product.
For your safety, it’s recommended for two adults to unpack and set up the product.
The unit should be placed standing on a level surface.
Do not use the unit for anything other than the manufacturer’s intended purpose.
It is recommended to be posioned 72.04 in - 96.06 in / 183 cm-244 cm above the floor to accommodate
standard garage door opening height(s).
Units must be installed into structurally sound overhead joists or supports. ARMADILLO TOUGH LLC, makes
no claim to the capacity or strength of the structure to which the units are mounted.
Rack Safety / Sécurité des racks / Seguridad del estante
Veuillez lire aenvement toutes les instrucons avant d'assembler ce produit.
Pour votre sécurité, il est recommandé que deux adultes déballent et installent le produit.
L'appareil doit être placé debout sur une surface plane.
N'ulisez pas l'appareil à d'autres fins que celles prévues par le fabricant.
Il est recommandé de le placer entre 72,04 po et 96,06 po / 183 cm et 244 cm au-dessus du sol pour s'adapt-
er à la ou aux hauteurs d'ouverture de porte de garage standard.
Les unités doivent être installées dans des solives ou des supports supérieurs structurellement solides.
ARMADILLO TOUGH LLC, ne revendique aucunement la capacité ou la résistance de la structure sur laquelle
les unités sont montées.
Use & Care / Ulisaon et entreen / Uso y cuidado
Use a so clean cloth that will not scratch the surface when dusng.
Using solvents of any kind on your product may damage the finish.
Do not use any harsh abrasives or chemicals to clean any metal surfaces as it may damage the protecve
coang.
Metal will rust if the finish is scratched or if your product is exposed to excessive humidity, parcularly in salt
water locaons.
Not recommended for outdoor use.
Ulisez un chiffon doux et propre qui ne rayera pas la surface lors du dépoussiérage.
L'ulisaon de solvants de tout type sur votre produit peut endommager la finion.
N'ulisez pas de produits abrasifs ou chimiques puissants pour neoyer les surfaces métalliques, car cela
pourrait endommager le revêtement de protecon.
Le métal peut rouiller si le revêtement de protecon est rayé ou si le produit est exposé à une humidité
excessive, notamment dans des zones où l'eau est salée.
Non recommandé pour une ulisaon en extérieur.
Lea atentamente todas las instrucciones antes de montar este producto.
Para su seguridad, se recomienda que dos adultos desempaquen e instalen el producto.
La unidad debe colocarse de pie sobre una superficie nivelada.
No ulice la unidad para nada que no sea el propósito previsto por el fabricante.
Se recomienda colocarlo a 72,04 in - 96,06 in / 183 cm-244 cm por encima del piso para adaptarse a las
alturas estándar de apertura de la puerta del garaje.
Las unidades deben instalarse en vigas o soportes elevados estructuralmente sólidos. ARMADILLO TOUGH
LLC no se hace responsable de la capacidad o resistencia de la estructura en la que se montan las unidades.
3
Ulice un paño suave y limpio que no raye la superficie al quitar el polvo.
El uso de solventes de cualquier po en su producto puede dañar el acabado.
No ulizar abrasivos ni productos químicos agresivos para limpiar las superficies metálicas, ya que podría
dañar el revesmiento protector.
El metal se oxida si el acabado se raya o si el producto está expuesto a una humedad excesiva, como en
lugares con agua salada.
No recomendado para uso al aire libre.
Use & Care / Ulisaon et entreen / Uso y cuidado
Remove all parts and hardware from the box. Place all items on a carpeted or scratch-free work surface, as
this will avoid damaging parts during assembly. The shipping box can provide an ideal work surface if none is
available.
Use the components list below to idenfy, inventory, and separate each of the components included.
To avoid accidentally discarding small components, do not dispose of any packaging or contents of the
shipping carton unl assembly is complete.
Rerez toutes les pièces et le matériel de la boîte. Placez tous les arcles sur une surface de travail recou-
verte de moquee ou sans rayures, car cela évitera d'endommager les pièces lors de l'assemblage. La boîte
d'expédion peut fournir une surface de travail idéale si aucune n'est disponible.
Ulisez la liste des composants ci-dessous pour idenfier, inventorier et séparer chacun des composants
inclus.
Pour éviter de jeter accidentellement de pets composants, ne jetez aucun emballage ou contenu du carton
d'expédion tant que l'assemblage n'est pas terminé.
Before Assembly / Avant l'assemblage / Antes del armado
Rere todas las partes y piezas de la caja. Coloque todas las piezas en una superficie con alfombra o acolcho-
nada, para evitar dañar las partes durante el armado. La caja del empaque puede ser una superficie ideal de
trabajo si no cuenta con una.
Use los componentes de la siguiente lista para idenficar, hacer el inventario y separar cada uno de los
componentes incluidos.
Para evitar desechar por accidente los componentes pequeños, no se deshaga del embalaje ni de los conteni-
dos del empaque de cartón hasta terminar el armado.
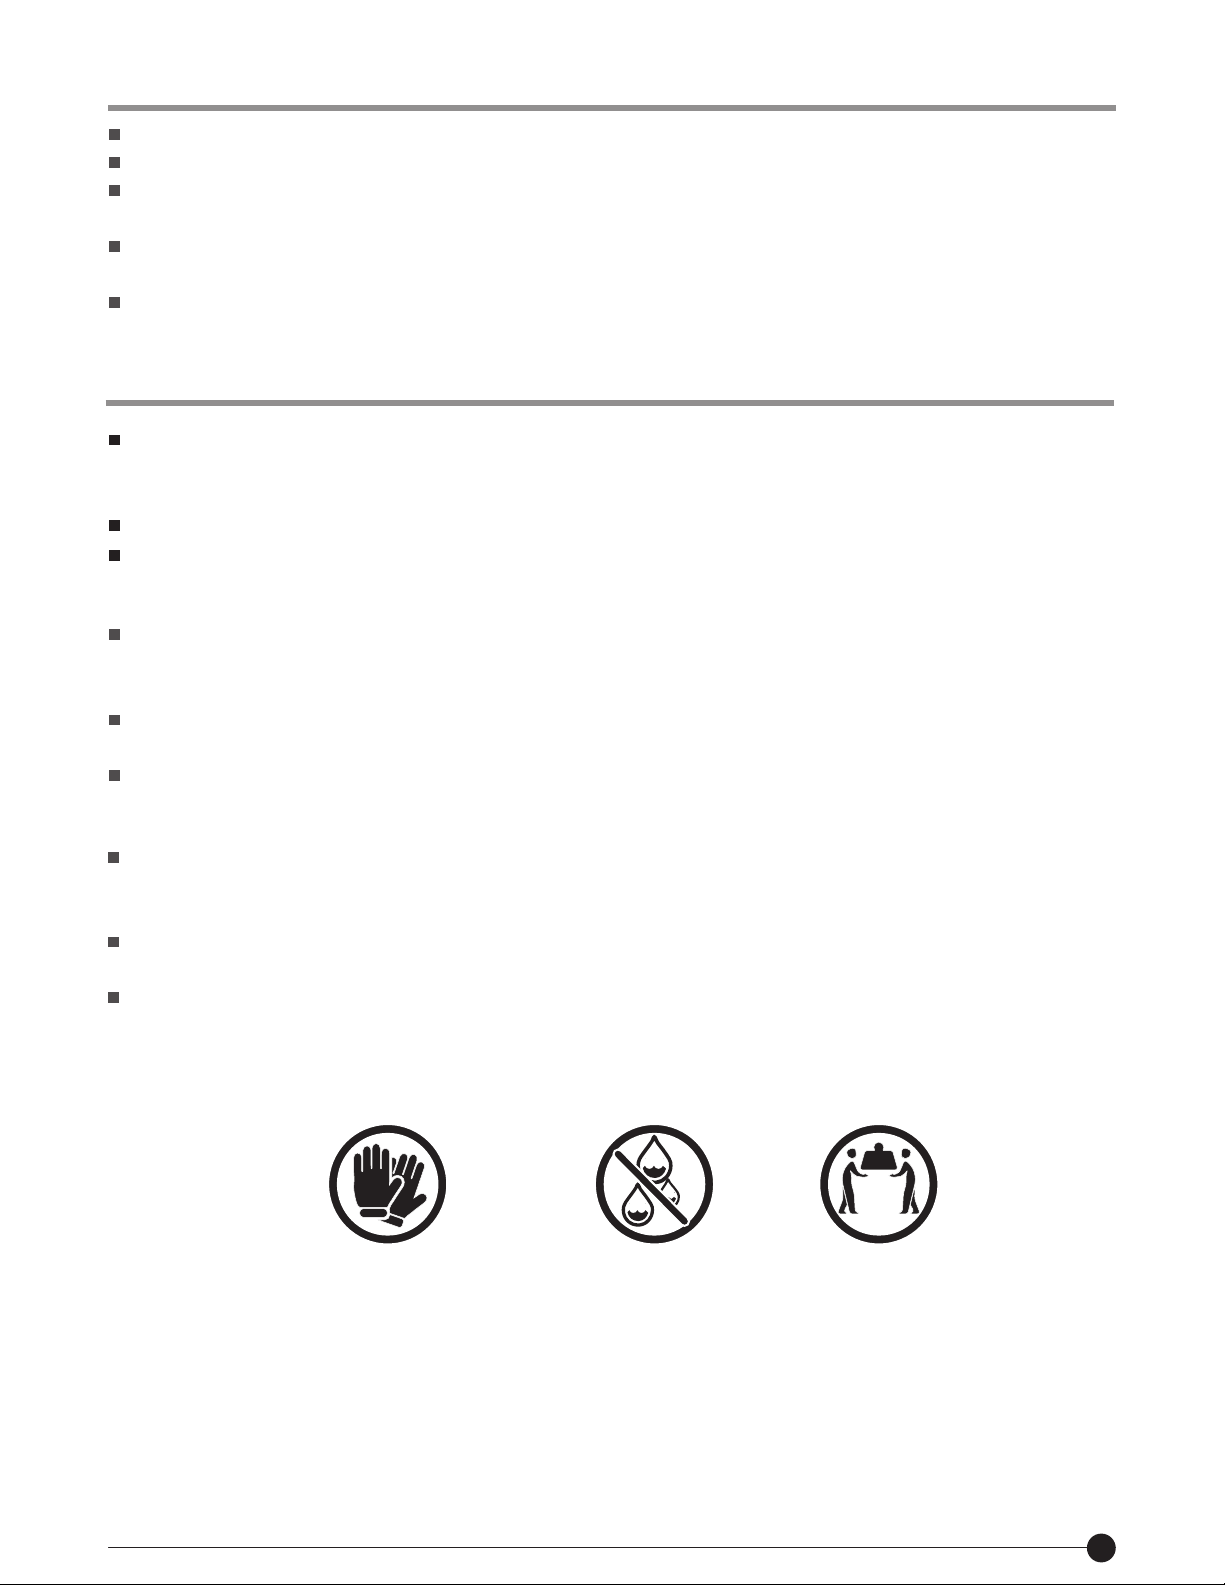
KEEP DRY
MAINTENIR AU SEC
MANTENER SECO
TEAM LIFT
DÉPLACER À PLUSIEURS
EQUIPO DE ELEVACIÓN
WEAR SAFETY GLOVES
PORTER DES GANTS DE SÉCURITÉ
USAR GUANTES DE SEGURIDAD
4
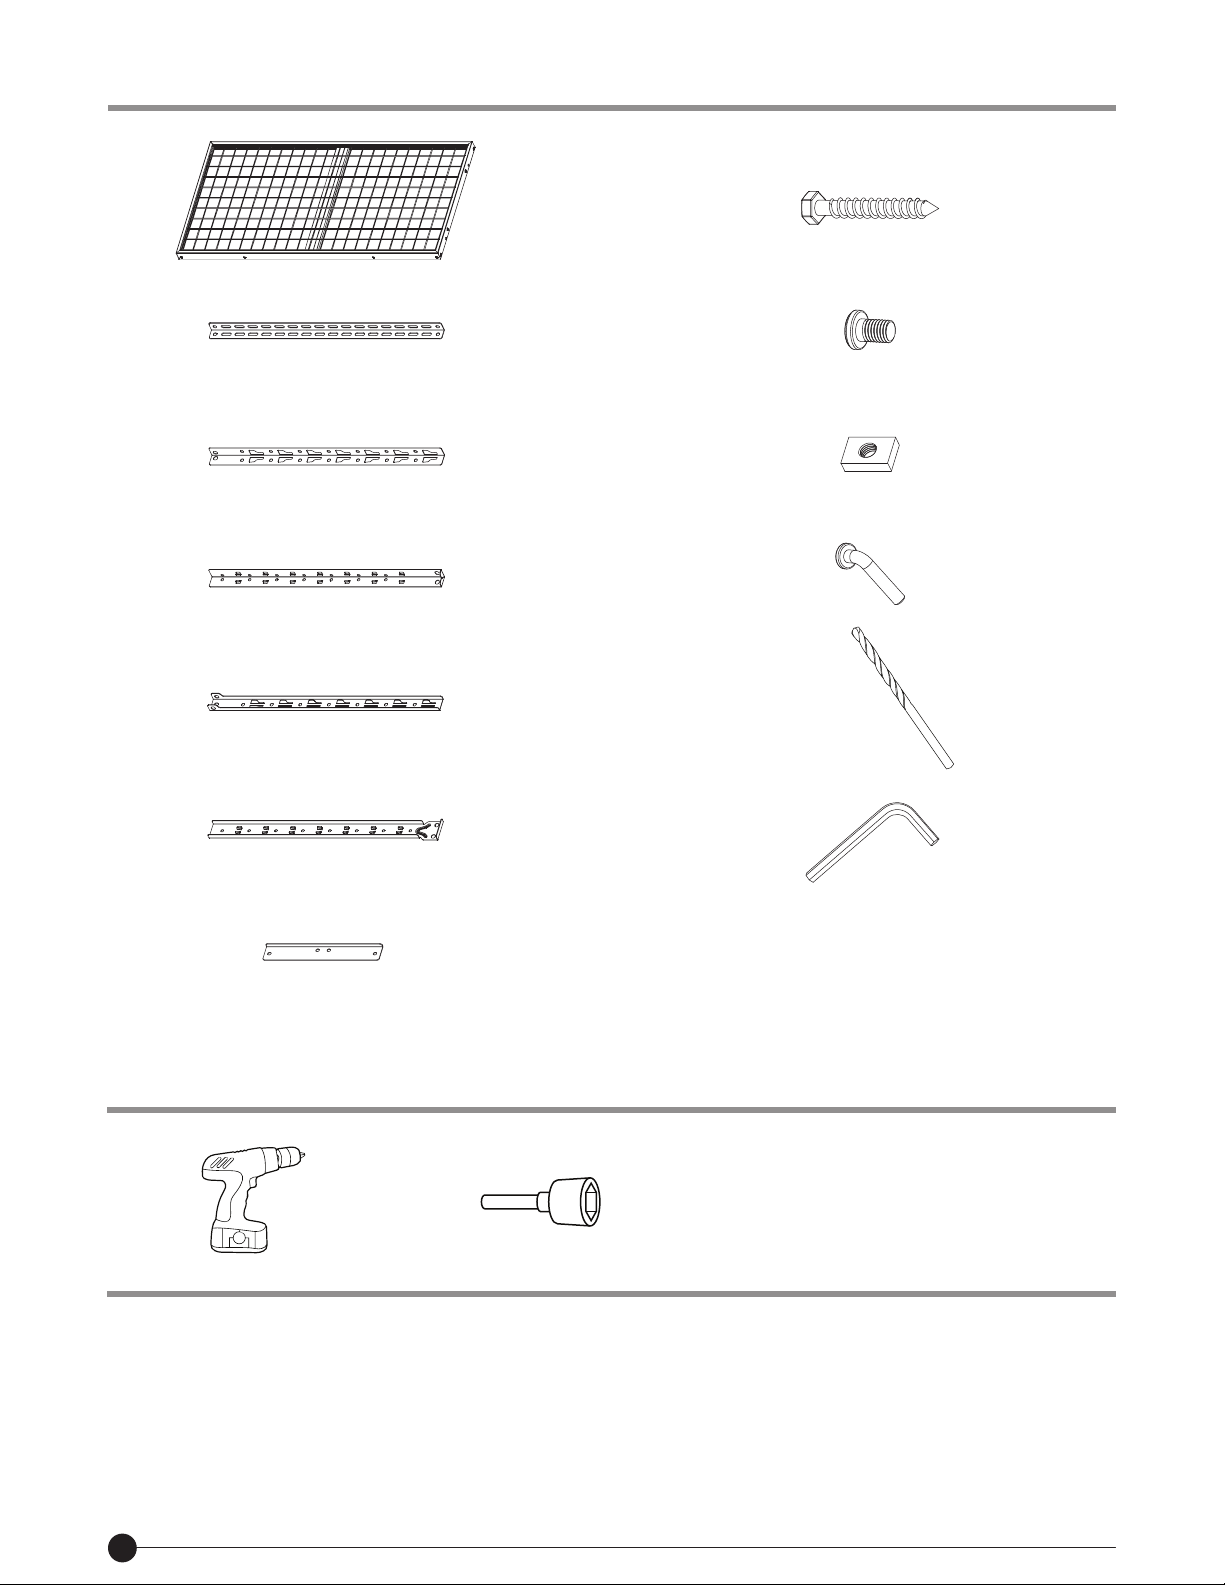
P1 H1
H2
H3
H4
P2
P3
P4
P5
P6
P7
T1
T2
3/16 in
6 mm
Parts / les pièces / Partes
Required Tool (Not Included) /
Oul requis (non inclus) / Herramienta requerida (no incluida)
Configuraon I starts from Page 4. /
La configuraon I commence à parr de la page 4. /
La configuración I comienza en la página 4.
Configuraon II starts from Page 10. /
La configuraon II commence à parr de la page 10. /
La configuración II comienza en la página 10.
5/16 in Driver Socket
Douille pilote 5/16"
Zócalo de controlador de 5/16 pulg
2 PCS / 2 UDS
2 PCS / 2 UDS 1 PC / 1 UD
1 PC / 1 UD2 PCS / 2 UDS
2 PCS / 2 UDS
6 PCS / 6 UDS
4 PCS / 4 UDS
4 PCS / 4 UDS
12+1 PCS /
12+1 UDS
22+1 PCS /
22+1 UDS
8+1 PCS /
8+1 UDS
6+1 PCS /
6+1 UDS
5
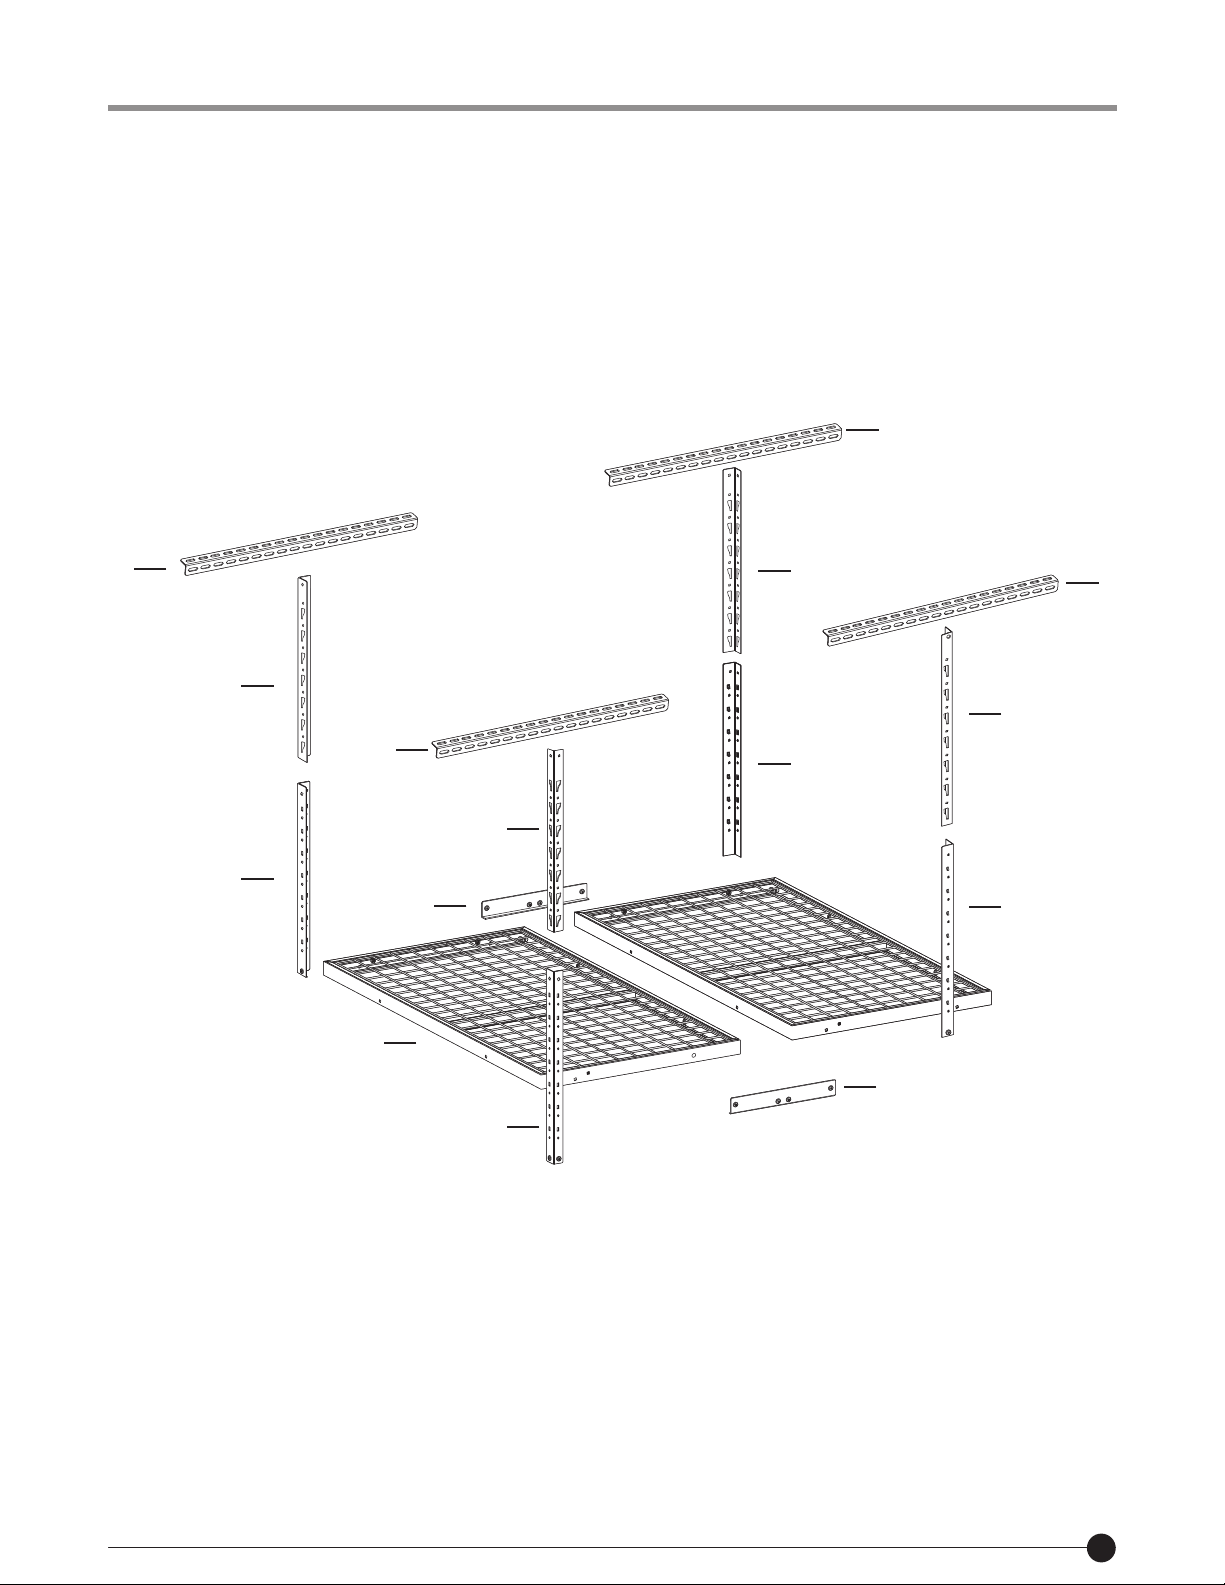
P2
P3
P2
P2
P2
P3
P7
P7
P4
P3
P4
P3
P4
P4
P1
Configuraon I / Configuraon I / Configuración I
48”W x 48”L x 23”-37.8”H / 48 po W x 48 po L x 23-37.8 po H/ 122 cm W x 122 cm L x 58.4-96 cm H
P2
P3
P2
P2
P2
P3
P7
P7
P4
P3
P4
P3
P4
P4
P1
Maximum Capacity: 750 lbs (340 kg), evenly distributed
Capacité maximale: 750 lb (340 kg), répare uniformément
Capacidad máxima: 750 lb (340 kg), distribuidos uniformemente

6
1
2
P1
P1
H2
H2
H3
H3
P7
P7
H2
H2
P7
Assembly Instrucons /
Instrucons de montage / Instrucciones de armado
Place the shelvings face down.
Placez les étagères face vers le bas.
Coloque las estanterías boca abajo.
CONNECT THE RACKS / CONNECTER LES BAIES / CONECTAR LOS RACKS
ATTACH THE RACK BRACKETS /
FIXER LES SUPPORTS DE RACK / FIJAR LOS SOPORTES DEL RACK
Shelvings sll face down.
Les étagères sont toujours face vers le bas.
Los estantes aún están boca abajo.
T2
T2
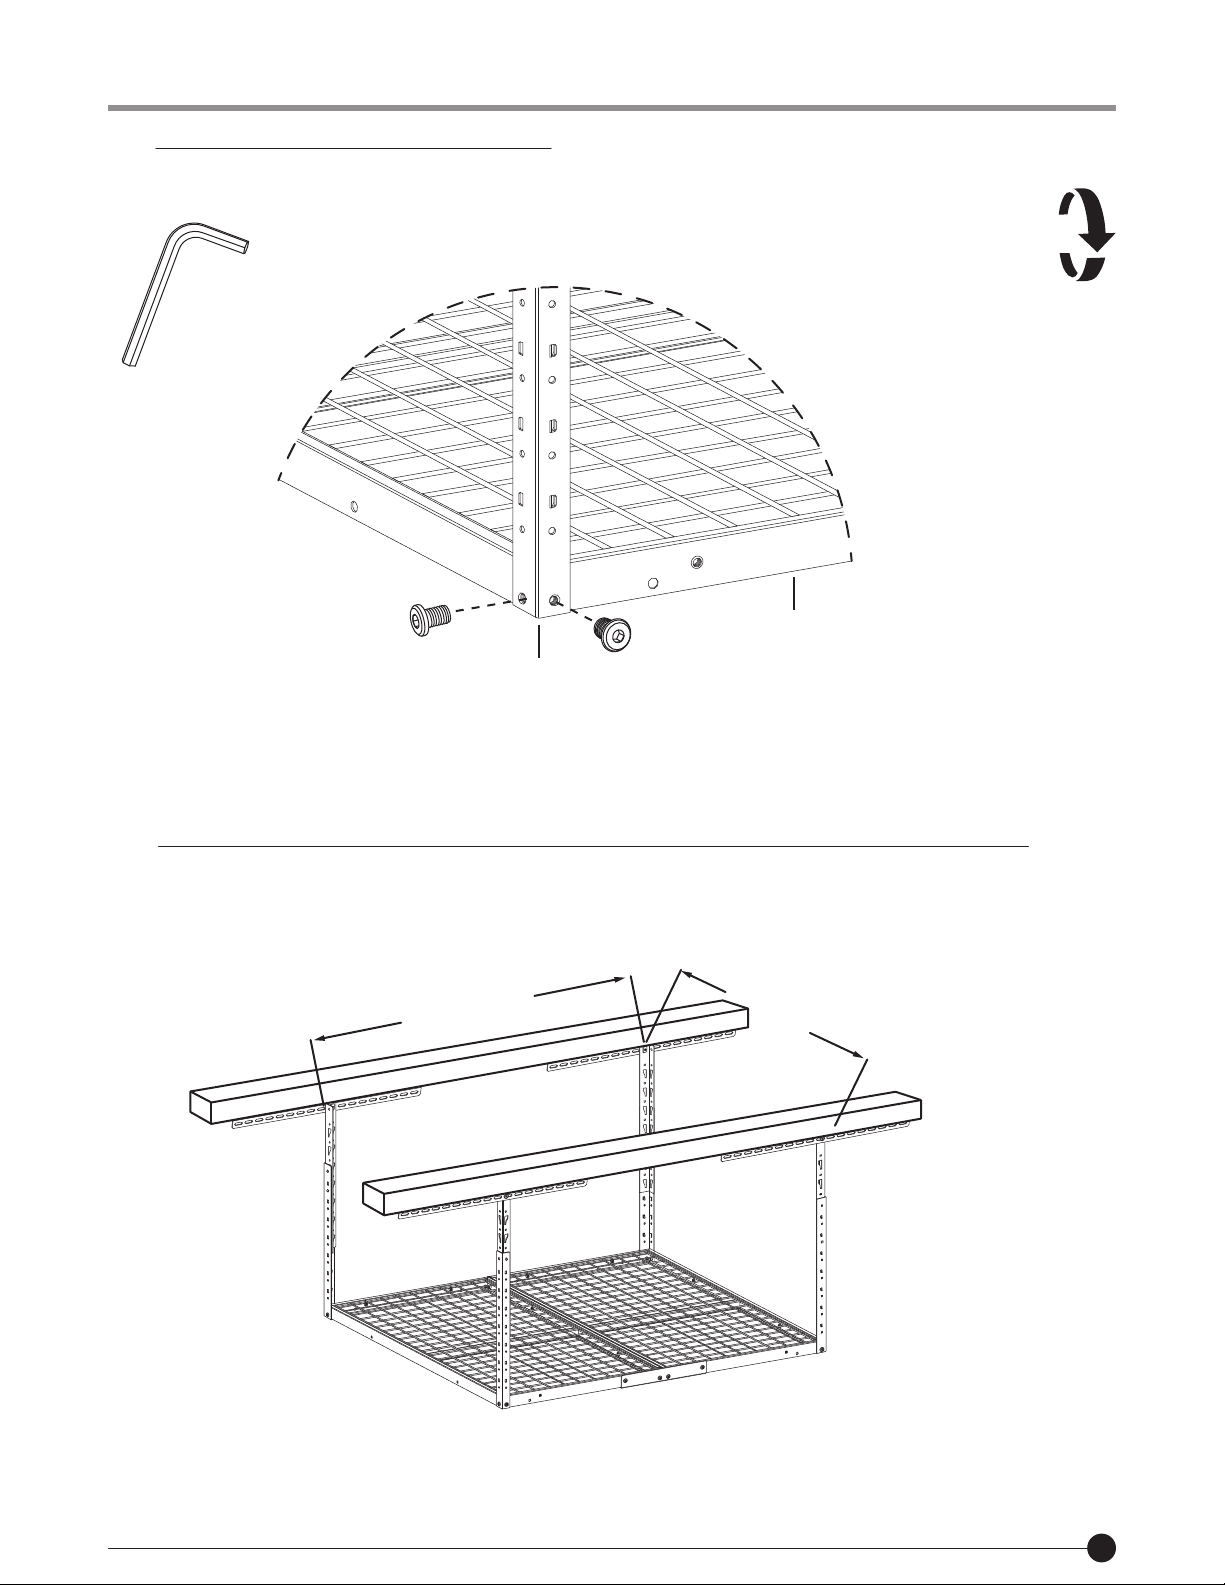
4
H2 H2P4
P1
122 cm
48 in
122 cm
48 in
Assembly Instrucons /
Instrucons de montage / Instrucciones de armado
ATTACH THE LOWER CORNER SUPPORTS /
FIXER LES SUPPORTS D'ANGLE INFÉRIEURS / FIJE LOS SOPORTES DE LA ESQUINA INFERIOR
3
Flip the shelving face up.
Retournez les étagères face vers le haut.
Voltea la estantería boca arriba.
Repeat for the remaining corner supports.
Répétez l'opéraon pour les autres supports d'angle.
Repita para los soportes de las esquinas restantes.
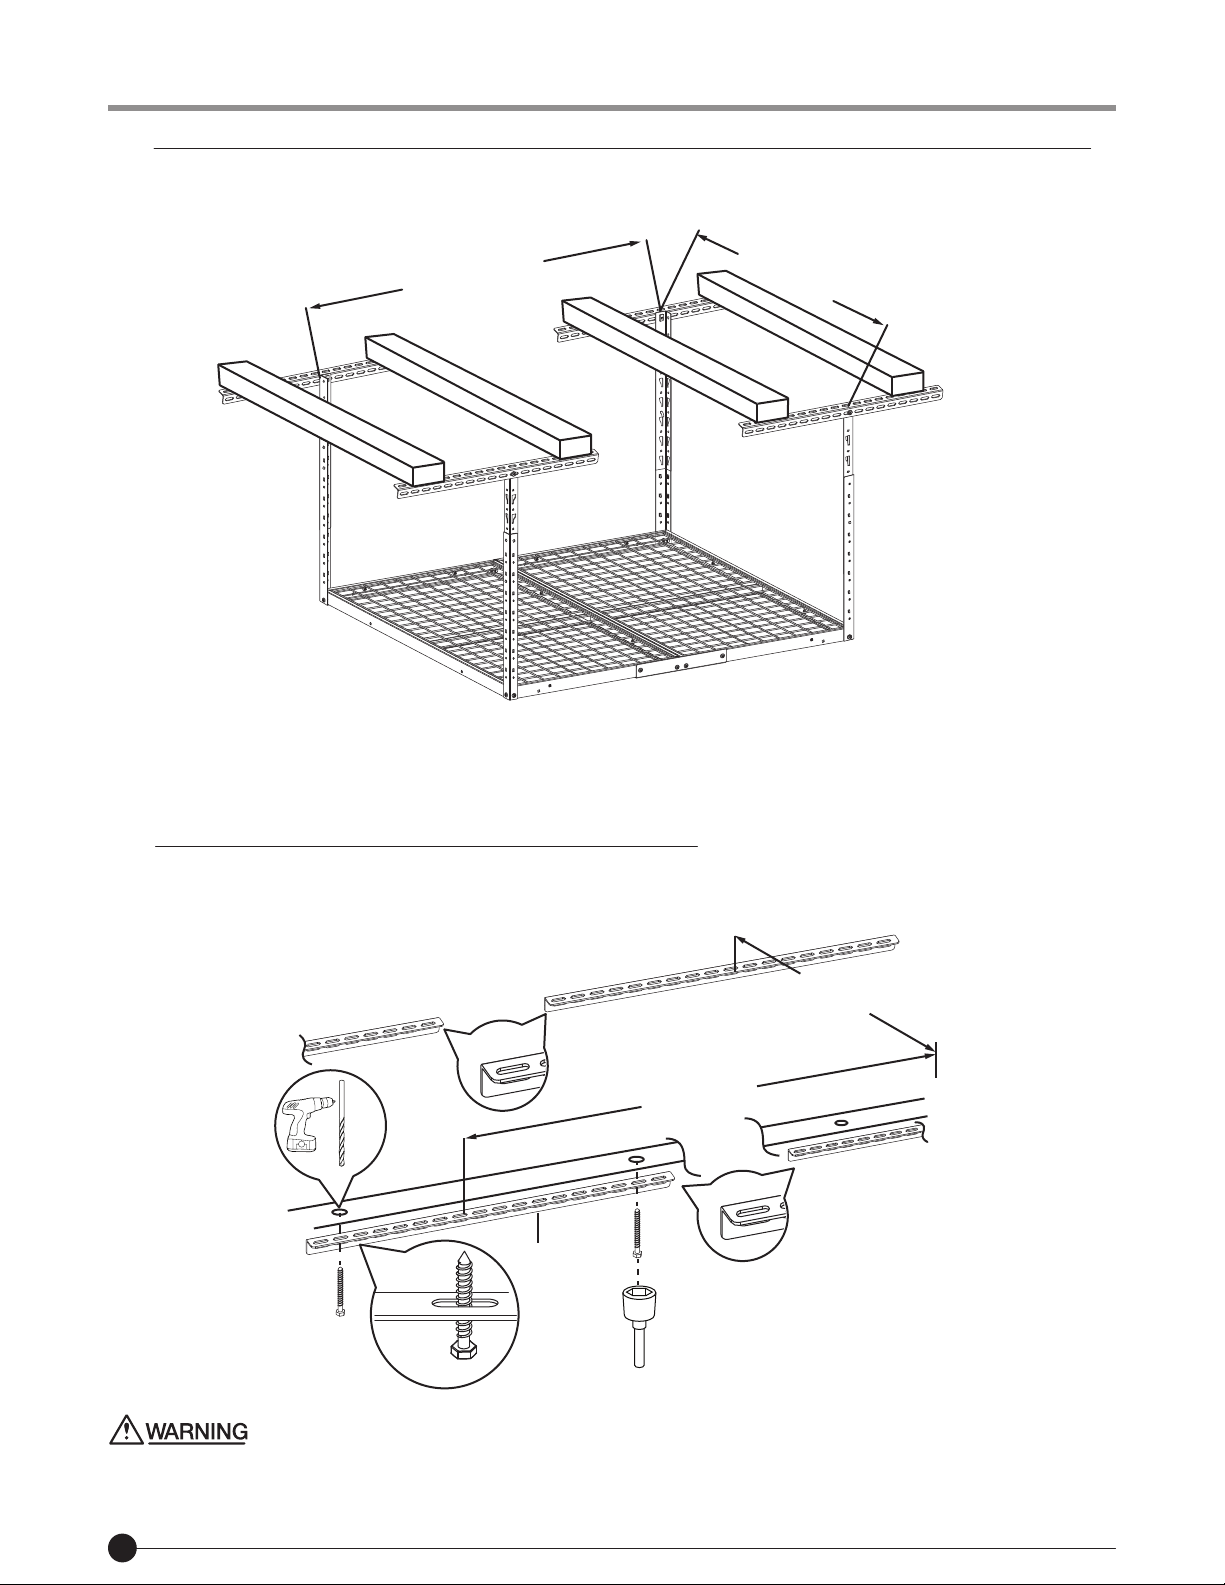
DETERMINE THE PLACEMENT OF THE CEILING BRACKET (OPTION 1: PARALLEL MOUNTING) /
DÉTERMINER L'EMPLACEMENT DU SUPPORT DE PLAFOND (OPTION 1 : MONTAGE PARALLÈLE) /
DETERMINE LA COLOCACIÓN DEL SOPORTE DE TECHO (OPCIÓN 1: MONTAJE EN PARALELO)
Connue to STEP 5 for installing the ceiling brackets.
Passez à l'ÉTAPE 5 pour installer les supports de plafond.
Connúe con el PASO 5 para instalar los soportes de techo.
T2
7
8
4
5
122 cm
48 in
122 cm
48 in
P2 H1
H1
H1
T1
P2
P2
122 cm
48 in
122 cm
48 in
Assembly Instrucons /
Instrucons de montage / Instrucciones de armado
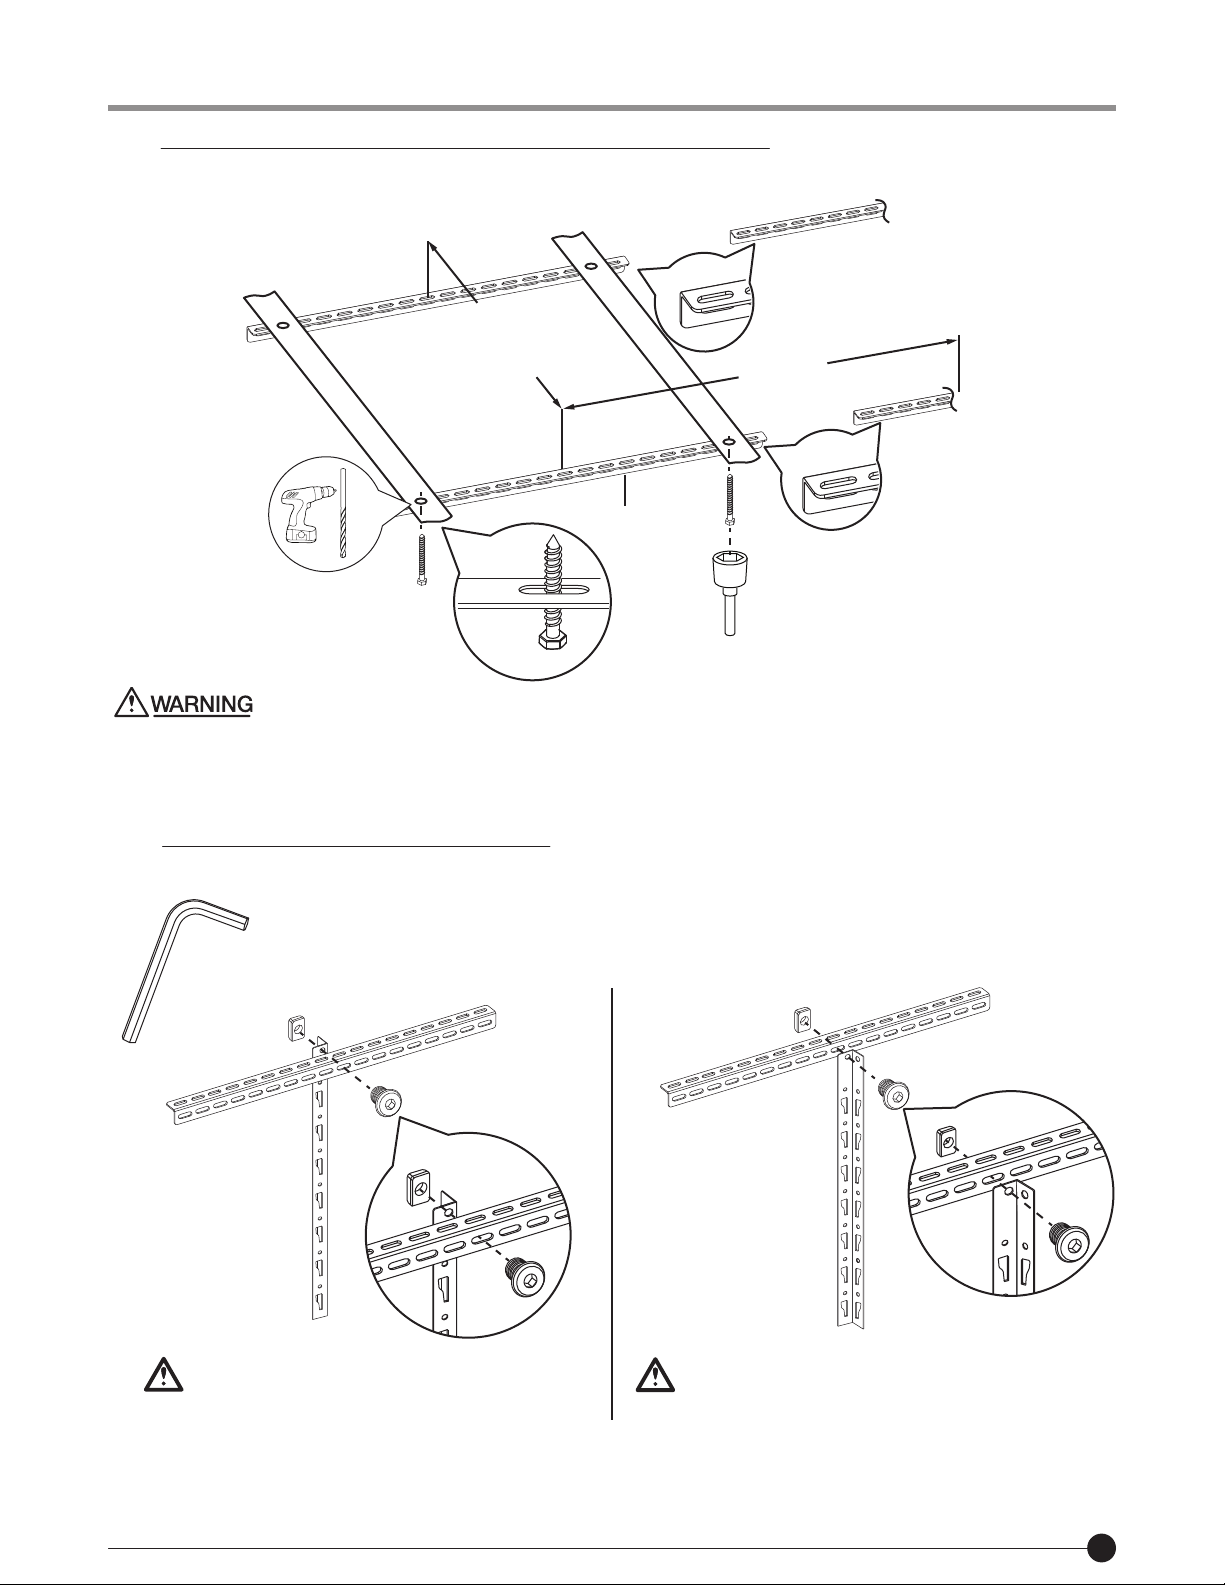
DETERMINE THE PLACEMENT OF THE CEILING BRACKET (OPTION 2: PERPENDICULAR MOUNTING) /
DÉTERMINER L'EMPLACEMENT DU SUPPORT DE PLAFOND (OPTION 2 : MONTAGE PERPENDICULAIRE) /
DETERMINE LA COLOCACIÓN DEL SOPORTE DE TECHO (OPCIÓN 2: MONTAJE PERPENDICULAR)
Connue to STEP 6 for installing the ceiling brackets.
Passez à l'ÉTAPE 6 pour installer les supports de plafond.
Connúe con el PASO 6 para instalar los soportes de techo.
ATTACH THE CEILING BRACKETS (PARALLEL MOUNTING) /
FIXER LES SUPPORTS DE PLAFOND (MONTAGE PARALLÈLE) /
FIJAR LOS SOPORTES DE TECHO (MONTAJE EN PARALELO)
Keep all the P2s towards the same direcon.
Gardez tous les P2 dans la même direcon.
Mantenga todos los P2 en la misma dirección.
Repeat for the remaining ceiling brackets.
Répétez l'opéraon pour les supports de plafond restants.
Repita para los soportes de techo restantes.
Driver Socket
Pilote Prise
Zócalo del conductor
9
6
7
P3 P3
H2
H3 P2 H2
H3 P2
On one side, mount P3 to the inside of P2
D'un côté, montez P3 à l'intérieur de P2
En un lado, monte P3 en el interior de P2
On the other side, mount P3 to the outside of P2
De l'autre côté, montez P3 à l'extérieur de P2
Por otro lado, monte P3 en el exterior de P2
T2
P2 H1
H1
T1
H1
P2
P2
122 cm
48 in 122 cm
48 in
Assembly Instrucons /
Instrucons de montage / Instrucciones de armado
Assembly Instrucons /
Instrucons de montage / Instrucciones de armado
Keep all the P2s towards the same direcon.
Gardez tous les P2 dans la même direcon.
Mantenga todos los P2 en la misma dirección.
Repeat for the remaining ceiling brackets.
Répétez l'opéraon pour les supports de plafond restants.
Repita para los soportes de techo restantes.
ATTACH THE CEILING BRACKETS (PERPENDICULAR MOUNTING) /
FIXER LES SUPPORTS DE PLAFOND (MONTAGE PERPENDICULAIRE) /
FIJAR LOS SOPORTES DE TECHO (MONTAJE PERPENDICULAR)
Driver Socket
Pilote Prise
Zócalo del conductor
ATTACH THE UPPER CORNER SUPPORTS /
FIXER LES SUPPORTS D'ANGLE SUPÉRIEURS / FIJE LOS SOPORTES DE LA ESQUINA SUPERIOR
Repeat for the remaining upper corner supports.
Répétez l'opéraon pour les autres supports de coin supérieur.
Repita para los soportes de las esquinas superiores restantes.
10
8
9
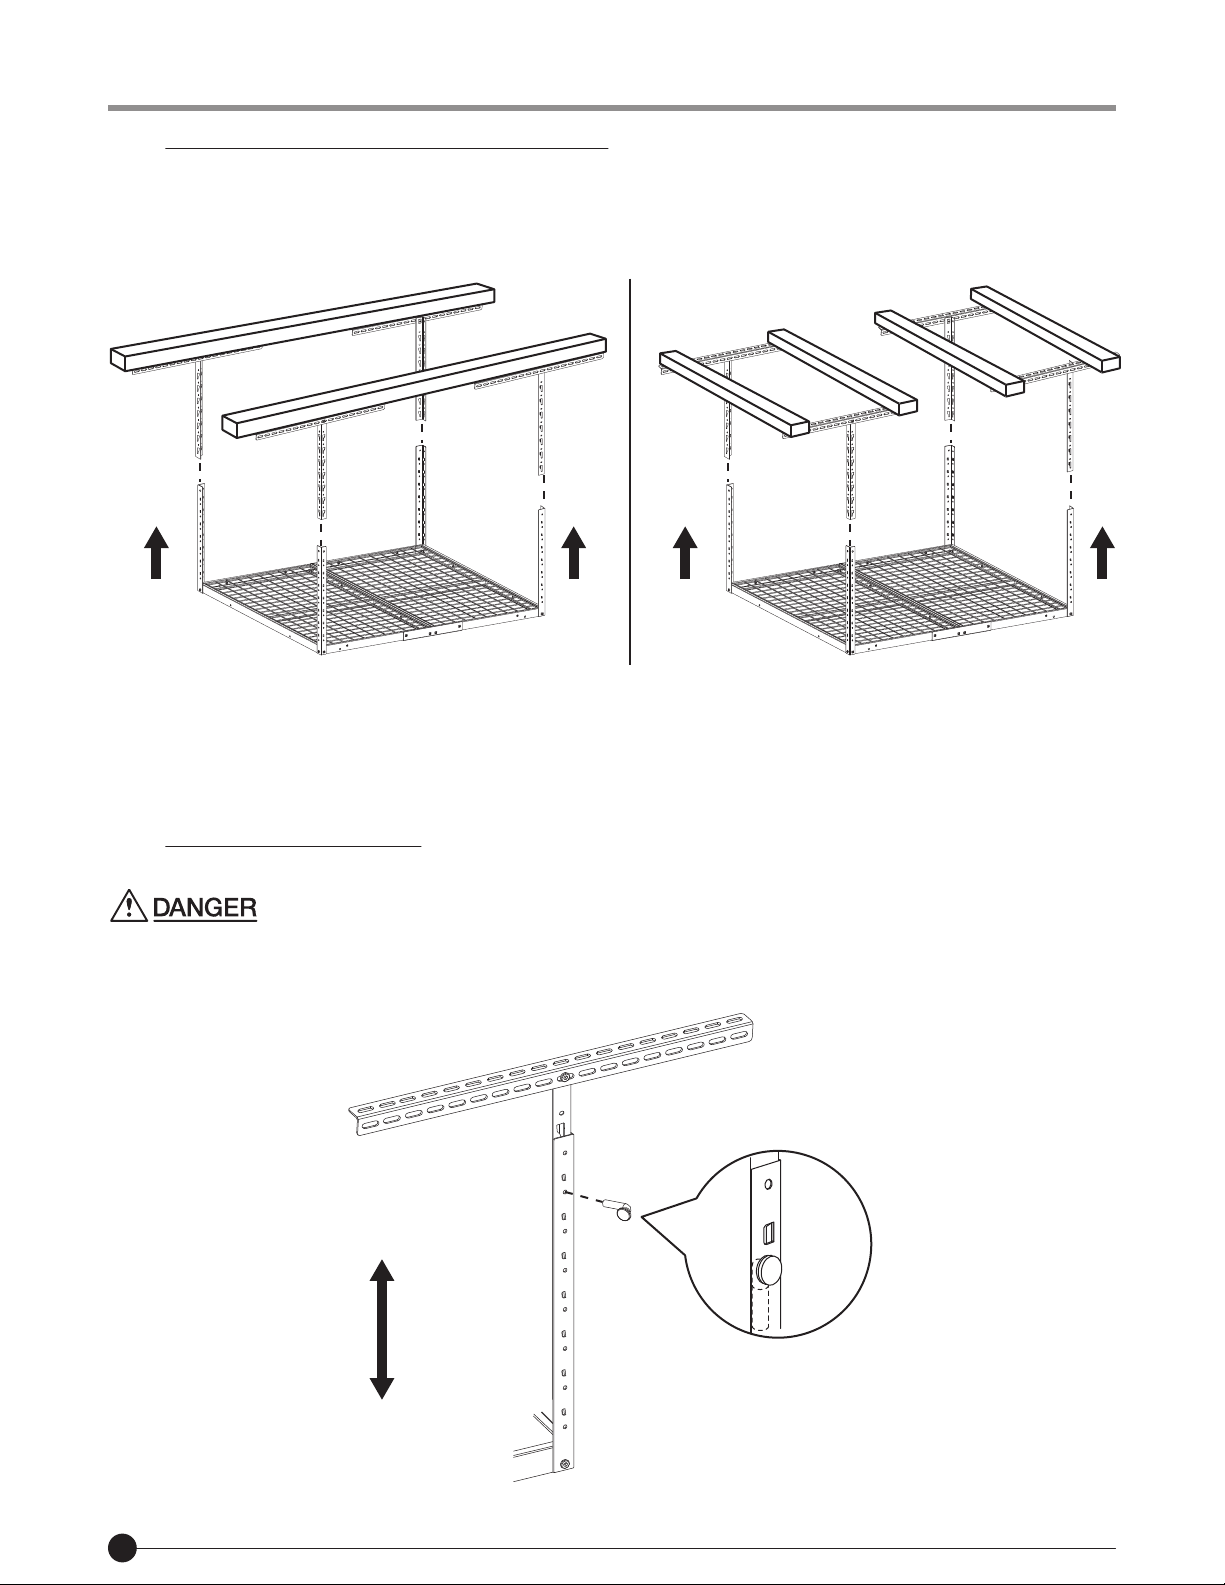
CONNECT THE UPPER AND LOWER SUPPORTS /
RACCORDER LES SUPPORTS SUPÉRIEUR ET INFÉRIEUR /
CONECTE LOS SOPORTES SUPERIOR E INFERIOR
H4
H4
Assembly Instrucons /
Instrucons de montage / Instrucciones de armado
PARALLEL MOUNTING
MONTAGE PARALLÈLE
MONTAJE EN PARALELO
PERPENDICULAR MOUNTING
MONTAGE PERPENDICULAIRE
MONTAJE PERPENDICULAR
INSERT THE LOCKING PINS /
INSÉRER LES GOUPILLES DE VERROUILLAGE / INSERTAR LOS PASADORES DE BLOQUEO
Installaon of locking pin in all supports is a MUST.
L'installaon d'une goupille de verrouillage dans tous les supports est un MUST.
La instalación del pasador de bloqueo en todos los soportes es IMPRESCINDIBLE.
Repeat for the remaining supports.
Répétez l'opéraon pour les supports restants.
Repita para los soportes restantes.
58.4 cm
23 in
23 po
96 cm
38 in
38 po
Table of contents
Other Armadillo Rack & Stand manuals


Popular Rack & Stand manuals by other brands

Salamander
Salamander Acadia AC/W/L400/WH Assembly instructions

Fohhn
Fohhn VAT-09 Mounting instruction

ricoo
ricoo FS0522 quick start guide

AMSOIL
AMSOIL BMK-22 Installation and service instructions

Kargo Master
Kargo Master 48220 installation guide

Milestone AV Technologies
Milestone AV Technologies SIMPLICITY SLF2 installation instructions


