Arkbird OSD 2.0 LITE User manual

-1-
ARKBIRD is a high-accuracy autopilot designed for fixed-wing. It can superimpose OSD (On Screen Display)
data on videos and at the same time control the balance, the return and many other maneuvers of your aircraft
with high precision.
The perfect auto-stabilization system and a plug-and-play design free you from worries and inconveniences
and enjoy the beauty of FPV in an instant.
Arkbird OSD 2.0 LITE Includes:
1. High accuracy air-speed meter interface; with air-speed and ground speed control and protection.
2. New design of shell and internal framework; flight performance optimized.
3. 7 input channels and 7 output channels; with stability augmentation output on the PTZ.
4. Flap can be intelligent controlled by speed , channel1-7 (aileron-flaps) mix-control selectable; with slow
release function, flap value can be displayed on the OSD.
5. More ways of mixed control include delta wing and V-tail wing, and Bi-motor plane, Bi-motor flying wing
and butterfly brake (mixed control of 1247channel).
6. Analog RSSI port and PPM port; support Arkbird 433 10channel+RSSI single wire transmission.
7. Supports Arkbird GCS(Ground Control System)Support the import and export of waypoint table;
multi-language. track replay;(refer to "Arkbird GCS &Two Planes' Formation Flight manual")
8 Basic functions Escorts your flight
1.Function all in one broad, on broad IMU (Inertial measurement unit), OSD (On Screen Display), barometer
Attitude sensor, 12V-5V regulation chip, “ESC + voltage regulation” dual power supply. Industrial reliable
designed.
2.Plug & Play design, no needed to weld any wire.
3.Can be installed flatwise or sidewise, suitable for small aircraft.
4. Intelligent PID controller. Easy to adjust.

-2-
5. Adjust parameters by OSD menu and radio stick.
6. Power & Video voltage, Go-home direction, radar mark, flight time, horizon, total distance, and power
consumption, etc, can be displayed on Screen.
7.One button auto-leveling, stick back to center, plane can fly levelly.
8. One button RTH (return-to-home), lost radio signal return-home.
12Extended functions Meets all you need
Launch Assist Run up with aircraft in hands, when the speed is higher than 5kmph, the throttle will start
output and automatically control the take-off.
Fence mode Out of rectangle area or safe height, it returns automatically, best helper for beginner
Waypoint Mode It is able to trace the Way Point Set by menu.
Hover mode Regard the hover position as balance position, nose up and keep steady
Cruise flight Keep a straight & constant-height flight.
Flap control Lower the flap surface automatically when speed is insufficient.
Butterfly brake Mixed control Make the fly wing change its direction smoothly without aileron inclining
Flight Record Records the time, voyage, data of power consumption and various maximum records of the
flights.
Gyro Mode It will do compensation for unintentional attitude changes to keep 3D angle status.
PTZ output When the flight is tilting, channel 5&6 will give an opposite compensation, so as to level the
camera.
Semi-Balance Mode When the CH1 and CH2 of rocker is less than 50%, the plane is in Balance Mode. When the
rocker is more than 50%, the plane is in Gyro Mode.
This function allows you making a turn with a large dip angle, even vertical rise and roll or other actions. After
finished these actions, you only need to move the stick to the center to make the plane back.
VTOL plane A unique fpv fixed wing plane with vertical taken off and landing function
Demonstration of Arkbird VTOL Mode:
https://www.youtube.com/watch?v=uQibL09skJ8

-3-
Attention
All the details can be found in our instruction. Please read carefully before operating and pay close attention
to the details and important parameters, in case you miss any important information which may leave hazards or
cause damage.
Reminding:
For the first installation, please power up after a wire check. Forcible satellite search interface will be
entered (incontrollable) every time you power up. You can pop-up manually and adjust rudder angle directions in
Manual Mode and auxiliary control in Balance Mode. A Neutral Point Check for the sensor is necessary. Also, you
need a fail-safe protection for the receiver in case your autopilot loses control when returning home. Adjust the
OSD voltage value before takeoff.
For the first flight, we suggest taking off with "Manual Mode". Check if the aircraft flies normally after
switching to “Balance Mode” in a level flight. Then switch to "RTH Mode" and check the autopilot by using OSD
parameter (see the last chapter in the instructions: Notes for Balance and RTH). Please keep an eye on the
important parameters during the flight (Vibration value, Satellite number, Speed and Altitude).
When the maiden flight test is done, Balance Mode can be used freely for taking off the autopilot, or you can
use extended functions such as waypoints, cruise flight or fence mode.

-4-
CONTENTS
1. Wirings 5
2. Power Supply Mode 7
3. 5V Dual Power Supply 9
4. Installation 9
5. Switch Modes through CH5 and CH6 12
6. GPS&Save Home Position 13
7. Manual Mode & Balance Mode 14
8. Fail-Safe to RTH mode 14
9. OSD and Menu 15
10. Balance Mode and RTH Adjustment11 24
11. FAQ and Solutions 26
12. Other FAQ 26
13. Attentions 27

-5-
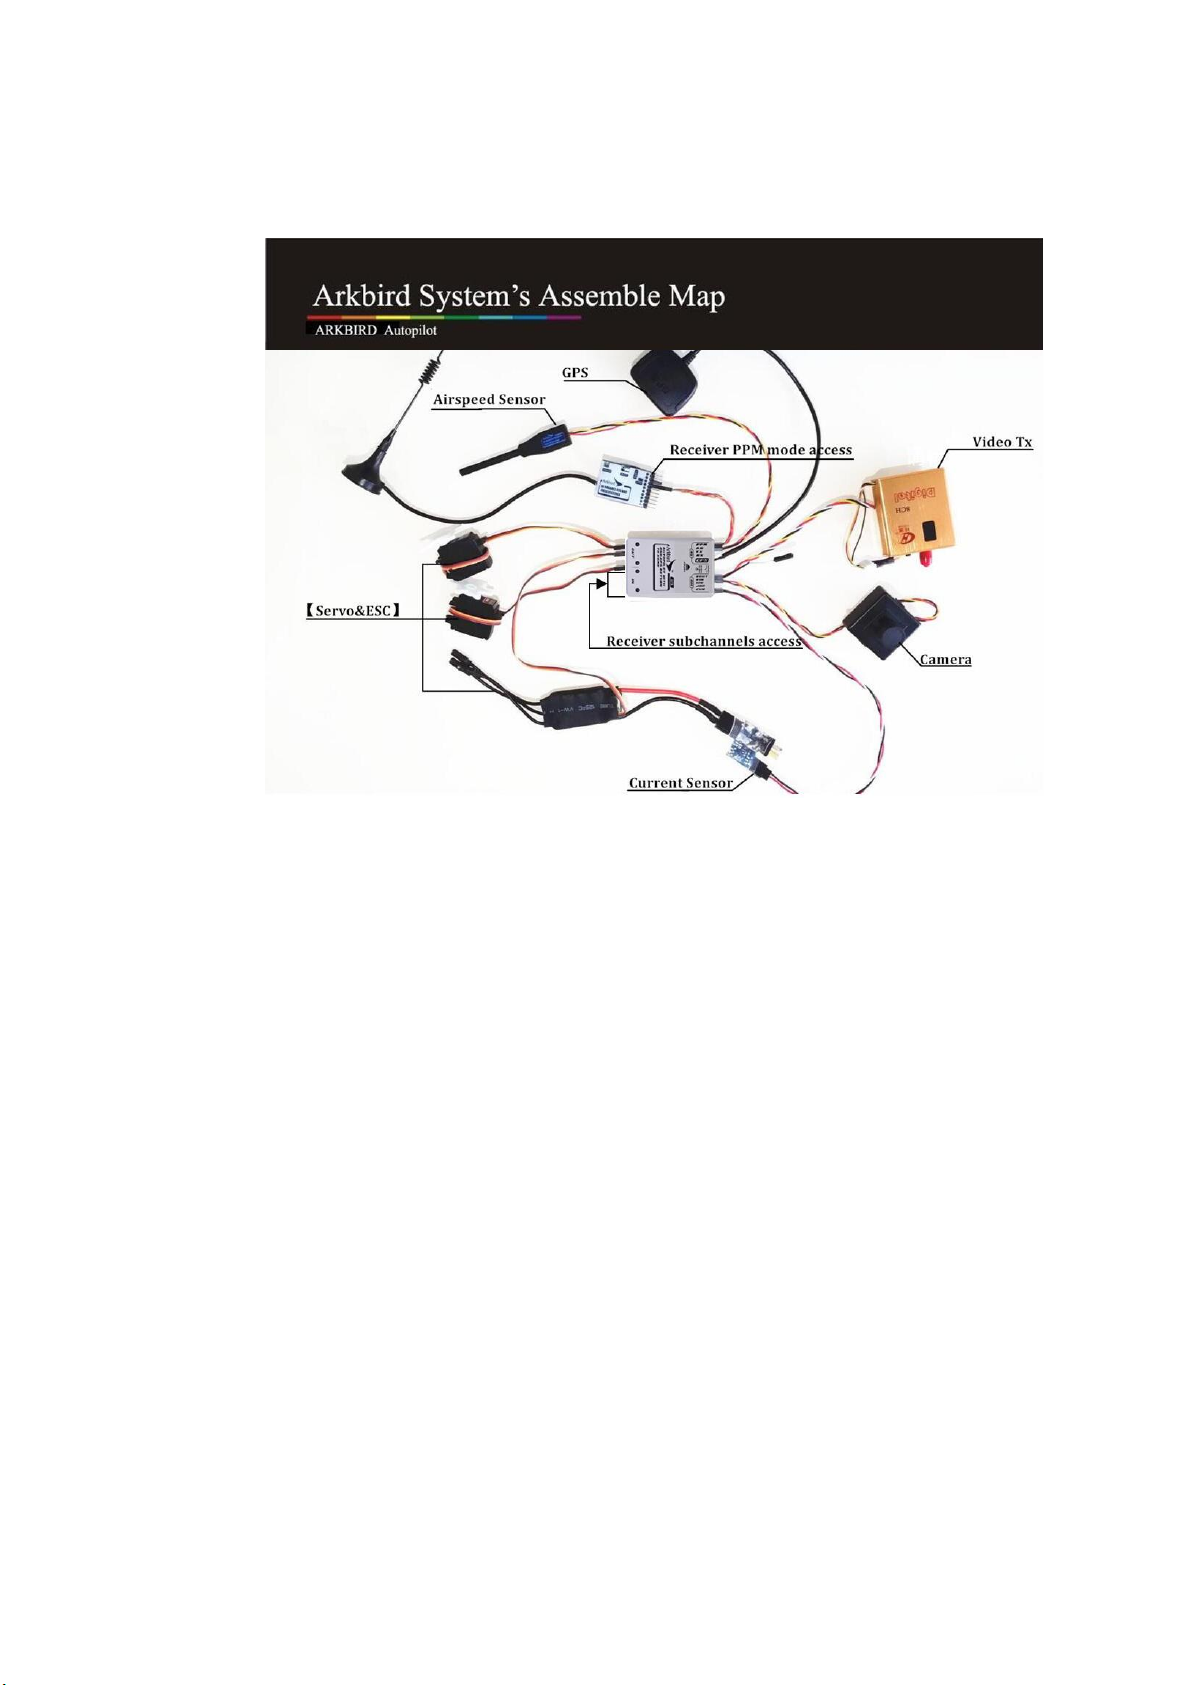
1Wirings
Attention:
Make sure connect according to the marked order of - + S. The black wire is the ground wire. It is close to the
upper side. The signal wire below is for the yellow socket. Check all the wiring before power on. Don't mistaken
12v and 5v so as not to cause damage to the equipment.
If your need to use RSSI function, please connect AIRSPEED METER on RX port, RSSI connect AR
port.
Mixed control output
Arkbird 2.0 provides various intelligent mixed control
Ordinary
Fly-Wing
V-Tail
Bi-motor
Bi-motor
Fly-Wing
Butterfly
Brake
CH 1
Aileron Y
Right surface
Aileron Y
Aileron Y
Right surface
Left-Outer
surface
CH 2
Elevator
Left surface
Right V-Tail
Elevator
Left surface
Right-Inner
surface
CH 3
ESC
ESC
ESC
Left ESC
Left ESC
ESC
CH 4
Rudder
Rudder
Left V-Tail
Right ESC
Right ESC
Left-Inner
surface
CH 5
Gimbal Roll
Gimbal Roll
Gimbal Roll
Gimbal Roll
Gimbal Roll
Gimbal Roll
CH 6
Gimbal Pitch
Gimbal Pitch
Gimbal Pitch
Gimbal Pitch
Gimbal Pitch
Gimbal Pitch
CH 7
Flap Y*
Flap Y*
Flap Y*
Flap Y*
Flap Y*
Right-Outer
surface *
1) When connecting CH7 to two Flap servos with a Y shape wire, you need a inversed servo, but when
connecting Butterfly Brake, there is no need using a inversed servo.
2) You can use CH1/7 mixed control, using two surfaces to achieve aileron & flap functions.
3) If you are using AR port as RSSI, you can also connect Airspeed sensor to RX port.

-6-
4) Bi-motor mixed control, when throttle is less than 25%, there is no differential steering, when over
25%, throttle outputs differential steering.
5) You can plug the airspeed sensor into paralleling "RX" port if using GCS function.
Attention:
1. If the camera needs a 5V supply, please connect a BEC from 12V or main power.Do not connect CPU 5V for
a 5V camera in case of the power supply shortage.
2. Connect Receiver's CH1-7 to IN PORT or use a PPM connection.PPM interface supports Arkbird 433 receiver
to achieve single-wire 10 Channel transmission and signal strength RSSI (automatically identified when
plugged in).
3. The digital high-accuracy airspeed meter of Arkbird 2.0, can calculate the relative speed between the plane
and air, which is different from GPS ground speed. As the air speed is a necessary condition for generation
of lift force. Insufficient airspeed may cause stall. The airspeed meter collects the speed in front of the plane.
As to flying in windy days or when flight is heavy-loaded, it will increase throttle when flying upwind and
decrease when flying downwind.
4. Extension wire can be used. Do not make the orifice get close to the motor so as to avoid airflow
interference. After power on, it will be calibrated automatically within 10 seconds. During this period, do
not touch the orifice.
5. When the airspeed meter is connected, the OSD will display the airspeed A 0km/h. Under the RTH and
waypoint mode, either air speed or ground speed is lower than the set “safe speed”, Autopilot will
increase the throttle proportionally.
Attention: The airspeed meter only participates in control under the mode of returning or waypoint etc. Under
the balance or manual mode, it does not participate in control. In this time keep an eye on the value on the
airspeed meter for reference.

-7-
2Power Supply Mode
Recommend using one single 3S (12V) battery to supply motor power and Arkbird OSD, Video TX & camera
(Shared supply),
Otherwise, use one battery (4S-6S) to supply motor power, another 3S battery to supply OSD & Video
(Separated supply).
3S Battery Shared Power Supply (Factory Default)
Current sensor’s 3P wire wires in the motor power.Flight Power port is only for voltage display and have a
maximum input of 33V.
1. If 3S battery, plug in the jumper (Default), it will supply power to 12V Video system (Arkbird OSD, Video
TX & camera).
Arkbird OSD(from Video Power) supports Maximum voltage of 17V, but notice that most video TX and
camera is 12V max, so we have to use a 3S battery.
If Using 4S(16.8V)battery, and the Video TX and the Camera can work under the input of 4S (17V), you can
also use this connection methods without worrying damage to the Autopilot.

-8-
Independent Power Supply
2. If separated supply, remove the jumper, connect another 3S battery (800mah-1400mah) to the Video
Power Port (12Vin) on the third row.
Schematic drawing of Independent Power Supply Wiring
(You can also choose the new Arkbird current sensor with 12V regulated output (accessories) which shares
one battery with motor and the video sector.) Please see as below :
Note:
When using 4S-6S battery, connect jumper cap on the regulator current sensor to”>3S” (Default connection), the
output voltage of white line is 12v at the moment.
When using 3S battery, connect jumper cap to "3s=POW", regulator module will not work at this time, the output
voltage is Power voltage of your 3S battery.

-9-
35V Dual Power Supply
On broad OSD 12V to 5V regulator, with 5V BEC (form ESC) supplies power to the CPU module at the same time.
If OSD function is not used, please plug in OSD 12V power as well to prevent a lack of power supply for 5V
electronic speed controller.
4Installation:
1. The pins of GPS and 12V ports shall stay forward (toward flying direction); the side with Arkbird LOGO shall
be upward or vertical toward right wing. (Default is level installation)
2. Keep GPS antenna upward placed and away from interference sources such as VideoTX and camera.
3. Put on heat-shrink tubing, fix by sponge and cable tie. Please keep away from motor to avoid vibration
which will reduce the accuracy of sensor.
4. When setting return-to-home, please take off propellers for safety concern.
Level Installation

-10-
Vertical Installation
2 ways of installation
This manual suits for next models
1
Table of contents
Other Arkbird Autopilot System manuals