ARK Travel System Series Manual

Frame, Seat & Carrycot
Part of the Ark®Travel System Range
BASIC INSTRUCTION LEAFLET
This product comes in conjunction with your chosen colour pack
which contains your hood canopy, seat pad and carrycot cover.

01
Please register your product purchase online at www.arkbeststart.com to
extend your warranty.
Please refer to these instructions for assembly and correct use of your Ark
travel system. A duplicate of these instructions can be found on the Ark
website www.arkbeststart.com.
We want you to be pleased with your purchase. If you have any comments or
feedback, we would be very happy to discuss these with you.
The information contained herein is subject to change without notice. The
purchased product may differ from the product described within the user
guide. For our most updated user guide please visit our website:
www.arkbeststart.com
The Ark Travel System complies with the EN1888:2012 and EN1466:2014 +
AC2015 standards.
Ark Global Innovations Ltd shall not be liable for technical errors or omissions.
All rights are reserved. Ark - for the best start and all associated logo’s and
assets are trademarks. They are not allowed to be reproduced or used without
prior written permission from Ark Global Innovations Limited.
IMPORTANT: Keep these instructions for future reference
more information can be found on our website www.arkbeststart.com

Preparation for use
1. Unfold the frame by raising the handle
and lift until it clicks and locks open.
2.1 The back wheels are interchangeable.
Line up the protruding spoke from the
wheel and push it into the frame until it
clicks.
2.2 The front wheels are left/ right
specific. The bare wheel should face out,
the plastic bar on the inside.
CLICK
CLICK
02
CLICK

!
1
2
3
4
Everyday use
4. To engage the brake: use your foot
to press down on the back section of the
break, indicated by a ‘stop’ sign.
To release: use your foot to press on the
front section of the brake, indicated with
a ‘play’ sign.
ALWAYS APPLY THE BRAKE
WHEN LOADING OR
UNLOADING YOUR CHILD.
03
3. To adjust the handle height, push
the button on the centre of the handle
and pull the handle up or down until it
locks into the required position. There
are 4 lock positions.
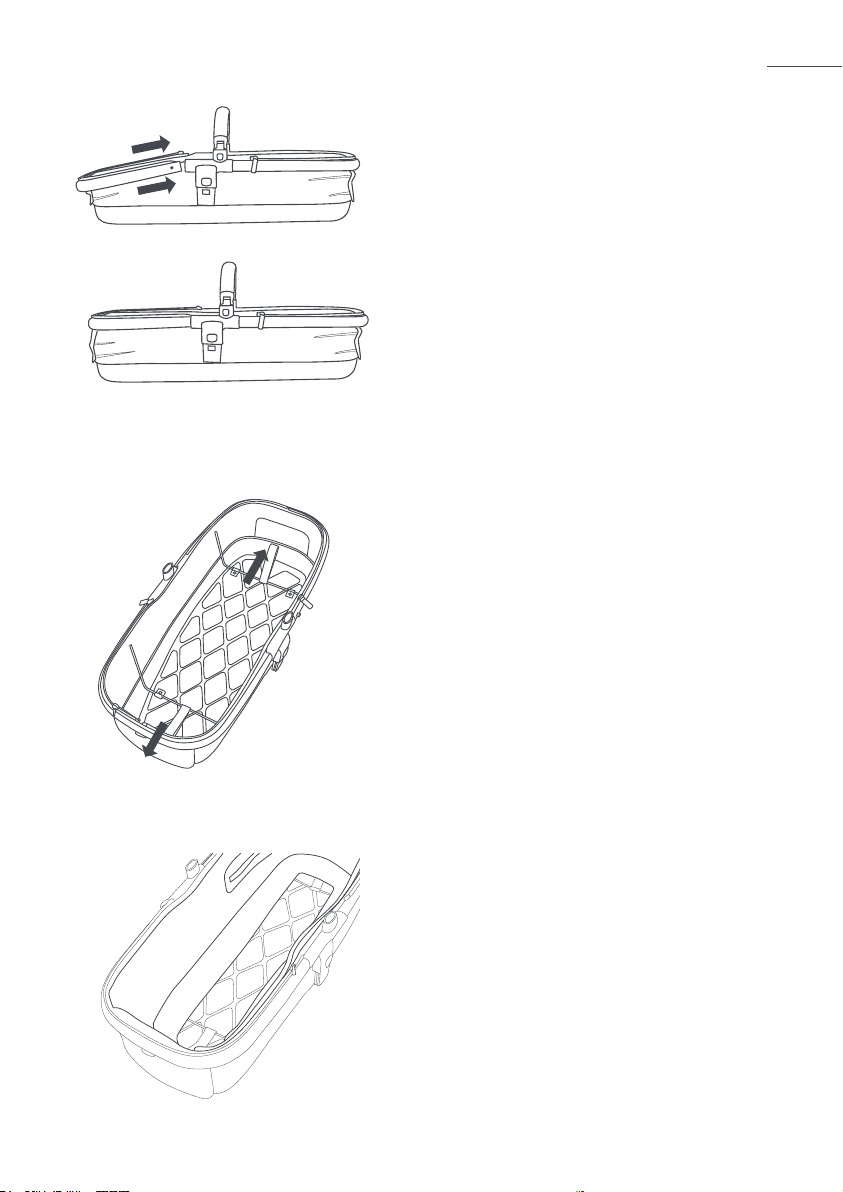
Assembling the carrycot
5. Fit the front tube of the carry cot frame
into the plastic part until they click and lock
into position.
04
6. Secure the carrycot base by locking
both the internal bars into the clips in the
base. Pull back on the tab until the bars lock
into the clips on both sides.
7. Zip the carrycot liner into the carrycot
with the two zips around the top edge.
CLICK
CLICK

10. To remove the carrycot from the
frame press the buttons on the left and
right of the carry cot at the same time,
and lift to remove.
Assembling the carrycot
8. To fit the bumper bar lock the clips in
both sides of the carrycot. To remove the
bumper bar press the button on the side to
release the clip. The bar can pivot on one
side for access to the child.
9. To fit the carrycot to the frame lock
the left and right clips into the mount-
ings on the side of the frame. They will
click as they lock in.
!
!
WARNING: DO NOT ATTACH
CARRYCOT TO OR REMOVE
FROM THE FRAME WITH A
CHILD INSIDE. DO NOT
CARRY THE CARRYCOT WITH
A CHILD INSIDE IT.
WARNING: DO NOT ATTACH
CARRYCOT TO OR REMOVE
FROM THE FRAME WITH A
CHILD INSIDE. DO NOT
CARRY THE CARRYCOT WITH
A CHILD INSIDE IT.
05

06
11. Inside your separate colour pack you
will find your hood canopy that fits on both
the carry cot and seat frames. Hook the
plastic clip over the bar and push down
firmly so that the hole fits over the metal
fixing.
12. Secure both sides over the
corresponding metal fixings and then
apply the zip.
13. Zip the carrycot cover onto the front
of the carrycot. Popper into the hood to
secure the flap.
Assembling the carrycot

07
16. To remove the seat from the frame,
press the buttons on the left and right of
the seat simultaneously, lift and pull up.
Assembling the seat
14. To fit the seat in the forward facing
position lock the left and right clips into the
side mountings of the frame with the seat
facing away from the handle.
15. To fit the seat in the rearward facing
position lock the left and right clips into the
side mountings of the frame with the seat
facing towards the handle.

08
19. To recline the seat press the
circular button on the left and right of
the seat and rotate the seat forwards
and backwards until it locks into
required position.
17. To raise the footrest lift until it clicks
into position.
18. To lower, press the buttons on
the left and right of the footrest
simultaneously to lower.
Assembling the seat
1
23

09
20. To fit the bumper bar, lock the ends into
the plastic parts until they click. To release, press
one or both side buttons for access to the child.
21. The bumper bar can pivot on one side for
access for the child by pressing the button on
the side to release the clip.
Assembling the seat
Table of contents