Apogee GiO User manual

User’s Guide
support.apogeedigital.com

i GiO by APOGEE – User’s Guide
Table of Contents
Package Contents 1
Introducing GiO 1
Quick Start 2
System Requirements 2
Getting Started 2
Install Apogee Software 2
Connect the USB Cable 2
Choose GiO for Mac Sound I/O 3
Connect Headphones or Speakers 3
Connect Your Guitar 3
Set up GarageBand ‘09 4
GarageBand Preferences 5
Using GiO’s Stompbox Buttons 5
Set the Input Level 5
Record! 5
Connecting GiO 6
Connecting an Apple Macintosh computer 6
Connecting Headphones 7
Connecting Powered Speakers 7
Connecting a Home Stereo 8
Connecting an Instrument Amplier 8
Connecting a Guitar or other Instrument 9
Connecting an Expression Pedal 9
Working With Apple GarageBand 10
Using GiO for GarageBand audio input and output 10
Using GiO’s Transport buttons to control GarageBand 10
Using GiO’s Stompbox buttons to control GarageBand 11
Setting GiO’s audio parameters from GarageBand 11
Working With Apple Logic Pro 12
Using GiO for Logic Pro audio input and output 12
Using GiO’s Transport buttons to control Logic Pro 12
Using GiO’s Stompbox buttons to control Logic Pro 13
Setting GiO’s audio parameters from Logic Pro 13
Using GiO’s Expression Pedal with Apple Logic Pro 14
Working With Apple Mainstage 15
Using GiO for Mainstage Audio Input and Output 15
Using GiO’s Transport Buttons to control Mainstage 15
Using GiO’s Stompbox Buttons to control Mainstage 16
Setting GiO’s audio parameters from Mainstage 16
Additional Hardware & Software Controls 17
OS X System Preferences - Sound 17
Apple Keyboard 17
OS X Audio MIDI Setup 18
Selecting GiO for Mac Sound Input/Output 18
Controlling GiO’s Input/Output Parameters 18
Setting GiO’s Sample Rate 18
Working With GiO 19
How do I set a recording level? 19
How do I set my software’s I/O buer? 19
I/O buer continued 20
What sample rate should I record at? 20
Can I record my session on the startup hard drive? 20
How do I set the input control of my powered speakers? 20
Using GiO Cong 21
FAQs 22
Troubleshooting 23
Specications 24

1 GiO by APOGEE – User’s Guide
GiO
1/4” to RCA Cable
USB Cable
QuickStart Guide
GiO is a USB Guitar Interface and Controller for the Mac.
This QuickStart section describes how to set up GiO with your Mac,
connect speakers, headphones and instruments to GiO, and get
started quickly with GarageBand.
Please check our web site for the most up-to-date information:
http://support.apogeedigital.com
Instrument Input Headphone/Speaker Output
USB Port
Stompbox buttons and indicators
Expression Pedal Input
Previous button Next button
Transport control buttons
Introducing GiOPackage Contents

2 GiO by APOGEE – User’s Guide
Connect the USB Cable
Connect GiO’s USB port to a USB port on your Mac using the
provided cable. GiO is powered through the USB connection.
Once the USB connection is made, the Transport buttons light in
sequence and all Stompbox indicators light green, indicating that
GiO is ready for use.
System Requirements
Your Mac should meet the following requirements:
• Intel or PPC G5 processor, OS X 10.5.8 or 10.6 or greater
• 1 GB minimum of installed RAM, 2 GB recommended
• GarageBand ‘09 v. 5.1 and/or Logic Studio 9
(Please consult our website for the most up-to-date
compatibility information: http://support.apogeedigital.com.)
Getting Started
Install Apogee Software
Download the GiO Software Installer from:
http://www.apogeedigital.com/downloads.php
Double-click it and follow on-screen instructions. The installer may
require the connection of your GiO to verify the rmware version, so
please have it ready. When the installation is complete you will be
required to restart your Mac.
Quick Start

3 GiO by APOGEE – User’s Guide
Connect Your Guitar
Connect your guitar to the Instrument input using a standard 1/4”
guitar cable. Shown below is a typical GiO setup shown with optional
expression pedal
Choose GiO for Mac Sound I/O
After connecting GiO to your Mac, a dialog box prompts you to
choose GiO for Mac sound output and input. Click Yes.
Connect Headphones or Speakers
Connect headphones to GiO’s back panel jack.
To connect a pair of powered speakers using the included 1/4” TRS
to dual RCA cable, connect the 1/4” TRS plug to GiO’s back panel
Output jack. Next, connect the white-banded RCA plug to the
left speaker and the red-banded RCA plug to the right speaker

4 GiO by APOGEE – User’s Guide
Set up GarageBand ‘09
Open GarageBand, found in your
Mac’s Applications folder. In the
Project Window that appears
during launch, click Electric
Guitar then click Choose to
create an audio track.
In GarageBand, double-click the
Track header to show the Track
Info pane. At the top of the pane,
click Guitar Track.
Choose a guitar preset from the
pop-up menu at the top of the
Track Info pane. You can scroll
through the preset list by tapping
GiO’s Previous or Next button.
Set up GarageBand ‘09
(continued)
Click Edit (at the top of the Track
Info pane) and click on the guitar
amp to highlight it.
At the bottom of the pane,
select Mono 1 (GiO) in the Input
Source menu and select On in
the Monitor menu. If GiO can’t
be selected in the Input Source
menu, please see the next page.
Click the faders button to the
right of the Input Source menu
to open the Apogee GiO control
panel

5 GiO by APOGEE – User’s Guide
GarageBand Preferences
If GiO can’t be selected in
the Input Source menu, open
GarageBand Preferences
(GarageBand > Preferences),
click Audio/MIDI, and select GiO
in the Audio Output and Audio
Input menus.
Important!
To experience the full audio
resolution of GiO, open
GarageBand Preferences, click
Advanced, and select Best in the
Audio Resolution menu.
Using GiO’s Stompbox buttons
When you load a GarageBand
guitar preset that includes
stompboxes, each of GiO’s
Stompbox indicators light to a
color that corresponds to the
stompboxes selected in the
preset. Press GiO’s stompbox
switch to turn the effect on - the
indicator glows brightly.
Press again to turn the effect
off - the indicator glows dimly.
Set the Input Level
Click the GarageBand track’s
Record enable button to see
the input signal level on the
track meters and hear it in your
headphones.
In the Apogee GiO control panel,
adjust the Recording Level
slider until a good signal level
is displayed in the track meters.
See page 19 for a more detailed
description of setting recording
levels.
Record!
Once you’ve set a level, tap the
Record Transport button. The
newly created region appears
in GarageBand’s timeline. Once
you’ve completed recording, tap
the Play button to stop recording,
tap either the Go To Beginning or
Rewind button, and tap Play to
listen back to your recording.

6 GiO by APOGEE – User’s Guide
Connecting GiO
In this section, the connection of GiO to your Mac, headphones, speakers,
instruments and other audio hardware devices is described.
Type B
Connecting an Apple Macintosh computer
• Using the provided USB cable, connect the Type B connector to
GiO’s back panel USB connector.
• Connect the Type A connector to your Mac computer.
• For the best system stability, it’s recommended to connect
directly to your Mac’s USB port, without passing through a USB
hub.
• To use GiO’s Transport and Stompbox switching, Apogee
software must be installed, as described on page 2
Type A

7 GiO by APOGEE – User’s Guide
Connecting Headphones
• Connect headphone to GiO’s back panel Output jack.
• The output level may be controlled from any of these hardware
and software controls:
Apple keyboard volume controls (when System Preferences
Sound is congured as described on page 17).
Menu bar volume slider (when System Preferences
Sound is congured as described on page 17).
Apogee Control Panel found in Logic Pro and Mainstage
System Preferences Sound > Output pane
Audio MIDI Setup
Connecting Powered Speakers
• Using the included 1/4” TRS to dual RCA cable, connect the 1/4”
TRS plug to GiO’s back panel Output jack. Next, connect the
white-banded RCA plug to the left speaker and red-banded RCA
plug to the right speaker.
• The output level may be controlled from any of the hardware and
software controls listed on the facing page.
• To set the speakers’ input level control (sometimes labelled input
sensitivity), please see the description on page 20.
• If hum or buzz is heard in the speakers, please see the
Troubleshooting tip on page 23.
8 GiO by APOGEE – User’s Guide
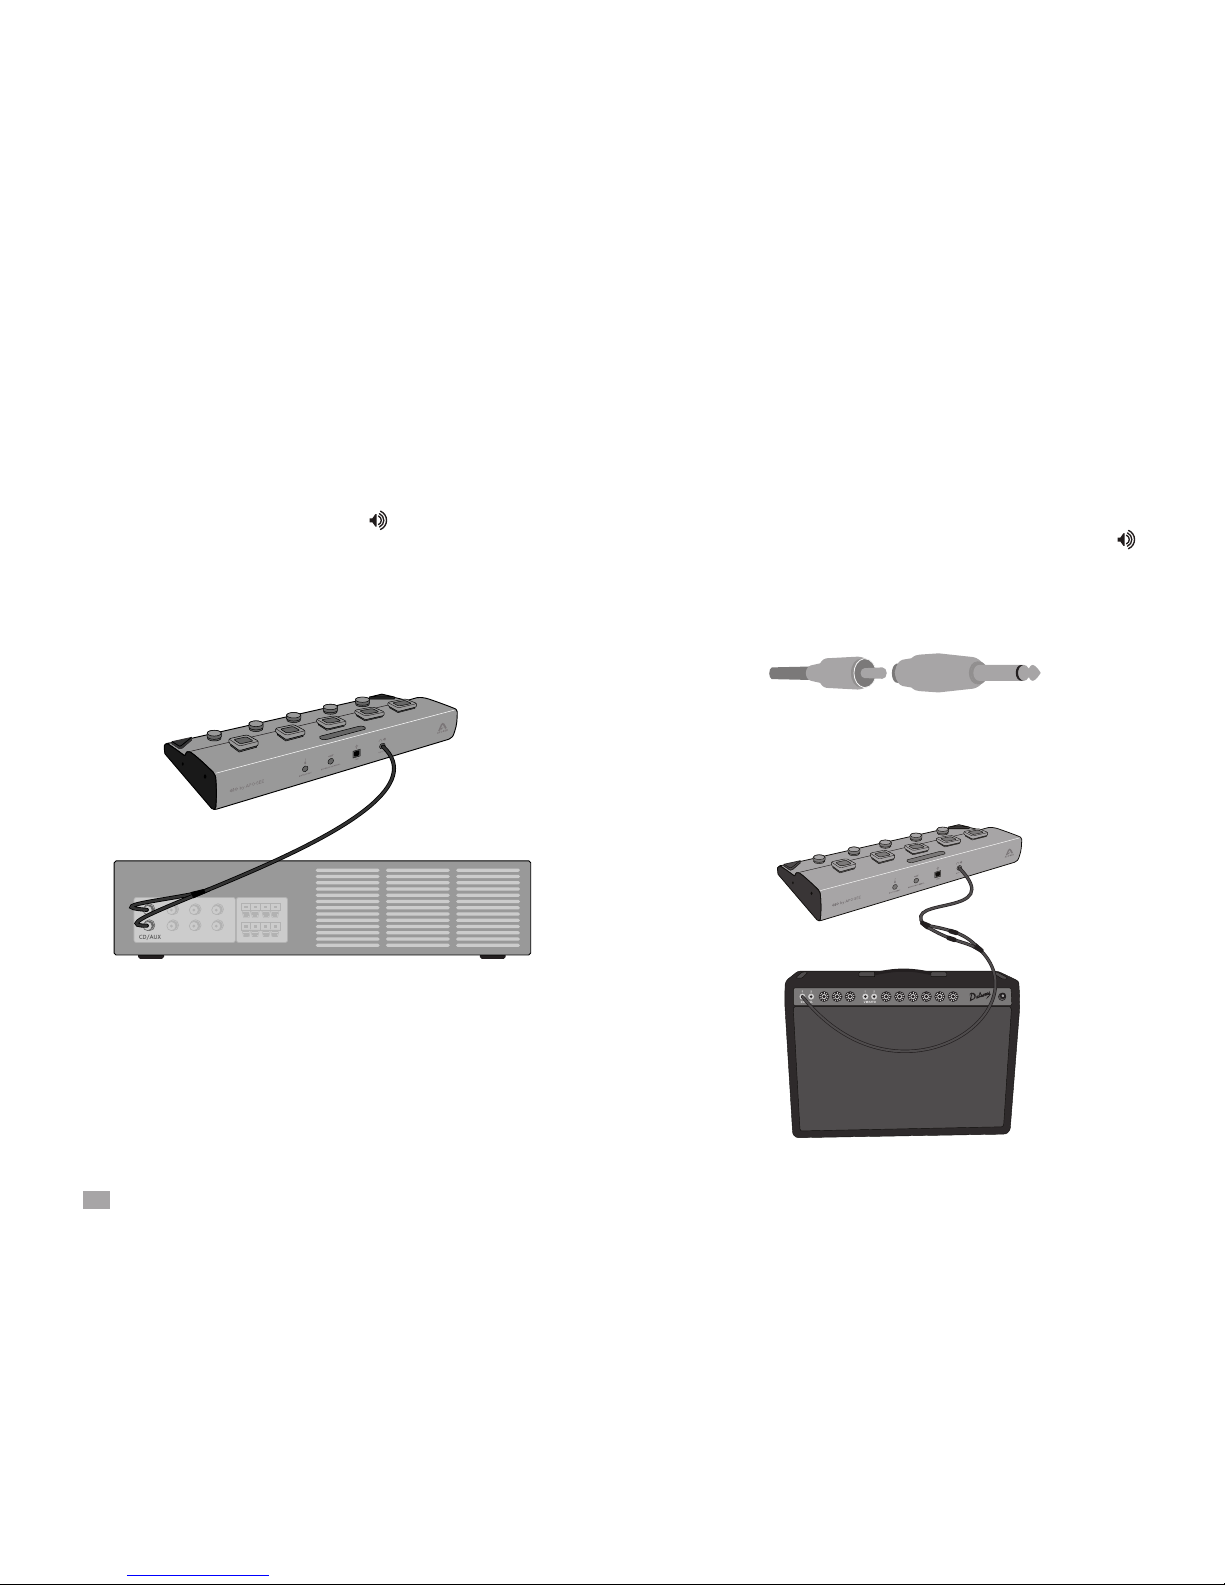
Connecting a Home Stereo
• Using the included 1/4” TRS to dual RCA cable, connect the 1/4”
TRS plug to GiO’s back panel Output jack. Next, connect the
RCA plugs to your stereo system’s Aux or Tape inputs.
• Set GiO’s output level to maximum, and control the listening
level using the home stereo’s volume control.
Connecting an Instrument Amplier
• To connect to most instrument ampliers, it’s necessary to add
a 1/4 TS to RCA female adaptor to the included cable’s RCA
plugs. Connect the 1/4” TRS plug to GiO’s back panel Output
jack and the RCA plugs (with 1/4” TS adaptors) to the instrument
amp’s inputs. If the amp has one channel, connect the left side of
the cable.
• It’s possible to set GiO’s output level to a xed value, so that it
can’t be inadvertently changed. Open Audio MIDI Setup (or any
of the other control panels listed on page 7), and select the Amp
(or Instrument Amp) setting.
Other manuals for GiO
2
Table of contents
Other Apogee Recording Equipment manuals

Apogee
Apogee AD-16X User manual

Apogee
Apogee Duet 2 User manual

Apogee
Apogee GiO User manual

Apogee
Apogee Apogee Duet User manual

Apogee
Apogee Boom User manual

Apogee
Apogee Apogee Duet User manual

Apogee
Apogee PSX-100 Supplement

Apogee
Apogee Symphony I/O Mk II SoundGrid User manual

Apogee
Apogee Element 46 User manual

Apogee
Apogee DLX24 Operator's manual


