Alva GHP20 User manual


IMPORTANT SAFETY INFORMATION
As with all gas appliances, misuse of this appliance or failure
to fully follow these instructions may cause re, injury or death.
Please read all the instructions before using your gas heater.
• THIS UNIT MUST BE THOROUGHLY CHECKED BEFORE
USE.
• Ensure that all the gas ttings are correctly and rmly tted
before every use.
• Remove all packaging materials before assembling.
• For OUTDOOR USE ONLY. Not for commercial use.
• For use with LP gas only
• DO NOT use within 1m of any ammable surfaces
• DO NOT use this patio heater if you do not clearly understand
the instructions and/or how to operate the controls.
• Phone the customer care line at 086 100 ALVA (2582) or email
info@stingray.co.za for assistance.
• DO NOT store ammable materials or another cylinder near the
patio heater.
• DO NOT leave the heater unattended while in use.
• Ensure that the gas supply is turned OFF at the cylinder after
use and while the heater is unattended.
• DO NOT move the heater while in use.
• DO NOT place objects on or against the heater.
• DO NOT use a naked ame to test for leaks. Follow the Leak
Testing procedure outlined under ‘LEAK TEST’.
• Leak test the patio heater every year or if you ever smell gas
• NEVER use this heater with a cylinder other than the size
recommended.
• DO NOT unscrew the regulator while the patio heater is on or if
the cylinder valve is open.
• DO NOT use a patio heater you suspect is faulty.
• For safety reasons, only a qualied technician may execute
maintenance and repairs.
• The guarantee for the patio heater will be rendered void if the
patio heater is serviced or repaired by any one other than an
Alva appointed technician.
• The patio heater should be inspected once a year by a qualied
technician, to make sure the unit is safe and fault free.
• The operator is responsible for the safety of all third parties
while the heater is in use.
• DO NOT use in windy or gusty conditions.
• Accessible parts may get very hot during operation. Keep young
children at a safe distance.
• Clean with warm soapy water only after the heater has cooled
down.
• Keep the burner unit clear of spider webs or other obstructions.
• Close the gas cylinder valve off after use.
• Any modication of this heater is dangerous.
• If you smell gas close the cylinder valve immediately.
Please read the
instructions carefully
before use.
Retain this manual for
future reference.
1
1
2
3
4
5
5
12
12
13
14
14
15
16
17
17
18
INDEX
INDEX
WARRANTY
GENERAL INFORMATION
PARTS DIAGRAM
EXPLODED VIEW
PARTS LISTING AND TOOLS REQUIRED
ASSEMBLY
HEATER SET UP
LOCATION
LEAK TEST
USING YOUR HEATER
FLASHBACK (Flames in the burner tube)
CHANGING YOUR CYLINDER
MAINTENANCE
FREQUENTLY ASKED QUESTIONS
TROUBLE SHOOTING GUIDE
SPECIFICATIONS
AFTER SALES SERVICE
KEY
Important information
Cautions and
warnings.
Danger
Contact an approved
ALVA technician.
Do It Yourself
Instructional
video available
WARRANTY
PLEASE RETAIN YOUR PROOF OF PURCHASE FOR
WARRANTY CLAIMS.
ALVA warrants this appliance to be free of defects in material and
quality for a period of 12 months from date of original purchase.
This warranty covers the intended use of this appliance – within
a domestic setting and not for commercial or industrial purposes.
Any damage caused by willful abuse, tampering, modication or
unauthorized repair will not be warranted.
Please retain all packaging material, as items returned without
original packaging material may be subject to a withholding fee.
Where this appliance is found to be defective, damaged, broken,
or does not work correctly for the intended purpose, you must
return the appliance to the retailer from where it was purchased.
The warranty will only be effected with valid proof of purchase.
Failure to provide the proof of purchase will most likely result in
the repair or service required being chargeable.
If you have any questions while setting up or using this heater,
please visit www.alva.co.za or call 086 100 ALVA (2582) or e-mail
info@stingray.co.za
GENERAL INFORMATION
Before using this heater, please read through this manual and
make sure you understand everything. If you are not sure, call
086 100 ALVA (2582) or visit www.alva.co.za for help. This
heater is a safe and efcient form of heating when used accord-
ing to these instructions.
Reading and understanding this manual should give you a good
indication of what to expect from your Alva gas heater. If this
product is not what you want or need, please help Alva and
the environment by not damaging or destroying any part of the
packaging, the manual or the Styrofoam inserts. Always keep
your proof of purchase. Keep these instructions for future use. If
you lose this copy, you can obtain a new copy from your dealer
or online at www.alva.co.za.
This appliance operates on a 2.8kPa SANS 1237 approved regu-
lator. Regulator and hose included.
Thank you for your
purchase of this
instant infrared heater.
Please read these
instructions carefully
before use and keep
them in a safe place,
for future reference.
Not using gas and/
or gas appliances
according to the
instructions is
extremely dangerous
and can lead to
property damage,
injury or death.
For outdoor use only.
For use with LPG only
DO NOT use within
1m of any ammable
surfaces.
Always turn OFF the
gas supply at the
cylinder after use.
DO NOT store
ammable materials or
another cylinders near
the heater.
1

•
PARTS DIAGRAM 1
2 Flame
Screen /
3 Glass
Tube
4 Protective
Guard
5 Upper
Support
6 Front
Panel
7 Side
Panel
8 Lower
Support
9 Bottom
plate
Refer to your ‘Key’ on
the index page.
2
2
1
4
3
6
5
8
7
9
2270 mm
900 mm
650 mm
730 mm

•
EXPLODED VIEW
3
A
B
C
D
E
F
G
H
L
K
J
I
M
N

PARTS LISTING AND TOOLS REQUIRED
PARTS SUPPLIED QUANTITY
Reector x1
Flame Screen x1
Upper Glass Tube x1
Upper Support x4
Protective Guard x4
Black Silicone Ring x1
Side Panel x3
Front Panel x1
Gas Hose and Regulator x1
Control Box Assy x1
Lower Support x4
Block Belt x1
Wheel Assembly x1
Bottom plate x1
4
A
B
C
D
E
F
G
H
I
J
K
L
M
N
Wing Nut x3
Small at washer
ø6 x6
Stud x3
3/16” Screw x38
Bolt M6x10 x4
M6 Flange Nut x4
M5x12 Screw x10
Fixing Bracket x4
Wrench x1
Philips
Screwdriver x1
Knob x1
M4x10 Screw x1
Chain x1
Long
Stem
Lighter
x1
AA
BB
CC
DD
EE
FF
GG
HH
II
JJ
KK
LL
MM
NN

ASSEMBLY
Remove all packaging materials before assembling the patio
heater.
Before Assembly:
• Please read all instructions thoroughly before proceeding
with the appliance assembly.
• Find a large clean area in which to assemble the patio
heater.
• Please refer to the parts list and diagrams. (see page 2)
• Assembly of the heater involves large components and it is
advisable to have two people to assemble the unit.
This patio heater makes use of an
industrial cylinder (9kg ALVA cylin-
der recommended) with a 5/8” BSP
thread; horizontal exit valve.
The Bullnose regulator supplied
with the heater tightens to the left
hand side (anti-clockwise). (Figure
A).
If you have bought a new gas cylinder, the cylinder needs to be
purged (emptied out), before it’s rst use. If it is not purged of air,
the heater will not work properly. This should happen at the gas
lling station when you ll up the cylinder. Always check this with
your gas supplier.
HEATER SET UP
1. Before removing this heater from the packaging, read this
manual in full and make sure that it is what you want /need.
2. Remove the heater from the packaging
3. Check if the nose cone sealing washer is in place, secure
and in good condition. (Figure B)
4. The regulator goes directly into the cylinder valve. Always
ensure that the regulator is correctly and rmly fastened in
place. The use of any adaptors is illegal.
5
Fig.A

bolts that have come loose.
Assemble the wheel assembly to the bottom plate. Fix the wheel
assembly to the bottom plate using 4pcs bolt M6X12 and 4pcs
6
Fig.B
Nose cone
sealing washer
STEP 1
M
EE
FF
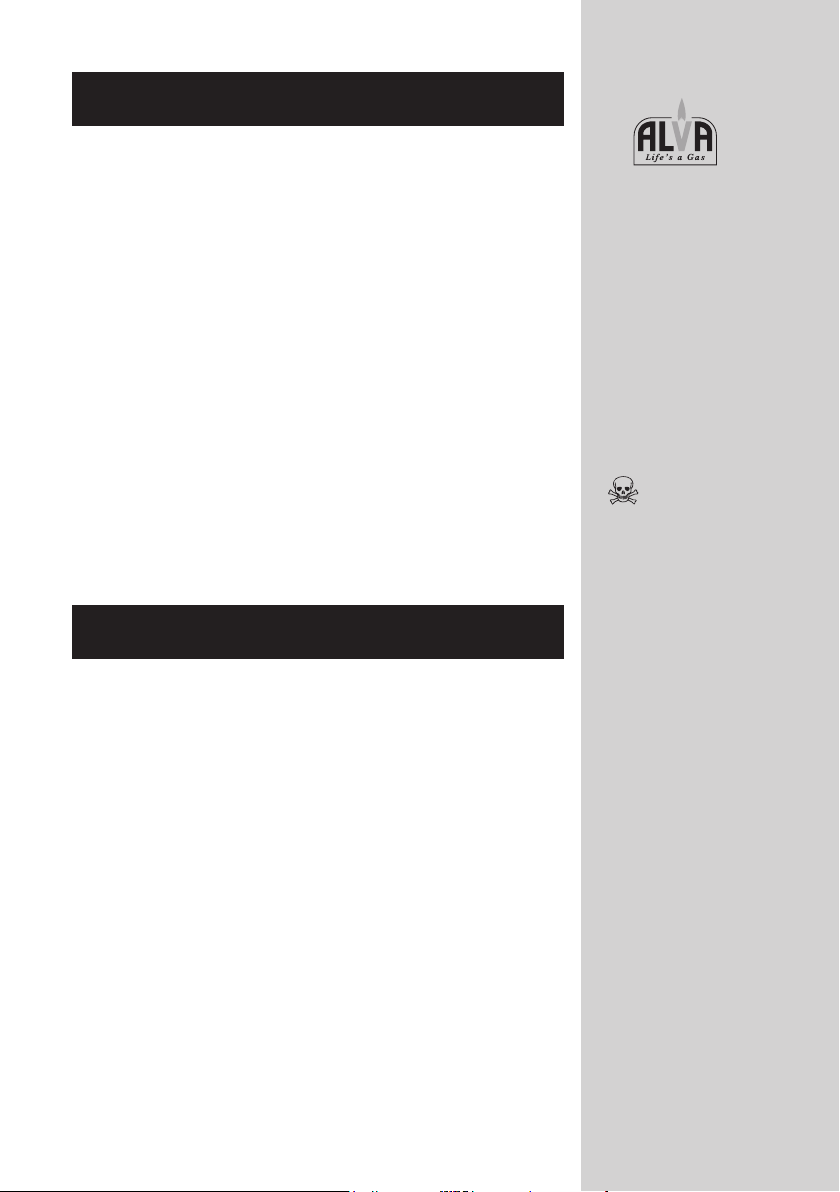
Insert the pins of the base to the holes of lower support, press
to secure the pins. Using 4pcs screw M5x12 to secure the lower
support and base. Insert the pins of the control box assy to the
holes of upper support, press to secure the pins. Using 4pcs
screw 3/16” screw to secure the upper support and control box
assembly.
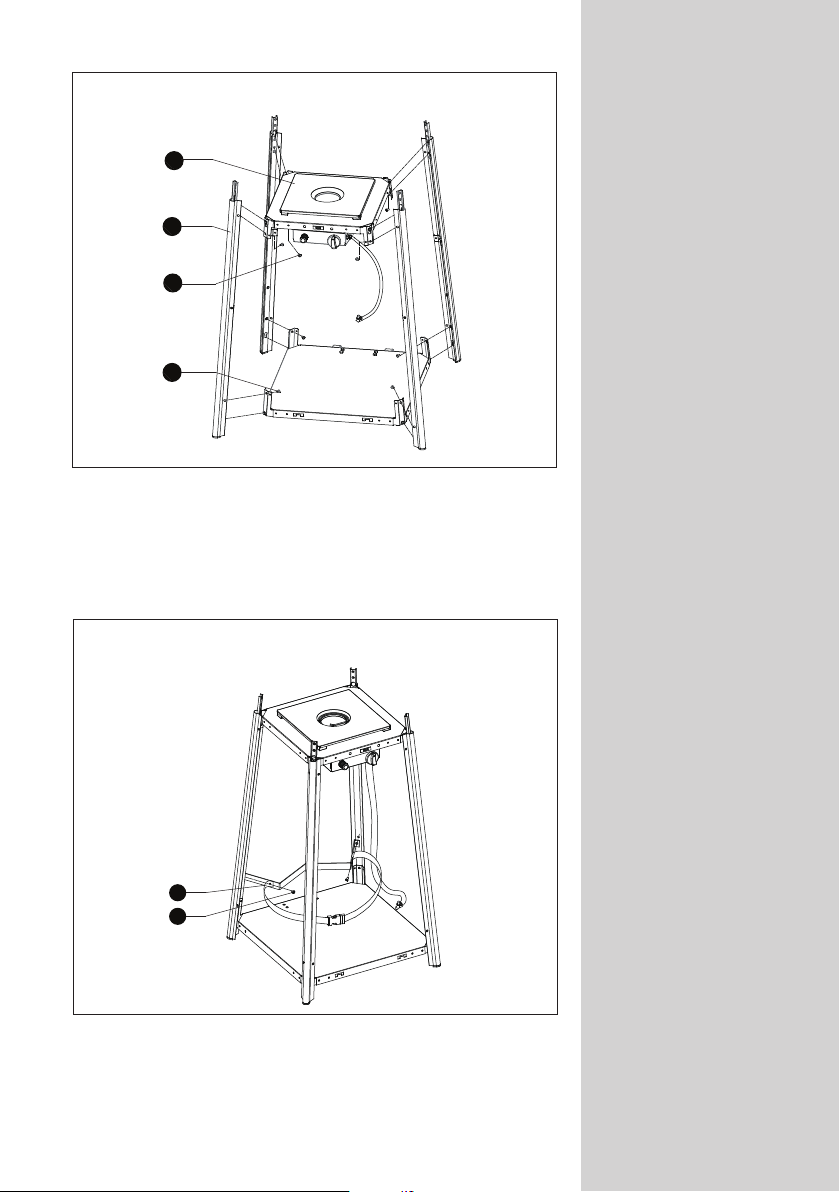
Assemble block belt. Fix the block belt to the 2pcs of lower
support behind the front door,using 2pcs screw M5X12.
7
STEP 2
STEP 3
J
K
DD
GG
L
GG
Table of contents
Other Alva Patio Heater manuals


Popular Patio Heater manuals by other brands


EUROM
EUROM 334241 instruction manual

Lava Heat
Lava Heat Venetian owner's manual

EHS Ltd.
EHS Ltd. HQH-2000W instruction manual

VONROC
VONROC ALICUDI PH515AC Original instructions

OZONA
OZONA Heatflow IF010997 Safety instructions and operation manual

theBBQshop
theBBQshop 51611010 Safety, Installation, Operation and Maintenance