Airwheel H3TS User manual

USER MANUAL
H3TS


- 3 -
Packing list
H3TS 1 unit Charger 1 piece
Instruction 1 unit Accessory 1 set
Controller
Armrest
Indicator light
Rear light
Frame
Footrest
foot backer
Front wheel
Backrest
Battery
Clutch
Motor
Rear wheel
Diagram

- 4 -
Turn on the main power when finished step one.
The power switch is located at the rear of the
battery box (see Picture2-1).Extended charging
plug underneath front light (Figure 2-2)
2.Turn on the main power
1-1 1-2
User Instructions:
Take out the controller from the accessory box, make
sure the main power on the battery box is turned
on while the power switch on the controller is not
turned on, then press and hold the folding key ①(see
Picture3-1) for 3 seconds, release the button when the
LED lights are on and there is a beep sound. Press
and hold the unfold key ②for 3 seconds to unfold the
wheelchair.Press key ③ to stop folding or unfolding.
3.Take out the controller and unfold the
wheelchair
Hand mode
Charging port
Power switch
Electric
mode
Tie rod of clutch
Open the wheelchair carton, take out the
wheelchair and place it gently on the floor, then
take out the accessory box at the rear of the
wheelchair (see Picture1-1) and remove the
cardboard near the motor lock. Turn the motor lock
to drive mode (see Picture1-2). Contents in the
paper box: a Charger, controller, rear stand, user
manual, plastic tie and assembling tools etc.
1.Take out the accessory box at the
rear of the wheelchair
3-1
Power Switch
Speed up /
Unfold
Speed down / Fold
Stop folding / unfolding
④
①
②
③
2-1 2-2
Extended
charging
plug

- 5 -
4-1
5-1 5-2
If the wheelchair cannot be folded automatically due to a
malfunction of the electrical parts, please use the given tools
to remove the screws located at the rear of the wheelchair
(see Picture 4-1) to fold/unfold it manually.
Please connect the charger to the wheelchair before
connecting it to the AC power while charging. Please
align the notch on the charger (See Picture 5-1) with the
protruding part of the charging port (See Picture 5-2), insert
and tighten the fixing cap for connection. Please loosen the
fixing cap before removing the charger from the wheelchair.
Notes:
notch
Screw
protruding part

- 6 -
2. Armrest installation
Unscrew the screw on the
armrest bracket, insert the
armrest, then tighten the
screw.
Insert the joystick into the
armrest slot, tighten the
screws and fix the wiring
with cable ties.
1. Joystick installation
Installation and usage
Screw
Tip: Please turn off power to prevent the battery from over-discharging if riders don't use it.

- 7 -
Main Technical Parameters
Specifications
Size 1100X620X980mm Item weight ~37kg
Folding size 960X620X680mm Max. load 130kg
Rotation radius 1.2m Frame Aluminum alloy 6061
Standard max. speed 6Km/h Climbing capacity about 8°
Braking performance ≤ 1.5m Slope capacity about 8°
Charging time about 5H Battery lithium 25.2V 524Wh
Reduction gearbox worm and gear
reduction ratio 1: 32 Applicable temperature -15℃~50℃
Over-obstacle capacity <40mm Trench crossing capacity <100mm
Front wheel 8 inch Rear wheel 12.5 inch, inflatable tire
Motor Dual-drive brush motor with clutch pull rod. Power: 200W; voltage: 24V;
revolving speed: 3776rpm
Automatic folding
function
a key to automatically contract and extend
armrest can be lifted up and down, and moved forward and backward
Warning
1.Please do not throw away the waste battery, so as not to pollute the environment. The waste lithium battery of
the product is to be recycled by the enterprise or dealer, and the government designated outlets.
2.Pay attention to the hands! During folding and unfolding process.

- 8 -
Horn Button
Joystick
Press the button the buzzer will buzz; Release the
button, the buzzer stop buzzing.
Horn Button
Controller instruction
Headlight Switch
Power Switch
Speed indicator
Speed up / Unfold
5-level LED power indicator
Speed down / Fold
Stop folding / unfolding
Make sure the power button on the battery box is
turned on and the wheelchair is unfolded, then press
the power switch on the controller to be ready to drive
or remote control. Press it again to shut down the
ready mode.
Note: The power switch on the controller cannot be
turned on when the wheelchair is completely folded.
Please turn on the power on the battery box first,
unfold the wheelchair, and turn on the power switch
on the controller to be ready to drive.
Power Switch
Make sure both the power on the battery box and
on the controller are turned on, then press the
headlight switch to turn on the headlight, and press
it again to turn off.
In the power-off state, press the button over 2
seconds, the H3TS enters the extending/contracting
mode. Release it to contract.
In the extending/contracting mode, click the button to
stop contracting if it is contracting. When extending
stops, click it to contract.
In the ready mode, remote control mode and riding
mode, click the gear button to decrease one gear.
Headlight switch
Speed down / Fold

- 9 -
Press the speed up button, the LED lights of speed
indicator will be on one by one.
Press the speed down button, the LED lights of
speed indicator will be off one by one.
It shows the percentage of the remaining battery
capacity. Each LED light represents 20% of the battery
capacity. The LED lights will be off one by one after
consumed every 20% of the battery. For example, it
means 40% battery consumed already when two LED
lights are off. Better charge the battery when 2 or 3 LED
lights are off to prolong the battery life. It is prohibited to
drive the wheelchair when there is only one LED light
on, otherwise, it will cause damage to the battery due to
over-discharge. The accuracy of the power indicator will
decrease after daily use.
Speed indicator
5-level LED power indicator
In the power-off state, press the button over
2 seconds, the H3TS enters the extending/
contracting mode. Release it to extend.
In the extending/contracting mode, click the
button to stop extending if it is extending. When
contracting stops, click it to extend.
In the ready mode, remote control mode and riding
mode, click the gear button to increase one gear.
In the extending/contracting mode, click the button to
stop extending or contracting. It enters the shutdown
state.
Speed up / Unfold Stop folding / unfolding
Shutdown state: the circuit connection is complete, the power switch in the battery pack is turned on. But
the on-off button in the control box isn't pressed and the indicator light isn't on.
Standby state: press the on-off button in the control box, the indicator light will be on, but without any man-
made operation.
Riding state: press the on-off button in the control box, the indicator light will be on, and use the operating
lever to make it move.
- 10 -
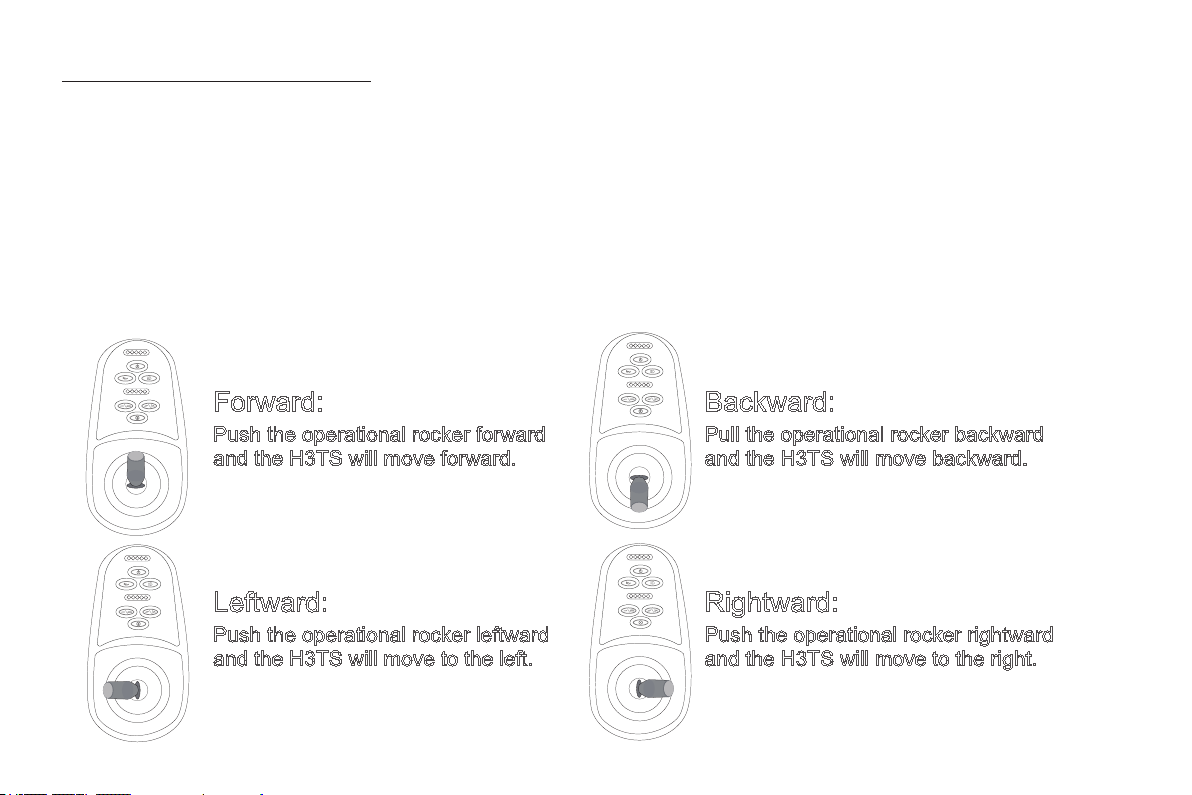
Forward:
Push the operational rocker forward
and the H3TS will move forward.
Backward:
Pull the operational rocker backward
and the H3TS will move backward.
Leftward:
Push the operational rocker leftward
and the H3TS will move to the left.
Rightward:
Push the operational rocker rightward
and the H3TS will move to the right.
The controller controls H3TS to go forward, backward, and turn left and right, and to accelerate, decelerate and
brake. After turn on the switch button, push the rod forward vertically and H3TS moves forward. More forward,
the faster the speed. Release the rod to slow down and when fully released, the rod is reset and H3TS stops and
is in the braking state. Pull the rod backward, H3TS moves backwards, more backward, the faster the speed to
backward.Release the rod to slow down and when fully released, the rod is reset and H3TS stops and is in the
braking state.
Similarly, turn the rod to left or right, H3TS will turn left or right. Pushing more left or right, the faster the speed
towards left or right. Release the rod to slow down and when fully released, the rod is reset and H3TS stops and is
in the braking state.
How to use the controller
Table of contents
Other Airwheel Wheelchair manuals


