AIRROBO T9 User manual

User manual
Robot Vacuum Cleaner T9
Lds Laser Navigation
C
M
Y
CM
MY
CY
CMY
K
T9 说明书英文版_20210629.pdf 1 2021/6/29 16:39:50

C
M
Y
CM
MY
CY
CMY
K
T9 说明书英文版_20210629.pdf 2 2021/6/29 16:39:50

Wecome to use!
May you have a nice usage experience!
C
M
Y
CM
MY
CY
CMY
K
T9 说明书英文版_20210629.pdf 3 2021/6/29 16:39:50

Contents
English P01-P12
.................................................................................................................................................
EN
Deutsch P13-P23
...............................................................................................................................................
DE
Русский P24-P34
.................................................................................................................................................
RU
Français Edition électronique
..........................................................................................................................
FR
Español E-edición
...............................................................................................................................................
ES
Italiano Edizione elettronica
.............................................................................................................................
IT
Friendly Tips!
Scan the QR code to get the latest electronic version of the manual.
Including English/Deutsch/Русский/Français/Español/Italiano
Airrobo airrobo_official
C
M
Y
CM
MY
CY
CMY
K
T9 说明书英文版_20210629.pdf 4 2021/6/29 16:39:50

- 01 -
Thank you for purchasing AIRROBO ROBOT VACUUM CLEANER.
• It is strongly recommended to read and understand the user manual comprehensively prior to the first use of robot for proper
usage, safety information and correct maintenance instructions for AIRROBO ROBOT VACUUM CLEANER.
• This user manual is for the user's instructions, it does not cover all possible situations. If there are any situations that you encounter
that are not addressed in this user manual, please contact our customer service at: support.airrobo@ubtrobot.com for product
technical support.
• This user manual will be updated upon new software or hardware updates, and the content and images are liable to be updated
without further notice.
Part 1 Safety Information
1.1 Usage Limitations
• The product is used for floor cleaning in a home environment only and cannot be used for outdoor (such as open terrace),
non-ground (such as sofa) and commercial or industrial environment.
• Please do not use the product in midair areas (such as penthouse, open terrace and furniture top) without protective fence.
• Please do not use the product at a temperature of above 40℃ or below 0℃or when there are liquids and sticky substances on the
ground.
• Please hang cables on the ground before use so as to avoid being dragged by the host.
• Please clear fragile objects and impurities (such as vase and plastic bag, etc.) on the ground so as to avoid damaging valuables when
the host is stuck or impacted slightly.
• People with physical, spiritual or perceptual disorder (including children) are not allowed to use or operate the product.
• Children cannot use the product as a toy. Please keep children and pets away when the host is working.
• Please keep main brush and other cleaning tools out of reach of children.
• Please do not place objects (including children and pets) on a stationary or moving machine.
• Please keep hair, fingers and other parts of human body or pets away from the suction inlet when the machine is works.
• Please do not use the product to sweep burning objects (such as burning cigarette end).
• Please do not use the product to clean long-haired carpet (some dark carpets may not be cleaned normally).
• Please prevent the host from suctioning hard or sharp objects (such as waste decorative materials, glass and iron nail, etc.).
• Please do not move the machine by holding the protective cover of laser distance sensor and collision bumper.
• Please clean or maintain the host and the charging base under shutdown or power-off state.
• Please do not wipe any part of the product using wet cloth or any liquid.
• Please use the product according to User Manual. User should be responsible for any damages and injuries caused by improper use.
• Please do not use mopping function for carpet and furniture top.
• Please be sure to remove the water tank when the machine is being charged.
1.2 Battery and Charging
• Please do not use battery, charging base or charger provided by any third parties.
• Please do not dismantle, report or refit battery or charging base arbitrarily.
• Please keep the charging base away from heat source (such as heating plate).
• Please do not wipe or clean the charging base shrapnel using wet cloth or wet hand.
• Please do not abandon used batteries arbitrarily. Used batteries should be disposed of by professional recycling agency.
• If power line is damaged or broken, please disuse it immediately and replace it through official channels.
• Please ensure the host shuts down during transportation and the product should be transported in or iginal packaging.
• If the machine is left unused long, it should be fully charged and then placed in a cool and dry place. Charge the machine at. least
every 3 months so as to avoid damaging batteries due to excessive discharge.
• The appliance is only to be used with the power supply unit provided with the appliance.
• The adapter must be removed from the socket-outlet before cleaning or maintaining the appliance.
• The appliance contains batteries that are only replaceable by skilled persons.
• The battery must be removed from the appliance before it is scrapped.
• The appliance must be disconnected from the supply mains when removing the battery.
• The battery is to be disposed of safety.
• WARNING: For the purposes of recharging the battery, only use the detachable supply unit (model: xxx) provided with this appliance.
1.3 Laser Safety Information
• Laser distance sensor of the product complies with the standard for class1 laser products of IEC60825 and does not produce
dangerous laser radiation.
• Laser class IEC-60825 Class 1
• The maximum laser output of the product 10mW
• Laser head Pulse time (1/2300) s
• Invisible laser radiation
• laser energy-Exposure near aperture may cay cause burns
• Standard: IEC 60825-1:2014
C
M
Y
CM
MY
CY
CMY
K
T9 说明书英文版_20210629.pdf 5 2021/6/29 16:39:50

- 02 -
Part 2 Product overview
2.1 Packing list
• Key Function
Sweep/ON &OFF
Sweep/ON &OFF
Recharging/ local cleaning
Recharging/
local cleaning
• Short press to start Sweep/Pause
• Long press for 3s for ON/OFF
• Long press for 15s for forced shutdown
under abnormal circumstances
• Blue: Normal operation or charging
• Red: Abnormal condition or low battery
• Purple: Equipment is not connected to the network
• Short press Recharge/Pause
• Long press to start partial cleaning
• Press two buttons simultaneously for 3s
Indicator light Reset WiFi
Main unit * 1
Charging base * 1 User manual * 1 Quick user guide * 1
Adapter * 1
Cleaning brush * 1
Duster cloth*1
HEPA Filter +
Sponge Filter *1
Left side brush*2
Right side brush*2
Electric-controlled
water tank * 1
2.2 Product Appearance
• Main unit
Filter screen cover
Dust bin button
Wall sensor
System reset button
System upgrade port
(This port is only for
professional use)
C
M
Y
CM
MY
CY
CMY
K
T9 说明书英文版_20210629.pdf 6 2021/6/29 16:39:50

- 03 -
LDS laser ranging sensor
Anti-collision sensor for radar
Infrared anti-collision sensor
Infrared recharging sensor
Charging contact
Universal wheel
Side brush
Battery cover
Driving wheel
Rolling brush
Rolling brush cover buckle
Anti-drop sensor
Power indicator light
Signal emission area Catching groove
Cover plate
Wire slot
Power adapter port
Wrapping post
Charging base pins
• Sensor and Structure
• Charging Base
C
M
Y
CM
MY
CY
CMY
K
T9 说明书英文版_20210629.pdf 7 2021/6/29 16:39:50
- 04 -
Part 3 Installation and operation
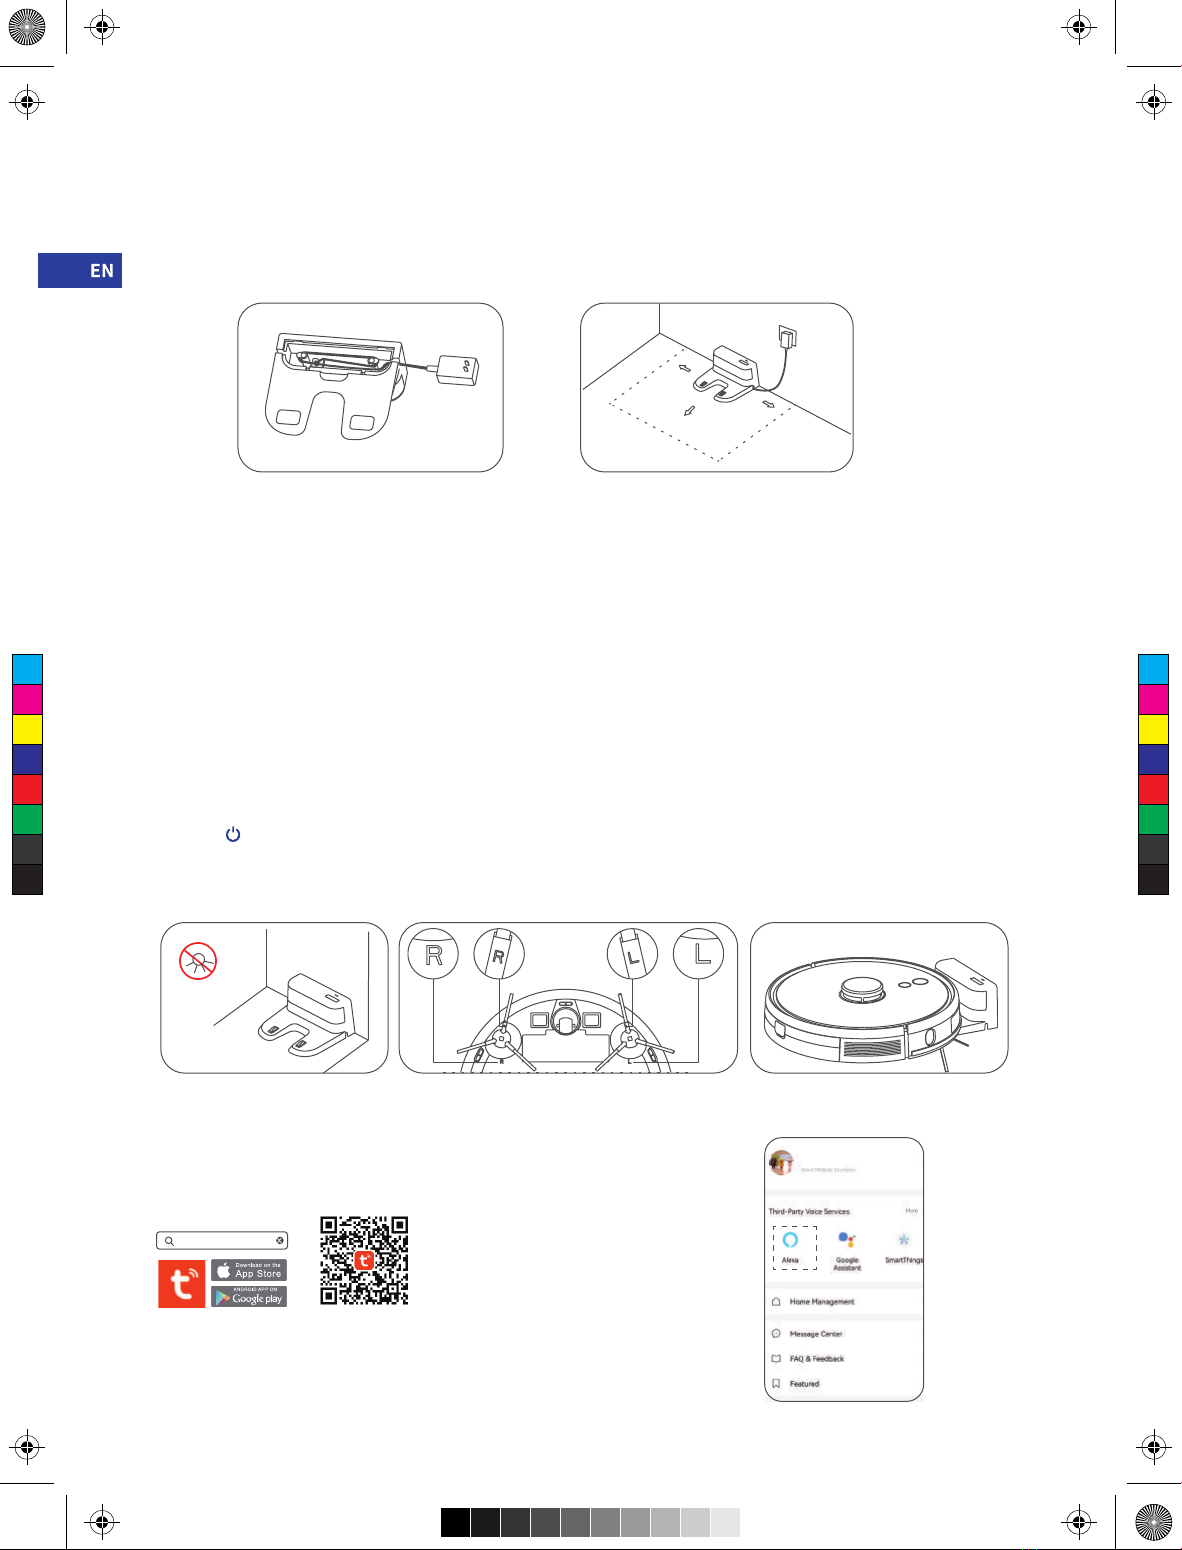
3.1 Installation
1. Connect power line and feed the excess wire into the slot.( Figure3.1a )
2. Place charging base against the wall and connect the power.( Figure3.1b )
Note:
• Ensure a space of above 0.5m on both sides of the charging base and a space of above 1.5m in the front.
• If the power line is vertical to the ground, it may be dragged by the host and consequently the charging base may be powered off .
• The charging indicator is normally on when powered on and off when charged.
3. Please do not move the charging base arbitrarily and keep it out of direct sunlight.( Figure3.1c )
Note:
• If the charging base is relocated, the host may fail in positioning and lose the map. When restarted, the host will rebuild and memorize
the map and the rebuilt map may lose cleaning information of forbidden areas and other areas。
• Direct sunlight will interfere with recharging signal and consequently the host may be unable to return to the charging base.
4. Installation of side brush.( Figure3.1d )
Make the left side brush (L) and the right side brush (R) correspond to L and R on the bottom casing, press L and R and the side brushes
are installed till you hear a “cracking” sound.
5. Starting up and charging.( Figure3.1e )
Long press to switch on the robot. Charge the robot on charging base when the power indictor light is normally on.
Note:
If the machine cannot be started due to low battery, please charge the host on the charging base and the machine will be started
automatically. The machine can work normally only when the battery level is ≥20%.
6. Connect mobile APP (this step can be skipped)
Please refer to WiFi connection guideline, then connect mobile APP.
Note: If you want to connect to Alexa, please click" Alexa" and follow the prompts!
>0.5m
>0.5m
>1.5m
( Figure3.1a )
( Figure3.1c ) ( Figure3.1d ) ( Figure3.1e )
( Figure3.1b )
Tuya Smart
C
M
Y
CM
MY
CY
CMY
K
T9 说明书英文版_20210629.pdf 8 2021/6/29 16:39:50

- 05 -
7. Start cleaning
After the robot is powered on, short press key on the robot or use mobile APP to start cleaning.
(press any button to pause during using).
Note:
• The sweeping robot cannot be used to remove liquids.
• If the battery level is less than 20, the machine cannot work. Please charge it.
• The machine will return to the charging base automatically if the battery level is less than 20% in use and will be powered off
and start cleaning automatically after the battery level reaches 80%.
• Please clear various wires (including power line of charging base) on the ground before use so as to avoid outage and damage of
objects or wires when wires are dragged by the host.
8. Installation of mopping module( Figure3.1f)
(a) Install Electric-controlled water tank;
(b) Fill the water tank: uncap the cover and fill with water;
(c) Intall the module: push the module horizontally along the rear part of the robot.
The module is installed in place if you hear a "click" sound.
9. Remove the mopping module( Figure3.1g) 10. Instructions for mopping module
When the robot is finished working, press the button in the
middle of the water tank to remove the mopping module
backwards, empty the water in the water tank and clean
the mopping cloth (do not move or turn the robot over
during cleaning) .
① Please do not use the mopping module when it is left
unused.
② For the sake of safety, please be sure to remove the
mopping module when it is being charged or left unused.
③ Please do not mop the carpet. Set a forbidden area in APP
to prevent the machine from entering the carpet.
④ To achieve a better mopping effect, the mopping module
should be installed after the floor is swept for three times.
⑤ To add water or clean the dust cloth when the machine
works, please pause it, and take out and reassemble the
mopping module according to steps 8 and 9. Please do
not move or turn over the host so as to avoid failing in
positioning and losing the map.
⑥ Mopping function of the machine is intended for wiping
and is conducive to deep cleaning. it cannot remove
stubborn stain effectively and replace labor force.
3.2 Operation
1) ON/OFF
Long press key for 3s, the indicator light is on and the machine is started.
Long press key for 3s when the machine is under standby mode,the indicator light is off and the machine shuts down.
Note: The machine cannot shut down when the host is being charged.
2) Sweep/Pause
After the machine is started, short press key on the host or start the machine using mobile APP.(Press any key to pause in use)
Note:
• The cleaning robot cannot be used to remove liquids.
• If the battery level is less than 20%, the machine cannot work. Please charge it.
• The machine will return to the charging base automatically if the battery leve is less than 20% in use and will be powered off and start
cleaning automatically after the battery level reaches 80% Please clear various wires (including power line of charging base) on the
ground before use so as to avoid outage and damage of objects or wires when wires are dragged by the robot.
( Figure3.1f)
( Figure3.1g)
C
M
Y
CM
MY
CY
CMY
K
T9 说明书英文版_20210629.pdf 9 2021/6/29 16:39:50

- 06 -
3) Charging
Automatic mode:
The robot will return to the charging base automatically after work.
Manual mode:
Under suspended state, short press key to start recharging or when the recharging host is charged under the control of mobile APP,
The indicator light is under breathing mode when the recharging host is charged.
Note: If the robot can not find the charging base, it will automatically return to the starting position. Please manually put the robot back to
the charging base for charging.
4) Cleaning mode( Figure3.2a)
After the robot is powered on, it will scan and generate the map and divide it into areas intelligently. Then sweep the areas one by one
along the wall orderly, efficiently and thoroughly and plan the cleaning route in a bow/S shape. The robot will return to the charging base
automatically after cleaning.
Note:
Do not move the robot casually and frequently when it is cleaning. After moving, please put the robot near the original position. When it
starts again, it will try to reposition itself. After successful positioning, it would follow the planned path and continue to work. If the
positioning fails, the robot would abort previous mission, make a map and do the cleaning again. Even it maynot find the charging base.
5) Spot cleaning
When a local area needs a deep sweep, the user specifies a point on the map on the APP, the machine will automatically drive to the
vicinity of the point, take the point as the center, and clean within 1.5m x 1.5m.
6) Partial cleaning( Figure3.2b)
When the robot cannot be controlled by the mobile APP, please remove the robot to the place you want to clean. Long press the
button for 3 seconds, and the robot will clean twice within the scope of 2mx2m centering on itself.
10) WiFi reset
If the mobile phone cannot be connected to the machine due to modification of router configuration and password or for other reasons,
please press the both keys simultaneously for 3s till a voice prompt “WiFi has been reset” is given and the indicator light turns
purple and flickers slowly.
Area being cleaned
Area to be cleaned
7) User-defined area cleaning
Use the mobile APP to set the size and location of the area you want to clean. You can set one or more areas. The robot would clean
according to the areas you set.
8) Restricted area
Set one or more forbidden areas using mobile APP. The robot will not sweep forbidden areas but other areas.
Note:
• The robot may intrude into the restricted area due to positioning errors, abnormal sensors and other reasons.
• The permanent closed zone may become invalid due to the big change of the position of the charging seat and furniture. Therefore,
please try not to move or interfere with the robot during cleaning.
• The permanent restricted area would be lost when the map is rebuilt.
9) Schedule cleaning
Schedule cleaning can be set by mobile APP. The robot will start cleaning automatically at the appointed time and return to the charging
base after cleaning.
2
2
( Figure3.2a) ( Figure3.2b)
C
M
Y
CM
MY
CY
CMY
K
T9 说明书英文版_20210629.pdf 10 2021/6/29 16:39:51
Other manuals for T9
1
Table of contents
Languages:
Other AIRROBO Vacuum Cleaner manuals


