
Aircatglobal VirtualFly SOLO AIRLINER User manual

© 2022 Virtual Fly, SL
All trademarks and brand names are
trademarks or registered trademarks of their
respective owners. All rights reserved.
C. Maria Aurèlia Capmany, 21
P.I. La Fàbrica – 08297 Castellgalí (Spain)
Phone: (+34) 938 333 301
https://www.virtual-fly.com
For support, contact us at
support@virtual-fly.com
SOLO AIRLINER
USER’S MANUAL
Rev. 2.0 - May 2022

SOLO AIRLINER RS | User’s manual
2
TABLE OF CONTENTS
1. IN THE BOX..........................................................................3
2. HARDWARE SETUP
. CONNECTING TO PC.............................................
. ADJUSTING MAGNETIC LABELS ........................
3. SOFTWARE SETUP
. INTERFACE WITH PC..............................................
. BOEING ADD-ON............................................
4. START UP
. ACTIVATING/DEACTIVATING PROCEDURES...
. START UP PROCEDURES......................................
5. SELECTION OF PANEL TYPE.............................................9
6. ENGINE STARTING PROCEDURES
. START & STOP FOR PISTON ENGINES..............
. START & STOP FOR TURBOPROP ENGINES...
. START & STOP FOR TURBOFAN (B-)
ENGINES- ONLY PreparD.........................................
7. AEROSOFT B-737 ADD ON............................................17
8. CONNECTING MULTIPE SOLO AIRLINER IN THE SAME
NETWORK..............................................................................19
9. TROUBLESHOOTING.......................................................20
10. REMOTE ASSISTANCE...................................................23
11. TECHNICAL SPECIFICATIONS......................................24

SOLO AIRLINER RS | User’s manual 3
1. IN THE BOX
A) SOLO Airliner Panel
B) Power strip
C) Network cable (Ethernet)
D) Magnetic labels for Turboprop
E) Magnetic labels Boeing pack
F) Quick Start Guide
It is important to save all parts you are not going to use in case
you need them in the future.
B
D
A
C
1x
1x
1x
1x
E1x
F1x

SOLO AIRLINER RS | User’s manual
4
2. HARDWARE SETUP
2.1 CONNECTING TO PC
The SOLO AIRLINER has been developed to be pluggable to
any standard Windows computer. After placing the panel on
the surface it will rest, connect all the power plugs from the
back of the SOLO AIRLINER to the provided multiple power
socket (B). Now connect the multiple power socket (B) to a -
VAC outlet.
You now have two options to connect the SOLO AIRLINER to
the computer running the flight simulation software; through
direct or LAN network connection. Independently of the
option you use, you will need to plug one end of the provided
Ethernet cable (C) to the back of the SOLO AIRLINER. The LAN
connector socket of the SOLO AIRLINER is found in the mini-
computer within the device, displayed below.
OPTION A: LAN Network Connection (Recommended)
Connect an Ethernet cable between the SOLO AIRLINER and
router, and another from your PC to the router as displayed
below.
Ethernet
cable (C)
Remote Connection is not available through Direct
Connection, given panel has no internet connection
using this method.
Ethernet
cable (C)
Ethernet cable
(not provided)
OPTION B: Direct Connection
Connect the Ethernet cable (C) between your SOLO AIRLINER
and your PC as displayed in the next diagram.
SOLO AIRLINER RS | User’s manual 5
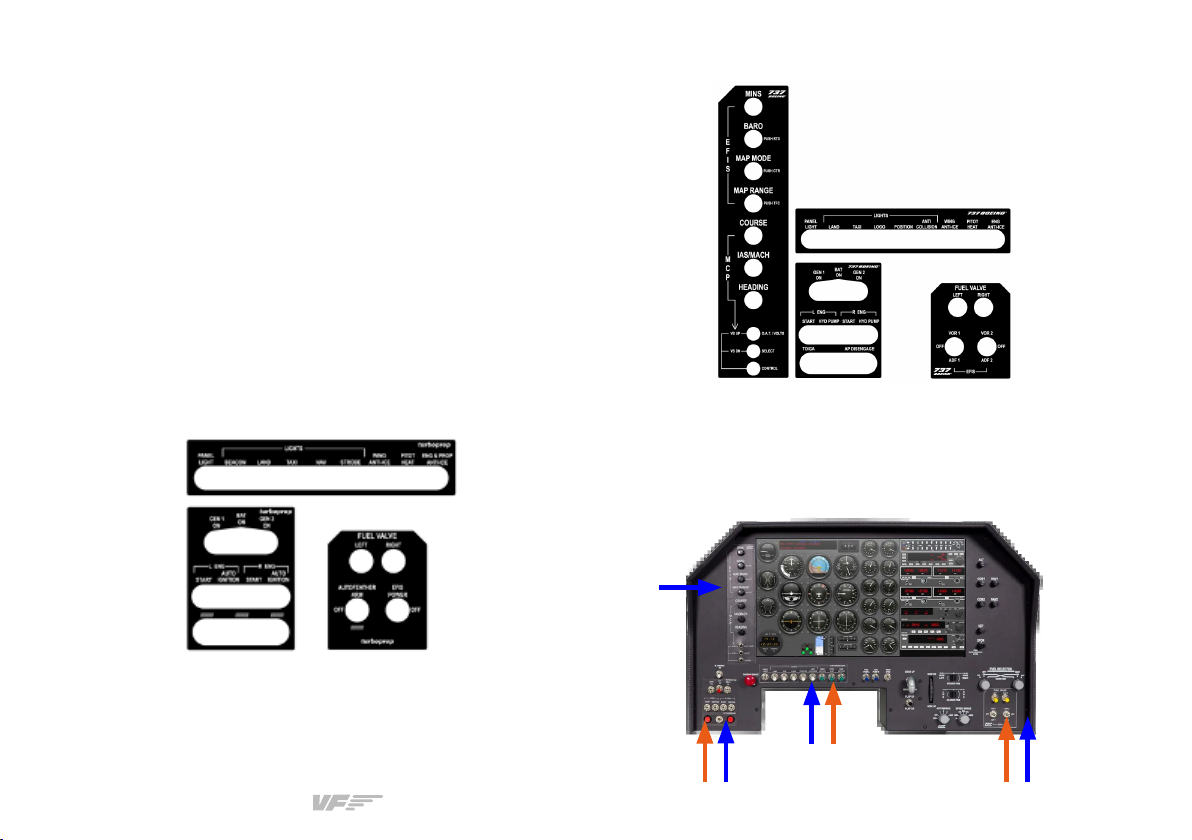
2.2 ADJUSTING MAGNETIC LABELS
ACCORDING TO AIRCRAFT TYPE
The SOLO AIRLINER is a multifuncion panel, and some
switches change their function depending on whether the
selected aircraft is a piston, turboprop or jet. The panel
incorporates two sets of magnetic labels, shown in following
images, which allow you to change the designation of each
switch and rotary switch to match the correct functionality.
The default designation of the switches and rotary switches
(without the magnetic labels) is for piston engine aircraft.
• Magnetic label pack for turboprop aircraft:
To apply the turboprop or Boeing magnetic labels (D&E),
simply place them over the SOLO AIRLINER in their correct
location, as displayed in the image below.
• Magnetic label pack for Boeing 737 aircraft:

SOLO AIRLINER RS | User’s manual
6
3. SOFTWARE SETUP
3.1 INTERFACE WITH PC
To interact with your PC, the SOLO AIRLINER requires installing
some additional software to your PC depending on the flight
simulation software you use. The SOLO AIRLINER is compatible
with MSFS, PreparD and X-Plane /.
MSFS and Prepar3D
To set up the SOLO AIRLINER with MSFS or Prepar3D, you will
need to install VFConnect, the software developed by Virtual
Fly to enable interaction between our flight pannels and PCs,
and FSUIPC. You can download these from the following links:
• VFConnect: https://downloads.virtual-fly.com/
software/vfconnect/latest/vfconnect.exe
• FSUIPC: http://www.fsuipc.com/
If you already have FSUIPC installed, skip this step. During the
installation, a registration window will appear, which you must
ignore by selecting "Not Now". Restart MSFS/PreparD after
the installation is complete.
X-Plane /
To set up the SOLO AIRLINER with X-Plane 11/12, you only
need to install the VFConnect version suitable for X-Plane
11/12. You can download it from the following link:
"VFConnect3-Xplane" might not work properly
if DatRefTool plugin is installed and activated in
X-Plane 11/12. If you are using this plugin, make sure
to deactivate it before using the SOLO AIRLINER.
3.2 BOEING 737 (ONLY Prepar3D) ADD-ON
To run the SOLO AIRLINER with the B737 panel, you must
install the server B- "aeroServer" in the computer
running PreparD. To do so, click on the following link and
follow the steps for the installation: http://www.aerosoft.com.
au/aerosoft_australia/home.html.
• VFConnect_XP: https://downloads.virtual-fly.com/
software/vfconnect/latest/vfconnect_xp.exe
The aerosystem737 avionics software license add-
on for the SOLO AIRLINER costs 49$. Without he
license, you won't be able to fly the B737 in the
SOLO AIRLINER.

SOLO AIRLINER RS | User’s manual 7
4. START UP
4.1 ACTIVATING PROCEDURES
1. Start your preferred flight simulation software (MSFS,
Prepar3D or X-Plane 11/12).
2. Press the push button (a) indicated below to start the
"Windows" operating system of the SOLO AIRLINER' mini
computer.
The device will be ready to operate after about seconds,
when you will see the "SELECT PANEL TYPE SCREEN"
displayed in the next image picture. Follow "PANEL
SELECTION (ACCORDING TO AIRCRAFT)" from section to
select the panel from the aircraft you wish to fly
a
The SOLO AIRLINER must not be disconnected
while the programs are loading. Doing so might
cause problems with booting in the future.
3. Execute the VFConnect version that corresponds to
the simulation software running. If the Windows firewall is
activated, a warning permission to communicate with networks
might appear. You must click "Allow Access" to enable the
connection between the SOLO AIRLINER and the computer.
Depending on the flight simulation software you use, the
connection time will vary.

SOLO AIRLINER RS | User’s manual
8
The SOLO AIRLINER' screen also displays if the simulation
software and panel are communicating successfully, as
displayed below:
• Connected: Your device is ready to fly.
• Searching…: There is a communication failure between
the MFS/PD and the SOLO AIRLINER. Refer to
Chapter "Troubleshooting".
If you have issues establishing the connection between the
SOLO AIRLINER and your computer, please contact Virtual
Fly's Technical support at support@virtual-fly.com.
4.2 DEACTIVATING PROCEDURES
Press the push button (a) of the SOLO AIRLINER's mini
computer to stop the "Windows" operating system. Wait until
everything is stopped before unplugging the SOLO AIRLINER
(b) The plugin is connected
to MSFS / PreparD / X-Plane
and SOLO AIRLINER
The VFConnect software window will look like (a) below if it
is not yet connected, and like (b) if a connection has been
established succesfully between computer and SOLO
AIRLINER.
(a) The plugin is searching
for MSFS/PreparD/X-Plane
/ and SOLO AIRLINER
If using X-Plane 11/12, VFConnect will not show a
"Connected" status until a flight has been loaded.

SOLO AIRLINER RS | User’s manual 9
The aircraft best suited to be flown using the SOLO AIRLINER
are those that MSFS, Prepar3D or X-Plane 11/12 incorporates
by default. However, planes from P3D CARENADO have been
tested and have yielded good results.
In the previous image you can see the SOLO AIRLINER has
a "GENERIC" option for each aircraft type ( in total). On
each "GENERIC" option ,you can select the full scale of the
speedometer "Airspeed Range" and the type of instrument
indication of direction "Directional Indicator".
To set up the SOLO AIRLINER with the aircraft you wish to fly,
you must:
• Select the corresponding Gauges Panel to desired
aircraft
• Place the corresponding magnetic labels
5. PANEL SELECTION (ACCORDING TO
AIRCRAFT)
The SOLO AIRLINER has been designed to operate and
display instruments for single and twin engine planes of
both piston, turboprop and turbofan aircraft. The following
picture shows that some aircraft have their own customised
panel, such as the C-172, Mooney, B-58. etc. There are also
customizable panels labelled as "GENERIC" to simulate other
aircraft.
The Boeing 737 option is only compatible with
Prepar3D flight simulation software.
Before selecting the B737 panel, you must already
have the Boeing 737 aircraft selected in Prepar3D
with the flight loaded. Failing to do so will make
some indicators work incorrectly.

SOLO AIRLINER RS | User’s manual
10
. If you have chosen a "GENERIC" panel, a "Generic panel
OPTIONS" menu will automatically open and enable you
to select your preferences regarding Airspeed Range and
Directional Indicator, as seen in the following image.
. Push the "Start selected panel" button shown below and
the panel will automatically show the gauges and indicators
correspondoing to your selection.
SELECTING INDICATORS PANEL
The SOLO AIRLINER incorporates a " touchscreen, so you
must manage it with your fingers. Follow the steps described
below:
. Select the label that corresponds to the aircraft you wish to
fly in the simulation software. If there isn't a customized label
for the desired aircraft, select the "GENERIC" corresponding
to the aircraft's engine type. For instance, if aircraft selected
in simulation software is "Beechcraft King Air ", you must
select the "GENERIC" button from the "TURBOPROP- Twin
Engine" menu.
Table of contents
Other Aircatglobal Avionic Display manuals


Popular Avionic Display manuals by other brands

Smart Avionics
Smart Avionics PB-4 Hardware manual

Midcontinent
Midcontinent SAM MD302 pilot's guide

MGL Avionics
MGL Avionics Stratomaster Maxi Single FF-3 manual

Garmin
Garmin GI 275 installation manual

Mid-Continent Instruments
Mid-Continent Instruments 4300 Series pilot's guide

Avidyne
Avidyne 700-00182 Series Instructions for Continued Airworthiness


