aion RIFT User manual

RIFT OCTAVE FUZZ 1
PROJECT NAME
RIFT
BASED ON
EFFECT TYPE
PROJECT SUMMARY
DOCUMENT VERSION
Univox®Superfuzz
A classic untamed fuzz from the 1970s that adds an octave-up overtone, famous for its use by Pete
Townshend of The Who.
Octave Fuzz 1.0.2 (2021-07-07)
BUILD DIFFICULTY
This documentation is for the kit version of the project. If you purchased the PCB by itself, please
use the PCB-only version of the documentation instead. The circuit is the same, but the instructions
are completely different due to the specialized parts and assembly methods used in the kit.
IMPORTANT NOTE
Intermediate
BALANCE EXPANDER
TONE
9V
OCTAVE FUZZ

RIFT OCTAVE FUZZ 2
TABLE OF CONTENTS
1Project Overview
2Table of Contents
3Introduction
4Packing List
5Packing List (Cont.)
6Tools Needed
7Component Identification
8Hardware Identification
9PCB Assembly Overview
10 Resistors
11 Diodes
12 Trimmer
13 Transistors
14 Capacitors (Non-Polarized)
15 Wire Headers
16 Capacitors (Polarized)
17 Footswitch PCB
18 Input/Output PCB
19 Enclosure Layout: Panel Mounts
20 Enclosure Layout: Main & Footswitch PCBs
21 Enclosure Layout: Input/Output PCB
22 Final Testing & Assembly
23 Schematic
24 Full Parts List
25 Troubleshooting Information
26 Support & Resale Terms
27 Legal Information & Document Revisions

RIFT OCTAVE FUZZ 3
INTRODUCTION
If this is your first pedal, welcome to the hobby and thank you for choosing Aion FX. You’ve just joined
a community of over 40,000 people around the world with a passion for building homemade noise
machines using obsolete electronics technologies, and we’re glad to have you!
If you’ve done this before, it’s great to see you again and we’re confident you’ll find this build experience
an enjoyable one.
Aion FX kits are designed to empower anyone to build a high-quality pedal, no matter the skill level.
The pedalbuilding hobby has traditionally had a steep learning curve, but don’t be overwhelmed—we’ve
done all the hard work for you. All you need to do is follow these instructions and you’ll be on your way
to transforming your tone.
There are a few things to go over before you get started.
• You’re going to have to get your hands dirty—there’s no way around it. Nothing here comes
preassembled, and you’ll have to learn the skills to put it all together. This document will walk you
through everything you need, but be prepared to learn a few things along the way.
• This will take time. Plan on about two hours start to finish. It may take even longer if it’s your first
time building. Don’t rush it. If you find yourself getting frustrated or overwhelmed, take a break and
come back in a couple of hours or the next day.
• No direct technical support is offered. There are several DIY forums and Facebook groups with
thousands of members who enjoy troubleshooting and teaching. But please be sensitive to the fact
that the staff at Aion FX is minimal, and every minute spent helping individuals in private is time
that can’t be spent on new project development.
• There is no implied guarantee of a final product. Aion FX provides the ingredients and the recipe,
but you are responsible for putting everything together to make it work. We’ve tried to make the
process as clear and accessible as possible, but it must be expressly stated that purchasing the kit is
not a guarantee that you will end up with a working pedal.
It’s recommended to read through all of the instructions before you start, particularly if you’ve never
built a pedal before. If you familiarize yourself with the entire process ahead of time and you know what
the goal looks like, each step will make more sense.
Now, on to the fun stuff!
RIFT OCTAVE FUZZ 4
PACKING LIST
This is a list of all the parts that are included with the kit, grouped by value. For a list of all the parts
based on their PCB part numbers, please see page 24.
If you find that any parts are missing or damaged, please fill out the Missing Parts form.
Film Capacitors
NAME QTY
1n 1
2n2 1
100n 2
Electrolytic Capacitors
NAME QTY
10uF 11
100uF 1
MLCC Capacitors
NAME QTY
100n (marked “104”) 1
Diodes
NAME QTY
1N5817 1
Germanium (glass case, no marking) 2
Resistors
NAME QTY
470R 2
1k 1
1k8 2
3k3 1
4k7 1
10k 7
15k 1
22k 4
47k 3
100k 6
150k 1
220k 1
470k 1
2M2 1
Transistors
NAME QTY
2N3904 3
2N3903 (matched) 2
2N3903 (unmatched) 1
RIFT OCTAVE FUZZ 5
PACKING LIST (CONT.)
Potentiometers
NAME QTY
10k trimmer potentiometer 1
50kB 3
Dust cover 3
Knob 3
Mounting nut, potentiometer, 0.44" 3
Lock washer, potentiometer, 0.5" 3
Outer washer, potentiometer, 0.475" 3
Other
NAME QTY
LED bezel 1
LED, blue 1
9V battery snap 1
DC jack 1
Input/output jack 2
Mounting nut, jack, 0.54" 4
Outer washer, jack, 0.6" 2
Lock washer, jack, 0.5" (thin) 2
Enclosure 1
Enclosure screws 4
PCB, main circuit 1
PCB, footswitch 1
PCB, input/output/DC 1
Switches
NAME QTY
Stomp switch, 3PDT 1
Mounting nut, stomp switch, 0.6" 2
Lock washer, stomp switch, 0.6" 1
Dress nut, stomp switch, 0.77" 1
Wiring
NAME QTY
3-strand wire assembly, 70mm 2
4-strand wire assembly, 108mm 1
3-pin wire assembly header 2
4-pin wire assembly header 1
RIFT OCTAVE FUZZ 6
TOOLS NEEDED
SOLDERING IRON
Temperature-adjustable is
recommended. The optimum
soldering temperature is 700-725º
F (371-385º C) for leaded solder, or
750º F (400º C) for lead-free.
WIRE SNIPPERS
Also called nippers or wire cutters.
The Hakko CHP-170 is the best you
can get for less than $10.
SCREWDRIVER (PHILLIPS)
Used for the enclosure screws. Get a
powered driver if you’ll be building a
lot of pedals!
SOLDER
Preferably 63/37 or 60/40 leaded
solder. Lead-free is more difficult to
use, so if that’s the only type you can
get, it’s best to watch tutorials that
are specific to lead-free solder.
NEEDLE-NOSE PLIERS
These are used for bending leads on
components and other general uses.
Use the smaller type with a tip that’s
approximately 0.05” (1.25mm) wide.
FLAT SCREWDRIVER (SMALL)
This is used for tightening the set
screws on the knobs. The tip should
be no more than 0.1” (2.5mm) wide.
DIGITAL MULTIMETER (DMM)
Most cheap ones in the $10-30 range
are fine for what we’re doing. Make
sure it has audible continuity testing
(i.e. it beeps at the lowest resistance)
and transistor hFE measurement.
FLAT-NOSE PLIERS
Many general-purpose uses, but par-
ticularly tightening the nuts of pots,
switches and jacks. Quicker than
changing out sockets on a ratchet.
RUBBER BAND
Yes, a plain old rubber band. This is
used to tighten the dress nut to avoid
scratching or denting it (which can
happen with metal tools).

RIFT OCTAVE FUZZ 7
COMPONENT IDENTIFICATION
If you’ve never built a pedal before, you’ll need to know what all the components are. These are shown
actual size. (Not all of these types of components may be part of this kit.)
RESISTOR TRIMMER POTENTIOMETER
FILM CAPACITOR
SILICON DIODE
ZENER DIODE
LED
DC JACKWIRE ASSEMBLY HEADER
LED BEZEL
WIRE ASSEMBLY
ELECTROLYTIC CAPACITOR
GERMANIUM DIODE
OP-AMP / IC
TANTALUM CAPACITOR
SCHOTTKY DIODE
IC SOCKET SNAP-APART SOCKET
MLCC
RECTIFIER DIODE
TRANSISTOR OR JFET
Not polarized. Color may
vary by brand and type.
Not polarized. MLCC stands for
“multi-layer ceramic capacitor.”
Some Schottky diodes
also look like this.
These are very fragile, so be
careful when handling them.
Polarized. The positive side
is marked.
Polarized. The negative side
is marked.
Some voltage regulators
also look like this.
It’s recommended to use a
razor blade to separate
these cleanly.
Charge pumps and delay chips
also look like this. They may
have more than 8 legs.

RIFT OCTAVE FUZZ 8
HARDWARE IDENTIFICATION
The hardware comes unassembled, so you’ll need to sort & identify each of the pieces. The diagrams
below are actual size, so you can set them against the printed page to identify them if needed.
I/O JACK
TOGGLE SWITCH
POTENTIOMETER
(SINGLE)
FOOTSWITCH
POTENTIOMETER
(DUAL)
MOUNTING NUT
MOUNTING NUT
MOUNTING NUT
MOUNTING NUT
DRESS NUT
OUTER WASHER
DRESS NUT
OUTER WASHER KNOB
LOCK WASHER
LOCK WASHER
LOCK WASHER
LOCK WASHER
DIAMETER: 0.54” / 13.7mm
DIAMETER: 0.36” / 9.1mm
DIAMETER: 0.44” / 11.2mm DIAMETER: 0.5” / 12.7mm
DIAMETER: 0.6” / 15.2mm
DIAMETER: 0.375” / 9.5mm
DIAMETER: 0.475” / 12mm
DIAMETER: 0.5” / 12.7mm
DIAMETER: 0.4” / 10.1mm
DIAMETER: 0.6” / 15.2mmDIAMETER: 0.77” / 19.6mmDIAMETER: 0.6” / 15.2mm
RIFT OCTAVE FUZZ 9
PCB ASSEMBLY OVERVIEW
Now it’s time to start building!
The first thing you need to do is snap apart the PCBs
into 3 separate boards (if needed) and break off the
tabs from each using needle-nose or flat-head pliers.
You should be left with the PCBs shown to the right.
The general principle for PCB population is that you
want to work in layers from shortest components
(i.e. lowest-profile) to tallest so that when the PCB is
upside-down, everything is making contact with the
work surface and is held in place.
Generally speaking, you should populate the
components in this order:
1. Resistors
2. Diodes
3. IC sockets
4. MLCC capacitors
5. Film capacitors
6. Transistors
7. Electrolytic capacitors
Not all of these component types are included in each
kit, so skip them if they aren’t applicable. Some types
of film capacitors are taller than electrolytics, so those
can be done last.
RIFT OCTAVE FUZZ 10
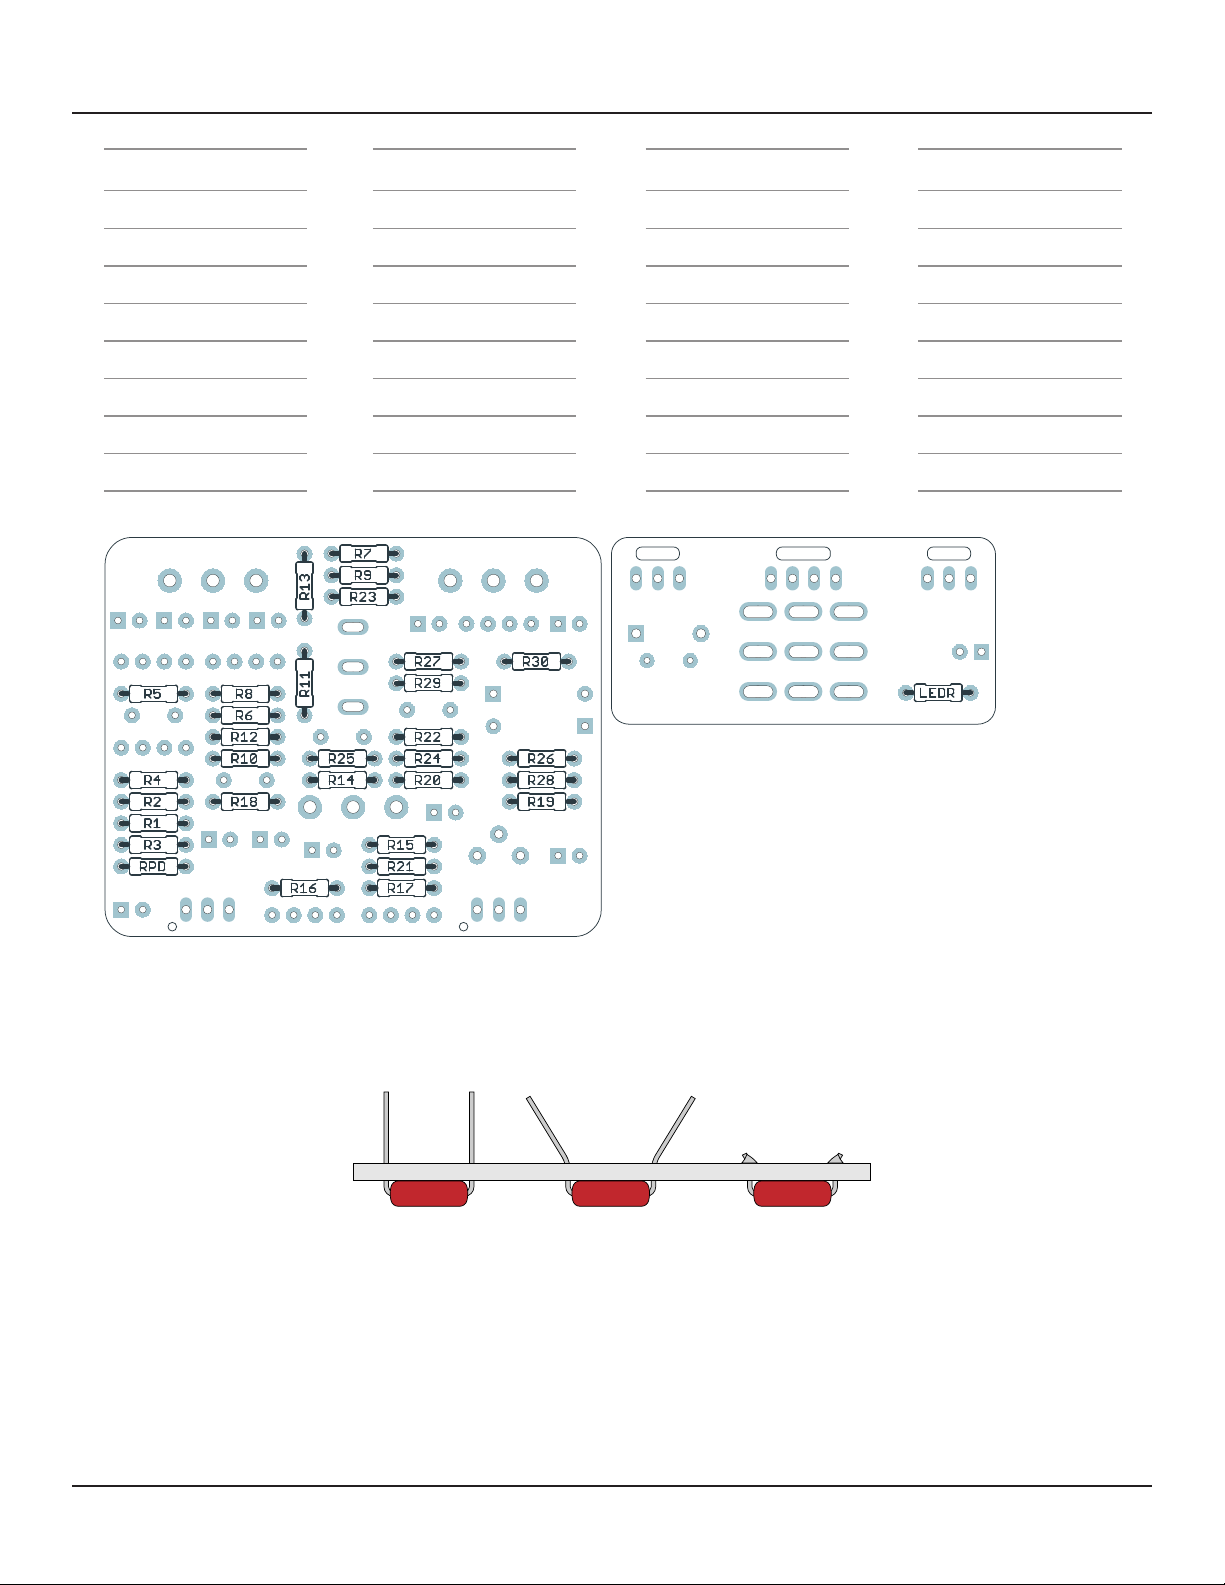
RESISTORS
Using the parts list above, populate the resistors by pushing them through the holes and bending the
leads outward at an angle to hold them in place. Resistors are not polarized, so they will work in any
direction. Turn the board upside-down to keep the components held in place while you solder.
You’ll use this same technique for most of the other components as well.
Don’t try to do all of the resistors at once. You’ll want to stop periodically flip the board and solder
everything, then cut the leads using the wire snippers to make room for more. Generally you don’t want
to do more than 10 or 15 resistors at a time or the bottom of the board will get too crowded.
If this is your first time soldering, watch tutorial videos on YouTube and make sure you get it down
before you begin. You don’t want to practice or experiment on this board!
PART VALUE
R1 22k
R2 100k
R3 100k
R4 1k8
R5 47k
R6 470k
R7 10k
R8 47k
PART VALUE
R9 3k3
R10 220k
R11 150k
R12 10k
R13 10k
R14 470R
R15 470R
R16 100k
PART VALUE
R17 22k
R18 10k
R19 1k8
R20 22k
R21 100k
R22 47k
R23 10k
R24 22k
PART VALUE
R25 10k
R26 100k
R27 15k
R28 10k
R29 1k
R30 100k
RPD 2M2
LEDR 4k7
Table of contents
Other aion Music Pedal manuals

aion
aion Lab Series User manual

aion
aion DYNAMO User manual

aion
aion SOMNUS User manual

aion
aion ZIRCON SILICON FUZZ User manual

aion
aion PROCYON User manual

aion
aion CRESCENT AMP DISTORTION User manual

aion
aion NOMAD User manual

aion
aion REFRACTOR User manual

aion
aion QUARK User manual

aion
aion Onyx User manual


